background image

Technical Publication  

(Continued)

Visit www.commscope.com/andrew for complete specifications on all the products listed 

                    Bulletin #  7694293    Rev. A

Gland Installation

At the base of the OVP boxes there are 

glands that provide weatherproofing 

for the enclosure. The following steps 

will show how to install the Hybrid cable 

properly. 

1.


Remove compression nut

2.


Pull out center gasket

3.


Slide compression nut over breakout, compress gasket  

        to  slide  over  breakout.  Leaving  protective  polly  tubing                                                  

    on will simplify this procedure. Be careful not to dam    

    age the fiber connectors. 

4.


Gasket needs to be 1" behind heat shrink tube.

5.


Carefully feed fiber and power  

    conductors into the OVP box and  

    tighten the compression nut.

1"

 8

OVP Identification 

Part  

Number

Description

Excess Fiber 

Storage 

RC3DC-3315-PF-48*

Distribution box with 6 Strikesorb modules 

55 ft 

RC3DC-4750-PF-48*

Distribution box with out Strikesorb modules

55 ft

RC3DC-1064-PF-48*

Sector box with 2 Strikesorb modules

45 ft

RCMDC-2260-RM-48*

6 circuit 

rack mount OVP

N/A

Note: *
RC3DC-XXXX-PF-48 couples with HFT series cables  

(accommodates expanded alarm wire pairs)

Summary of Contents for HELIAX FiberFeed HFT1206-24S49 Series

Page 1: ... FES Group gives Andrew Solutions customers access to technical support where and when it is needed the most in the field The FES team is staffed by an expert team of technicians who in turn are supported by some of the brightest and most experienced product line managers With all of this knowledge and support the FES offers our customers access to hands on specialized training classes Section 1 S...

Page 2: ...s OVP Fiber Junction Box OVP Fiber Junction Box Excess Fiber Management Box Hoisting Grips Cable Hangers Universal Grounding Kit Feed Thru Glands Fiber Management Tray HELIAX FiberFeed Hybrid Jumpers HELIAX FiberFeed Hybrid Jumpers HELIAX FiberFeed Hybrid Cable WARNING CommScope Hybrid FiberFeed cables require the use of approved installation accessories 2 6 Circuit Rack Mount OVP ...

Page 3: ...d insensitive singlemode 14 18 AWG 1 24 lb ft 1 3 in 39 in 29 in 39 in 29 in 26 in 13 in 240 lbf 800 lbf HFT406 8S48 XXX UL Type TC OF ER 6 AWG 4 8 Corrugated aluminum Bend insensitive singlemode 10 18 AWG 772 lb ft 1 12 in 23 in 23 in 23 in 23 in 22 in 11 in 180 lbf 600 lbf General Specifications Cable Type Rating Center Conductor Gauge Conductors quantity Total Fiber Quantity Shielding Type Fibe...

Page 4: ...r during the hoisting process Attach a hoisting grip on the jacketed cable no less than 6 below the fiber breakout point If a hoisting grip is not easily attached use a simple line attached below the fiber break out point i e at the cable outer jacket Prevent the fiber tails in protective tube at the cable end from undue movement during hoisting by securing the protective tube with outer sock to t...

Page 5: ... the OVP box RRU or in BBU equipment Ensure the weatherproof boots for both fiber and power connections and seated firmly in the RRU Heat shrink tube of the jumper should be 1 25 40mm inside of the OVP box Installation temperature range is 22F to 158F 30C to 70C Minimum cable bend radii can be found in this document or on line Standard lengths available are 3 6 9 12 15 30 foot All jumpers are indi...

Page 6: ...face This may cause scratches if large contamination is present Always inspect connector end face for contamination after each cleaning Clean adapter by inserting adapter cleaning stick or fiber adapter sleeve brush moistened with fiber optic cleaning solution or 91 isopropyl alcohol inside the adapter and gently pull out with twisting motion Repeat process with a dry cleaning stick Caution Do not...

Page 7: ...p Part Number FCCT L There are 3 basic principles that are critical to achieving an efficient fiber optic connection 1 Perfect Core Alignment 2 Physical Contact 3 Pristine Connector Interface Today s connector design and production techniques have eliminated most of the challenges to achieving core alignment and physical contact What remains challenging is maintaining a pristine end face As a resu...

Page 8: ... Leaving protective polly tubing on will simplify this procedure Be careful not to dam age the fiber connectors 4 Gasket needs to be 1 behind heat shrink tube 5 Carefully feed fiber and power conductors into the OVP box and tighten the compression nut 1 8 OVP Identification Part Number Description Excess Fiber Storage RC3DC 3315 PF 48 Distribution box with 6 Strikesorb modules 55 ft RC3DC 4750 PF ...

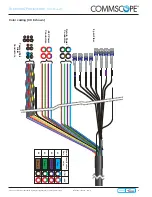
Page 9: ...andrew for complete specifications on all the products listed Bulletin 7694293 Rev A 9 Color coding 2 X 4 shown 48V Power Conductors Return Power Conductors Twisted Pair Alarm Conductors 4 pair Fiber Power Pair 48V RTN Identification color X1 X2 Blue Violet ...

Page 10: ...r complete specifications on all the products listed Bulletin 7694293 Rev A 10 Color coding 4 X 8 shown 48V Power Conductors Return Power Conductors Twisted Pair Alarm Conductors 8 pair Fiber Power Pair 48V RTN Identification color X1 X2 X3 X4 Blue Violet Green Brown ...

Page 11: ...specifications on all the products listed Bulletin 7694293 Rev A 11 Color coding 6 X 12 shown 48V Power Conductors Return Power Conductors Twisted Pair Alarm Conductors 12 pair Fiber Power Pair 48V RTN Identification color X1 X2 X3 X4 X5 X6 Blue Violet Green Brown Yellow White ...

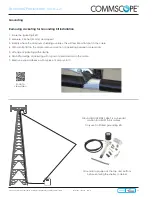
Page 12: ...nly use Tin Plated grounding kits Removing Jacketing for Grounding Kit installation 1 Score the jacketing 360º 2 Measure 2 inches 51 mm and repeat 3 Identify where the aluminum shielding overlaps this will feel like a flat spot in the cable 4 With a knife flat on the cable remove a section of jacketing between score marks 5 Lift edge of jacketing with knife tip 6 Grab lifted edge of jacketing with...

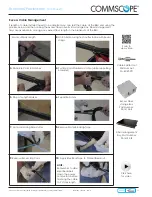
Page 13: ... BBU 1 Mark cutback length 2 Notch Armor using flush cutter in line with Kevlar strings 3 Place Rip Cord in Notches 4 Pull Rip Cord Parallel to Cable while supporting breakout 5 Stop at Length Marker 6 Separate Armor 7 Cut Armor Using Side Cutter 8 Remove Water Blocking Tape 9 Remove Excess Rip Cord 10 Apply Electrical Tape to Protect Breakout Excess Fiber storage Box Part Number FE 14126 E Fiber ...

Page 14: ...enza CommScope declina eventuali responsabilità derivanti dell esecuzione di procedure di installazione ispezione manutenzione e smontaggio improprie o poco sicure CommScope 1100 CommScope Place SE P O Box 339 Hickory NC 28603 0339 828 324 2200 800 982 1708 www commscope com andrew Customer Service 24 hours North America 1 800 255 1479 toll free Any country 1 779 435 6500 email acicustomersupportc...

Reviews: