860463082
Instruction Sheet
www.commscope.com
Page 8 of 13
Prepare the fiber optic cable for connection to the faceplate either by splicing or terminating the cable
For instructions, see “Splicing and Installing the Cable” on page 9 or “Terminating and Installing the Cable” on
page 11.
Splicing and Installing the Cable
To fully cable the shelf, install two RoloSplice multiple splice organizers (ordered separately).
To install each RoloSplice in the shelf:
1. Temporarily remove the pivoting trays from the RoloSplice base by spreading the sides of the base
sufficiently to allow for removal.
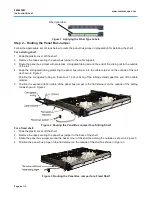
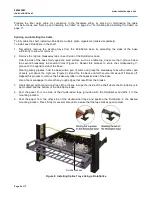
2. Remove the top two breakaway tabs on each side of the RoloSplice base:
Hold the side of the base firmly against a solid surface, such as a table top, and score the V-groove below
the second breakaway tab several times (Figure 9). Repeat this process to score the corresponding V-
groove on the opposite side of the base.
Wearing safety glasses, hold the base with a pair of pliers and grasp the breakaway tabs with another pair
of pliers just above the V-groove (Figure 9). Bend the tab back and forth several times until it breaks off.
Repeat this process to remove the breakaway tabs on the opposite side of the base.
Use a file or sandpaper to smooth any rough edges that result from the breaks.
3. Use isopropyl alcohol and a lint-free cloth or tissue to wipe the inside of the shelf where the RoloSplice is to
be mounted and the bottom of the RoloSplice base.
4. Peel the paper from one side of the double-sided tape (provided with the RoloSplice) and affix it to the
mounting location.
5. Peel the paper from the other side of the double-sided tape and position the RoloSplice in the desired
mounting location. Press firmly for several seconds to assure that the tape makes good contact.
Figure 9 Installing Splice Trays Using a RoloSplice
Scoring the V-groove
on the RoloSplice base
Breaking the tab on
the RoloSplice base
RoloSplice base

