www.commscope.com
860463082
Instruction Sheet
Page 5 of 13
Step 3 – Installing the Shelf
When installing multiple shelves in a rack, install the lowest shelf first and work toward the top of the rack.
To install the shelf in the rack:
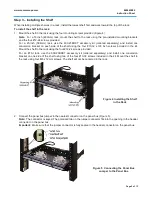
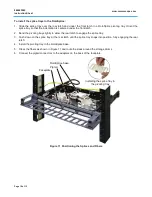
1. Mount the shelf in the rack using the four mounting screws provided (Figure 4).
Note:
For a 19-inch (483mm) rack, mount the shelf to the rack using the pre-installed mounting brackets
and the four #12-24 screws provided.
For a 23-inch (584mm) rack, use the 600-23BRKT accessory kit (ordered separately) and install one
conversion bracket on each side of the shelf using the four #10-32 x 3/8 inch screws included in the kit.
Mount the shelf to the rack using the four #12-24 screws provided.
For an ETSI rack, use the 600-23BRKT accessory kit (ordered separately) and install one conversion
bracket on one side of the shelf using two of the four #10-32 screws included in the kit. Mount the shelf to
the rack using four M6 x 12mm screws. The shelf will not be centered in the rack.
Figure 4 Installing the Shelf
in the Rack
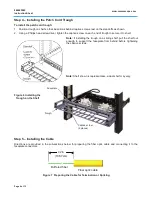
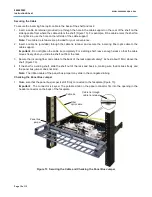
2. Connect the panel bus jumper to the nearest connector on the panel bus (Figure 5).
Note:
The connector is keyed. The polarized tab on the jumper connector fits into the opening in the header
connector on the panel bus.
Important:
Make sure that the jumper connector is fully seated in the header connector on the panel bus.
Figure 5 Connecting the Panel Bus
Jumper to the Panel Bus

