background image

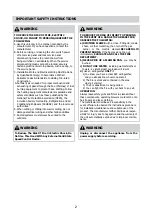
WARNING

TO REDUCE THE RISK OF INJURY TO PERSONS, 

IN THE EVENT OF A RANGE TOP GREASE FIRE, 

OBSERVE THE FOLLOWING:

a)


SMOTHER FLAMES 

with a close - fitting lid, cookie

sheet, or other metal tray, then turn off the gas 

 burner or the electric element.  


BE CAREFUL TO 

PREVENT BURNS.

 If the flames do not go out  

immediately, 

EVACUATE AND CALL THE FIRE 

DEPARTMENT.

b)


NEVER PICK UP A FLAMING PAN 

- you may be

burned.

c)


DO NOT USE WATER

, including wet dishcloths or

towels - a violent steam explosion will result.


Use an extinguisher 

ONLY

 if:

You know you have a class ABC extinguisher, 

and you already know how to operate it.

The fire is small and contained in the area 

where it started.

The fire department is being called. 

You can fight the fire with your back to an exit. 

OPERATION 

Always leave safety grills and filters in place.Without 

these components, operating blowers could catch onto 

hair, fingers and loose clothing.

The manufacturer declines all responsibility in the 

event of failure to observe the instructions given here 

for installation,maintenance and suitable use of the 

product. The manufacturer further declines all respon-

sibility for injury due to negligence and the warranty of 

the unit automatically expires due to improper mainte

-

nance.

d)

1)

2)

3)

4)

IMPORTANT SAFETY INSTRUCTIONS

WARNING

Unplug  or  disconnect  the  appliance  from  the 

power supply before servicing.

WARNING

TO REDUCE THE RISK OF FIRE, ELECTRIC 

SHOCK, OR INJURY TO PERSONS, OBSERVE THE 

FOLLOWING:

Use this unit only in the manner intended by the 

manufacturer. If you have questions, contact the 

  manufacturer

Before servicing or cleaning the unit, switch power 

off at service panel and lock service panel 

disconnecting means to prevent power from 

being switched on accidentally. When the service 

disconnecting means cannot be locked, securely  

fasten a prominent warning device, such as a tag, to 

the service panel.

Installation Work and Electrical Wiring Must Be Done 

By Qualified Person(s) In Accordance With all


Aplicable Codes & Standards, Including Fire-rated 

Construction.


When cutting or drilling into wall or ceiling, do not 

damage electrical wiring and other hidden utilities. 

Ducted systems must always be vented to the  

outdoors.

A.

B.

C.

E.

F.

Sufficient air is needed for proper combustion and 

burning equipment to prevent back- drafting. Follow  

the heating equipment manufacturers guideline and 

safety standards such as those published by the 

National Fire Protection Association (NFPA), the 

American Society for Heating, Refrigeration and Air 

Conditioning Engineers (ASHRAE), and the local code 

authorities.

D.

exhausting of gases through the flue (Chimney) of fuel

WARNING

To Reduce The Risk Of Fire Or Electric Shock, Do 

Not Use This Hood With Any External Solid State 

Speed Control Device.

2

Summary of Contents for CVG30W8AST

Page 1: ...the original limited warranty period Simply text a picture of your proof of purchase to 1 844 224 1614 The warranty extension is for the three months immediately following the completion of the produ...

Page 2: ...CTIONS WARNING Unplug or disconnect the appliance from the power supply before servicing WARNING TO REDUCE THE RISK OF FIRE ELECTRIC SHOCK OR INJURY TO PERSONS OBSERVE THE FOLLOWING Use this unit only...

Page 3: ...liance is equipped with a cord having a grounding wire with a grounding plug The plug must be plugged into an outlet that is properly installed and grounded WARNING IMPROPER GROUNDING CAN RESULT IN A...

Page 4: ...me use not suitable for barbecue roast shop and other commercial purposes Never use the hood for purposes other than for which it has been designed Never leave high open flames under the hood when it...

Page 5: ...ter 2 pack for Ductless Recirculation installation Sold Separately on Amazon search part CVP CVG CF 1 2 1 2 2 3 4 5 1 Instruction Manual 11 12 10 20 21 COMPONENTS Qty Documentation 10 7 11 Hood fixing...

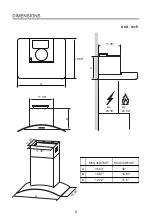
Page 6: ...11 38 19 69 A 11 38 Min Min 25 59 25 59 B C 11 38 MVG36W7AST MVG30W7AST A 35 43 30 B 10 87 10 87 C 12 72 11 5 A 11 38 1 9 6 9 6 unit inch...

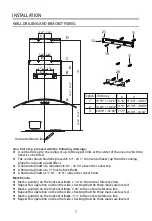
Page 7: ...orizontal lineB at a minimum above the cooker top inch above theB A horizontal lineD at Mark a point 1 on the horizontal lineD to the vertical reference line Repeat this operation on the other side ch...

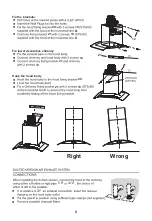
Page 8: ...12 21 21 Fix lower decorative chimney Hook the hood body 20 21 10 C 12 21 12 Right Wrong Fix the brackets 11 20 10 B 21 10 D 3 4 5 9 4 72 4 72 8...

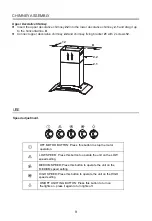
Page 9: ...screws 12 12 D 2 2 2 1 USE Speed adjustment 9 ON OFF LIGHTING BUTTON Press the lights on press it again to turn lights o OFF MOTOR BUTTON Press this button to stop the motor operation LOW SPEED Press...

Page 10: ...ay attention that they are mounted in correct position the handle facing outwards REPLACING THE ACTIVATED CHARCOAL FILTER Sept1 Remove the metal grease filters If you choose Recirculation Ductless Ins...

Page 11: ...DISPOSAL OF OLD ELECTRICAL APPLIANCES The European directive 2012 19 EU on Waste Electrical and Electronic Equipment WEEE requires that old household electrical appliances must not be disposed of in t...

Page 12: ...tightly fastened The range hood is not tightly fixed Fixed the range hood tightly Insufficient suction The distance between the cooker hood and the cooker top is too large Readjust the distance Too mu...

Page 13: ...rice Every implied warranty including any statutory warranty or condition of merchantability RU WQHVV IRU SDUWLFXODU SXUSRVH LV GLVFODLPHG H FHSW WR WKH H WHQW SURKLELWHG E ODZ LQ ZKLFK FDVH VXFK ZDUU...

Page 14: ......

Page 15: ......

Page 16: ......

Reviews: