background image


63


For some specified versions, anonymous login with a private protocol can be enabled 
here.  If  this  function  is  enabled,  enter 

http://host:port/Anonymous/1[2/3

]  (eg. 

http://192.168.1.150:80/Anonymous/1

)  via  web  browser  to  access  the  camera.  1 

indicates main stream; 2 indicates sub stream; 3 indicates third stream. Only video can 
be viewed, no other operations can be done. 
 

4.8   Maintenance 

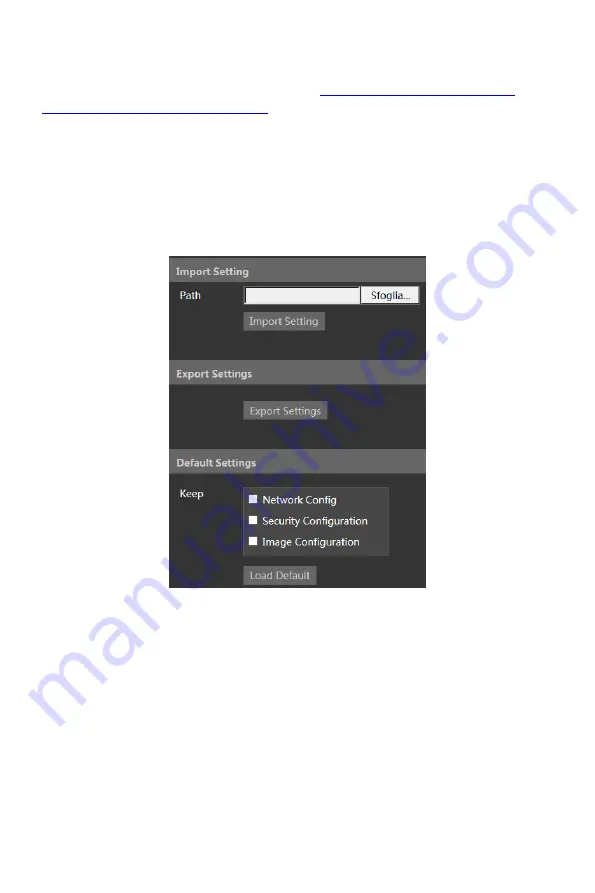
4.8.1  Backup & Restore 

Go to Config

Maintenance

Backup & Restore. 


Import & Export Settings 

Configuration  settings  of  the  camera  can  be  exported  form  a  camera  into  another 
camera. 
1. Click “Browse” to select the save path for import or export information on the PC. 
2. Click the “Import Setting” or “Export Setting” button.   


Default Settings 

Click  the  “Load  Default”  button  to  restore  all  system  settings  to  the  default  factory 
settings except those you want to keep. 


4.8.2  Reboot 

Go to Config

Maintenance

Reboot. 

Summary of Contents for IPPTZA02Z20A

Page 1: ...1 IPPTZ CAMERAS ART IPPTZA02Z20A IPPTZA04Z30A Please read this manual thoroughly before use and keep it for future reference ...

Page 2: ...vice center as soon as possible if there is any failure Avoid from incorrect operation shock vibration heavy pressing which can cause damage to product Do not use corrosive detergent to clean main body of the camera If necessary please use soft dry cloth to wipe dirt for hard contamination use neutral detergent Any cleanser for high grade furniture is applicable Avoid aiming the camera directly to...

Page 3: ... Password 13 3 2 8 Auto Exit Time 13 3 3 Camera Setup 13 3 3 1 Camera Control 14 3 3 2 Image Setup 15 3 3 3 Lens Setup 16 3 3 4 Day Night Setup 17 3 3 5 Infrared Control 18 3 3 6 Video Format 18 3 4 Dome Function 18 3 4 1 Preset Setup 18 3 4 2 Cruise Tour Setup 19 3 4 3 Group Setup 19 3 4 4 Task Setup 20 3 4 5 Trace Pattern Setup 21 3 4 6 Alarm Setup 21 3 4 7 Home Position 22 3 4 8 Wiper Setup 23 ...

Page 4: ...r 37 4 5 Event Configuration 38 4 5 1 Object Removal 38 4 5 2 Exception 40 4 5 3 Line Crossing 42 4 5 4 Intrusion 43 4 5 5 Crowd Density Detection 45 4 5 6 People Intrusion 47 4 5 7 People Counting 48 4 6 Network Configuration 50 4 6 1 TCP IPv4 50 4 6 2 Port 52 4 6 3 Server 52 4 6 4 DDNS 52 4 6 5 SNMP 53 4 6 6 802 1X 54 4 6 7 RTSP 55 4 6 8 UPnP 56 4 6 9 E mail 56 4 6 10 FTP 57 4 6 11 HTTPS 58 4 6 ...

Page 5: ...oot Device 63 4 8 3 Upgrade 64 4 8 4 Log 64 5 Playback 65 5 1 Image Search 65 5 2 Video Search 66 5 2 1 Local Video Search 67 5 2 2 Micro SD Card Video Search 68 Appendix 70 Appendix 1 Troubleshooting 70 Appendix 2 Preset description 72 ...

Page 6: ...nd IPC are connected to the LAN and the Comelit Advance IP Tool is installed in the PC Double click the Comelit Advance IP Tool icon on the desktop to run this software as shown below Modify the IP address The default IP address of the camera is 192 168 1 150 Click the information of the camera listed in the above table to show the network information on the right hand Modify the IP address and ga...

Page 7: ...administrator and click the Modify button to modify the setting Double click on the IP address and the system will pop up the IE browser to connect the IPC Follow instructions to download install and run the ActiveX control Enter the username and password in the login window The default Password of the administrator is admin The default Username is admin the default Password is admin ...

Page 8: ...ault network settings are shown below IP address 192 168 1 150 Subnet Mask 255 255 255 0 Gateway 192 168 1 1 HTTP 80 Data port 9008 Use the above default settings when logging in the camera for the first time Connect the camera to the computer directly through network cable Manually set the IP address of the PC the network segment should be the same as the default settings of the IP camera Open th...

Page 9: ...t the network of the PC Open the Internet Explorer browser enter the default address of the IPC and confirm Follow instructions to download and install the ActiveX control Enter the default username and password in the login window and then enter to Live view 1 2 WAN Access through the router or virtual server ...

Page 10: ...ia LAN and go to Config Network Port menu to set the port number Port Setup Go to Config Network TCP IP menu to modify the IP address IP Setup Go to the router s management interface through Internet Explorer browser to forward the IP address and port of the camera in the Virtual Server ...

Page 11: ...rough PPPoE auto dial up The setup steps are as follow Go to Config Network Port menu to set the port number Go to Config Network TCP IP PPPoE Config menu Enable PPPoE and then enter the user name and password from your internet service provider Go to Config Network DDNS menu Before configuring the DDNS please apply for a domain name first Please refer to DDNS configuration for detail information ...

Page 12: ...o to Config Network Port menu to set the port number Go to Config Network TCP IP menu to set the IP address Check Use the following IP address and then enter the static IP address and other parameters Open the Internet Explorer browser and enter its WAN IP and http port to access ...

Page 13: ... screen Scene change indicator Start stop live view Line crossing indicator Start stop two way audio Crowd density indicator Enable disable audio People counting indicator Snapshot Object removal indicator Start stop local recording Intrusion indicator Zoom in People intrusion indicator Zoom out Sensor alarm indicator PTZ control Motion alarm indicator Move the cursor to view the live image in all...

Page 14: ...the preset Select the set preset and click to delete it Select cruise and click to start cruise Icon Description Icon Description Click it to rotate the dome diagonally up left Click it to rotate the dome diagonally up right Click it to rotate the dome upwards Click it to stop rotating the dome Click it to rotate the dome towards left Click it to rotate the dome towards right Click it to rotate th...

Page 15: ...direction button moving up and down into the menu to return to the menu to confirm to enter sub menu or to select the menu on the right Note dash before the menu means that the menu is not available Different models may have different menus The menus in this manual are for reference only 3 1 System Information Select System Information by clicking or button then click button to enter into the menu...

Page 16: ...n to select ON OFF After click button to return to the menu on the left and click button to select Exit or Return Exit the setup or Return to the main menu 3 2 2 Language Setup English or Chinese 3 2 3 RS485 Setup not available for some models Select RS485 Setup menu as shown below Dome ID from 001 to 255 Protocol PELCO D or PELCO P Baud Rate from 1200 to 9600bps 3 2 4 Date Setup Select Date Setup...

Page 17: ...n North Setup menu as shown below Choose a location by clicking the arrow buttons Select STORE to save the setting The horizontal angle will treat the north position as a reference otherwise it will treat the horizontal origin as a reference to display the clockwise rotation angle of camera The vertical PTZ will treat its highest point as a reference when the camera is parallel with the horizontal...

Page 18: ...new password Password needs to be entered when you login next time Select Change Passsword menu as shown below Enter the current password and then enter the new password twice Entering empty new password to delete the current password 3 2 8 Auto Exit Time Select Auto Exit Time to set the time to exit the menu automatically 3 3 Camera Setup Select Camera Setup by clicking or button then click butto...

Page 19: ...e set the hue of the image not available for some models Antiflicker not available for some models OFF disables the anti flicker function This is used mostly in outdoor installations 50Hz reduces flicker in 50Hz lighting conditions 60Hz reduces flicker in 60Hz lighting conditions WDR setup WDR can adjust the camera to provide a better image when there are both very bright and very dark areas simul...

Page 20: ... and chroma of the image in low illumination condition Color Level adjust the saturation of the image from 0 to 7 Defog Setup Auto Manual Activate and set an appropriate value as needed in foggy dusty smoggy or rainy environment to get clear images Gamma measurement of the contrast of an image not available for some models VE visibility enhancement not available for some models High Sensitivity se...

Page 21: ... Setup Select WB Setup menu as shown below WB Mode White Balance Mode Auto or manual MWB Red Gain set the red gain value Available only when Manual mode is selected MWB Blue Gain set the blue gain value Available only when Manual mode is selected AGC Automatic Gain Control From 0 to 15 Image Flip MIRR mirror Turn the image horizontally FLIP turn the image vertically ROTA rotation Turn the image ho...

Page 22: ...t to restore the lens parameters to the factory default settings 3 3 4 Day Night Setup Select Day Night Mode menu as shown below Auto the camera automatically switch between day and night mode depending on the environment illumination Night the camera will be in night mode black white at all time Day the camera will be day mode color at all time Time the camera will switch the mode between day and...

Page 23: ... Dome Function menu as shown below 3 4 1 Preset Setup This function is used to memorize the specific position of pan tilt zoom and focus for quick return to this position by calling a Preset Select Preset Setup menu as shown below Select the Preset number Select Edit CUR Preset menu as shown below ...

Page 24: ...uise list the system can recall those presets at the set time in sequence when executing the Cruise command Select the Cruise number Select Edit CUR Cruise menu as shown below This camera supports 8 Cruises with 16 Presets for each cruise Select the Preset number from 1 to 360 and the dwell time from 5 to 240 seconds Run CUR Cruise The camera will automatically start the Cruise Select STORE to sav...

Page 25: ... on Run Group means to run the cruises in order 3 4 4 Task Setup Select Task Setup menu as shown below By dividing 24 hours into several periods and appointing different commands for each period the camera system will automatically execute the commands according to the set time if there is no operation Enable the task Set the task ...

Page 26: ...k Iris to start recording the track 180 seconds max Control the dome movement by arrow buttons and then save the setting If the time exceeds 180 seconds the system will automatically save the operation data and return to the previous menu In addition 360 commands can be stored for each track If exceeding 360 commands the system will automatically save the first 360 commands and return to the previ...

Page 27: ...function set ALARM OVER call the Preset Cruise Track Scan When the alarm trigger stop the camera will automatically start the function set OUTPUT ENABLE if ON when alarm input occurs the camera will output alarm information 3 4 7 Home Position Select Home Position menu as shown below Enable the Home function ON and select the Preset in Home set Select the delay time from 7 to 180 seconds and exit ...

Page 28: ... level and run time Call START to enable wiper function 3 5 Display Setup You can enable title display and time display 3 6 Load Default There are three menus master reset master clear and master reboot Master Reset restore the camera factory default settings but do not clear the parameters such Preset Cruise Master Clear restore the camera factory default settings System Reboot reboot the camera ...

Page 29: ...u can check the relative information of the device Some versions may support device ID and QR code If P2P is enabled see Network Configuration P2P the network camera can be quickly added to mobile surveillance client by scanning the QR code or entering device ID 4 1 2 Date and Time Configuration Go to Config System Date and Time Please refer to the following interface Select the time zone and DST ...

Page 30: ...orage Go to Config System Storage to go to the interface as shown below Micro SD Card Management Click the Format button to format the micro SD card All data will be erased by clicking this button Click the Eject button to stop writing data to micro SD card Then the micro SD card can be removed safely Snapshot Quota set the capacity of captured pictures on the micro SD card Video Quota set the cap...

Page 31: ...ing Check Enable Schedule Record and set the schedule Weekly schedule Set the alarm record time from Monday to Sunday for a single week Each day is divided in one hour Green means scheduled Blank means unscheduled Add add the schedule for a specific day Drag the mouse to set the time on the timeline Erase delete the schedule Drag the mouse to delete the time on the timeline Manual Input click it o...

Page 32: ...imum quantity of snapshots The actual quantity of snapshots may be less than this number Supposing the occurrence time of an alarm event is less than the time of capturing pictures the actual quantity of snapshots is less than the set quantity of snapshots Enable Timing Snapshot enable timing snapshot first and then set the snapshot interval and schedule The setup steps of schedule are the same as...

Page 33: ...gins in a video until that scene ends the entire group of frames or pictures can be considered as a group of pictures If there is not much movement in the scene setting the value higher than the frame rate is fine potentially resulting in less bandwidth usage However if the value is set too high and there is a high frequency of movement in the video there is a risk of frame skipping Video Compress...

Page 34: ...t1 choose Picture Overlay and click Browse to select the overlap picture Then click Upload to upload the overlap picture The size of the image shall not exceed 200x200 pixels or it cannot be uploaded 4 2 3 Video Mask Privacy Go to Image Video Mask interface as shown below A maximum of 4 zones can be set up To set up video mask 1 Enable video mask 2 Click direction buttons to change the area you wa...

Page 35: ... list 2 Click Delete to delete this mask area 4 2 4 Camera Setup Go to Config Image Camera Setup Many parameters of the camera can be set in above sub menu such as Color Brightness Sharpness 3D DNR Fog Day Night Mode and so on Schedule Settings of Image Parameters ...

Page 36: ... configuration mode will automatically switch between day and night according to the schedule 4 3 PTZ configuration 4 3 1 PTZ and Password setting PTZ Setting Go to Config PTZ Setting In this submenu PTZ flip language auto logout time can be set If your model support RS485 interface you may configure the communication setting for keyboard control Password setting If the password is set you must en...

Page 37: ...up and wiper setup 4 4 Alarm configuration 4 4 1 Motion Detection Go to Alarm Motion Detection to set motion detection alarm 1 Check Enable check box to activate motion based alarms Alarm Out if selected this would trigger an external relay output that is connected to the camera on detecting a motion based alarm Trigger Snap if selected the system will capture images on motion detection and ...

Page 38: ...ion chapter for more details 2 Set motion detection area and sensitivity Click the Area and Sensitivity tab to go to the interface as shown below Move the Sensitivity scroll bar to set the sensitivity Higher sensitivity value means that motion alarm will be triggered more easily Select Add and click Draw Area Drag the mouse to draw the motion detection area Select Erase and drag the mouse to clear...

Page 39: ...rd the corresponding alarms will be triggered 1 Go to Config Alarm Anomaly SD Card Error as shown below 2 Click Enable alarm and set the alarm holding time 3 Set alarm trigger options Trigger alarm out Email and FTP The setup steps are the same as motion detection Please refer to motion detection chapter for details IP address conflict This function is only available for some models 1 Go to Config...

Page 40: ...ection This function is only available for some models 1 Go to Config Alarm Anomaly Cable Disconnected as shown below 2 Click Enable alarm and set the alarm holding time 3 Trigger alarm out When the camera is disconnected the system will trigger the alarm out 4 4 3 Alarm input This function is only available for some models To set sensor alarm Alarm In go to Config Alarm Alarm In interface as show...

Page 41: ...o motion detection chapter for details 3 Click Save button to save the settings 4 Set the Schedule of the sensor alarm The setup steps of the schedule are the same as the schedule recording setup 4 4 4 Alarm Out This function is only available for some models Go to Config Alarm Alarm Out Alarm Out Mode Alarm linkage Manual Operation Day Night Switch Linkage or Timing ...

Page 42: ...output when the camera switches to day mode or night mode Timing select the alarm type Select Add and drag the mouse on the timeline to set the schedule of alarm out Select Erase and drag the mouse on the timeline to delete the set time schedule After the schedule is saved the alarm out will be triggered in the specified time 4 4 5 Alarm Server Go to Alarm Alarm Server interface as shown below Set...

Page 43: ...d places that are narrow or have too much shadowing Avoid scenario where the object s color is similar to the background color At any time of day or night please make sure the image of the camera is clear and with adequate light avoiding overexposure or too much darkness on both sides Note the following functions are only available when the speed dome stops rotating 4 5 1 Object removal Alarms wil...

Page 44: ...ed area Enable Item Missing Detection alarm will be triggered if there are items missing in the pre defined area 2 Set the alarm holding time and alarm trigger options The setup steps are the same as motion detection 3 Click Save to save the settings 4 Set the alarm area of the object removal detection Click the Area tab to go to the interface as shown below ...

Page 45: ...1 50 to 1 3 of the entire image 2 Make sure cameras can view objects for at least from 3 to 5 seconds 3 The defined area cannot be covered frequently and continuously i e people and traffic 4 The drawn frame must be very close to the margin of the object to enhancing the sensitivity and accuracy of the detection 5 Not enable object removal detection with scenes with various light changes 6 Not ena...

Page 46: ... as motion detection Please refer to motion detection chapter for details 3 Click Save button to save the settings 4 Set the sensitivity of the exception detection Click Sensitivity tab to go to the interface as shown below Drag the slider to set the sensitivity value or directly enter the sensitivity value in the textbox Click Save button to save the settings Camera configuration and surrounding ...

Page 47: ... lines Go to Config Event Line Crossing interface as shown below 1 Enable line crossing alarm and set the alarm holding time 2 Set alarm trigger options The setup steps are the same as motion detection 3 Click Save to save the settings 4 Set the area and the sensitivity of the line crossing alarm Click the Area tab to go to the interface as shown below ...

Page 48: ...ame as the schedule recording setup Camera configuration and surrounding area 1 Auto focus function should not be enabled for line crossing detection 2 Avoid the scenes with many trees or the scenes with various light changes like many flashing headlights The environment brightness of the scenes shouldn t be too low 3 Cameras should be mounted at a height of 2 8 meters or above 4 Keep the mounting...

Page 49: ...et the alarm area number on the right side Up to 4 alarm areas can be added Click the Draw Area button and then click around the area where you want to set as the alarm area in the image on the left side the alarm area should be a closed area Click the Stop Draw button to stop drawing Click the Clear button to delete the alarm area Click the Save button to save the settings 5 Set the schedule of t...

Page 50: ...ove 4 Keep the mounting angle of the camera at about 45 5 The detected objects should not be less than 1 of the entire image and the largest sizes of the detected objects should not be more than 1 8 of the entire image 6 Make sure cameras can view objects for at least 2 seconds in the detected area for accurate detection 7 Adequate light and clear scenery are crucial for intrusion detection 4 5 5 ...

Page 51: ...lick Draw Area and drag the mouse to draw a rectangle area Drag the border lines of the rectangle to modify its size and move the rectangle to change its position Click Stop Draw to stop drawing the area Click Clear to clear the area 5 Set the schedule of the crowd density detection The setup steps of the schedule are the same as schedule recording setup Camera configuration and surrounding area 1...

Page 52: ...ollows 1 Go to Config Event People Intrusion 2 Enable the people intrusion detection 3 Set Alarm Sensitivity and Alarm Holding Time 4 Set alarm trigger options The setup steps are the same as motion detection 5 Set the schedule of the people intrusion detection The setup steps of the schedule are the same as schedule recording Camera configuration and surrounding area 1 The detection area should h...

Page 53: ...ng 2 Enable the people counting detection 3 Set Detection Sensitivity Entrancing Threshold Departing Threshold Staying Threshold Counting Period Alarm Holding Time and so on Counting Period all daily weekly or monthly Counting Reset the number of people counting will be cleared and the counting period will restart by clicking Reset button If the number of people exceeds the pre defined threshold v...

Page 54: ...49 5 Set the area of the people counting Click the Area tab to go to the area setting interface ...

Page 55: ...llation height of the camera depends of the focal length of the lens The entrance exit in the image should take up over a half of the width of the entire image and the head of a single person should occupy about 1 5 of the height of the entire image Remember keeping a certain space on both sides to let the entrance exit lie in the center of the entire image The recommending height of installation ...

Page 56: ...SP Either methods of network connection can be used If PPPoE is used to connect internet the camera will get a dynamic WAN IP address This IP address will change frequently To be notified the IP change notification function can be used Click IP Change Notification Config to go to the interface as shown below Trigger Email when the IP address of the device change the new IP address will be sent to ...

Page 57: ...er media server in the Comelit Advance VMS Then enable the auto report in the Comelit Advance VMS when adding a new device Next enter the remaining information of the device in the Comelit Advance VMS After that the system will automatically allot a device ID Please check it in the Comelit Advance VMS 3 Enter the above mentioned server address server port and device ID in the corresponding boxes C...

Page 58: ...en click the Register product button 4 6 5 SNMP This function is only available for some models To get camera status parameters and alarm information and remotely manage the camera the SNMP function can be used Before using SNMP please install an SNMP management tool and set the parameters of the SNMP such as SNMP port trap address 1 Go to Config Network SNMP ...

Page 59: ...Address Trap Port and so on Please make sure the settings are the same as that of the SNMP software Note please use the different version in accordance with the security level you required The higher the version is the higher the level of the security is 4 6 6 802 1X If it is enabled the camera s data can be protected When the camera is connected to the network protected by the IEE802 1x user auth...

Page 60: ...me and the Password must be the same with the username and password applied for and registered in the authentication server 4 6 7 RTSP Go to Config Network RTSP Select Enable to enable the RTSP function Port access port of the streaming media default is 554 Address the RTSP address unicast format that can be used to play the stream in a media player Multicast Address Main stream the address format...

Page 61: ...lay with the web client 2 The IP address mentioned above cannot be IPv6 3 Avoid the use of the same multicast address in the same local network 4 When playing the video through the multicast streams in a VLC player please pay attention to the mode of the VLC player If it is set to TCP mode the video cannot be played 5 If the coding format of the video of the main stream is MJPEG the video may be d...

Page 62: ...rms are triggered within 60 seconds they will be considered as only one alarm event and only one email will be sent If one motion alarm event is triggered and then another motion detection alarm event is triggered after 60 seconds two emails will be sent When different alarms are triggered at the same time multiple emails will be sent separately Click the Test button to test the connection of the ...

Page 63: ...o the FTP server 4 6 11 HTTPS HTTPs provides authentication of the web site and protects user privacy Go to Config Config Network HTTPS as shown below There is a certificate installed by default as shown above Enable this function and save it Then the camera can be accessed by entering https IP address https port via the web browser eg https 192 168 1 150 443 A private certificate can be created i...

Page 64: ...password province state region and so on Then click OK to save the settings Click Create a certificate request to enter into the following interface Click Create to create the certificate request Then download the certificate request and submit it to the trusted certificate authority for signature After receiving the signed certificate import the certificate to the device 4 6 12 P2P optional If th...

Page 65: ...priority to solve the network delay and network congestion by using this function Go to Config Network QoS Video Audio DSCP the range is from 0 to 63 Alarm DSCP the range is from 0 to 63 Manager DSCP the range is from 0 to 63 The higher the number is the higher the priority is 4 7 Security configuration 4 7 1 User Configuration Go to Config Security User interface as shown below Add user 1 Click t...

Page 66: ...pecified MAC address can access the camera for that user 6 Click the OK button and then the new added user will be displayed in the user list Modify user 1 Select a user to modify password and MAC address if necessary in the user configuration list box 2 The Edit user dialog box pops up by clicking the Modify button 3 Enter the old password of the user in the Old Password text box 4 Enter the new ...

Page 67: ...y Block and Allow Lists as shown below The setup steps are as follows Check the Enable address filtering check box Select Block Allow the following address IPv4 IPv6 MAC and then enter IP address or MAC address in the address box and click the Add button 4 7 4 Security management Go to Config Security Security Management as shown below In order to prevent malicious password unlocking locking once ...

Page 68: ...ther operations can be done 4 8 Maintenance 4 8 1 Backup Restore Go to Config Maintenance Backup Restore Import Export Settings Configuration settings of the camera can be exported form a camera into another camera 1 Click Browse to select the save path for import or export information on the PC 2 Click the Import Setting or Export Setting button Default Settings Click the Load Default button to r...

Page 69: ... button to start upgrading the firmware 3 The device will restart automatically Caution Do not close the browser or disconnect the camera from the network during the upgrade For some specified models online upgrade is available The setting steps are as follows 1 Create the upgrade file location and save it 2 Check the latest version by clicking Check version 3 Click Upgrade to update the firmware ...

Page 70: ...an be found here Local image search 1 Choose Picture Local 2 Set time select the date and choose the start and end time 3 Click to search the images 4 Double click on the file name in the list to view the snapshots as shown above Click to return to the previous interface Micro SD card image search 1 Choose Picture SD Card ...

Page 71: ...utton to close the image Close all click this button to close all images Save click this button to select the path for saving the image on the PC Save all click this button to select the path for saving all images on the PC Fit size click to fit the image on the screen Actual size click this button to display the normal size of the image Zoom in click this button to digitally zoom in Zoom out clic...

Page 72: ...nterface as shown below Videos were recorded locally to the PC can be played in this interface 1 Choose Record Local 2 Set search time select the date and choose the start and end time 3 Click to search the images 4 Double click on a file name in the list to start playback ...

Page 73: ...icro SD Card Video Search Click Search to go to the interface as shown below Videos that were recorded on the micro SD card can be played in this interface 1 Choose Record SD Card 2 Set search time select the date and choose the start and end time 3 Click to search the images 4 Select the alarm events at the bottom of the interface 5 Select mix stream video and audio stream or video stream as need...

Page 74: ...tart time by clicking on the timetable 3 Click to set the start time and then this button turns green 4 Select the end time by clicking on the timetable Then click to set the end time 5 Click to download the video file in the PC Click Set up to set the storage directory of the video files Click Open to play the video Click Clear List to clear the downloading list Click Close to close the downloadi...

Page 75: ...mber D Exclude the above reasons Restore to default setting by Comelit Advance IP Tool Comelit Advance IP tool cannot search devices The anti virus software in your computer may cause it Please stop it and try to search device again Internet Explorer cannot download ActiveX control A Internet Explorer browser may be setup to block ActiveX Follow the steps below Open the browser and then click Tool...

Page 76: ...he device is unable to start normally when upgrading If the device is unable to start normally when upgrading please rename the files suffixed with tar as updatepack tar and copy it to the root directory of SD card Restart the device and then the device will upgrade automatically from the SD card After finishing upgrading the user can search the IP address of IP Cam in the IP Tool ...

Page 77: ...e 4 95 Recall OSD menu 97 Enable random scan 99 Enable Point to Point SCAN Set Preset 91 Set random scan 92 Set left border of Point to Point SCAN 93 Set right border of Point to Point SCAN 94 three times Set the value of the near and middle infrared light 95 three times Set the value of the middle and far infrared light ...

Reviews: