HF COLOR VIDEO INTERCOM
WITH RECORDING
,
OWNER S MANUAL
INSTALLATION AND OPERATION
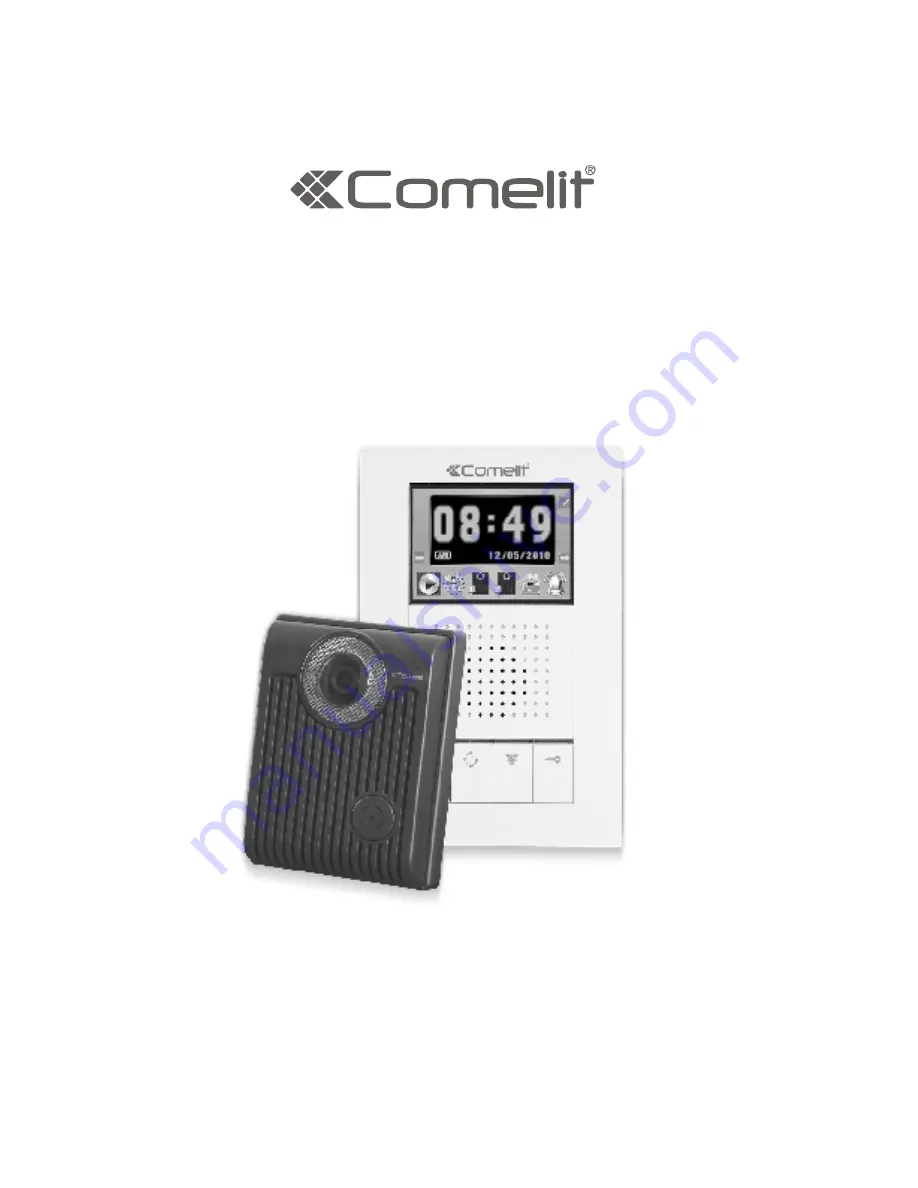
HFX-700R KIT
Page 1: ...HF COLOR VIDEO INTERCOM WITH RECORDING OWNER S MANUAL INSTALLATION AND OPERATION HFX 700R KIT...
Page 2: ...0A 2 1 EX 700A Identification 2 2 EX 700A Installation 2 3 EX 700A Operation 3 Door camera EX 700D 3 1 EX 700D Identification 3 2 EX 700D Installation 3 3 EX 700D Operation 4 4 1 EX 700V Contents 4 2...
Page 3: ...re they exit the equipment Cleaning Clean the equipment by wiping with a soft cloth do not use any abrasive agents or water Non use Periods Power cords should be unplugged from the outlet when left un...
Page 4: ...constitute risk of electrical shock to persons The exclamation point within an equilateral triangle is intended to alert the user to the presence of important operating and maintenance servicing inst...
Page 5: ...uant to Part 15 of the FCC rules These limits are designed to provide reasonable protection against harmful interference in a residential installation This equipment generates uses and can radiate rad...
Page 6: ...on screen menu for easy operation by touch sensitive buttons located on the two sides of the screen Please read thru this manual for all detailed functions This package consists of a main monitor and...
Page 7: ...2 3 5 Color TFT Screen 3 Touch sensitive buttons 4 on each side unmarked 4 Speaker 5 In use LED 6 Monitor LED 7 Intercom LED 8 Speach open LED 9 Microphone 10 Cut off button 11 Intercom button 12 Mon...
Page 8: ...arty device Expansion monitor connection for more indoor monitor expansion w polarity Door camera connection 2 to the 2nd door camera terminals no polarity Door camera connection 1 to the 1st door cam...
Page 9: ...t output selection 10 Wire to door strike 11 Wire to main Monitor 7 HFX 700R Door Camera identification 98mm 3 86 JP1 JP2 1 2 3 4 3 4 5 2 6 7 8 9 10 11 Door camera 2 3 HFX 700R KIT Packaging X1 X1 Mai...
Page 10: ...m 39 3 Main monitor 165cm 64 9 From main monitor to door camera Maximum of 328 feet with AWG18 normal 2 wrie parallel wires or CAT 5 cable From monitor to monitor every section Maximum of 328 feet wit...
Page 11: ...wer at this stage Wall mount bracket Monitor A Use security screw wrench disassemble screw and remove door camera unit from bracket B Fasten wall mount bracket on position C Fasten wires on terminals...
Page 12: ...agnetic switch optional 9 A Wire the system from door camera terminals to monitor terminals accordingly B Select and plug JP2 to its RIGHT to disable LED illumination of the doorbell camera when it s...
Page 13: ...he power requirements figure 2 If you are using power from the system figure 2 It is necessary to use an electric lock that requires less than 300mA of power to engage the strike Electric Lock Power f...
Page 14: ...reen blue LED of the call button at doorbell camera on F Menu display will turn off after 90 seconds of standing by G There is a power reserve for 12 hours for clock adjustments after 12 hours of the...
Page 15: ...atus Chime 15 30 V3 0 2 101206 4 3 2 Door open status indication A There are PT1 and PT2 terminals on main monitor for connection of a magnetic switch to detect door open status magnetic switch is not...
Page 16: ...it setup menu A At setup menu move and to EXIT option to select figure 2 Exit 15 30 V3 0 2 101206 figure 1 figure 2 4 3 3 Video or photo recording Video 15 30 V3 0 2 101206 Photo 3 15 30 V3 0 2 101206...
Page 17: ...r Camera A Typical video intercom function when call button is triggered all monitors will B In 3 seconds time the main monitor begins to record video of the door camera In 20 seconds time i answer fr...
Page 18: ...time operate the on screen menu to stop or resume video recording B To operate zoom and pan tilt function has to stop recording first and resume afterward figure 1 2 3 4 4 4 4 Monitor doorbell cameras...
Page 19: ...ction Privacy A Move and select the BELL icon on the main menu B means means disabled privacy off chime on privacy on and the chime is 4 6 1 Video or photo playback A Select playback icon on main menu...
Page 20: ...for the action figure 6 D Select EXIT to move to PLAYBACK menu Select to return to main menu 0 4 5 7 3 9 1 0 1 2 0 8 1 0 1 2 0 8 0 0 1 1 2 6 5 5 1 10122400 04 57 39 2010 06 28 figure 1 figure 2 figur...
Page 21: ...io mixing types and 2 door cameras Maximum wiring distance using dry contact lock control at doorbell camera Signal wires Signal wires Wire assignment AWG 22 parallel wires AWG 18 parallel wires Wire...
Page 22: ...The wiring HUB can amplify and distribute the 2 wire signal among the main monitor and sub monitors NOTE 2 the system is capable of expanding up to a total of 5 monitors with 1 EX HUB or 8 total monit...
Page 23: ...WER IN OUT1 OUT2 OUT3 OUT4 EX HUB EX 700H or EX 700A EX 700H or EX 700A NOTE 1 OUT4 can also be used to connect to a expansion monitor NOTE 2 wiring distance 300ft C Max POWER LED POWER IN OUT1 OUT2 O...
Page 24: ...65 1 3 5 Color TFT Screen 2 Speaker 3 In use LED 4 Monitor LED 5 Intercom LED 6 Speach open LED 7 Microphone 8 Cut off button 9 Intercom button 10 Monitoring button 11 Door release button 12 Power sw...
Page 25: ...tion for door status detection OUT to next EX 700H monitor w polarity IN from HFX 700R or EX 700H monitor w polarity Power adapter connection 1 2 3 4 1 2 3 4 PT1 PT2 IN IN OUT OUT POWER PT1 PT2 IN IN...
Page 26: ...nals for next monitor w polarity Terminals for power adapter 1 2 A Fasten the wall mount bracket using the provided hardware B Fasten wires on terminals accordingly Refer to STAGE 2 C Plug pin wires a...
Page 27: ...monitors on the system will ring with a chime sound and all monitors will be activated B After the call if nothing on the monitor is pressed the system will time out after 30 seconds If the monitor bu...
Page 28: ...12 13 178mm 7 0 36mm 1 42 118mm 4 65 1 Speaker 2 In use LED 3 Monitor LED 4 Intercom LED 5 S LED 6 Microphone 7 Cut off button 8 Intercom button 9 Monitoring button 10 Door release button 11 Power swi...
Page 29: ...or door status detection OUT to next EX 700A audio monitor w polarity IN from HFX 700R or EX 700A monitor w polarity Power adapter connection 1 2 3 4 1 2 3 4 PT1 PT2 IN IN OUT OUT POWER PT1 PT2 IN IN...
Page 30: ...nals for next monitor w polarity Terminals for power adapter 1 2 A Fasten the wall mount bracket using the provided hardware B Fasten wires on terminals accordingly Refer to STAGE 2 C Plug pin wires a...
Page 31: ...eak and broadcast voice message to all other monitors C The broadcast mode can last for 20 seconds During the 20 seconds any other monitor intercom button to engage intercom conversation with the host...
Page 32: ...w angle knob 6 degrees 0 degrees 8 degrees 16 degrees 8 Jumper 2 enable disable light senor 9 Jumper 1 dry contact or current output selection 10 Wire to door strike 11 Wire to main Monitor EX 700D id...
Page 33: ...ination of the doorbell camera when it s activated Factory setting is LEFT which enables automatic LED illumination B Select and plug JP1 to its RIGHT for direct current output control 12VDC 300mA dir...
Page 34: ...ment or brick wall cut open size Front panel outlook 100x150x41 114x165x49 120x180x7 Unit mm Unit inch 3 94 x5 91 x1 62 4 49 x6 50 x1 93 4 72 x7 08 x0 28 Doorbell function is unchanged as EX 700D Refe...
Page 35: ...2 directly on the wooden wall A Install bracket 1 on top of bracket 2 A Remove doorbell camera unit from its plastic wall mount bracket B Install the doorbell camera unit on top of bracket 1 A Place r...
Page 36: ...700D door camera Image Sensor Resolution Camera Lens View Angle Auto Light Sensor Operating Temperature Dimensions w bracket Power consumption Remote Control dry contact bridge Remote Control direct c...
Page 37: ...0W maximum EX 700A optional expansion non video monitor Auto Timer visitor call Auto Timer intercom Operating Temperature Dimensions w bracket Power adaptor Power consumption 30 seconds time out 90 se...
Page 38: ...positive Black negative System is on but no picture on the monitor Make sure the cable is cnnected securely between the master monitor and the camera Adjust the brightness and sharpness controls Soun...
Page 39: ...ty is good for one year from the date purchased If the product reacts down under proper treatment during warranty please contact our after sales connection for free of charge repairs c The following e...
Page 40: ...http www comelitusa com Info comelitusa com...