N.B.
: when the F2 working phase is active, the words “F2 ON” will appear on the work display.
6.
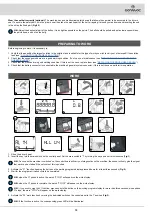
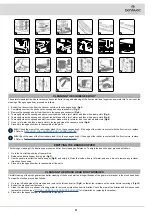
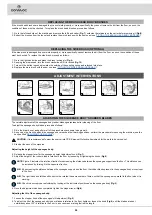
Open the detergent solution flow into the machine's water system by turning the tap control lever in the direction indicated by the arrow (
Fig.4
).
7. Select the speed level (e.g. “step-01”) and turn the handle on the direction selection lever (
Fig.5
) under the steering wheel.
N.B.:
adjust the forward speed to suit the adhesion conditions.
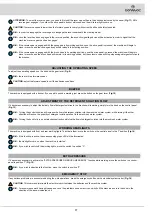
8. Select the direction in which you want to move the machine. For example, if you want to move forward, shift the direction selector lever in the
direction shown by the arrow (
Fig.6
).
N.B. :
To select the forward gear (F) you need to first shift the lever up and then in the direction indicated by the arrow (
Fig.6
).
9. Press the drive pedal to begin moving the machine (
Fig.7
).
10.
The machine will now work at its maximum efficiency level until the batteries run down.
N.B.:
the squeegee and brush head lower until they touch the floor, and the traction motor, brush head motor and suction motor will start
working. As a result, the solenoid valve will also be activated and detergent solution will be dispensed onto the brushes. During the first few
metres, check that there is sufficient solution and that the squeegee is drying correctly.
N.B.:
Before cleaning, pick up large pieces of waste. Pick up wire, tape, string, large pieces of wood or other refuse that could wrap around
the brushes or become entangled. Drive the machine in a straight line. Avoid hitting obstacles and scratching the sides of the machine.
Overlap the cleaning track by a few centimetres. Avoid turning the steering wheel abruptly when the machine is moving. The machine
responds rapidly to the movements of the steering wheel. Avoid hairpin turns, except in emergencies. Adjust the speed of the machine, the
pressure of the brushes and the flow of the solution according to the type of cleaning to be carried out. Drive the machine slowly on inclines. Use
the brake pedal to control the speed when going down an incline. If working on a slope, slow down on ramps and slippery surfaces, and carry out
the scrubbing operation by moving the machine upwards rather than downwards.
ATTENTION:
Do not use the machine in areas where the ambient temperature is higher than 43 ° C (110° F). Do not use the scrubbing
functions in areas where the ambient temperature is less than freezing 0 °C (32 °F).
GENERAL HOUR METER
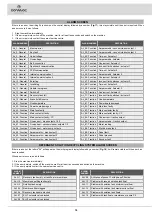
The command display is located on the control panel, and the screen that appears after the start-up screen displays the machine's total usage
time (
Fig. 8
).
The digits that precede the "." symbol identify hours, whilst the digit that follows it indicates hour decimals (an hour decimal corresponds to six
minutes).
When the “hour glass” symbol is flashing, it indicates that the hour meter is counting the appliance operating time.
DETERGENT SOLUTION RECYCLING SYSTEM HOUR METER
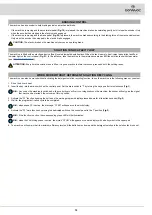
When the machine is in stand-by, the hour meter pertaining to the usage of the detergent solution recycling system can be viewed on the working
program display (
Fig.9
). The time of use will be displayed in tenths of an hour.
BATTERY CHARGE LEVEL INDICATOR
The control panel is equipped with a control display.
The graphic symbol that identifies the charge level of the batteries appears at the bottom of the control display (
Fig. 8
).
The indicator consists of charge level symbols.
When the minimum remaining charge is reached, the graphic symbol will start to blink, and will turn off after a few seconds, after which the symbol
will start to blink. Under these conditions, the machine must be brought to the battery charging area.
N.B.
: a few seconds after the battery charge reaches the critical level, the brush motors switch off automatically. With the remaining charge it
is possible to complete the drying process before starting the recharge.
N.B.
: a few seconds after the battery charge reaches the discharge level, the suction motor switches off automatically.
SELECTING THE OPERATING DIRECTION
The machine has a lever for selecting the travel direction, located under the steering wheel.
N.B.:
To select the forward gear you need to first shift the lever up and then in the direction indicated by the arrow (
Fig.6
).
N.B.:
To go from forward to neutral, first move the lever in the direction indicated by the arrow (
Fig.10
).
16


