background image


                                                                                                                                                                       Page 

22

 of 

39


SubliXpress Plus


Click on the 

Next

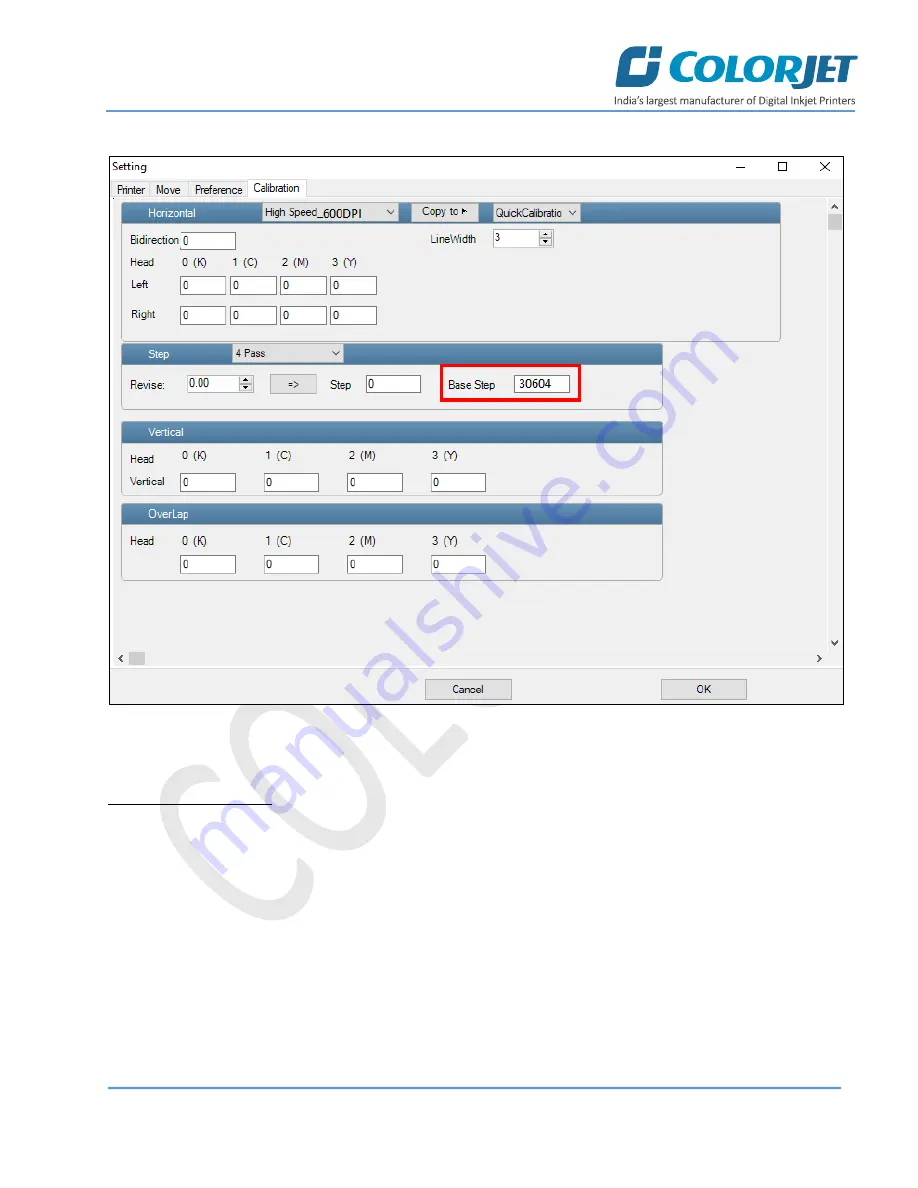
 button to redirect to the software calibration screen, as shown in the below images: 


Fig 25: Displaying the Printer Calibration Options 

Note: 

Base Step value should be 

30583

Bi-direction Calibration 

Bi-

directional calibration is performed to achieve dot placement accuracy between the “Left to Right” and “Right 

to Left” print sweeps. If the bi

-direction offset value is correct, the Left to Right test print would align accurately 

with the Right to Left test print at

“0”

 position. In case of error in the Bi-Direction offset, the Left to Right and 

Right to Left print would align at some other point on the scale. 


Summary of Contents for SubliXpress plus

Page 1: ......

Page 2: ...Plus machine without anyone else assistance The information provided in this document ensures its uniqueness and language quality For safe and proper use of the product please read this manual careful...

Page 3: ...etting Menu 10 Tools Menu 15 Help Menu 15 6 Getting Ready for Printing 16 Switch ON Procedure 16 Loading Media 17 Ink Refilling 18 Feeding Password 18 7 Printing 20 Nozzle Testing 20 Print Head Calibr...

Page 4: ...35 Environmental Maintenance 35 Print Head Maintenance 35 Head Plate Maintenance 35 11 Troubleshooting 36 Printer Not Initializing 36 Printer Manager Not Showing READY 36 Print Stops in Between Print...

Page 5: ...igned to facilitate both types of users 2 Machine Specifications Machine Specifications are shown in the table below SubliXpress Plus Configuration X4403 X4806 Printing Technology Drop on demand Piezo...

Page 6: ...e Front View of the machine is shown as below Fig 1 Displaying the Front View 1 Left Door Carriage Home Position 2 Front Middle Door 3 Console TFT Screen 4 Control Panel Unit 5 Leveller 6 Wheel 7 Drye...

Page 7: ...or 2 Back Middle Door 3 Right Door 4 Main Ink Tanks 5 Print Dryer 6 Take up Roller 7 Supply Roller 8 Power Inlet Machine MCB and Heater Switch 9 Take Up and Supply Control Buttons Control Panel Detail...

Page 8: ...Page 7 of 39 SubliXpress Plus Different options of the Control Panel Bed Vacuum Regulator Control the bed vacuum POWER ON OFF Turn ON OFF the printer power USB Port Insert USB cable into the USB port...

Page 9: ...Page 8 of 39 SubliXpress Plus The Take Up and Supply controls are shown in the image below Fig 4 Displaying the Take Up and Supply Controls...

Page 10: ...lete Job Print Job Pause or resume Abort job check nozzle Auto clean Move left Move right Set print origin Move forward Move backward Move carriage to origin and Edit job are available as buttons on t...

Page 11: ...xml file will be created for further references Load Using this option you can load the previously saved machine s settings Save To Printer When you click on this option all the current settings get...

Page 12: ...Default Double and More Color Bar Space Specify the distance of the color bar from the image Width Set width of the color bar Placement Enable or disable the color bar and its placement viz left righ...

Page 13: ...Page 12 of 39 SubliXpress Plus The Move tab are shown in the image below Fig 9 Displaying the Move Tab Note X and Y manual moving speed can be selected using the Move tab...

Page 14: ...the image below Fig 10 Displaying the Preference Tab Different options by the Preference tab View Mode Enable to set the Printer Manager screen view Language Enable to change the language of the Print...

Page 15: ...Page 14 of 39 SubliXpress Plus The Calibration and Multilayer Print tabs are shown in the image below Fig 11 Displaying the Calibration and Multilayer Print Tabs...

Page 16: ...he time and language passwords of the printer Calibration Wizard Using this option you can perform different types of calibration viz Angle Check Vertical Check Nozzle Check and more For more details...

Page 17: ...n the printer from the Control Panel Fig 15 Displaying the Power ON OFF Button Step 6 Load the media Step 7 Turn on the computer system and open the printer manager software Step 8 Check the print hea...

Page 18: ...and guiding rollers Refer to Fig 16 Step 3 Pull out enough media from the supply roller to the print bed Roller no 5 in Fig 16 Step 4 After this pass the media through guiding rollers and dancing Fin...

Page 19: ...r to feed or update password of the printer On clicking Password option under the Tools menu the Password window appears with two options viz Time Password and Language Password Follow these steps to...

Page 20: ...indow as shown below Fig 19 Displaying the Password Window Step 5 After performing the above steps restart the printer Note When First Warning appears kindly contact Head Office with the following scr...

Page 21: ...he Head Cleaning section to perform head cleaning before proceeding to other calibration steps Print Head Calibration The Print Head calibration is categorized into the following types Mechanical Chec...

Page 22: ...Page 21 of 39 SubliXpress Plus This should bring up the calibration wizard which is shown below Fig 24 Displaying the Calibration Wizard...

Page 23: ...ection Calibration Bi directional calibration is performed to achieve dot placement accuracy between the Left to Right and Right to Left print sweeps If the bi direction offset value is correct the Le...

Page 24: ...from the default set value It has to be performed for each print mode whichever is required Left to Right and Right to Left Calibrations Left to Right Calibration is performed to achieve dot placement...

Page 25: ...he media movement After each pass the printer moves the media forward for the next pass This movement of media is called a step The distance by which the media is moved is called the step size and it...

Page 26: ...above you can conclude that the pattern is corrected at 0 position The Step Calibration and its parameters are shown in the image below Fig 31 The Step Calibration Parameters Follow these steps to pe...

Page 27: ...box Now the printing origin gets set Additionally you can also enter the print origin value manually in the Origin X field under the Print Parameter section Setting Print Parameters Using the Printer...

Page 28: ...o add the file into the Job List area as shown below Fig 34 Adding the Job Once a file has been added its information such as file path size resolution and number of passes can be viewed in the Job In...

Page 29: ...below Fig 37 Displaying the Edit Job Options Clip By enabling this a portion of the image can be selected by dragging the image preview And its height and width can be adjusted Also the crop margins c...

Page 30: ...he Print command While ripping the color profiles are used to automatically perform the color corrections in the image Now you can print an image on the selected media simply by clicking on the Print...

Page 31: ...inting job using the Pause or resume and Abort Job buttons available on the Quick Access Toolbar as shown below Fig 40 Issuing the Pause or resume Command Similarly you can abort the process by right...

Page 32: ...ad Blotting Head blotting refers to the process in which the head surface area is cleaned for better printing result and quality In SubliXpress Plus auto wiping option is available to clean the head s...

Page 33: ...per position Capping Enable Enable the auto capping functionality Auto Capping Time Define the auto capping time When the printer is ideal for the define time then auto capping process gets started an...

Page 34: ...urging Buttons Note Negative pressure should be in the 4 3 5 0 range Head Spraying Head spraying clears the mixing of colors during blotting may also clear few dry nozzles When heads are sprayed all t...

Page 35: ...lean the Print Heads if required Step 3 Remove the media from the machine Step 4 Clean the Capping Station area and check the water in the Capping tray Step 5 Click on the Auto Capping icon to engage...

Page 36: ...nozzle test daily 2 3 times before printing to monitor the blockage in the head nozzles Avoid head damage due to media and Print Head confliction Color Bar should be ON Avoid ink spilling on the Print...

Page 37: ...ed Print Margin is Shifting or Junk Printing Encoder scale is having ink stains Encoder sensor is not clean Pulley or belt is slipping Data cable is faulty Print is Blur Not Sharp Improper printer cal...

Page 38: ...Page 37 of 39 SubliXpress Plus Ink Not Supply Ink path have disclosure No ink in the main or sub ink tanks...

Page 39: ......

Page 40: ...For Any Query Please Contact Us www colorjetgroup com Call us on 91 120 4548195 Email on info colorjetgroup com For Ink Enquiry sales colorjetgroup com For Support support colorjetgroup com...

Reviews: