background image


Collomix GmbH 


Shaker 

AGIA 200, VIBA 300 & VIBA 330


D-85080 Gaimersheim 


Version G 1.4-16


13 

6.3


Starting the mixing cycle 

The mixing cycle can only be started after the door is closed. 


Push buttons I, II, or III to start the mixing process. The corresponding mixing times are shown 

on the LD display above the key pad.  


The mixing container is clamped into the machine and the mixing process is started. The remaining 

mixing time is displayed during the mixing process. 


6.4


Ending the mixing cycle 

After the selected time is over 

The mixing process is automatically stopped. The mixing unit is opened, the door is opened by spring 

force, and the container can be removed. 

Before the selected time is over 

The mixing process can be stopped early by pushing the E-button.  


6.5


EMERGENCY STOP switch 

In dangerous situations, the machine can be turned off with the EMERGENCY STOP switch. 

After the machine is turned off, the mixing unit rotates until it comes to a stop in its position.  

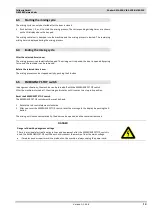
Reset the EMERGENCY STOP switch 

The EMERGENCY STOP switch must be reset by hand. 


Rotate the red control element clockwise.    


After you reset the EMERGENCY STOP switch, reset the message in the display be pushing the E-

button.  


The mixing unit  loosens automatically, the door can be opened, and the container removed. 


DANGER 

Danger of death by dangerous voltage 

There is a residual electrical energy in lines and equipment after the EMERGENCY STOP switch is 

used. The EMERGENCY STOP switch does not disconnect the machine from the mains voltage. 


If maintenance or repair work is carried out on the machine, always unplug the power cord. 


Summary of Contents for AGIA 200

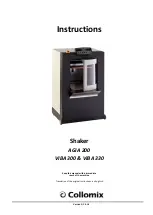
Page 1: ...Version G 1 4 16 Instructions Shaker AGIA 200 VIBA 300 VIBA 330 Keep this manual within immediate reach of the machine Translation of the original instructions en Englisch...

Page 2: ...Shaker AGIA 200 VIBA 300 VIBA 330 Collomix GmbH D 85080 Gaimersheim 2 Version G 1 4 16...

Page 3: ...t time 10 5 1 Content 10 5 2 Transport 10 5 2 1 Attach transport lock 10 5 2 2 Remove transport lock 11 5 3 Set up the equipment 11 5 4 Trial run 11 6 Operation 12 6 1 Switching on the machine 12 6 2...

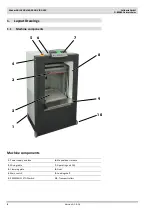
Page 4: ...ion G 1 4 16 1 Layout Drawings 1 1 Machine components Machine components 1 Power supply and fuse 6 Manual door release 2 Mixing table 7 Operating unit CSE 3 Clamping plate 8 Door 4 Main switch 9 Loadi...

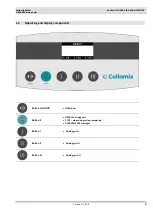
Page 5: ...aimersheim Version G 1 4 16 5 1 2 Operating and display components Button for DOOR OPEN door Button E OPEN the mixing unit STOP stop mixing cycle prematurely ACKNOWLEDGE messages Button I Mixing cycle...

Page 6: ...t paying attention to the corresponding precautionary measures WARNING This signal word is used if death or severe physical injuries may result from not paying attention to the corresponding precautio...

Page 7: ...Operating Instructions before working with the machine Keep the Operating Instructions within immediate reach of the machine Please hand the Operating Instructions to any subsequent owners 3 1 General...

Page 8: ...vious with obvious malfunctions Repair cleaning and maintenance work without disconnecting the system from power WARNING Danger of injury through improper modifications Hazards exist through unauthori...

Page 9: ...ne if needed 3 6 Residual Risks If all precautions are taken there may be obvious residual risks Adhering to the safety instructions the designated use and the operating instructions as a whole can re...

Page 10: ...ances in an ergonomically user friendly manner The door must be opened for the machine to be handled safely during transport Secure the opened door with the hand against swinging 5 2 1 Attach transpor...

Page 11: ...ately upon receipt and the equipment when unwrapping it for any visual external defects Keep all parts of the original packaging for a possible necessary return Remove the machine from the pallet with...

Page 12: ...isplay Any errors detected during initialisation are shown in text form on the display 6 2 Load a container To place the container proceed as follows Open the door by pushing the DOOR button To adjust...

Page 13: ...e mixing process can be stopped early by pushing the E button 6 5 EMERGENCY STOP switch In dangerous situations the machine can be turned off with the EMERGENCY STOP switch After the machine is turned...

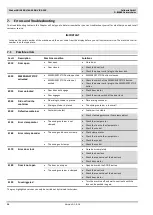
Page 14: ...otor Door engages Check the micro switch of the door lock E030 Did not find the container No mixing container is placed Place mixing container Mixing container is placed The mixing container is too sm...

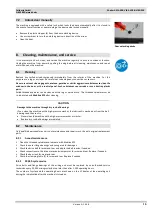
Page 15: ...aned with a rag or a wire brush The threaded spindles must be re lubricated with Mobilux EP2 after cleaning CAUTION Damage to the machine through dry run ball bearings If you clean the machine with a...

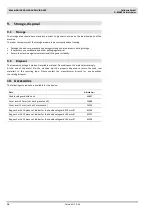
Page 16: ...transport package is made of recyclable material Please dispose this material accordingly At the end of the useful life the machine must be properly disposed to return the used raw materials to the r...

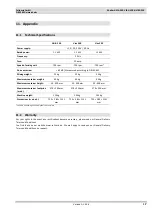
Page 17: ...kg Maximum container weight 40 kg 40 kg 40 kg Maximum container height 50 300 mm 50 400 mm 50 400 mm Maximum container footprint w x d 370 330 mm 370 330 mm 370 330 mm Machine weight 135 kg 150 kg 15...

Page 18: ...05 AC 2005 in accordance with the requirements of the guidelines 2006 95 EC 2004 108 EC 19 04 2016 2014 30 EU 20 04 2016 2006 42 EC Please request technical information from Collomix GmbH Abt Technisc...

Page 19: ...Collomix GmbH Shaker AGIA 200 VIBA 300 VIBA 330 D 85080 Gaimersheim Version G 1 4 16 19...

Page 20: ...haker AGIA 200 VIBA 300 VIBA 330 Collomix GmbH D 85080 Gaimersheim 20 Version G 1 4 16 Collomix GmbH Daimlerstr 9 85080 Gaimersheim Germany Tel 49 0 8458 32 98 0 Fax 49 0 8458 32 98 30 www collomix de...

Reviews: