background image


16 

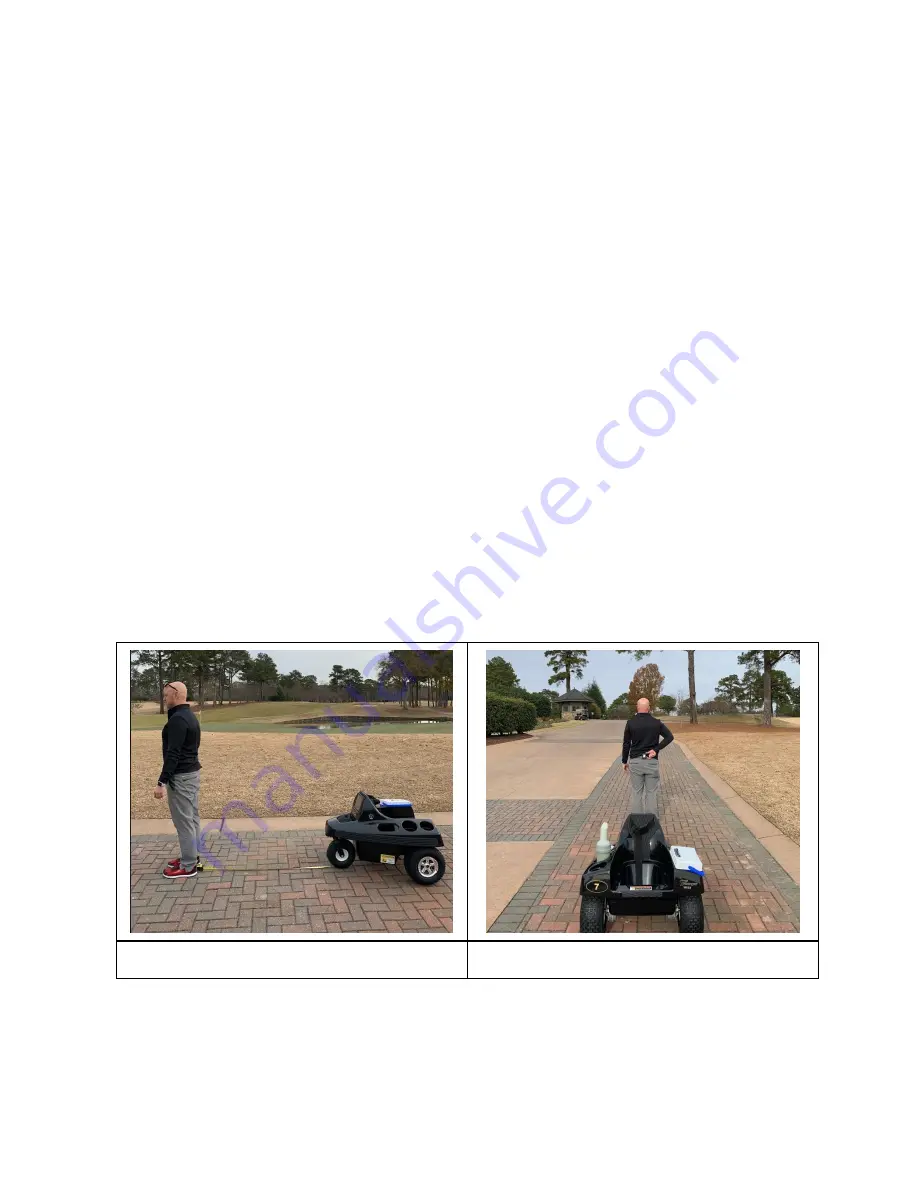
CALIBRATING A TEMPO WALK 

Calibrating the Tempo Walk allows the unit to travel centered on the golfer and at the appropriate 
following distance (48”).  

1.  Always calibrate the unit on a flat and level surface. 

2.  Place a tape measure extending straight from the front nose of the unit for 

48” (see table below). 

Make sure the tape is centered on the unit (see table below). 

3. 

Power on the unit and press the neutral button steadily until you hear the voice audio “Calibration 
Mode” 

4.  Quickly move to straddle the measuring tape, with your heels at 

the 48” mark. Your back should 

be facing the unit and you must stand still during calibration process. 

5.  The transmitter should be turned on and it should be centered on your waist in the middle of your 

back.   

6.  Wait for the unit to successfully complete its calibration, which will be signaled by several quick 

chimes. You must wait until these chimes end before you move. It is now ok to turn off the 
transmitter. 

7.  Should you hear repetitive gongs it means the calibration was unsuccessful.  Possible reasons for 

this are as follows: 

a. 

Transmitter isn’t charged properly (Green light flashing or off) 

b. 

Transmitter isn’t turned on during calibration, or the unit is not turned on. 

c. 

The Channels between Tempo Walk (abbreviated: TW) and transmitter aren’t the same. 

d.  Make sure no other transmitters or units are ON. 

8.  Once these conditions are corrected you can repeat steps 1-6 to re-calibrate the unit 
9.  Test the unit tracking by walking it around to make sure that the Tempo Walk is following 

correctly, both following distance (48

”) and tracking centered on the transmitter. 


Stand 4 ft in front of TW 

Stand centered on the TW 

Summary of Contents for Tempo Walk

Page 1: ...To nd your local authorized Club Car dealer visit www clubcardealer com or call 1 800 ClubCar 258 2227 OWNERS MANUAL...

Page 2: ...P O Box 204658 Augusta Georgia 30917 4658 USA Telephone 706 863 3000 Service Parts Fax 706 855 7413 www clubcar com Copyright 2018 Club Car LLC Club Car Tempo Walk is a registered trademark of Club Ca...

Page 3: ...ON AND DAILY SAFETY CHECKLIST 10 PERFORMANCE INSPECTION 10 STARTING AND OPERATING TEMPO WALK 11 STOPPING TEMPO WALK 12 TEMPO WALK TRANSMITTER 13 REPLACING A TOGGLE SWITCH 14 CHANGING CHANNELS ON TEMPO...

Page 4: ...urvey can be found at http bit ly 1w9uFMh TEMPO WALK OVERVIEW 1 47640674001 Ultrasonic Sensors 3 qty Obstacle Detection 2 47640671001 Dual USB Charge Ports Charging cell phones 3 47642670001 8 Tablet...

Page 5: ...ce Items SAFETY DECAL AND FEATURE IDENTIFICATION The following pages contain safety decal and feature identification information For detailed information on specific features read the appropriate sect...

Page 6: ...anual could result in property damage severe personal injury or death It is important to note that some vital statements throughout this manual and on the decals affixed to the unit are preceded by th...

Page 7: ...periods or servicing the unit turn off the power to the unit and disconnect the main power fuse under the cooler Chock the wheels when servicing the unit Improper use of the unit or failure to proper...

Page 8: ...damage and personal injury Lithium Ion batteries should be properly recycled Figure 3 They cannot be disposed as municipal waste and must be collected separately Responsibility for environmental prote...

Page 9: ...t we strongly recommend that a safety committee be appointed One of the main concerns of this committee should be the safe operation of the carts This should include at a minimum Where carts should be...

Page 10: ...iately stop the unit if its power switch is turned off see figure 8 The dashboard is located on the driver side of Tempo Walk push the power button to turn the unit off and on see Figure 7 you will he...

Page 11: ...ts bolts and screws are tight Safety and information decals Check to ensure that all safety and information decals are in place See Safety Decal and Feature Identification on page 5 Tires Visually ins...

Page 12: ...e Fall line of slopes Do not operate along steep side hills Do not operate unit on slopes exceeding 10 grades STARTING AND OPERATING TEMPO WALK 1 Study and understand all controls 2 Read safety and in...

Page 13: ...NING Walking through shallow water 5 inches may affect the brakes and the electronics After walking through water check effectiveness of the brakes by turning the transmitter OFF and checking to see t...

Page 14: ...ubmerging in water contact your local Club Car distributor dealer immediately The transmitter should be charged daily If the green light on the front of the transmitter is Flashing it means the transm...

Page 15: ...tion will be up when the case lid is reattached 7 Repeat steps 2 4 in reverse order to close and secure the transmitter case Figure 10 Opened Transmitter CHANGING CHANNELS ON TEMPO WALK DANGER Never h...

Page 16: ...igure 10B Transmitter Board Setting the channel on the Tempo Walk Unit 1 Power On the unit using the dashboard 2 Press the neutral button steadily until you hear the voice audio Calibration Mode conti...

Page 17: ...dle of your back 6 Wait for the unit to successfully complete its calibration which will be signaled by several quick chimes You must wait until these chimes end before you move It is now ok to turn o...

Page 18: ...w to activate New User training mode 1 Press the Gear Icon on the Operating Instructions Screen 2 Enter password 6456 then press submit 3 Select the Operating Mode tab on the left side 4 Press the Ena...

Page 19: ...cable c If nothing works call you Club Car service technician to get a replacement Broken Waterlogged Tablet Screen see warnings below Remove the tablet from your Tempo Walk and call your Club Car se...

Page 20: ...ssociated with reputable manufacturers and carriers might be selling incompatible or even counterfeit batteries and chargers Consumers should purchase manufacturer or carrier recommended products and...

Page 21: ...nected for winter storage see video 4 Remove tablet from TW power it off see video and store indoors 5 TW should not be connected to NOCO G7200 charger during long term storage 6 TW must be recharged...

Page 22: ...to keep the unit in proper working condition Any unit not functioning correctly should be removed from use until it is properly repaired This will prevent further damage to the unit and avoid the pos...

Page 23: ...CE Daily service by owner Pre Operation and Daily Safety Checklist See Pre Operation and Daily Safety Checklist on page 11 Performance Inspection See Performance Inspection on page 11 Charge battery d...

Page 24: ...service by trained technician only Brake System Check brakes and grease motor gearbox Battery If battery is not performing as expected See batteries in maintenance and service manual Electrical wiring...

Page 25: ...After use charge the batteries The batteries should never be left discharged any longer than absolutely necessary do not leave discharged overnight The battery should be stored in full state of charg...

Page 26: ...n 4 First Aid Measures Eye Contact Flush eyes with plenty of water for at least 15 minutes occasionally lifting the upper and lower eyelids Get medical aid Skin Contact Remove contaminated clothes and...

Page 27: ...not crush or puncture the battery or immerse in liquids Precautions to be taken in handling and storing Avoid mechanical or electrical abuse Stored preferably in cool dry and well ventilated area whic...

Page 28: ...STANCE OF PREPARATION If batteries are still fully charged or only partially discharged they can be considered a reactive hazardous waste because of significant amount of uncreated or unconsumed lithi...

Page 29: ...l Pollution Act OPA Superfund Amendments and Reauthorization Act Title III 302 311 312 313 SARA Resource Conservation and Recovery Act RCRA Safety Drinking Water Act CWA California Proposition 65 Code...

Page 30: ...the charger dry Do not connect the charger to a receptacle if the charger cord plug or the unit receptacle is broken damaged or does not make a good electrical connection Fire or personal injury can...

Page 31: ...pt a three prong plug The extension cord should be a three wire No 12 AWG American Wire Gauge or no 14 British Standard Wire Gauge and be as short as possible no more than 12 feet 3 7 m The use of an...

Page 32: ...etects the input voltage and will operate at full power if the voltage is within the 110 to 120 VAC range THERMAL CUTBACK The NOCO charger operates at full power in ambient temperatures between 40 F 4...

Page 33: ...32 Figure 16 NOCO G7200 Charger Status Indicators...

Page 34: ...ease to disconnect the plug Do not twist rock or bend the plug To disconnect the charger plug from the unit receptacle grasp the plug by the tab press the red spring release and pull the plug straight...

Page 35: ...lacement battery Contact your authorized Club Car dealer distributor with any questions about battery and charger compatibility Battery Charging Procedure 1 With the charger cord disconnected from the...

Page 36: ...Such a process will expose electrical components to moisture Moisture entering electrical components can result in water damage and subsequent component failure Battery acid fertilizers tars asphalt...

Page 37: ...Tablet 8 Cellular WiFi GPS Android 7 0 Processor 1 2GHz RAM 1 5GB Storage 16GB Battery 4200 mAh BODY CHASSIS Frame Aluminum Box Style Powder Coated Body Vacuum Formed ABS Plastic 220 1000 UV protecti...

Page 38: ...37 BATTERY SPECIFICATIONS...

Page 39: ...38 BATTERY CHARGER SPECIFICATIONS...

Page 40: ...rmed only by Club Car or authorized Club Car dealers or distributors For repairs made by authorized technicians other than Club Car or authorized Club Car personnel Club Car will provide only the repl...

Page 41: ...condition The installation of batteries in reverse or recharging in reverse breakage of cases terminal posts or batteries used in applications for which they were not designed 1 4 A battery damaged by...

Page 42: ...ny implied warranties of merchantability or fitness for a particular purpose are hereby disclaimed by Club Car and excluded from this warranty The purchaser and Club Car expressly agree that the sole...

Page 43: ...in Provided 10 min TBD USB charger replacement X X X 10 min Provided 10 min TBD Sensor replacement X X X 15 min Provided 15 min TBD Micro USB C replacement X X 15 min Provided 15 min TBD Motor Replace...

Reviews:

Related manuals for Tempo Walk