


19
Battery
GASOLINE VEHICLE - ELECTRICAL
COMPONENTS
VIBRATION DAMAGE
The battery hold-down clamp should always be tight enough to keep the battery from bouncing. Battery life may be
severely shortened if the clamp is too loose. Excessive vibration shortens the life of the battery. It may also cause acid
to leak out of the vent caps and corrosion to build up on surrounding metal parts. The acid that is lost reduces the
capacity of the battery and cannot be replaced.
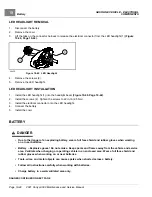
BATTERY REMOVAL
See General Warnings on page 1-1. Also see DANGER at beginning of Battery topic.
1.
Turn the key switch OFF and remove the key. Place the Forward/Neutral/Reverse control (FNR) in the NEUTRAL
position. Chock the wheels.
2.
Disconnect the battery and spark plug wire.
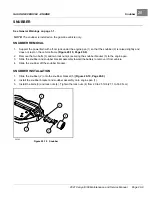
3.
Remove the battery hold-down clamp from the battery.
4.
Lift the battery from the vehicle.
See following WARNING.
WARNING
• Keep the battery in an upright position to prevent electrolyte leakage. Tipping the battery beyond a
45° angle in any direction can allow a small amount of electrolyte to leak out of the vent hole. Do not
exceed this 45° angle when lifting, carrying or installing battery. The battery acid could cause severe
personal injury when accidentally coming in contact with the skin or eyes, and could damage clothing.
CHARGING THE BATTERY
See General Warnings on page 1-1. Also see DANGER at beginning of Battery topic.
1.
Charge the battery using an automotive type 12-volt battery charger. Follow all warnings and procedures supplied
by the battery charger manufacturer.
2.
Attach the positive (+) charger cable to the positive (+) battery post.
3.
Attach the negative (–) charger cable to the negative (–) battery post.
4.
The battery may be charged with a slow charge (3 to 10 amps) or a fast charge (20 to 30 amps). Charge until
the battery voltage is greater than 12.4 volts.
See following WARNING.
WARNING
• If the battery case feels hot (approximately 125 °F (52 °C) or more), emits gases, or fluid boils from
vents, stop charging immediately. Failure to stop charging battery when any of these conditions are
present could result in an explosion, personal injury and/or damage to the battery.
• Do not disconnect the charger DC leads from the battery when the charger is on. The resulting arcing
between the DC leads and battery post could cause an explosion.
• If the charger must be stopped, disconnect the AC supply cord from the wall outlet before
disconnecting the DC leads from the battery. Allow the battery to cool to room temperature and
resume charging battery at a lower amp rate.
BATTERY INSTALLATION
See General Warnings on page 1-1. Also see DANGER at beginning of Battery topic.
1.
Place the battery into the vehicle with the battery posts facing the engine.
2.
Secure the battery to the vehicle with the clamp and install bolt, washer and locknut and tighten to 144 in·lb (16.3
N·m). A loose battery clamp may allow the battery to become damaged from vibration or jarring.
Page 19-44
2021 Carryall 300 Maintenance and Service Manual
Summary of Contents for Carryall 300 2021
Page 2: ......
Page 16: ......
Page 551: ...80 2018 by Kohler Co All rights reserved KohlerEngines com 17 690 15 Rev...
Page 565: ...GASOLINE ENGINE HARNESS Wiring Diagrams Gasoline Engine Harness 26...
Page 566: ...Page intentionally left blank...
Page 567: ...GASOLINE KEY START MAIN HARNESS Wiring Diagrams Gasoline Key Start Main Harness 26...
Page 568: ...Page intentionally left blank...
Page 569: ...GASOLINE PEDAL START MAIN HARNESS Wiring Diagrams Gasoline Pedal Start Main Harness 26...
Page 570: ...Page intentionally left blank...
Page 571: ...GASOLINE INSTRUMENT PANEL HARNESS Wiring Diagrams Gasoline Instrument Panel Harness 26...
Page 572: ...Page intentionally left blank...
Page 573: ...GASOLINE FNR HARNESS Wiring Diagrams Gasoline FNR Harness 26...
Page 574: ...Page intentionally left blank...
Page 575: ...ELECTRIC MAIN HARNESS Wiring Diagrams Electric Main Harness 26...
Page 576: ...Page intentionally left blank...
Page 577: ...ELECTRIC INSTRUMENT PANEL HARNESS Wiring Diagrams Electric Instrument Panel Harness 26...
Page 578: ...Page intentionally left blank...
Page 579: ...ELECTRIC ACCESSORIES HARNESS Wiring Diagrams Electric Accessories Harness 26...
Page 580: ...Page intentionally left blank...
Page 588: ...NOTES...
Page 589: ...NOTES...
Page 590: ...NOTES...
Page 591: ...NOTES...
Page 592: ...NOTES...
Page 593: ...NOTES...
Page 594: ...NOTES...
Page 595: ......
Page 596: ......


