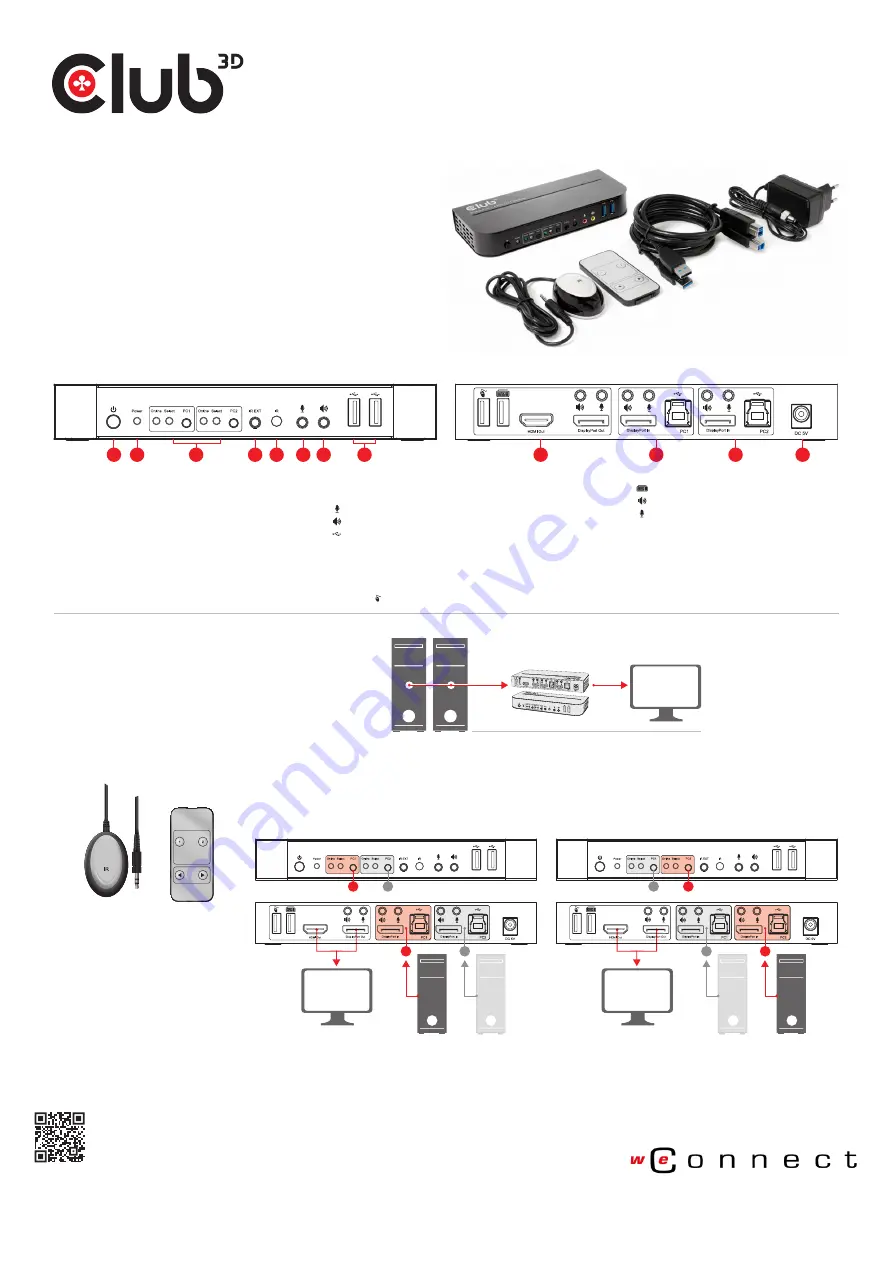
BACK
FRONT
1
2
3
4 5
6 7
8
9
10
11
12
DisplayPort™
or
HDMI™
Display
DisplayPort™
or HDMI™
Display
DisplayPort™
or
HDMI™
Display
How it works
PC
1
to Display
Connect two PC’s to one DisplayPort™
or
HDMI™ Display
PC
2
to Display
FRONT
PC
PC
BACK
BACK
FRONT
PC
PC
1
2
2
1
PC
1
PC
2
2
1
1
2
1
2
1
2
CSV-7210
Output up to: 4Kx2K@60Hz
*
Output up to: 4Kx2K@60Hz
*
*
Depends on input source resolution.
40x87x6.5mm
40x60x25mm
40x87x6.5mm
40x60x25mm
C S V-7 2 1 0 Q U I C K I N S TA L L AT I O N G U I D E
CSV-7210 QIG 03-2021
Thank you for purchasing our CSV-7210 Product.
After un-
packing the product, please make sure you have all the items
provided and checked for any damages. In case of any missing/
damaged parts please inform your supplier immediately.
You should have:
• CSV-7210
• 5V/3A Power Adapter x1
• IR Remote Control x1
• IR Extender x1
• USB Gen1-B Male to USB Gen1-A Male Cable x2
• QIG, Quick Installation Guide
DisplayPort™/HDMI™ KVM Switch For Dual DisplayPort™ 4K 60Hz
Disclaimer:
While we endeavor to provide the most accurate, up-to-date information available, the content on this document may be out of date or include omissions, inaccuracies or other errors. Therefore Club 3D does not accept any rights claimed on the content of this document.
Please refer to a full overview of our Legacy Terms and Conditions on www.club-3d.com. All other brand names are trademarks or registered trademarks and are the property of their respective owners. All content is subject to change without prior notice.
Copyright © 2022, Club 3D B.V.
www.club-3d.com
Front Panel
1
Power Button:
Press to turn on/off the unit.
2
Power Indicator:
The LED will light up once the DC/5V
is provided and the unit is turned on.
3
Input Selection:
When PC1/PC2 is selected, the cor-
responding “Select” lights up to indicate input selec-
tion(“Select” LEDs flash in a loop under automatic
switching mode). “Online” LED lights up when the
corresponding USB-B port is connected.
4
IR EXT:
Connect IR Extender to this port for IR signal
reception from the remote control.
5
I
R:
For IR signal reception from the remote control.
6
: 3.5mm MIC input port.
7
: 3.5mm stereo output port.
8
: USB Gen1 ports, mainly used for connecting to
printers, scanners, U-disk, etc.
Back Panel
9
Output ports:
Connect to a mouse or a keyboard.
Connect to a keyboard or a mouse.
Connect to an amplifier.
Connect to a MIC.
Connect “
DisplayPort™ Out
” to DisplayPort™ display
or
“
HDMI™ Out
” to HDMI™ display.
10
PC1 input ports:
Respectively connect to
DisplayPort™, USB, MIC, stereo ports of PC1.
11
PC2 input ports:
Respectively connect to
DisplayPort™, USB, MIC, stereo ports of PC2.
12
DC 5V:
Plug the 5V DC power supply into the unit.
The IR Extender
The IR Remote Control
1/2
CSV-7210 Unit
IR Remote Control
2x: USB Gen1-B Male to
USB Gen1-A Male Cable
Power Adapter
IR Extender
This is a high performance DisplayPort™
KVM (Keyboard Video and Mouse)
switcher. It routes high definition videos
up to 4096x2160 at 60Hz resolution and
audio from any DisplayPort™ source to any
HDMI™ or DisplayPort™ supported display.
This DisplayPort™ KVM switcher not only
has the key press switching function, but
also has an intelligent function as well as
hot pluggable function.
Switch easily between the two
connected computers.
This can be done using the
selection buttons
PC1
or
PC2
,
on the front of the unit.
Or user the
Remote Controller
.
After connecting the
IR Extender
to the
IR port
, you can use the
Remote Control
when the CSV-7210
unit is behind the display or computer.
How it works!


