background image


23 

 
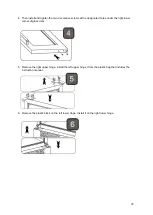
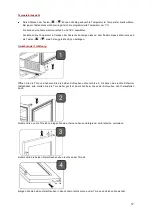
7.  Remove the left lower hinge supporter with the adjusting washer. Install the right lower hinge 

supporter from the plastic bag that includes the instruction manual. Make sure to put the adjusting 
washers at the designated position. 


8.  Rotate door at 180 degrees. Locate the glass door to the designated position making sure that the 

door shaft enters the door hole at the left upper corner of the glass door. Install the two screws that 
are used to connect the left lower hinge with the glass door and tighten them before the door is 
leveled.  


Summary of Contents for PRO116XDZ

Page 1: ...in de service D GEBRAUCHSANWEISUNG SP MANUAL DE UTILIZACION p 34 p 66 NOTICE D UTILISATION P PR RO O1 11 16 6X XD DZ Z P PR RO O1 14 47 7X XD DZ Z Fr INSTRUCTIONS p 2 GB USER MANUAL p 16 D GEBRAUCHSANWEISUNG p 31 ...

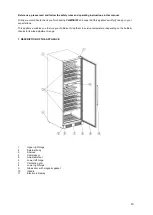
Page 2: ...nement vos attentes Cet appareil vous permet au choix de conserver vos bouteilles ou de les mettre à température de service suivant vos bouteilles grâce à sa plage de réglage étendue 1 DESCRIPTION DE L APPAREIL 1 Charnière supérieure droite 2 Carrosserie 3 Clayettes 4 Compresseur 5 Pieds ajustables 6 Charnière inférieure gauche 7 Grille d aération 8 Charnière inférieure droite 9 Porte vitrée avec ...

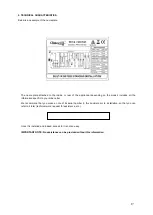
Page 3: ... informations spécifiques à votre armoire à vin Nous vous conseillons de noter son numéro de série sur ce livret avant son installation pour vous y référer si nécessaire ultérieurement intervention technique demande d assistance En effet une fois l armoire installée et chargée son accès y est plus compliqué ATTENTION Aucune assistance ne pourra vous être donnée sans ces informations ...

Page 4: ...iablement le corps de l appareil Les parties électriques ne doivent pas être directement accessibles Tenez éloigné les enfants de l appareil N utilisez pas cet appareil à l extérieur Dans le cas d écoulement accidentel de liquide bouteille cassée ou autres sur les organes électriques moteur et autres débranchez aussitôt la fiche d alimentation Pour éviter tout risque d incendie d électrocution ou ...

Page 5: ... explosives comme les bombes d aérosol avec un propulseur inflammables dans cet appareil Attention Ne pas endommager le circuit frigorifique de l appareil Attention Les unités de réfrigération fonctionnant avec de l isobutane R600a elles ne peuvent être placées dans une zone avec des sources d ignition par exemple descellé contacts électriques ou lorsque le fluide frigorigène pourrait rassembler e...

Page 6: ...pose libre ou encastrée en prenant garde de laisser un espace de 1cm de chaque côté Pour la mettre à niveau ajustez la hauteur des pieds réglables au dessous de la cave Pour obtenir le meilleur de votre appareil avec la plus faible consommation d énergie ne placez pas votre appareil près d une source de chaleur chauffage cuisinière ne l exposez pas directement aux rayons du soleil et ne le mettez ...

Page 7: ...açon simultanée sur les touches pendant une durée d environ 5s Réversibilité de la porte Ouvrez la porte et retirer les deux écrous situés sous l angle droit de celle ci servant à maintenir la charnière droite Veillez à soutenir manuellement la porte afin d éviter toute chute lors du retrait des écrous Retirez alors la porte et placez la sur une surface plane afin d éviter tout risque de rayures R...

Page 8: ...eure gauche avec la rondelle associée Installez le support de la charnière inférieure droite situé dans le sachet plastique contenant la notice Assurez vous de positionner correctement la rondelle à l endroit désigné sur le croquis Faites pivoter la porte à 180 Repositionnez la porte en vous assurant que les axes entrent dans les trous supérieurs gauche de la porte Placez les deux écrous servant à...

Page 9: ...eur situé au fond afin d apporter une humidité minimale Attention à contrôler le niveau d eau si vous stockez vos vins sur une longue période et que vous ne dédiez pas l appareil à leur mise à température de service uniquement avec des rotations rapides de vos bouteilles Le système anti UV La lumière accélère le vieillissement de vos vins Dans nos caves à portes pleine vos vins sont naturellement ...

Page 10: ...tant chacune des diamètres et des hauteurs propres Dans la réalité on pourrait ranger à l extrême plus de bouteilles en empilage monotype et sans clayettes mais une cave variée se constitue d une grande variété de bouteilles et l aspect pratique de la gestion quotidienne d une cave limite son chargement Vous en chargerez donc probablement un peu moins que le maxima annoncé Comment garnir et tenir ...

Page 11: ... périodes laissez le panneau de commande à ses réglages habituels Pendant un arrêt prolongé Enlevez les bouteilles contenues dans l appareil Débranchez l appareil de la prise de courant Nettoyez soigneusement l intérieur et l extérieur de l appareil Laissez la porte ouverte pour éviter la formation de condensas odeurs moisissures 9 QUE FAIRE EN CAS DE COUPURE DE COURANT La majorité des coupures de...

Page 12: ...eau de votre installation électrique La cave ne refroidit pas assez Contrôlez la température choisie La température externe est au delà de la température d application de la cave La cave est ouverte trop souvent La porte n est pas bien fermée Le joint de la porte n est pas étanche Le compresseur démarre et s arrête fréquemment La température externe est élevée Une grosse quantité de bouteilles a é...

Page 13: ... environnement contribue à éviter les effets négatifs possibles sur l environnement sur la santé et favorise le recyclage des matériaux dont le produit est composé Pour obtenir des renseignements plus détaillés sur les systèmes de collecte disponibles s adresser au service local d élimination des déchets ou bien au magasin où l appareil a été acheté 14 AVERTISSEMENT Dans un souci d amélioration co...

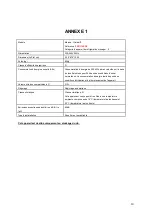
Page 14: ...es conditions d essai normalisées La consommation d énergie réelle dépend des conditions d utilisation et de l emplacement de l appareil Volume utile des compartiments l 312L Dégivrage Dégivrage automatique Classe climatique Classe climatique N Cet appareil est conçu pour être utilisé à une température ambiante comprise entre 16 C température la plus basse et 32 C température la plus haute Emissio...

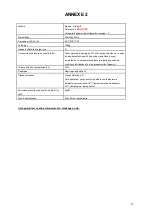
Page 15: ...es conditions d essai normalisées La consommation d énergie réelle dépend des conditions d utilisation et de l emplacement de l appareil Volume utile des compartiments l 416L Dégivrage Dégivrage automatique Classe climatique Classe climatique N Cet appareil est conçu pour être utilisé à une température ambiante comprise entre 16 C température la plus basse et 32 C température la plus haute Emissio...

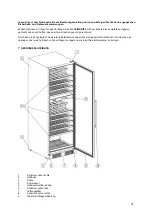
Page 16: ...p to your expectations This appliance enables you to store your bottles or bring them to service temperature depending on the bottles thanks to its wide adjustment range 1 DESCRIPTION OF THE APPLIANCE 1 Upper right hinge 2 External body 3 Shelves 4 Compressor 5 Adjustable feet 6 Lower left hinge 7 Ventilation grill 8 Lower right hinge 9 Glass door with magnetic gasket 10 Handle 11 Electronic displ...

Page 17: ...includes all the information specific to your wine cellar We recommend that you make a note of its serial number in this booklet prior to installation so that you can refer to it later technical work request for assistance etc Once it is installed and loaded access to it is not so easy IMPORTANT NOTE No assistance can be provided without this information ...

Page 18: ...f liquid is accidentally spilled broken bottle or similar on electrical parts motor or similar unplug the appliance immediately To prevent any risk of fire electrocution or injury do not immerse the mains cable plug or the appliance itself in water or any other liquid Do not handle the appliance with wet hands Keep the appliance away from any source of heat and out of direct sunlight Do not allow ...

Page 19: ... the refrigerant circuit Refrigerating units operating on Isobutane R600a may not be placed in an area with sources of ignition e g unsealed electrical contacts or where the refrigerant could gather in the event of a leak The type of refrigerant is indicated on the cabinet s type plate Warning Do not use electrical appliances inside the food storage compartments of the appliance unless they are of...

Page 20: ... designed for free standing or built in installation Position it in a place with sufficient strength to support its weight when loaded To ensure that it is level adjust the height of the feet underneath To get the best from your appliance with the lowest energy consumption do not place the appliance close to a heat source heater cooker etc do not expose it to direct sunlight and do not place it in...

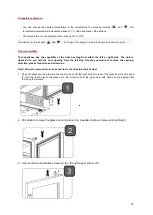
Page 21: ...or right side The unit is delivered to you with the door opening from the left side Should you desire to reverse the opening direction please follow these instructions Note All parts removed must be saved to do the reinstatement of door 1 Open the glass door and remove the two screws under the right bottom corner of the glass door that are used to hold the right hinge to the glass door Be careful ...

Page 22: ...esignated holes under the right lower corner of glass door 5 Remove the right upper hinge Install the left upper hinge r from the plastic bag that includes the instruction manual 6 Remove the plastic block on the left lower hinge Install it on the right lower hinge ...

Page 23: ...ke sure to put the adjusting washers at the designated position 8 Rotate door at 180 degrees Locate the glass door to the designated position making sure that the door shaft enters the door hole at the left upper corner of the glass door Install the two screws that are used to connect the left lower hinge with the glass door and tighten them before the door is leveled ...

Page 24: ...rks to too low a level of ambient humidity This is why the tray should be placed on the shelf below the fan situated in the bottom to provide minimum humidity Be sure to check the water level if you are storing wines over a long period and you are not using the appliance solely for bringing wines to service temperature with a quick rotation of bottles The anti UV system Light accelerates the aging...

Page 25: ...lity and in extreme cases you could store more bottles by stacking the same type of bottle without using shelves but a varied cellar comprises a wide variety of bottles and the practical aspect of everyday cellar management limits its capacity You will therefore probably load the appliance a little less than the recommended maximum How to fill and maintain your wine cellar Types of bottle We see h...

Page 26: ...dours 8 STORING YOUR WINE CELLAR If you will not be using your appliance for short periods leave the control panel with its usual settings During an extended shutdown Remove all bottles from the appliance Unplug the appliance Thoroughly clean the inside and outside of the appliance Leave the door open to prevent condensation unpleasant odours and mould 9 WHAT TO DO IN THE EVENT OF A POWER CUT Most...

Page 27: ... in your electrical installation has blown The cellar does not cool sufficiently Check the temperature selected The external temperature is beyond the cellar s operating temperature The cellar is opened too often The door is not properly closed The door seal is not sealing correctly The compressor starts and stops frequently The external temperature is high A large quantity of bottles has been put...

Page 28: ...ed appliances and their disposal and destruction in an environmentally friendly manner helps to prevent potential negative effects on the environment and health and encourages the recycling of materials used to make the product For more detailed information about available collection systems contact your local waste collection organisation or the retail outlet where you bought the product 14 WARNI...

Page 29: ...lts obtained over 24 hours in standardised test conditions Actual energy consumption depends on conditions of use and the location of the appliance Usable volume of the compartments litres 312 L Defrosting Automatic Climate class Climate class N This appliance is designed to be used at an ambient temperature of between 16 C lowest and 32 C highest Acoustic emissions in air in dB A re 1pW 42 dB Ins...

Page 30: ...ults obtained over 24 hours in standardised test conditions Actual energy consumption depends on conditions of use and the location of the appliance Usable volume of the compartments litres 416L Defrosting Automatic Climate class Climate class N This appliance is designed to be used at an ambient temperature of between 16 C lowest and 32 C highest Acoustic emissions in air in dB A re 1pW 44 dB Ins...

Page 31: ...ben und hoffen dass es Ihren Erwartungen voll gerecht wird Durch den breit angelegten Temperatur Einstellbereich haben Sie mit diesem Gerät die Wahl Ihre Flaschen je nachdem über welche Flaschen Sie verfügen zu lagern oder sie auf Serviertemperatur zu bringen 1 GERÄTEBESCHREIBUNG 1 Scharnier oben rechts 2 Gehäuse 3 Roste 4 Kompressor 5 Höhenverstellbare Füße 6 Scharnier unten links 7 Lüftungsgitte...

Page 32: ...32 10 Türgriff 11 Elektronische Anzeige ...

Page 33: ...schen Angaben über Ihren Weinschrank Wir raten Ihnen die Seriennummer vor der Installation in der Bedienungsanleitung zu notieren um sie später bei Bedarf griffbereit zu haben Reparatur Kundendienstanfrage Ist der Schrank erst einmal installiert und gefüllt ist der Zugriff auf die Seriennummer erschwert ACHTUNG Ohne Angabe dieser Informationen können wir Ihnen leider nicht helfen ...

Page 34: ...verstellen wenn es gefüllt ist andernfalls kann sich das Gerätegehäuse unwiederbringlich verformen Die elektrischen Geräteteile dürfen nicht direkt zugänglich sein Halten Sie Kinder von dem Gerät fern Das Gerät nicht im Freien verwenden Beim ungewollten Auslaufen von Flüssigkeit zerbrochene Flasche o ä auf die Elektrobauteile Motor und sonstige sofort den Netzstecker aus der Steckdose ziehen Zur V...

Page 35: ...öffnungen im Gerätegehäuse oder in der Struktur frei bleiben Bewahren Sie keine explosiven Substanzen wie Spraydosen mit einem entzündlichen Treibgas in diesem Gerät auf Achtung Achten Sie darauf den Kältekreislauf nicht zu beschädigen Kühleinheiten die mit Isobutan R600a betrieben werden dürfen nicht in Bereichen mit Zündquellen z B nicht isolierte Stromkontakte oder dort aufgestellt werden wo si...

Page 36: ... als auch als Einbaugerät installiert werden wenn man darauf achtet auf allen Seiten einen Freiraum von 1 cm zu belassen Zur Nivellierung die Höhe der Stellfüße unter dem Weinschrank justieren Zur Erzielung eines optimalen Betriebs mit dem geringsten Stromverbrauch das Gerät nicht in der Nähe einer Wärmequelle Heizung Herd usw aber auch nicht in einem zu kühlen Raum aufstellen und keiner direkten ...

Page 37: ...die Tasten etwa 5s lang gleichzeitig zu betätigen Umkehren der Türöffnung Öffnen Sie die Türe und nehmen Sie die beiden Schrauben unten rechts ab mit denen das rechte Scharnier festgehalten wird Halten Sie die Türe dabei gut fest damit Sie beim Lösen der Schrauben nicht herausfallen kann Nehmen Sie nun die Türe ab und legen Sie sie auf einen ebenen Untergrund um Kratzer zu vermeiden Nehmen Sie die...

Page 38: ...er zugehörigen Scheibe ab Bringen Sie die Halterung des rechten unteren Scharniers an die sich in der Plastiktüte mit der Bedienungsanleitung befindet Vergewissern Sie sich dass die Scheibe an jene Stelle kommt die auf der Skizze angegeben ist Schwenken Sie die Türe um 180 Bringen Sie die Türe wieder an und vergewissern Sie sich dass die Achsen auch in die Löcher links oben in der Türe passen Brin...

Page 39: ...alb der Lüftung an der Rückseite zu stellen um ein Mindestmaß an Feuchtigkeit zu gewährleisten Vergessen Sie nicht den Wasserstand zu prüfen wenn Sie Ihre Weine über einen langen Zeitraum hinweg lagern und das Gerät nicht nur zu Temperierungszwecken vor dem Servieren mit einer häufigen Flaschenrotation nutzen UV Filterung Licht beschleunigt den Alterungsprozess Ihrer Weine In unseren Schränken mit...

Page 40: ...l mehr Flaschen einförmig und ohne Roste übereinander stapeln aber ein reichhaltiger Weinschrank umfasst eine Vielzahl verschiedener Flaschen und durch den praktischen Aspekt der alltäglichen Nutzung des Weinschranks bleibt die Flaschenanzahl begrenzt Sie werden das Gerät daher wahrscheinlich mit etwas weniger Flaschen befüllen als die angegebene Höchstzahl Befüllen und Einsortieren Ihres Weinschr...

Page 41: ...e gewohnten Einstellungen auf dem Bedienpanel Bei längerem Ausschalten Die im Gerät enthaltenen Flaschen entnehmen Den Netzstecker aus der Steckdose ziehen Das Gerät sorgfältig innen und außen reinigen Die Tür offen lassen um die Kondenswasser Geruchs und Schimmelbildung zu verhindern 9 WAS TUN BEI STROMAUSFÄLLEN Die meisten Stromausfälle sind nur von kurzer Dauer Ein ein bis zweistündiger Stromau...

Page 42: ...ROBLEME MÖGLICHE URSACHEN Der Weinschrank läuft nicht an Der Netzstecker ist nicht angeschlossen Der Ein Aus Taster steht auf Aus Die Sicherung in Ihrer Elektroanlage ist herausgesprungen Der Weinschrank ist nicht kühl genug Überprüfen Sie die ausgewählte Temperatur Die Außentemperatur liegt über der Anwendungstemperatur des Schrankes Die Tür wird zu oft geöffnet Die Tür ist nicht richtig geschlos...

Page 43: ...gerechten Entsorgung trägt dazu bei mögliche negative Auswirkungen auf Umwelt und Gesundheit zu vermeiden und fördert das Recycling der Wertstoffe aus denen das Produkt besteht Um genauere Auskünfte zu den bestehenden Sammelsystemen zu erhalten wenden Sie sich bitte an das örtliche Amt für Abfallentsorgung oder das Geschäft in dem Sie das Gerät gekauft haben 14 WARNHINWEIS In dem Bestreben der kon...

Page 44: ...sierten Testbedingungen erhaltenen Ergebnisses Der tatsächliche Energieverbrauch ist abhängig von den Betriebsbedingungen und dem Aufstellort des Geräts Nutzvolumen der Fächer l 312L Abtauung Automatische Abtauung Klimaklasse Klimaklasse N Das Gerät ist ausgelegt für den Betrieb bei einer Raumtemperatur zwischen 16 C niedrigste Temperatur und 32 C höchste Temperatur Akustische Emissionen in der Lu...

Page 45: ...auch ist abhängig von den Betriebsbedingungen und dem Aufstellort des Geräts Nutzvolumen der Fächer l 416L Abtauung Automatische Abtauung Klimaklasse Klimaklasse N Das Gerät ist ausgelegt für den Betrieb bei einer Raumtemperatur zwischen 16 C niedrigste Temperatur und 32 C höchste Temperatur Akustische Emissionen in der Luft in dB A re 1pW 44 dB Installationsart Frei stehend und als Einbaugerät Di...

Reviews: