background image

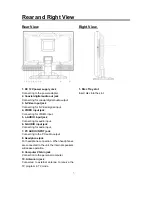
Rear and Right View                                               

 
Rear View


- 7 - 


1. DC 12V power supply Jack 

Connecting to the power adapter. 

2. Coaxial digital audio out jack 

Connecting for coaxial digital audio output. 

3. S-Video input jack 

Connecting for S-Video signal input. 

4. VIDEO input jack 

Connecting for VIDEO input.


5. L-AUDIO input jack 

Connecting for audio input. 

6. R-AUDIO input jack 

Connecting for audio input. 

7. PC AUDIO INPUT jack 

Connecting to the PC audio output. 

8. Headphone jack 

For headphone connection. When headphones 
are connected to the unit, the internal speakers 
will cease operation. 

9. Computer VGA in jack 

Connection to the personal computer. 

10. Antenna in jack 

Connected to external antenna to receive the 
TV program in TV mode. 

Right View   


1. Disc Tray slot 

Insert disc into the slot. 


Summary of Contents for LTD1510

Page 1: ...PROGRAM RATING TV PG LTD1510 15 LCD DVD COMBO ...

Page 2: ...ther Audio Video Source Connecting to TV Signal Input 4 5 6 7 8 10 10 11 11 12 2 Connecting to a Personal Computer Connecting to Power Adapter Connecting to Headphones TV Function AUX Function S VIDEO Function Computer Screen Function Disc Playback DVD Playback CD Playback JPEG Playback Playback Functions 12 13 13 14 19 20 21 22 22 23 23 25 System Setup 28 Placement of the Unit Troubleshooting Spe...

Page 3: ...r radiation when open Avoid direct exposure to beam CAUTION These servicing instructions are for use by qualified service personnel only To reduce the risk of electric shock do not perform any servicing other than that contained in the operating instructions unless you are qualified to do so Refer to service manual for servicing instructions POWER SUPPLY Connect the supplied adapter to the side of...

Page 4: ... the manufacturer 12 Use only with the cart stand tripod bracket or table specified by the manufacturer or sold with the apparatus When a cart is used use caution when moving the cart apparatus combination to avoid injury from tip over 13 Unplug the unit during lightning storms or when it will not be used for time long periods of 14 Refer all servicing to qualified service personnel Servicing is r...

Page 5: ...ack for Digital Audio Sound LCD Liquid Crystal Display Designed with a colour TFT liquid crystal display for maximum clearly BBE By correcting the phase delay and distortion naturally generated by audio systems BBE ensures that the sound that reaches your ears is as natural as the original recording By enhancing the mid range sound frequencies BBE increases the presence and clarity of dialog and m...

Page 6: ...back of CD R or CD RW discs created on a computer requires proper formatting and finalization of the disc for audio playback Some computers and or software programs may not be capable of creating compatible discs About Disc Terms Title Generally pictures or music compressed on a DVD are divided into several sections title Chapter The smaller section unit of picture or music in a DVD under the titl...

Page 7: ...er DVD mode 8 Speakers Two speakers produce stereo sound 9 SOURCE button Press to shift modes among DVD TV AUX S Video and PC The player is designed with the function of power stop memory function The player will resume from the same mode before the power was stopped 10 VOL button Press to decrease increase the volume the same function as direction button when in screen setup menu 11 Power On indi...

Page 8: ...L AUDIO input jack Connecting for audio input 6 R AUDIO input jack Connecting for audio input 7 PC AUDIO INPUT jack Connecting to the PC audio output 8 Headphone jack For headphone connection When headphones are connected to the unit the internal speakers will cease operation 9 Computer VGA in jack Connection to the personal computer 10 Antenna in jack Connected to external antenna to receive the ...

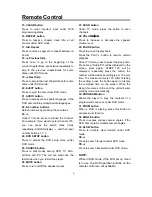
Page 9: ...r exit from the search menu under DVD mode 8 SCREEN SETUP button Press to access to LCD functional setup menu 9 direction buttons Press to select menu items or settings Under TV mode use the buttons to advance to the next channel or to go back to the preceding channel 10 OK button Press to confirm the selection Press to exit from the SCREEN SETUP menu 11 PIC MODE button Press to change the current...

Page 10: ...last mode when you restart the player 26 MUTE button Press to turn on off the speaker output 27 SCAN button Under TV mode press the button to scan channels 28 VOLUME Press to increase or decrease the speaker volume level 29 PAUSE button Press to pause the playback Press the PLAY button to resume normal playback Under TV mode press to select the sleep time Press once SLEEP 0 will be displayed on th...

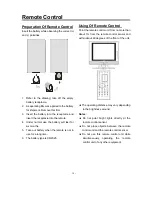
Page 11: ...Take out battery when the remote is not in use for a long time 6 The battery type is CR2025 Using Of Remote Control Point the remote control unit from no more than about 7m from the remote control sensor and within about 60 degrees of the front of the unit The operating distance may vary depending to the brightness around Notes Do not point bright lights directly at the remote control sensor Do no...

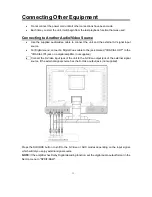
Page 12: ...t a Digital Coax cable to the jack marked COAXIAL OUT to the COAXIAL IN jack on a digital amplifier not supplied Connect the S Video input jack of the unit to the S Video output jack of the external signal source if the external signal source has the S Video output jack not supplied Press the SOURCE button to shift to the S Video or AUX modes depending on the input signal which will let you enjoy ...

Page 13: ...shift to TV mode Connecting to a Personal Computer The unit can be used as a display screen when connecting to a personal computer Connect the unit and the computer via the VGA jack Use an audio cable to connect the Audio input jack on the rear panel of the unit to the audio output of the computer NOTE Press the SOURCE button to shift PC mode and set the PC S resolution to 1024 768 60Hz 12 ...

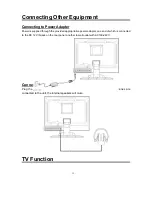
Page 14: ...ative power adapter one end of which is connected to the DC 12V IN jack on the rear panel another to wall outlet with AC100 240V 13 Connecting to Headphone Plug the headphones to the jack on the rear panel of the unit When headphones are connected to the unit the internal speakers will mute TV Function ...

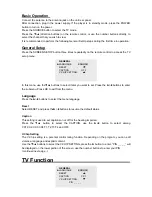
Page 15: ...enu use the buttons to select items you want to set Press the buttons to enter the submenu Press OK to exit from the menu Language Press the buttons to select the menu language Reset Select RESET and press the buttons to resume the default status Caption This setting is used to set captions on or off for the hearing impaired Press the button to select the CAPTION use the button to select among CC1...

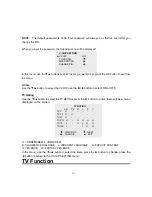
Page 16: ... select the V CHIP use the button to select ON or OFF TV Rating Use the button to select the TV RATING press the button to enter there will be a menu displayed on the screen 15 U UNBLOCKED L BLOCKED D SUGGESTIVE DIALOGUE L INDECENT LANGUAGE S EXPLICIT CONTENT V VIOLENCE FV FANTASY VIOLENCE In the menu use the or button to select the items press the button to change press the button to return to th...

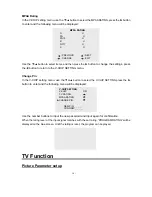
Page 17: ...NG menu Change Pin In the V CHIP setting menu use the or button to select the V CHIP SETTING press the button to enter and the following menu will be displayed V CHIP SETTING V CHIP ON TV RATING MPAA RATING CHANGE PIN NEW PIN _ _ _ _ CONFIRM _ _ _ _ Use the number buttons to input the new password and input again for confirmation When the rating level of the input signal matches with the set ratin...

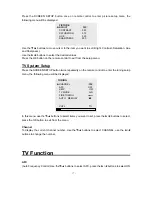
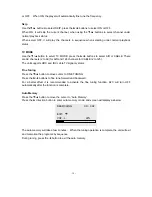
Page 18: ... setup menu TV System Setup Press the SCREEN SETUP button twice repeatedly on the remote control to enter the tuning setup menu the following menu will be displayed TUNING CHANNEL 002 AFC OFF SKIP OFF TV MODE AIR FINE TUNING AUTO MEMORY VHF L 7 In this menu use the buttons to select items you want to set press the buttons to select press the OK button to exit from the menu Channel To display the c...

Page 19: ...r CABLE 2 to 125 The unit supports HRC and IRC cable TV signal systems Fine Tuning Press the button to move cursor to FINE TUNING Press the buttons to fine tune forward and backward For a better effect it is recommended to activate the fine tuning function AFC will turn OFF automatically after the function is complete Auto Memory Press the button to move the cursor to Auto Memory Press the directi...

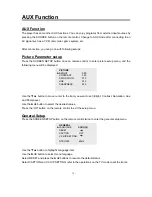
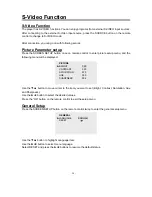
Page 20: ...50 CONTRAST 050 SATURATION 070 HUE 050 SHARPNESS 000 Use the button to move cursor to the item you want to set Bright Contrast Saturation Hue and Sharpness Use the button to select the desired values Press the OK button on the remote control to exit the setup menu General Setup Press the SCREEN SETUP button on the remote control twice to enter the general setup menu GENERAL LANGUAGE ENGLISH RESET ...

Page 21: ...enu and the following menu will be displayed PICTURE BRIGHT 050 CONTRAST 050 SATURATION 070 HUE 050 SHARPNESS 004 Use the button to move cursor to the item you want to set Bright Contrast Saturation Hue and Sharpness Use the button to select the desired values Press the OK button on the remote control to exit the setup menu General Setup Press the SCREEN SETUP button on the remote control twice to...

Page 22: ...ure brightness Contrast You can adjust display zone contrast suitable to your environment condition Auto To automatically adjust the display zone and the picture quality Phase You can adjust the picture quality Clock You can enlarge or reduce the display zone horizontally H Position You can adjust the display zone left and right horizontally V Position You can adjust the display zone up and down v...

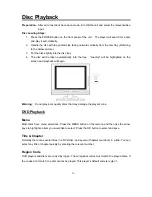
Page 23: ...ted on the screen and playback will begin Warning Do not play poor quality discs that may damage the player s lens DVD Playback Menu Most discs have menu selections Press the MENU button on the remote and then use the arrow keys to highlight an item you would like to select Press the OK button to select and save Title Chapter Normally there are several titles in a DVD disc and several chapters sec...

Page 24: ...The player will play all tracks on a CD disc by default You can use the and PREV NEXT skip buttons or number buttons to select a track JPEG Playback JPEG is a common picture format that requires small amounts of storage per image and has low loss in resolution Hundreds of pictures can be stored on a disc in this format In order to view JPEG photo albums you can ask your film development company to...

Page 25: ... buttons to select them Picture Zoom The ZOOM button is used to turn on off the zoom function and the move function When this function is turned on use the buttons to control zoom proportion and the TV screen will display the relevant proportion When this function is turned off the picture will resume normal size Press the MENU button to return to menu page Some JPEG discs may support playback but...

Page 26: ...n on the remote control once there will be a menu displayed on the screen You can set or select items for your preference Use the direction buttons to select items press the OK button to enter and use the direction buttons to select the desired item Press the direction button to return When selecting the Title or Chapter use number buttons to input desired title or chapter NOTE Some DVD discs do n...

Page 27: ...d chapters playing in the previously stored order To delete the program press the STOP button Or you call up the PROGRAM function again then choose STOP and press OK Choose EXIT to leave the function CD Insert the CD and press the PROGRAM button The screen shows Now input the desired track number Again please use the 10 button for two digit inputs Repeat this procedure until all desired audio trac...

Page 28: ...sing the POWER button on the remote control 27 Correctly put the disc into the disc tray Playback will start automatically and most discs will display a menu You can control this menu with the direction buttons Select the desired option and press the OK button to activate To determine what content a disc contains please check the disc sleeve or packaging To interrupt playback press the STOP once T...

Page 29: ...4 Press the OK button to confirm 5 Press left direction button to exit the category General Setup Page The General Setup is shown as follows General Setup Page TV Display LB Normal PS Angle Mark Off Normal LB OSD Lang ENG Wide SPDIF Output Captions Off Screen Saver On Last Memory Off Set TV Display Mode TV Display The program s screen format e g Normal TV Wide screen is fixed by the DVD Please not...

Page 30: ...em is used to set the function of last memory ON or OFF Speaker Setup Page Press the direction button to select your preference The item you select will be highlighted Downmix Selecting Lt Rt in the Downmix will alter the audio output into a mixed Dolby output By selecting Stereo in the Downmix menu the player will output a common stereo signal Dolby Digital Setup Dual Mono This function is used t...

Page 31: ... this feature may not be available with all discs Parental DVD discs are equipped with the Parental Lock function and rated according to their contents The contents and locking level may vary from disc to disc If the disc allows you can edit out violent scenes and replace them or lock out playback of the disc altogether To set the parental level on the sub menu press direction buttons on the remot...

Page 32: ...adjust display zone contrast suitable to your environment condition Auto To automatically adjust the display zone and the picture quality Phase You can adjust the picture quality Clock You can enlarge or reduce the display zone horizontally H Position You can adjust the display zone left and right horizontally V Position You can adjust the display zone up and down vertically General setup Press th...

Page 33: ...egree position C at which point you will hear a click Set the stand vertically with the LCD screen Pos C 3 Turn up the player put it standing on the table then you can go on with operations for your preference When adjusting the screen for viewing please revolve the screen about the axis make sure the axis stands vertically Pos D 4 If you want to return to initial position A you should pull the ta...

Page 34: ...em connection is correct If it is not access the setup menu and select the correct system Cannot continue to play and play a section repeatedly Make sure is not in A B repeat status Press A B button to cancel it Make sure disc is not dirty or damaged Clean the disc or skip the section The remote control does not work Make sure there are no obstructions between the remote control and the player Mak...

Page 35: ... 50 60Hz DC 12V Power Consumption 48W Dimension 422 mm x374 mm 102mm Weight About 6 5 kgs DESIGN AND SPECIFICATIONS ARE SUBJECT TO CHANGE WITHOUT NOTICE Manufactured under license from Dolby Laboratories Dolby and the double D symbol are trademarks of Dolby Laboratories Confidential unpublished works 1992 1997 Dolby Laboratories All rights reserved ...

Page 36: ...Any installation setup and or programming charges Should this Citizen product fail to operate during the warranty period warranty service may be obtained upon delivery of the Citizen product together with proof of purchase and a copy of this LIMITED WARRANTY statement to an Authorized Citizen Service Centre In home warranty service may be provided at Citizen Electronics discretion on any Citizen t...

Reviews: