background image

PRECAUTIONS IN HANDLING THE PRINTER

 WARNING

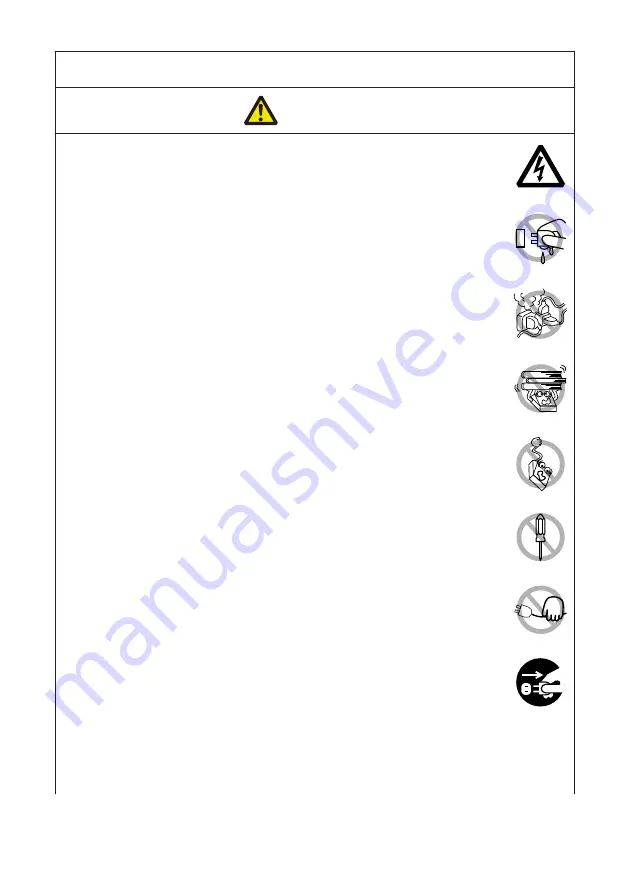
Please observe the following precautions for power source and power

cord:

l

Do not plug or unplug the power cord with a wet hand.

l

Use the printer only at the specified supply voltage and frequency.

l

Use only the specified AC adapter with the printer.

l

Use only the power cord that comes with the printer, and never use the supplied

power cord with another device.

l

Check to make sure that the supply outlet from which the printer is powered has

a sufficient capacity.

l

Do not supply the printer from a power strip or current tap shared with other ap-

pliances.

l

Do not plug the power cord into an electric outlet with dust or debris left on the

plug.

l

Do not use a deformed or damaged power cord.

l

Do not move the printer while its power is on.

u

Neglecting to handle it properly may result in printer failure, emission

of smoke, fire, or electric shock.

u

An overload may cause the power cord to overheat, catch fire, or the

circuit breaker to trip.

l

Do not allow anything to rest on the power cord. Do not place the printer where

the power cord may be stepped on.

l

Do not subject the power cord to severe bending, twisting, or pulling. Do not

carry the product while it is in this state either.

l

Do not attempt to modify the power cord unnecessarily.

l

Do not place the power cord near any heating device.

u

Neglecting these cautions may cause wires or insulation to break,

which could result in electric leakage, electric shock, or printer failure.
If the power cord sustains damage, contact your Citizen Systems

dealer.

l

Do not leave things around the electric outlet.

l

Supply power to the printer from a convenient electric outlet, readily accessible

in an emergency.

u

Pull the plug to immediately shut it down in an emergency.

l

Insert the power plug fully into the outlet.

l

If the printer will not be used for a long time, disconnect it from its electric outlet.

– 9 –

Summary of Contents for CT-D101

Page 1: ...LINE THERMAL PRINTER MODEL CT D101 User s Manual ...

Page 2: ...this manual l Except explained elsewhere in this manual do not attempt to service disas semble or repair this product l Note that Citizen Systems is not responsible for any damage attributable to in correct operation handling or improper operating environments that are not specified in this manual l Data is basically for temporary use and not stored for an extended period of time or permanently Pl...

Page 3: ...l Citizen Systems use these trademarks in accordance with the license of relevant owners Copyright CITIZEN SYSTEMS JAPAN CO LTD 2021 3 ...

Page 4: ...ree of hazard and damage that could occur if the printer is improperly operated by ignoring the instructions indicated by the warning symbols Be sure to read this information carefully WARNING Neglecting precautions indicated by this symbol may result in fatal or serious injury CAUTION Neglecting precautions indicated by this symbol may result in injury or damage to property This symbol is used to...

Page 5: ... object such as paper clips pins or screws into the printer n Do not place a flower vase pot or anything containing water on the printer n Do not spill coffee soft drinks or any other liquid into the printer n Do not spray insecticide or any other chemical liquid over the printer n Dropping a metallic foreign object into the printer may cause printer fail ure fire or electric shock Should it occur...

Page 6: ...cause an unexpected injury or accident if they are handled or used improperly l Keep the power cord and signal cables out of the reach of children Also chil dren should not be allowed to gain access to any internal part of the printer l The plastic bag the printer came in must be disposed of properly or kept away from children Wearing it over the head may lead to suffocation 6 ...

Page 7: ... near a radio or TV set or from supplying it from the same electric outlet as these appliances l Avoid using the printer interconnected with a cable or cord that has no protec tion against noise For interconnections use shielded or a twisted pair of cables and ferrite cores or other anti noise devices l Avoid using the printer with a device that is a strong source of noise u The printer may have a...

Page 8: ...xplosion could result Telephone line ground Lightning rod l If lightning strikes a large surge of current may cause fire or shock Water pipes l Plastic water pipes should not be used for grounding Those approved by a Waterworks Department may be used n Before connecting or disconnecting the grounding lead to or from the printer always unplug it from the electric outlet 8 ...

Page 9: ...ilure emission of smoke fire or electric shock u An overload may cause the power cord to overheat catch fire or the circuit breaker to trip l Do not allow anything to rest on the power cord Do not place the printer where the power cord may be stepped on l Do not subject the power cord to severe bending twisting or pulling Do not carry the product while it is in this state either l Do not attempt t...

Page 10: ...WARNING l Hold the plug and connector when plugging or unplugging the power cord or signal cable after turning off the printer and the appliance connected to it 10 ...

Page 11: ...nter with the paper roll inside l Printer failure or damage may occur To prevent possible malfunction or failure observe the following l Do not open the paper cover during printing l Avoid operating the printer without paper properly loaded l Avoid the use of paper not complying with specifications u May result in poor print quality l Avoid using torn pieces of paper or paper spliced with plastic ...

Page 12: ...stems serv ice for repair l Be careful that the covers do not pinch your hands or fingers l Be careful of the sharp edges on the printer Do not allow them to injure you or damage property u May result in electric shock burn or injury If the printer emits smoke an odd smell or unusual noise while printing immediately abort the current print session and unplug the printer from the electric outlet DA...

Page 13: ...CAUTION The thermal head is at a dangerously high temperature immediately after printing Allow it to cool off before starting maintenance work 13 ...

Page 14: ...3 5 Precautions for Installing the Printer 35 3 6 Loading Paper 36 3 7 58 mm Width Roll Paper Partition 39 3 8 Precautions for Creating Applications and Practical Operations 40 3 9 Download Site for Various Electronic Files 40 4 MAINTENANCE AND TROUBLESHOOTING 41 4 1 Periodic Cleaning 41 4 2 Clearing a Cutter Error 43 4 3 Self Test 44 4 4 Hexadecimal Dump Printing 45 4 5 Error Indications 46 4 6 P...

Page 15: ... 80 mm and 58 mm l High speed cutter employed l Equipped with a paper anti curling function l Equipped with triple interface USB serial Ethernet or single interface USB l Built in drawer kick interface l Energy saving function ENERGY STAR compliant l USB linked power OFF function available l Paper saving function available l Support for the JIS X0213 third and fourth level Kanji character sets l S...

Page 16: ...king Make sure the following items are included with your printer NAME QUAN TITY ILLUSTRATION Printer 1 AC Adapter 37AD5 1 AC power cord 1 Quick Start Guide 2 The specifications vary according to destination 16 ...

Page 17: ... Print method Line thermal dot print method Print widths 72 mm 576 dots 68 25 mm 546 dots 64 mm 512 dots 54 5 mm 436 dots 54 mm 432 dots 52 5 mm 420 dots 48 75 mm 390 dots 48 mm 384 dots 45 mm 360 dots factory default 72 mm Dot density 8 8 dots mm 203 dpi Print Speed 250 mm sec maximum speed print density level 100 2000 dot lines sec Number of print columns 1 Font Maximum number of characters col ...

Page 18: ...ltage DC 24 V 5 Power consumption Approx 45 W when printing approx 1 W in standby mode approx 0 3 W with power off AC Adapter 37AD5 Rated input AC 100 to 240 V 50 60 Hz 150 VA Rated output DC 24 V 2 1 A Weight Approximately 1 2 kg Outside dimensions 125 W 165 D 108 H mm Operating temperature and humidity 5 to 45 C 10 to 90 RH no condensation Storage temperature and humidity 20 to 60 C 10 to 90 RH ...

Page 19: ...o open the paper cover 3 POWER button Hold down two or three seconds to switch power on or off 4 FEED button Press this button to feed paper In case of a cutter error press the FEED button with the paper cover closed after removing the cause The printer enters the mode for setting memory switches and running self test Refer to 4 3 Self Test Refer to 5 3 Manual Setting of Memory Switches 5 Operatio...

Page 20: ...tion POWER LED Turns on when the power is turned on and turns off when the power is turned off Flashes when a memory error occurs and when data is being re ceived ERROR LED Flashes when the print head is hot when the paper cover is open when a cutter error occurs and so on Refer to 4 5 Error Indications 20 ...

Page 21: ...onnector Connect to the cable from the cash drawer 3 Power connector Connect to the AC adapter cable 4 USB connector 5 Ethernet connector 6 Panel button The current configuration information can be printed For details refer to Ethernet LAN Interface in Section 3 3 Refer to 3 3 Ethernet LAN Interface 21 ...

Page 22: ...ensor detects there is no paper 3 Platen Feeds the paper Do not remove the platen except to do maintenance 4 Auto cutter Cuts the paper Refer to 5 3 Manual Setting of Memory Switches 5 Manual cutter For cutting the paper manually when printing is finished 6 Paper anti curling roller Roller for reducing the warp of the paper 7 Paper anti curling damper Damper for reducing the warp of the paper 22 ...

Page 23: ...Notes The anti curling roller and anti curling damper do not straighten the paper completely 23 ...

Page 24: ...he printer becomes the state of USB linked power OFF after 3 seconds when PC power off or USB connection lost This mode is canceled when the PC is turned back on or when a USB connection is established Notes n Since the POWER LED is unlit when the state of USB linked power OFF it cannot be identi fied from the power OFF n Pressing the POWER button while the state of USB linked power OFF turns on p...

Page 25: ...specific head heating element If no data is received within 15 seconds after each cut or print the print position is automatically slid N dots to the right The original print position is returned to at the next slide timing N is the MSW8 6 setting value Notes n If the right margin is too narrow this may result in some print characters being cut off n This function is disabled under initial setting...

Page 26: ...the power 2 Connect the power connector to the AC adapter cable connector Next connect the AC power cord to the AC inlet and insert the plug into an electric outlet 1 3 4 5 2 1 Cable connector 2 Power connector 3 AC adapter 4 AC inlet 5 AC power cord 26 ...

Page 27: ...se a fire electric shock or break a wire n If a lightning storm is approaching unplug the AC power cord from the electric outlet A light ning strike may cause a fire or electric shock n Keep the AC power cord away from heat generating appliances The insulation on the AC power cord may melt and cause a fire or electric shock n If the printer is not going to be used for a long time unplug the AC pow...

Page 28: ...r USB USB serial Ethernet CAUTION n When disconnecting the cable always hold the connector n Be careful not to insert the USB cable into the cash drawer kick out connector n Hold the connector of the LAN cable perpendicular and straight when connecting or discon necting it Doing it at an angle may cause the connector to misconnect 28 ...

Page 29: ...ber of the USB interface Use a serial cable with the connection layout shown below 9 pin female 9 pin female cable Printer PC Signal Pin Pin Signal RXD 2 2 RXD TXD 3 3 TXD DTR 4 4 DTR SG 5 5 SG DSR 6 6 DSR RTS 7 7 RTS CTS 8 8 CTS CAUTION Place the interface cable so that people do not trip on it 29 ...

Page 30: ...panel button l Returning to factory settings Hold down the panel button A buzzer will sound and then hold down the panel but ton again within 3 seconds It returns network settings to its factory settings Depending on settings the buzzer may not sound Notes n The board will automatically restart after this operation is complete n If settings are configured to obtain an IP address from a DHCP server...

Page 31: ...hanging network settings You can use a web browser to access a special settings page to check and change board settings l Access the special settings page 1 Use a web browser to access the URL of the special settings page Enter the IP ad dress assigned to the printer as the part of URL Example For an IP address of 169 254 1 10 input http 169 254 1 10 2 This displays the page to display the current...

Page 32: ...3 Press the Change Settings button to enter the following Change Settings screen For details refer to a separate manual 32 ...

Page 33: ...4 1 2 1 3 1 Cash drawer kick out connector 2 Cash drawer kick out cable connector 3 Ground wire 4 Screw for ground wire CAUTION n Connect only the cash drawer kick out cable to this connector Do not connect a telephone line n Hold the connector of the drawer kick cable perpendicular and straight when connecting or disconnecting it Doing it at an angle may cause the connector to misconnect Notes Si...

Page 34: ...c characteristics 1 Drive voltage 24 VDC 2 Drive current Approx 1 A max not to exceed 510 ms 3 DRSW signal Signal levels L 0 to 0 5 V H 3 to 5 V 3 DRSW signal Status can be tested by commands 4 Drive circuit Cash drawer kick out connector Cash drawer open close switch Shielded Printer Cash drawer CAUTION n Cash drawers 1 and 2 cannot be operated at the same time n The solenoid used for the cash dr...

Page 35: ...very dirty or dusty l Avoid locations where the printer is not level u The printer may fall and cause an injury u The quality of printing may deteriorate l Oriented other than as specified u Malfunction failure or electric shock may result Precautions for horizontal installations l Do not use the full cut setting Doing so could cause a cutter jam For wall mounting If the printer is to be wall moun...

Page 36: ...3 6 Loading Paper 1 Turn on the power 2 Pull the cover open lever toward you to open the paper cover 36 ...

Page 37: ...s shown by arrow A Set the roll paper so that it passes over the paper anti curling damper A 4 Pull a few centimeters of paper straight out in the direction of arrow B B 5 Close the paper cover until you hear a click Paper is fed and cut automatically by the factory setting 37 ...

Page 38: ... Be careful of paper cuts while loading the paper Notes n Always use the specified types of paper rolls n Confirm that the paper roll is set correctly n If the paper is skewed and not coming straight out of the paper cover open it and straighten the paper n Always pull a few centimeters of paper straight out of the printer if you open the paper cover while paper is loaded n Press on the center of ...

Page 39: ...ng of Memory Switches CAUTION n When opening the paper cover be careful not to touch the entrance of the blade of the auto cutter n The print head is very hot immediately after printing Be careful not to touch it with your hands n Do not touch the print head with bare hands or metal objects Notes When using 58 mm wide paper use the printer as a dedicated printer for that paper size The printer may...

Page 40: ... may appear in the printouts when you are printing graphics or gradated text which require large amounts of data USB interfaces may be susceptible to the effects of electromagnetic interference from the host or environment If this is the case try using a cable with ferrite cores on both ends which are very effec tive at eliminating EMI 3 9 Download Site for Various Electronic Files You can view su...

Page 41: ...o printer n Wipe off the disinfectant with a soft damp cloth after cleaning procedure No water droplets should remain on the printer n Do not soak or wipe the inside of the printer nor allow disinfectant gets inside It may cause a product failure How to clean the print head and platen If the print head platen or other parts of the printer are dirty the printer may not print cleanly or it could cau...

Page 42: ...eful not to touch the entrance of the blade of the auto cutter n The print head is very hot immediately after printing Be careful not to touch it with your hands n Do not touch the print head with bare hands or metal objects Refer to PRECAUTIONS IN HANDLING THE PRINTER 42 ...

Page 43: ...er open lever to open the paper cover 3 Remove any jammed paper including any scraps of paper Remove the paper roll that is loaded in the holder also 4 Reload the paper roll and close the paper cover 5 Turn on the power CAUTION n When opening the paper cover be careful not to touch the entrance of the blade of the auto cutter n The print head is very hot immediately after printing Be careful not t...

Page 44: ... the FEED button and turn on the power 2 Hold the FEED button down for about one second until the buzzer sounds Release the button to start self test The printer will print its model name version memory switch settings and built in fonts 1 Printer type name 2 Firmware version 3 Interface settings 4 Buffer size 5 Memory switch settings 44 ...

Page 45: ...The printer will print HEX dump print mode followed by the received data printed in hexadecimal numbers and some characters How to stop hexadecimal dump printing Do one of the following to stop printing l Press the FEED button consecutively three times l Turn off the power l Receive a reset command from an interface Notes n The printer prints if there is no character corresponding to the data n No...

Page 46: ...he cause and press the FEED key If the auto cutter still does not move and the pa per cover cannot be opened refer to Clearing a Cutter Error Refer to 4 2 Clearing a Cutter Error l Print Head Hot Dense printing heavy black printing and continuous printing in a high temperature environment increase the temperature of the print head When the print head ex ceeds a certain temperature the printer stop...

Page 47: ...lit No Notes 1 Indicated when a cover is opened during standby 2 Indicated when a cover is opened during printing 3 The buzzer sounds when MSW5 1 buzzer setting is enabled However the condition that the buzzer sounds varies depending on the MSW5 1 and MSW10 5 settings 47 ...

Page 48: ...g for Which Printing Speed Changes When printing for which the printing speed changes is performed white lines may be printed or paper may not be fed depending on the printing conditions To prevent these problems change the following memory switch settings 1 Enable MSW2 3 buffering 2 Increase the baud rate of MSW7 1 serial baud rate 3 Change MSW10 2 print speed to a lower level Notes Depending on ...

Page 49: ...5 OTHER 5 1 External Views and Dimensions Unit mm 125 108 111 165 49 ...

Page 50: ...on Paper TP50KR 2Y TP50KJ R TL69KS LH TF50KS E2D Oji Paper PD150R PD160R PD160R 63 Mitsubishi Paper Mills HP220AB 1 P220AB Koehler KT48 FA Unit mm Max printing width 72 Paper width 80 0 1 Printing surface φ83 or less Paper width 58 0 1 Printing surface 48 384 dot Paper thickness μm 53 to 85 Core inner diameter d mm ø12 Core outer diameter D mm ø18 50 ...

Page 51: ...Notes Use thermal paper that is wound as follows l Not creased and fits tight to the core l Not folded l Not glued to the core l Rolled with the printable side out 51 ...

Page 52: ... 2 While the paper cover is open press and hold the FEED button and turn on the power 3 Press the FEED button twice and close the paper cover The printer enters the mode for setting memory switches individually The printer prints Memory SW 1 and the current setting 0 off or 1 on The current settings for memory switches 7 to 13 are not printed Current memory switch Current setting 4 Press the FEED ...

Page 53: ...nds The selected settings are set The next memory switch function and settings are printed 8 Repeat steps 5 to 7 to change different functions for the current memory switch num ber 9 Open the paper cover and close it The changed memory switch settings are printed 10 Repeat steps 4 to 9 to change functions for a different memory switch number 11 Press the FEED button until Save To Memory is printed...

Page 54: ... Print Invalid Valid MSW2 4 Full Col Print LineFeed WaitData MSW2 5 Resume aft PE Next Top MSW2 6 Reserved Fixed MSW2 7 Reserved Fixed MSW2 8 Reserved Fixed MSW3 1 Resume Cttr Err Valid Invalid MSW3 2 Reserved Fixed MSW3 3 Reserved Fixed MSW3 4 Reserved Fixed MSW3 5 Reserved Fixed MSW3 6 Reserved Fixed MSW3 7 CBM1000 Mode Invalid Valid MSW3 8 Resume Open Err Close Command MSW4 1 Reserved Fixed MSW...

Page 55: ...Gap Reduce Invalid Invalid 3 4 2 3 1 2 1 3 1 4 1 5 ALL MSW8 5 Reduced Char V H 100 100 100 100 75 100 50 100 100 75 75 75 50 75 MSW8 6 Auto Side Shift Invalid Invalid 1 dot 2 dots 3 dots 4 dots 5 dots 6 dots 7 dots MSW9 1 Code Page PC437 PC 437 Katakana PC 850 PC 858 PC 860 PC 863 PC 865 PC 852 PC 866 PC 857 WPC1252 Space page PC 864 ThaiCode11 1Pass ThaiCode11 3Pass ThaiCode18 1Pass ThaiCode18 3P...

Page 56: ... The specifications vary according to destination 56 ...

Page 57: ...CT D101_UM_100_EN PMC 2103 March 2021 ...

Reviews: