


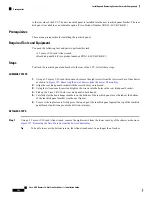


Installing the Vertical Brackets and Upper Air Grille (Default)
This section describes how to install the vertical brackets and upper air grille on the rear (MSC) side of the
LCC,
Prerequisites
Before performing these tasks, ensure that the LCC power is off.
Required Tools and Equipment
You need the following tool to perform this task:
• 6-in long number 1 Phillips screwdriver
Steps
To install the vertical brackets and upper air grille on the rear (MSC) side of the chassis, perform the following
steps:
SUMMARY STEPS
1.
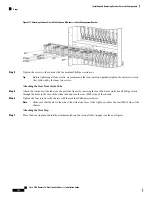
Attach the vertical brackets—one left and one right—to the rear of the chassis.
2.
Using the large Phillips screwdriver, tighten the three panel fasteners on each vertical bracket.
3.
Attach the upper air grille by carefully hooking the hanger brackets that are on top of the grille over the
hook supports that are on top of the vertical brackets.
4.
Press the upper air grille firmly against the vertical brackets until its ball studs snap onto the vertical
bracket's ball stud retainers.
DETAILED STEPS
Step 1
Attach the vertical brackets—one left and one right—to the rear of the chassis.
Step 2
Using the large Phillips screwdriver, tighten the three panel fasteners on each vertical bracket.
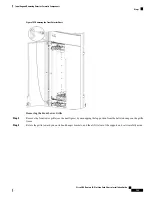
Step 3
Attach the upper air grille by carefully hooking the hanger brackets that are on top of the grille over the hook supports
that are on top of the vertical brackets.
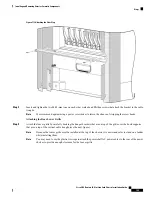
Because the upper air grille must be installed at the top of the chassis, it is easier and safer to stand on a ladder
while installing them.
Note
You may need to use the plastic tie wraps to attach the power shelf AC power cables to the rear of the power
shelves to provide enough clearance for the upper air grille.
Note
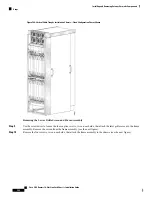
Step 4
Press the upper air grille firmly against the vertical brackets until its ball studs snap onto the vertical bracket's ball stud
retainers.
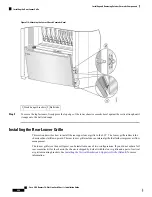
Installing the Rear Kick Panel (Optional)
The rear kick panel is a panel installed at the bottom of a standalone LCC, so that it matches the outward
extent of the rear components (the upper air grille). This section describes how to attach the rear kick panel
Cisco CRS Routers 16-Slot Line Card Chassis Installation Guide
191
Installing and Removing Exterior Cosmetic Components
Installing the Vertical Brackets and Upper Air Grille (Default)


