


Prerequisites
Before performing this task, open the front (PLIM) side cosmetic doors (if installed).
Required Tools and Equipment
You need the following tools and part to perform this task:
• ESD-preventive wrist strap
• Medium Phillips screwdriver
• PLIM
Steps
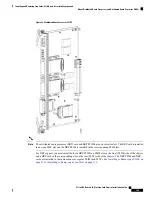
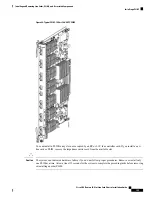
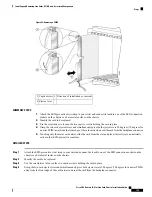
To install a PLIM, see the following figure and follow these steps:
SUMMARY STEPS
1.
Attach the ESD-preventive wrist strap to your wrist and connect its leash to one of the ESD connection
sockets on the chassis or a bare metal surface on the chassis.
2.
Remove the PLIM from its antistatic packaging.
3.
Remove the PLIM impedance carrier from the slot you need to fill and set it aside.
4.
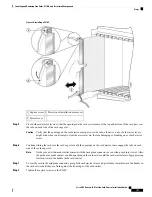
Grasp the card carrier handle with one hand and place your other hand under the carrier to support and
guide it into the correct slot (see the following figure). Slide the card halfway into the far left slot. Avoid
touching the card circuitry or any connectors.
5.
Pivot both card ejector levers so that the openings on the card ejector cams at the top and bottom of the
card pass over the tabs on each side of the card cage slot.
6.
Continue sliding the card into the card cage slot until the openings on the card ejector cams engage the
tabs on each side of the card cage slot.
7.
To seat the card in the midplane connector, grasp both card ejector levers and pivot them inward toward
the handle in the card carrier until they are flush against the front edge of the card carrier.
8.
Tighten the captive screws on the PLIM.
9.
Install the optical modules, if applicable.
10.
Install the PLIM cable management bracket.
11.
Install the interface cables.
DETAILED STEPS
Step 1
Attach the ESD-preventive wrist strap to your wrist and connect its leash to one of the ESD connection sockets on the
chassis or a bare metal surface on the chassis.
Step 2
Remove the PLIM from its antistatic packaging.
Step 3
Remove the PLIM impedance carrier from the slot you need to fill and set it aside.
Remove only one impedance carrier and install one PLIM at a time. Be sure to verify that each PLIM is fully installed
and secured before installing another card.
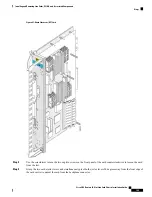
Step 4
Grasp the card carrier handle with one hand and place your other hand under the carrier to support and guide it into the
correct slot (see the following figure). Slide the card halfway into the far left slot. Avoid touching the card circuitry or
any connectors.
Cisco CRS Routers 16-Slot Line Card Chassis Installation Guide
156
Installing and Removing Line Cards, PLIMs, and Associated Components
Prerequisites


