

5375 Oakbrook Parkway, Norcross, Georgia 30093
Tel. +1 678 684 2000 Fax. +1 678 684 2001
www.cirronet.com
CR-HN04/50/X Quick Start Guide
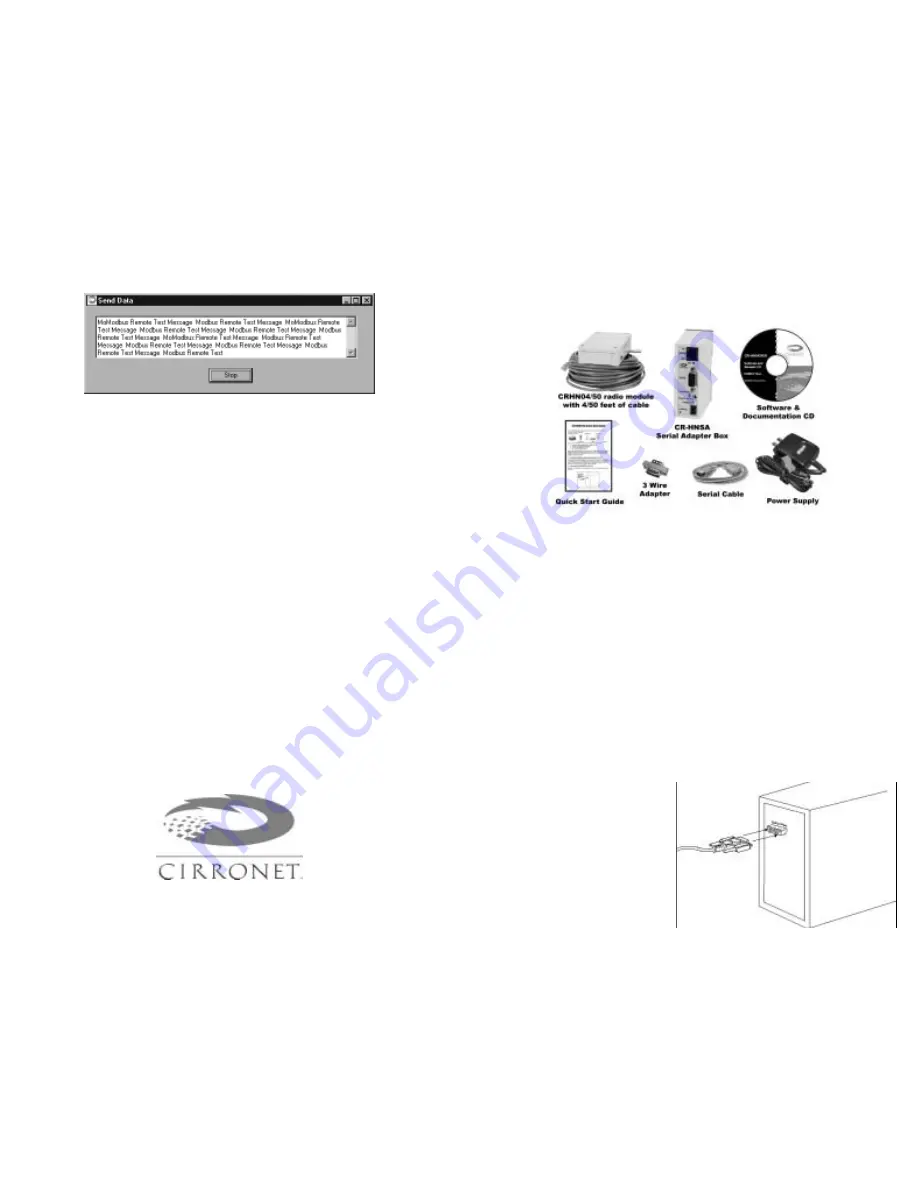
The CR-HN04/50 comes with the items shown below.
Identify the various components before beginning.
A pair of CR-HN04/50s is setup by performing the following steps:
1. Install the HopNet Configuration Wizard on a PC.
2. Connect the CR-HN04/50 to the PC.
3. Set one CR-HN04/50 as a base.
4. Run a communications test.
5. Prepare the radios for application
These steps are performed by connecting the CR-HN04/50 to a PC running the
HopNet Configuration Wizard included on the CD. The communications tests
requires a second unused serial port on the PC or a second PC running the
HopNet Configuration Wizard.
1 - Install the HopNet Configuration Wizard on a PC.
The HopNet Configuration Wizard is located on the software and documentation
CD included in the CR-HN04/50 package. Install the program by inserting the
CD in the PC and following the installation wizard. If autorun has been turned
off, double-click on setup.exe on the CD to start the wizard.
2 - Connect the CR-HN04/50 to the PC.
Connect one end of the serial cable
to the PC as shown in Figure 1, then
connect the other end to the 9-pin
serial connector labeled “Data” on
the CR-HNSA serial adapter box.
(See Figure 2)
The CR-HN04/50 set up as the Base will send the message "Base Test
Message" to the Remote CR-HN04/50. This message will be displayed in the
message window in the HN Wizard running on the PC to which the Remote CR-
HN04/50 is connected.
The Remote CR-HN04/50 will send the message "Remote Test Message" to the
Base CR-HN04/50. This message will be displayed in the message window in
the HN Wizard running on the PC to which the Base CR-HN04/50 is connected.
The test will run continuously until the Send Data button is clicked a second
time.
5 - Prepare the radios for the application.
Set the Run/Config switch to the proper position:
• RUN-DATA-DCE if connecting to a DirectLogic PLC or other DTE device
OR
• CONFIG-PC-DTE if connecting to a PC or other DCE device.
Note: If using DirectSoft software, use the three-wire adapter included with the
radio for proper operation.
The radios are now ready for service. Additional settings are available
for issues such as;
• Avoiding interference with 802.11 Wireless Ethernet LANs
• Co-locating multiple radio networks
• Conforming to European power requirements
For information on these and other advanced CR-HN04/50 configuration
settings, the RF tools, or if problems are encountered, refer to the User’s
Manual on the CR-HN04/50 CD.
Connect one
end of the
serial cable to a
serial port on
the PC.
Figure 1
Part # M-2410-0023 Rev A