


2564MR Barcode Scanner
User Guide
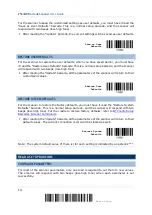
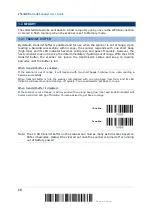
1.2 MEMORY
The collected data can be sent back to a host computer one by one via the WPAN connection
or stored in flash memory when the scanner is set to Memory mode.
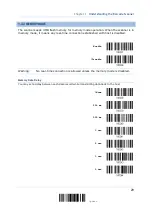
1.2.1 TRANSMIT BUFFER
By default, transmit buffer is enabled and for use when the scanner is out of range. Upon
reading a barcode successfully within range, the scanner responds with one short beep
(high tone) and its LED indicator becomes solid green and goes off quickly. However, the
host computer may not receive the data immediately if getting out of range. With the 10 KB
transmit buffer, the scanner can ignore the transmission status and keep on reading
barcodes until the buffer is full.
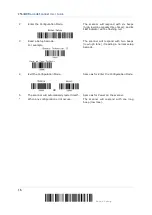
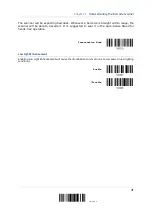
When transmit buffer is enabled…
If the scanner is out of range, it will respond with two short beeps, high-low tone, upon reading a
barcode successfully.
When transmit buffer is full, the scanner will respond with one long beep (low tone) and its LED
indicator will become solid red and go off quickly. You are advised to get back to range.
When transmit buffer is disabled…
If the scanner is out of range, it will respond with one long beep (low tone) and its LED indicator will
become solid red and go off quickly. You are advised to get back to range.
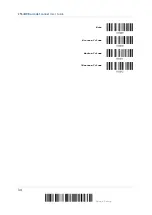
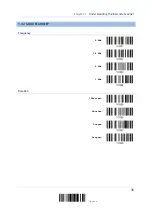
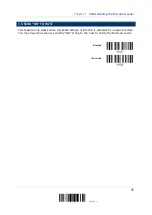
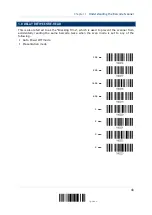
*Enable
Disable
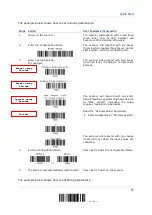
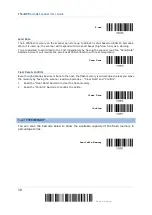
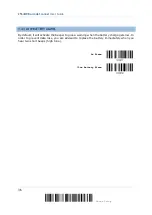
Note: The 10 KB transmit buffer on the scanner can hold as many as 640 scans based on
EAN-13 barcodes. Data will be cleared out once the scanner is turned off or running
out of battery power!
28
Enter Setup
Summary of Contents for 2564MR
Page 1: ...2564MR Barcode Scanner Setup barcodes included Version 1 00...
Page 6: ...Version Date Notes 1 00 Jan 09 2017 Initial release...
Page 124: ...Chapter 3 Setting up a WPAN Connection BT SPP Connected BT SPP Disconnected 113 Update...
Page 128: ...2564MR Barcode Scanner User Guide 4 2 CODE 25 INDUSTRIAL 25 Enable Disable 118 Enter Setup...
Page 140: ...2564MR Barcode Scanner User Guide 4 9 CODE 93 Enable Disable 130 Enter Setup...


