


(2)
Measure valve stems for wear. Measure stem
about 60 mm beneath the valve lock grooves.
(3)
If valve stems are worn more than 0.05 mm
(.002 in.), replace valve.
VALVE SPRINGS
(1)
Whenever valves have been removed for
inspection,
reconditioning
or
replacement,
valve
springs should be tested for correct tension. Discard
the springs that do not meet specifications. The fol-
lowing
specifications
apply
to
both
intake
and
exhaust valves springs:
•
Valve Closed Nominal Tension— 76 ft. lbs. @
38.0 mm (1.50 in.)
•
Valve Open Nominal Tension— 136 ft. lbs. @
29.75 mm (1.17 in.)
(2)
Inspect each valve spring for squareness with
a steel square and surface plate, test springs from
both ends. If the spring is more than 1.5 mm (1/16
inch) out of square, install a new spring.
OIL PUMP
(1)
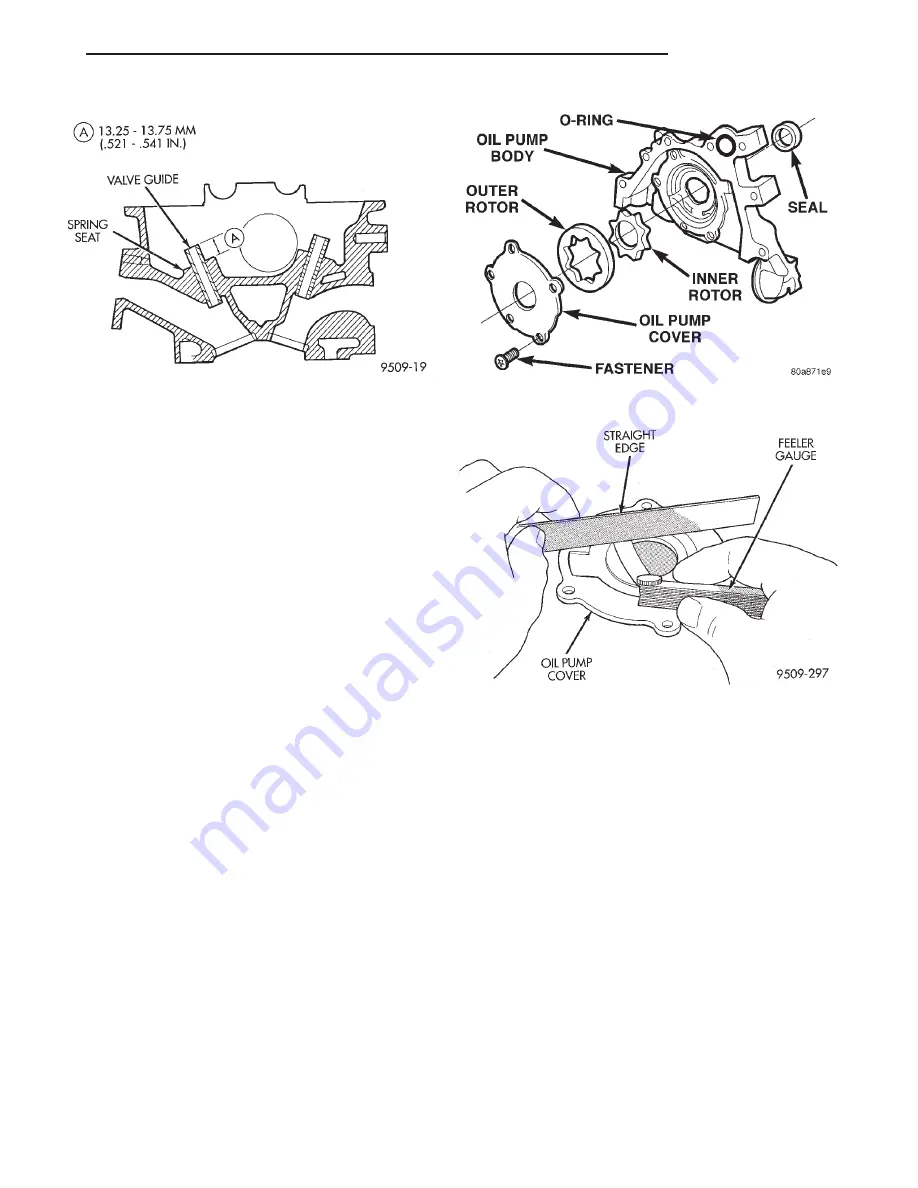
Clean all parts thoroughly. Mating surface of
the oil pump should be smooth (Fig. 92). Replace
pump cover if scratched or grooved.
(2) Lay a straightedge across the pump cover sur-
face (Fig. 93). If a .076 mm (.003 inch) feeler gauge
can be inserted between cover and straight edge,
cover should be replaced.
(3) Measure thickness and diameter of outer rotor.
If outer rotor thickness measures 9.40 mm (0.370
inch.) or less (Fig. 94), or if the diameter is 79.95 mm
(3.148 inches.) or less, replace outer rotor.
(4)
If inner rotor measures 9.40 mm (.370 inch.)
or less replace inner rotor (Fig. 95).
(5)
Slide outer rotor into pump housing, press to
one side with fingers and measure clearance between
rotor and housing (Fig. 96). If measurement is 0.39
mm (0.015 inch.) or more, replace housing only if
outer rotor is in specification.
(6) Install inner rotor into pump housing. If clear-
ance between inner and outer rotors (Fig. 97) is .203
mm (.008 inch) or more, replace both rotors.
(7)
Place a straightedge across the face of the
pump housing, between bolt holes. If a feeler gauge
of .102 mm (.004 inch) or more can be inserted
between rotors and the straightedge, replace pump
assembly (Fig. 98), ONLY if rotors are in specs.
(8)
Inspect oil pressure relief valve plunger for
scoring and free operation in its bore. Small marks
may be removed with 400 grit wet or dry sandpaper.
(9)
The relief valve spring has a free length of
approximately 60.7 mm (2.39 inches) it should test
between 18 and 19 pounds when compressed to 40.5
mm (1.60 inches). Replace spring that fails to meet
specifications.
Fig. 91 Valve Guide Height
VALVE GUIDE
SPRING HEAT
13.25 - 13.75 MM
(.521 - .541 IN.)
Fig. 92 Oil Pump
O-RING
SEAL
INNER ROTOR ROTOR
OIL PUMP COVER
FASTENER
OUTER ROTOR
OIL PUMP BODY
Fig. 93 Checking Oil Pump Cover Flatness
STRAIGHT
EDGE
FEELER
GAUGE
OIL PUMP COVER
JX
2.4L ENGINE
9 - 45
CLEANING AND INSPECTION (Continued)
Summary of Contents for 1997 Stratus Convertible LHD
Page 22: ......
Page 186: ......
Page 224: ......
Page 234: ......
Page 237: ...Charging System Schematic Typical JX CHARGING SYSTEM 8C 3 DIAGNOSIS AND TESTING Continued ...
Page 246: ......
Page 320: ......
Page 326: ......
Page 333: ...Fig 9 Wiper Motor Test JX WINDSHIELD WIPERS AND WASHERS 8K 7 DIAGNOSIS AND TESTING Continued ...
Page 358: ......
Page 380: ......
Page 386: ......
Page 396: ......
Page 398: ......
Page 414: ......
Page 464: ......
Page 468: ......
Page 472: ......
Page 496: ......
Page 532: ......
Page 536: ......
Page 572: ......
Page 584: ......
Page 592: ......
Page 598: ......
Page 610: ......
Page 624: ......
Page 628: ......
Page 632: ......
Page 636: ......
Page 640: ......
Page 702: ......
Page 726: ......
Page 733: ...Fig 8 Body Splices JX 8W 95 SPLICE LOCATIONS 8W 95 7 DESCRIPTION AND OPERATION Continued ...
Page 734: ...Fig 9 Rear Body Splices 8W 95 8 8W 95 SPLICE LOCATIONS JX DESCRIPTION AND OPERATION Continued ...
Page 735: ...Fig 10 Door Splices JX 8W 95 SPLICE LOCATIONS 8W 95 9 DESCRIPTION AND OPERATION Continued ...
Page 736: ......
Page 913: ...Fuel Line Adapter 1 4 JX FUEL SYSTEM 14 59 SPECIAL TOOLS Continued ...
Page 914: ......
Page 1033: ...41TE TRANSAXLE HYDRAULIC SCHEMATIC JX TRANSAXLE 21 65 SCHEMATICS AND DIAGRAMS Continued ...
Page 1034: ...41TE TRANSAXLE HYDRAULIC SCHEMATIC 21 66 TRANSAXLE JX SCHEMATICS AND DIAGRAMS Continued ...
Page 1035: ...41TE TRANSAXLE HYDRAULIC SCHEMATIC JX TRANSAXLE 21 67 SCHEMATICS AND DIAGRAMS Continued ...
Page 1036: ...41TE TRANSAXLE HYDRAULIC SCHEMATIC 21 68 TRANSAXLE JX SCHEMATICS AND DIAGRAMS Continued ...
Page 1037: ...41TE TRANSAXLE HYDRAULIC SCHEMATIC JX TRANSAXLE 21 69 SCHEMATICS AND DIAGRAMS Continued ...
Page 1038: ...41TE TRANSAXLE HYDRAULIC SCHEMATIC 21 70 TRANSAXLE JX SCHEMATICS AND DIAGRAMS Continued ...
Page 1039: ...41TE TRANSAXLE HYDRAULIC SCHEMATIC JX TRANSAXLE 21 71 SCHEMATICS AND DIAGRAMS Continued ...
Page 1040: ...41TE TRANSAXLE HYDRAULIC SCHEMATIC 21 72 TRANSAXLE JX SCHEMATICS AND DIAGRAMS Continued ...
Page 1041: ...41TE TRANSAXLE HYDRAULIC SCHEMATIC JX TRANSAXLE 21 73 SCHEMATICS AND DIAGRAMS Continued ...
Page 1042: ...41TE TRANSAXLE HYDRAULIC SCHEMATIC 21 74 TRANSAXLE JX SCHEMATICS AND DIAGRAMS Continued ...
Page 1043: ...41TE TRANSAXLE HYDRAULIC SCHEMATIC JX TRANSAXLE 21 75 SCHEMATICS AND DIAGRAMS Continued ...
Page 1044: ...41TE TRANSAXLE HYDRAULIC SCHEMATIC 21 76 TRANSAXLE JX SCHEMATICS AND DIAGRAMS Continued ...
Page 1045: ...41TE TRANSAXLE HYDRAULIC SCHEMATIC JX TRANSAXLE 21 77 SCHEMATICS AND DIAGRAMS Continued ...
Page 1054: ......
Page 1070: ......
Page 1166: ......
Page 1169: ...JX EMISSION CONTROL SYSTEMS 25 3 DESCRIPTION AND OPERATION Continued ...
Page 1196: ......