CHIKO AIRTEC CBA-1300AT2 Instruction Manual Download Page 4

チコーエアーテック株式会社 

Copyright CHIKO AIRTEC CO., LTD. 2009 


  4


1


製品使用上のご注意

Cautions on Using Product


1.1 

全般 

General


設置、接続、運転、操作、点検、故障診断の作業は、取扱説明書の内容に従い、適切に行って下さい。


誤った作業を行うと、火災・感電・けがの原因になります。


Perform installation, connection, operation, manipulation, inspection and failure diagnosis work properly in 
accordance with the instruction manual. Incorrect work may cause fire, electrical shock and injury. 

1.2 

運搬・設置・保管・輸送の条件 


The condition of carry installation, transportation and safekeeping 


輸送・保管については安全な場所で、温度

-10

℃~

60

℃  湿度

80%

以下の範囲として下さい。


For  transport  and storage,  keep in a safe  place,  with  a  temperature  range  of  -10  to +60

  and  humidity 

below 80%. 


運搬や設置は、二人以上で行って下さい。落下などにより、けがをする恐れがあります。


During  carrying-in  and  installation,  enlist  the  help  of  others  when  carrying  heavy  objects  to  prevent  an 
accident. There is danger of injury due to falling. 


回転機器が内蔵されていますので、水平で振動の無い場所に設置して下さい。


Rotary equipment is built into the product. Install the product in a horizontal place without vibrations. 


爆発・引火性ガス・腐食の危険がある場所や、水のかかる場所、可燃物のそばでは使用しないで下さい。


Do not use the product in places with explosive or flammable gas, with corrosion risk, with water splashes 
or near combustible substances. 


本機は、屋内クリーンルーム内  又は、清浄度の高い工場に設置することを前提とした構造となっていますので、屋
外などには設置しないで下さい。


The product is designed to be installed in an indoor clean room or highly cleaned factory. Do not install it 
outdoors. 


常温(周囲温度

0

40

℃ 

/

  湿度

80

%以下)で、結露しない場所に設置して下さい。高温・結露は、電気部品の故

障、感電の原因になります。


Install  the  product  in  a  place without  dew  condensation  at  room  temperature  (ambient  temperature:  0  to 
40ºC,  humidity: 80%  or  less). High temperature  and  dew  condensation  may  cause  electrical  parts  to  fail 
and may cause an electrical shock. 


排気口は十分なスペース(排気口より

100

㎜以上)を設けて下さい。排気口を塞ぐと正規の吸引力が発揮できませ

ん。また、ボックス内部で十分な冷却が行われないため、モータ焼けや電気部品の故障原因となります。


Provide sufficient space around the exhaust port (100 mm or more). 
Clogging the exhaust port disables the regular suction force, and may cause motor burning and electrical 
part failure due to insufficient cooling inside the product. 


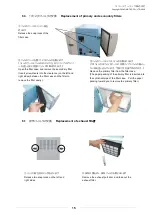
フィルタの交換、メンテナンスのしやすい場所に設置して下さい。


(フィルタ交換のため、本体正面から

350

㎜以上のスペースが必要です。)


Install the product in a place where filter replacement and maintenance can be performed easily. 
(To replace filters, a space of 350 mm or more is required from the main body front face.) 


本機は歩行面から

0.2

2

mの範囲で設置してください。


Install the product in a place 0.2 to 2.0 m from the walking surface. 


本機の設置標高は

1,000

m以下です。


The installation height of the product is 1,000 m or less 


設置区分は汚染度Ⅱ

(

製造工場

)

です。


The installation classification is “Contamination level 

  (manufacturing plant).
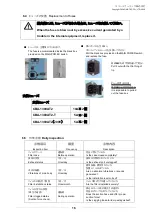
 

1.3 

接続 

Connection


接続は、確実におこなって下さい。ケーブルを無理に曲げたり、引っ張ったりしないで下さい。


火災・感電の原因になります。


Connect the product securely. 
Do not bend or pull cables forcibly. Forcible bending or pulling may cause a fire and electrical shock. 


異なった電源で使用しないで下さい。また、アース線を接続してお使い下さい。


Use the correct power supply, and connect the ground wire. 


電源の過電圧カテゴリーは区分Ⅲです。(産業用装置など)


The category of over-voltage of the power supply is division 

  (industrial device). 

Summary of Contents for CBA-1300AT2

Page 1: ...d this instruction manual thoroughly and handle this CBA Series machine correctly so that you can use it safely for a long time and enjoy its full performance Symbols used in this manual WARNING This...

Page 2: ...osene paint etc Explosive dust Aluminum magnesium titanium zinc epoxy etc Dust containing sparks Dust containing sparks generated by high speed cutters grinders welding machines etc Fire sources Cigar...

Page 3: ...8 4 2 AT AT panel 8 4 3 Remote connector 9 4 4 Confirmation before operation 10 4 5 Operation procedure 10 5 Remote Cable Sold Separately 11 5 1 Electrical circuit diagram 11 5 2 Color and signal of e...

Page 4: ...t outdoors 0 40 80 Install the product in a place without dew condensation at room temperature ambient temperature 0 to 40 C humidity 80 or less High temperature and dew condensation may cause electri...

Page 5: ...ternal inspection and repair 1 6 Disposal Dispose of the product properly as industrial wast 2 Confirmation and Preparation at Arrival After unpacking make sure that all parts are provided Contact our...

Page 6: ...xhaust port AT AT Panel operation panel MAIN POWER switch BOX Fuse Box Remote connector MT 173 8 Remote cable option The remote cable is so designed as to be prevented from falling off Insert it secur...

Page 7: ...ion flange Detachable flange If th flange diameter needs to be changed to match usage conditions the installed flange can be changed without having to use any tools Replacement flanges are sold separa...

Page 8: ...4 2 AT AT panel Operating the product with a different power supply may cause a failure 3 ON OFF 30 ON OFF Allow an interval of at least three minutes before turning the equipment ON or OFF If the equ...

Page 9: ...r decreases due to a factor such as an open front door a clogged exhaust filter or a blocked exhaust duct The lamp turns off when the cause of the problem is corrected Insufficient Airflow Red LED Ale...

Page 10: ...en it is over 4 0 kPa lower it under 4 0 kPa by adjusting the suction hose Using the suction hose which is too thin and is clogged may cause failure by the load too much Confirm that abnormal sounds s...

Page 11: ...Temperature correction is not provided Reference example 3 5 6 33 0 1 F Attach a noise limiter Approximately 33 0 1 F to the output terminals Nos 1 2 and 3 When adding inductors such as relays 1 2 3 5...

Page 12: ...operation The AT panel is disabled while the wires 4 and 8 are short circuited Yellow Change capacity level 0 5 The capacity level can be changed by applying a voltage of 0 to 5V between pins 7 and 8...

Page 13: ...wire AT ON Lo Hi To change the capacity level using the buttons on the main unit when switching to remote operation check that pin is not shorted circuited then press and hold the ON button on the AT...

Page 14: ...filter grid frame should be located on the exhaust side Make sure to turn OFF the main power and disconnect the power plug from the electrical outlet to cut off the electricity before starting inspec...

Page 15: ...s into the clearance on the left and right sides between the filter case and the filter to remove the filter easily Remove the primary filter from the filter case The paper packing of the primary filt...

Page 16: ...ion level correct Filter installation status Once month Are the filters installed securely Filter clogged status Suction force check During operation Does the suction hose end offer proper suction for...

Page 17: ...ing 1 to 3 above remove the cause of error and press the RESET switch Or turn OFF and ON the MAIN POWER switch to reset the error status Start the operation 30 minutes later Fuses are blown out 6 5 Re...

Page 18: ...Copyright CHIKO AIRTEC CO LTD 2009 18 8 Electrical Circuit Diagram...

Page 19: ...onths CBA 1300AT2 FB 30 CHF 3030 50 HEP 3030 69 Note The life above varies depending on the use frequency and suction density Note The contents of this manual are subject to change without prior notic...

Page 20: ...emo about purchase Model Manufacturer s serial number Date of purchase Start of operation Your name Address Phone Person in charge LTD 562 0012 2 27 24 2 27 24 Hakushima Minoh City Osaka apan 562 0012...

Reviews: