Installation Instructions
WP2XS, WP2XUS
3
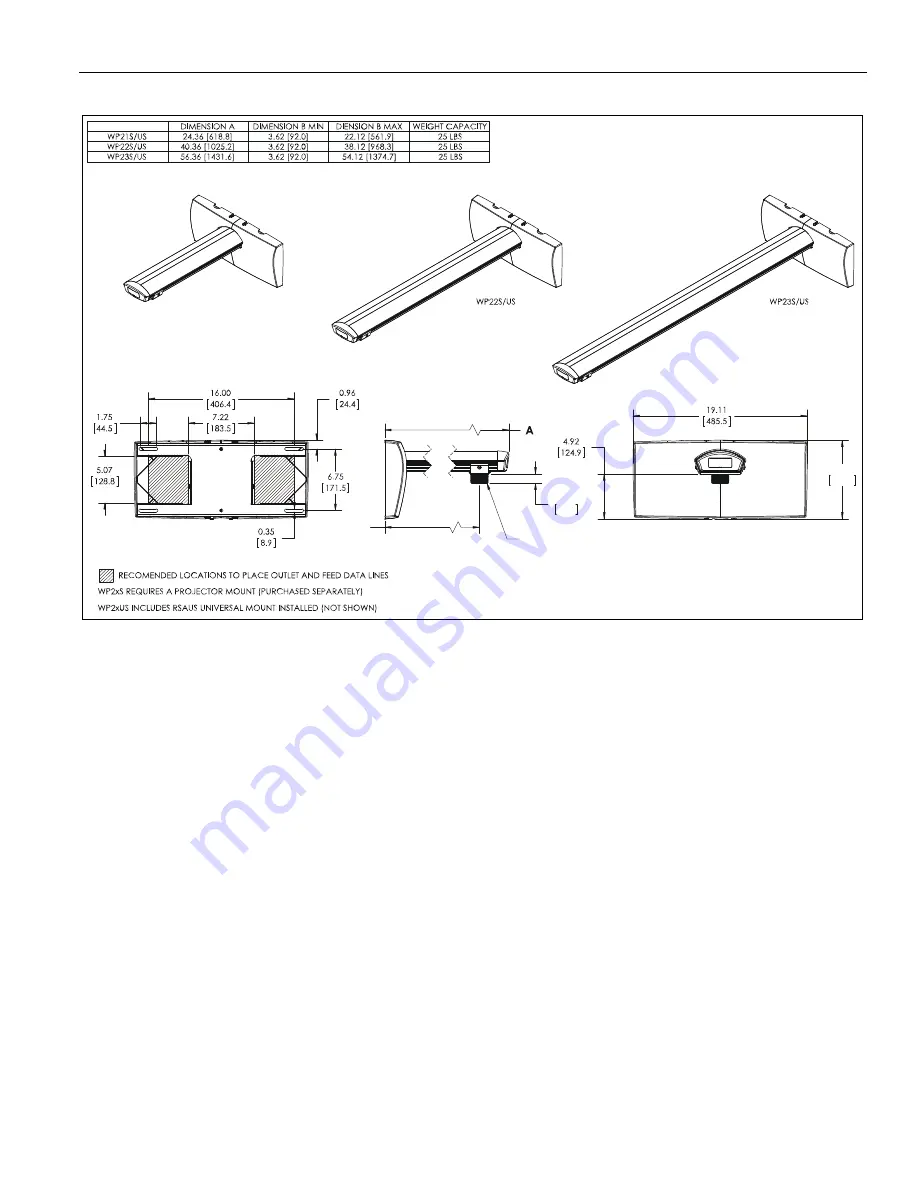
DIMENSIONS
8.62
219.0
1.00
25.4
B
1-1/2" PIPE THREAD
ATTACH PROJECTOR MOUNT HERE
WP21S/US
DIMENSIONS: INCHES
[MILLIMETERS]
Page 1: ...T I O N S WP2XS WP2XUS Short Throw Projector Wall Mounts Spanish Product Description German Product Description Portuguese Product Description Italian Product Description Dutch Product Description Fr...
Page 2: ...staller s responsibility to make sure all components are properly assembled and installed using the instructions provided WARNING Failure to provide adequate structural strength for this component can...
Page 3: ...Installation Instructions WP2XS WP2XUS 3 DIMENSIONS 8 62 219 0 1 00 25 4 B 1 1 2 PIPE THREAD ATTACH PROJECTOR MOUNT HERE WP21S US DIMENSIONS INCHES MILLIMETERS...
Page 4: ...ssel Chave de bocas Chiave a punte aperte Steeksleutel Cl fourche By Hand A mano Von Hand Com a m o A mano Met de hand la main Hex Head Wrench Llave de cabeza hexagonal Sechskantschl ssel Chave de cab...
Page 5: ...S ONLY A 1 Projector arm B 1 Wall plate cover left C 1 Wall plate cover right D 1 End cap E 1 Wall plate F 4 5 16 G 4 5 16 x 2 1 2 H 1 M5 x 35mm J 8 M5 x 12mm K 4 Anchor L 1 5 32 security M 4 10 24 x...
Page 6: ...d holes See Figure 1 5 Install four 5 16 x 2 1 2 hex head lag screws G through four 5 16 washers F holes in wall plate E and into four anchors K See Figure 1 NOTE Proceed to Install Short Throw Projec...
Page 7: ...t should be mounted to the same stud See Figure 3 Figure 3 Must be centered over two studs Drywall 1 2 minimum Drywall Thickness Short Throw Mount Installation Location FRONT Both Sides of Stud There...
Page 8: ...Toggler 1 4 20 BB Snap Toggle not included flat alongside plastic straps and slide channel through hole See Figure 5 Figure 5 6 Holding plastic straps on anchor pull anchor away from wall until chann...
Page 9: ...R INSTALLATION CAN LEAD TO EQUIPMENT FALLING CAUSING SERIOUS PERSONAL INJURY OR DAMAGE TO EQUIPMENT Overtightening of mounting hardware can damage the steel studs DO NOT overtighten mounting hardware...
Page 10: ...at mounting slots in mount base slide under thumb screws and that screws are seated in the back of slots 2 Orient projector with attached SSBU bracket so that front of projector faces wall See Figure...
Page 11: ...ONAL INJURY OR DAMAGE TO EQUIPMENT Ensure that mounting slots in RSA slide under thumb screws and that screws are seated in the back of slots 3 Orient projector with attached bracket so that front of...
Page 12: ...screws Roll Adjustment See Figure 15 NOTE Use a level to make this process easier 10 Loosen one Phillips screw 11 Adjust horizontal tilt as required 12 Tighten one Phillips screw Figure 15 Projector...
Page 13: ...all plate covers B and C over wall plate E See Figure 18 2 Fasten covers using four M5 x 12mm Phillips cap head screws J See Figure 18 Figure 18 3 Add end cap D to end of short throw projector arm A S...
Page 14: ...WP2XS WP2XUS Installation Instructions 14...
Page 15: ...Installation Instructions WP2XS WP2XUS 15...
Page 16: ...6918 Europe A Franklinstraat 14 6003 DK Weert Netherlands P 31 0 495 580 852 F 31 0 495 580 845 Asia Pacific A Office No 918 on 9 F Shatin Galleria 18 24 Shan Mei Street Fotan Shatin Hong Kong P 852...