


20
21
G. Harness fastening/ unfastening buckle
H. Lining
I. Padded crotch strap
J. Child car seat reclining lever
K. Reclining position indicator
L. Reducer cushion
M. Mirror
N. Top Tether visual and acoustic alert
O. Side Safety System
Fig. B
P. Child car seat rotation knob
Q. Forward/rearward facing release lever
Fig. C
R. Isofix connectors
S. Isofix System fastening/release buttons
T. Top Tether
U. Top Tether hook
2. PRODUCT FEATURES
• This child car seat has been approved under
regulation ECE R 129 for transport of children
with heights ranging from 40 to 105 cm (≤
16,5 kg).
WARNING
This is an advanced “i-Size” Child Restraint Sys-
tem. It is approved as per regulation No. 129, for
use in, “i-Size compatible” vehicle seat positions
as indicated by vehicle manufacturers in the
vehicle users’ manual. If in doubt, consult either
the child restraint manufacturer or the dealer.
Advanced “i-Size” Child Restraint Systems are
designed mainly for use on “i-Size-compati-
ble” seats, when the advanced child restraint
systems are installed in compliance with the
vehicle manufacturer’s instructions.
This advanced child restraint system can be
used on any car seat equipped with Isofix sys-
tem with Top Tether.
3. RESTRICTIONS AND REQUIREMENTS
REGARDING THE USE OF THE PRODUCT
AND VEHICLE SEAT
WARNING!
Strictly complies with the following
restrictions and requirements for use concern-
ing the product and car seat: safety will not be
guaranteed otherwise.
This child car seat can be installed so that it faces
opposite of the car driving direction.
Install the AroundU so that it faces opposite
the driving direction for children with heights
ranging between 40 cm and 105 cm. The child
car seat must always be installed rear facing up
to 15 months of age of the child.
IMPORTANT,
Do not use the child car seat
installed facing forward unless the child is 15
months or older.
Chicco recommends using AroundU in rear
facing position for the longest amount of time
possible.
WARNING!
Deactivate the passenger airbag
when the child is in the front seat in rear facing
direction.
WARNING!
Activate the passenger airbag
when the child is in the front seat in forward
facing direction and position the seat in the
most retracted position possible.
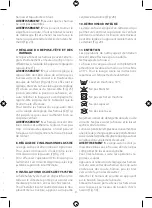
4. INSTALLING THE CHILD CAR SEAT
Activating the Top Tether buzzer.
To activate the Top Tether buzzer, remove the
battery cover located on the back of the mirror
(see figure 34) by removing the transparent
film protruding from the cover.
The child car seat is in the facing forward po-
sition when packed.
For easy installation, we recommend position-
ing the child car seat facing rearward.
Turn the child car seat rotation knob (P) while
turning the car seat toward you (Fig. 1). Now,
using the release lever (Q), position the car
seat in forward-facing position until you hear
the CLICK when it is fastened correctly (Fig. 2).
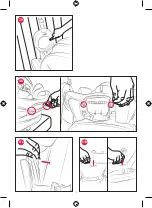
Starting from the storage position, release Top
Tether hook (U) from its coupling position (Fig.
3). As soon as it is released, the buzzer (N) is ac-
tivated until installation is completed correctly.
Pull out both Isofix connectors by pressing the
buttons (S) (Fig. 4).
Fasten both ISOFIX connectors (R) to the corre-
sponding ISOFIX hooks on the car seat between
the backrest and the seat (Fig. 5). You will hear
a “click” when the connectors fit into place and
the relevant indicators turn green.
Push the child car seat firmly against the back-
rest of the car seat (Fig. 6).
WARNING!
Pull the car seat towards you to
make sure that the seat has been installed
correctly on both sides. Check also that the
child car seat is resting perfectly against the
backrest of the car seat.
The child car seat is completely fitted ONLY
with the installation of the Top Tether.
WARNING!
Refer to your car’s user manual
to identify where the Top Tether of the child
car seat is attached to the car. This fastening
point is denoted with a specific label (Fig. 7)
and can be found in the
positions indicated by figures 8a – 8b – 8c – 8d.
WARNING!
Check that the Top Tether fastener
used is the one that has been specially desig-
nated. Do not confuse it with a ring used for
hanging bags (Fig. 9).
WARNING!
Pass the Top Tether between the
top of the car seat backrest and the headrest.
Never pass the Top Tether above the car head-
rest (Fig. 10-11).
Once you have identified the fastening point,
connect to the Top Tether hook (U).
Adjust the length of the Top Tether belt by
forcefully pulling the belt until it is tight (Fig.
12). The indicator located above the mirror
goes green (N) and the buzzer stops when
the tether is suitably tight (Fig. 13).
Roll up any excess belt and tie up using the
velcro (Fig. 14).
5. USING THE CAR SEAT FACING REAR-
WARD (40 – 105 cm)
WARNING:
The only allowed position when
the vehicle is travelling is either facing forward
or rearward (Fig. 15).
WARNING:
The child car seat must always
be installed rear facing up to 15 months of
age of the child.
Turn the child car seat rotation knob (P) while
turning the car seat toward you (Fig. 16).
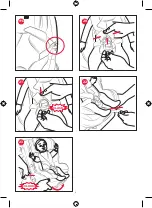
Before sitting your child in the child Car seat,
press the harness adjustment button (D) and,
at the same time, hold the two child Car seat
harnesses under the shoulder straps, and pull
them in your direction to slacken them (Fig. 17).
Unfasten the buckle (G) of the child car seat har-
nesses by pressing the red button (Fig. 18), and pull
Summary of Contents for 00079579840000
Page 2: ......
Page 3: ...3 T U R S P Q M B F A O L H C G K I D J E N A C B...
Page 4: ...4 CLACK 1 3 5 2 4 6...
Page 5: ...5 7 8c 8d 9 8b 8a...
Page 6: ...6 10 11 12 14 13...
Page 7: ...7 15 16 18 17 19a...
Page 8: ...8 CLACK CLACK 21 19b 20 22 23...
Page 9: ...9 OK NO NO 24 25 27 26 28...
Page 10: ...10 29 31a 31b 30...
Page 11: ...11 32 34 33...
Page 73: ...73 AroundU ECE R 129 40 cm 105 cm...
Page 77: ...77 17 6 kg 60 cm 6 16 105 cm 16 7 D 17 G 18 19A 19B o 20 21 Q 22 E 23 7 8 F 24 F 25 26 8 4...
Page 78: ...78 30 31 32 33 C 30 C J 27 9 SIDE SAFETY SYSTEM Side Safety System 28 10 29 11 30 C 30 C 12 3V...
Page 79: ...79 30 1 12 34 CR 2032 3V 2006 66 Hg Cd Pb Hg Cd Pb 13...
Page 121: ...121 AroundU 129 40 cm 105 cm...
Page 126: ...126 29 11 30 C 30 C 30 31 32 33 12 C 30 C...
Page 127: ...127 32 34 CR 2032 3V 2006 66 CE Hg Cd Pb Hg Cd Pb 13...
Page 128: ...128 AroundU ECE R 129 40 105 1 2 3 4 5 6 7 8 9...
Page 132: ...132 20 21 Q 22 E 23 7 8 F 24 F 25 26 8 4 J 27 9 28 10 29 11 30 C 30 C 30 C 30 C...
Page 133: ...133 J 29 C 30 31 32 33 12 34 CR 2032 3 2006 66 CE...
Page 134: ...134 Hg Cd Pb Hg Cd Pb 13...
Page 135: ...135 AroundU ECE R 129 40 105...
Page 140: ...140 28 10 29 11 30 C 30 C C 30 C 30 31 32 33 12 3...
Page 141: ...141 32 12 34 CR 2032 3 2006 66 Hg Cd Pb Hg Cd Pb 13...
Page 148: ...148 AroundU ECE R 129 105 40...
Page 152: ...152 30 31 32 33 12 34 3 CR 2032 EC 2006 66 Pb Cd Hg...
Page 153: ...153 12 13...
Page 155: ......