RM245 Series
System Components Removal and Installation
│
23
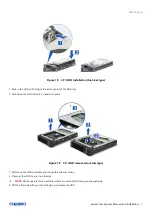
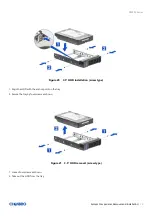
Figure 22
2.5” HDD installation
in 3.5” tray
(screw type)
1. Install the HDD in position on the tray.
2. Secure three screws as shown.
NOTE:
To ensure proper system airflow requirements, all front drive bays are suggested to populate with a 3.5" drive tray where
it is supposed to be installed with a 3.5” drive, a 2.5” drive with plastic dummy filler or only dummy fillers.
In addition, in order
to support a 2.5
”
drive in a 3.5
”
tray, a screw-type tray is required.
NOTE
: Dedicated screw type is required for 2.5” SSD Installation, Chenbro P/N: 384
-14602-3143A0.
Figure 23
2.5” HDD removal in 3.5” tray (screw type)
1. Loosen three screws as shown.
2. Remove the HDD.


