

Things You Need for Installation
Step Two
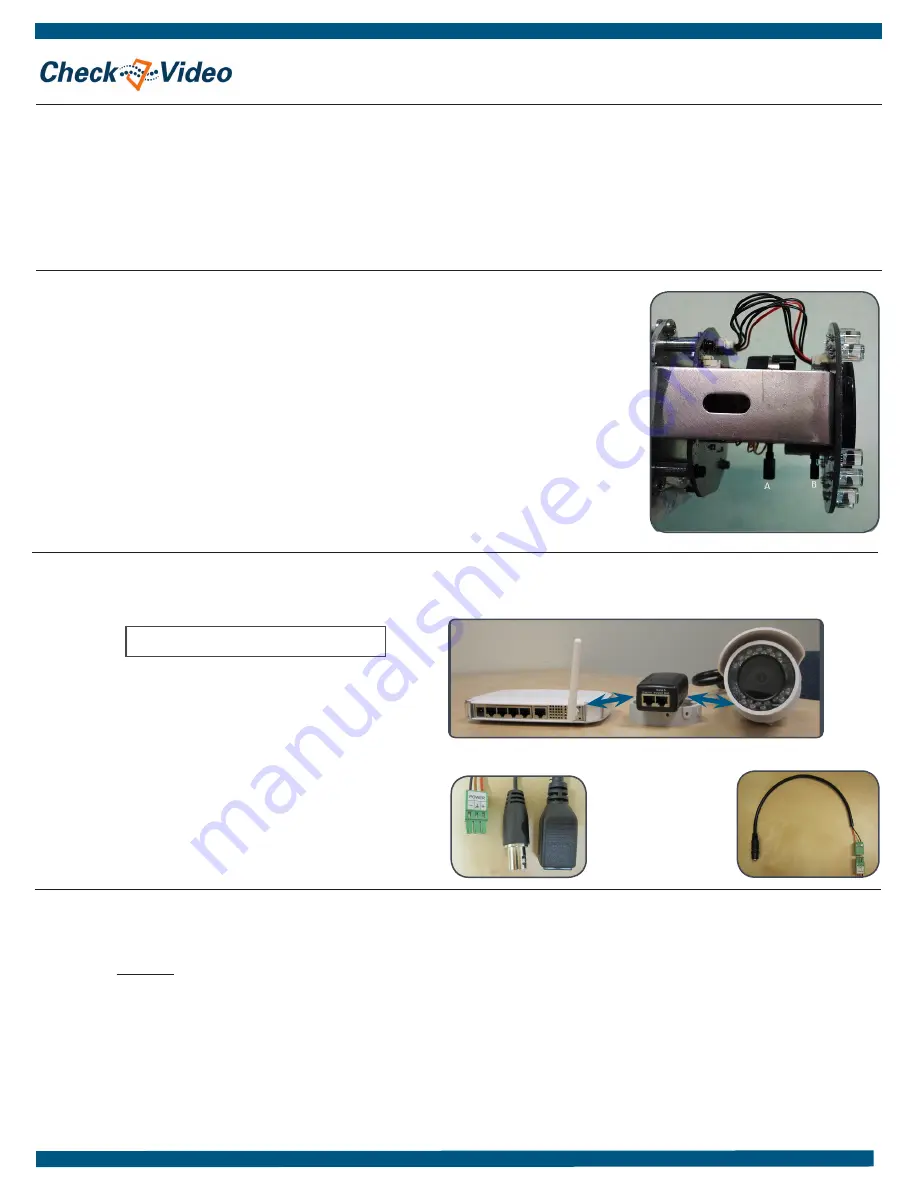
Connect Camera to Router
CheckVideo High Definition Outdoor Bullet Camera
Installation Quick Reference
Step Three
Create/Access Your Account
1. Go to the CheckVideo Dashboard login page:
portal.checkvideo.net
Click the Start here link to create your account.
If you have an existing account, log in and skip to the next
section to register your CheckVideo devices.
2. Complete the User Information section.
3. In the Define Notification Methods section, for Contact
Information enter the email addresses that may receive event
notifications. For MMS notifications to mobile phones, the
address format will vary by carrier (ex: mobile number@
mms.att.net). Check your carrier’s website for more
information.
Fig. 1a- Connection path using a PoE injector as the mid span
Router
HD Camera
1. For later reference, enter the device’s serial number. This
number, “the MAC”, is found on the underside of the
camera:
2. Before installing the camera in its final location, connect
the router to “Data In” on the PoE injector and connect the
injector’s “Data & Power Out” port to the Camera using
Cat-5 network cables. Note: Runs can be no longer than 100
meters. Connect the PoE injector to a power outlet.
3. If you intend to take advantage of the camera’s onboard
heater, the camera must be powered using a 12VDC/24VAC
power supply. Attach the camera’s “Power” connector
to the power cable adapter using the optional Phoenix
connector and plug in a power supply to the female barrel
connector. When using a separate power supply, the PoE
injector is no longer necessary. Instead use a Cat-5 network
cable to connect the camera’s network jack to the router.
Included in the box:
•
CheckVideo® HD Outdoor Bullet Camera
•
Bag of mounting parts: screws (5), drywall
mounts (5), hex wrench, 2 Phoenix connectors
•
32GB MicroSD card, pre-inserted
•
Power Over Ethernet (PoE) injector
•
Power cable adapter (female connector)
You’ll also need:
•
PC or Mac® with Broadband Internet Service
•
Router, connected to the Internet
•
Phillips screwdriver
•
Cat-5 network cables
•
12VDC/24VAC, 2A camera power supply, not
provided
4. Choose a maximum Video Resolution for each email address. If
you intend to use MMS to send video to a mobile phone, do not
select a resolution higher than 480p. For 720p or 1080p, send the
notifications as an attached video clip to a traditional email address
(ex: [email protected]). Use the Test button to confirm that the video
resolution is valid for your device/carrier.
5. In the Billing Preferences, choose your Service option.
If you choose
Central Service, complete the form and CheckVideo Support will contact
you directly.
6. (Professional Service only) Specify method of payment, authorize service
fees, and accept the License Agreement.
If this CheckVideo device will be monitored
by a central station, please contact the central
station for a username and password on their
existing CheckVideo account. The central
station will add the device to their account.
If this device will be self-monitored, you will
be creating a CheckVideo account in Step Two.
PoE Injector
4. If the connections have been made correctly, the network jack
on the camera will light green and yellow. This will be your sign
to continue.
Fig. 1b - Camera cables
A: Power
B: Video out
C: Network jack
D: Power Cable Adapter
E: Phoenix Connector
A
B
C
A
D
E
To power
supply
Step One
Adjust Focus and Zoom
1. The CheckVideo High Definition Outdoor Bullet camera
(CV136) contains a manual var-focal lens set to 3mm at the
factory.
2. To adjust the lens settings:
•
Remove the sunshield, reserving the screws.
•
Loosen the screw on the bottom of the camera just above the
product sticker.
•
Gently twist the lens cover until it comes apart from the camera.
•
The lens has two adjustments: Focus (A) and Zoom (B)
•
Connect a video monitor to the BNC connector on the camera
before contributing.
•
Loosen the Zoom adjustment lever (B) and move the lever
clockwise/counterclockwise until you have reached the desired
position. Tighten the lever with a screwdriver.
•
Loosen the Focus
adjustment lever (A) and
move the lever clockwise/
counterclockwise until the
lens is focused. Tighten the
lever with a screwdriver.
•
If you remove the lens cover
in the future, you should
replace the desiccant inside
the unit. A spare desiccent
pack can be found inside the
camera’s packaging.
•
Replace the lens cover and
sunshield.