background image

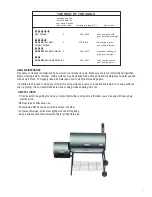
GRILL MAINTENANCE

Frequency of cleanup is determined by how much your smoker is used.  Make sure coals are completely extinguished 
before cleaning inside of smoker.  Inside surfaces may be cleaned with a strong solution of detergent and water applied 
with a scrub brush.  Thoroughly rinse with water and allow to air dry before using again.

HELPFUL HINTS

• If food seems to be getting too smoky or brown before the cooking time is finished, cover it loosely with heavy duty 

aluminum foil.

•Remove the ash after each use.
•Covered side dishes can be warmed in smoker chamber.

•To prevent flare-ups, brush meat lightly with oil before grilling.
•Keep a small squirt bottle of water handy for grilling flare-ups.

If a bristle brush is used to clean any of the grill cooking surfaces, ensure no loose bristles remain on cooking surfaces 
prior to grilling.  It is not recommended to clean cooking surfaces while grill is hot.

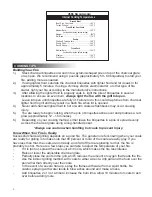
THE HEAT OF THE COALS

seconds you can 
hold the palm of 

your hand 4 inches 

above the coals

temperature range (Fº)

visual cues

HOT COALS

2

400 to 450

barely covered with 

gray ash; deep red glow

MODERATELY HOT

375 to 450

thin coating of gray

ash; deep red glow 

MODERATELY HOT COALS

4

325 to 375

significant coating of 

gray ash; red glow

MODERATELY COOL COALS

5

300 to 325

thick coating of gray 

ash; dull red glow

3

TO HOT COALS

5

Summary of Contents for 12201776

Page 1: ... could result in serious personal injury and or property damage CAUTION Some parts may contain sharp edges Wear protective gloves if necessary WARNING CARBON MONOXIDE HAZARD Burning charcoal indoors can kill you It gives off carbon monoxide which has no odor NEVER burn charcoal inside homes vehicles or tents CAUTION THIS UNIT IS HEAVY DO NOT attempt to assemble without a helper If you have questio...

Page 2: ...le by products produced when using this product contains chemicals known to the State of California to cause cancer birth defects or other reproductive harm 2 This product contains chemicals including lead and lead compounds known to the State of California to cause cancer birth defects or other reproductive harm Wash your hands after handling this product WARNING All surfaces can be hot during us...

Page 3: ... or burned off first as it contains a high acid content and imparts an acrid flavor After allowing the fire to burn down close the doors and control the temperature and smoke with the dampers located on the firebox and atop the smokestack Smoke is contained within the chambers which will reduce burn while imparting more smoke flavor Do not operate the Smoker with temperatures exceeding 450 degrees...

Page 4: ...ent injury Know When Your Fire is Ready Successful charcoal grilling depends on a good fire The general rule for knowing when your coals are ready for grilling is to make sure that 80 percent or more of the coals are ashy gray If you have less than that the coals are not ready and if all of them are glowing red hot the fire is probably too hot Here are a few steps you can take to adjust the temper...

Page 5: ...r To prevent flare ups brush meat lightly with oil before grilling Keep a small squirt bottle of water handy for grilling flare ups If a bristle brush is used to clean any of the grill cooking surfaces ensure no loose bristles remain on cooking surfaces prior to grilling It is not recommended to clean cooking surfaces while grill is hot THE HEAT OF THE COALS seconds you can hold the palm of your h...

Page 6: ...imited warranty Manufacturer will not be responsible for any consequential or incidental damages arising from the breach of either this limited warranty or any applicable implied warranty or for failure or damage resulting from acts of God improper care and maintenance grease fire accident alteration replacement of parts by anyone other than Manufacturer misuse transportation commercial use abuse ...

Page 7: ...M6 x 15 Phillips Head Bolt M5 x 10 Phillips Head Bolt M8 Flat Washer ...

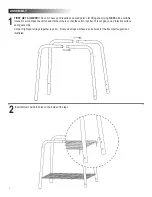
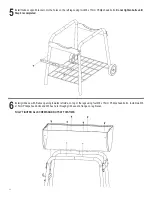
Page 8: ...location to work Open the carton and slit the corners so that the carton lays flat This will give you a protective surface during assembly Insert bottom shelf into holes on the inside of the legs Connect right and left legs together 2 pairs Front pair of legs will have 2 extra holes for the front shelf supports as illustrated ...

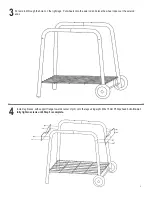
Page 9: ...s center of grill onto the legs using eight M6 x 15mm Phillips head bolts Do not fully tighten screws until Step 6 is complete Put axle rod through the holes on the right legs Put wheels onto the axle rod and place the wheel caps over the axle rod ends ...

Page 10: ...Do not tighten bolts until Step 6 is completed Install grill base with firebox opening towards left side on top of the legs using four M6 x 15mm Phillips head bolts Install two M6 x 15mm Phillips head bolts and M6 hex nuts through grill base and flange on leg braces FULLY TIGHTEN ALL SCREWS AND NUTS AT THIS TIME ...

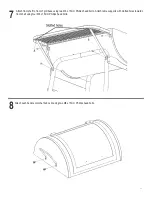
Page 11: ... of grill base using two M6 x 15mm Phillips head bolts Attach table supports with slotted holes towards front shelf using four M6 x 15mm Phillips head bolts Attach push handle onto the firebox lid using two M6 x 15mm Phillips head bolts ...

Page 12: ...10 9 12 Attach handle to the firebox lid using two M6 x 15mm Phillips head bolts and two M6 hex nuts Attach firebox lid stop using one M5 x 12mm Phillips head bolt and M5 hex nut ...

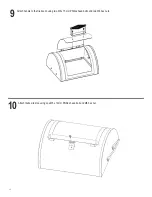
Page 13: ...ld move freely Attach door latch using one M5 x 12mm Phillips head shoulder bolt and M5 hex nut as illustrated Connect firebox door hinge to the outside of the door and firebox base using four M5 x 12mm Phillips head bolts and M5 hex nuts Attach one M6 x 15mm Phillips head shoulder bolt onto the firebox base for the door latch Note orientation of hinge ...

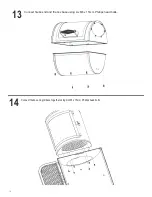
Page 14: ...Connect firebox lid and firebox base using six M6 x 15mm Phillips head bolts 14 13 14 Connect firebox and grill base together using six M6 x 15mm Phillips head bolts ...

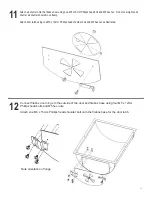
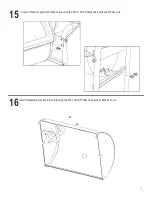
Page 15: ...5 16 Connect firebox support with firebox base using two M6 x 15mm Phillips head bolts and M6 hex nuts Install smokestack bracket into grill lid using two M6 x 15mm Phillips head bolts and M6 hex nuts 15 ...

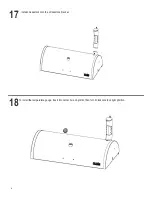
Page 16: ...17 18 Install smokestack onto the smokestack bracket To install the temperature gauge insert into center hole on grill lid then turn it clockwise to upright position 16 ...

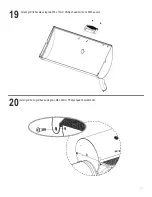
Page 17: ...19 20 Attach grill lid handle using two M6 x 15mm Phillips head bolts and M6 hex nuts Install grill lid on grill base using two M8 x 23mm Phillips head shoulder bolts 17 ...

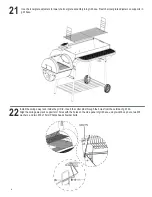
Page 18: ...upports in grill base 18 Install the swing away rack inside the grill lid Insert the cotter pins through the holes from the outside of grill lid Align the swing away rack support arm holes with the holes on the side panel of grill base using two M6 cap nuts two M6 washers and two M6 x 15mm Phillips head shoulder bolts ...

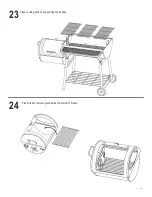
Page 19: ...23 24 Place cooking grills on support lips of grill base 19 Place firebox charcoal grate inside the bottom of firebox ...

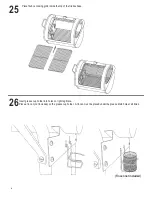
Page 20: ...s inside the top of the firebox base 20 Insert grease cup holder into holes on right leg brace Place a tin can not included on the grease cup holder A tin can must be placed under the grease drain hole at all times Tin can not included ...

Page 21: ...27 Congratulations Enjoy your Deluxe Smoker 21 ...

Page 22: ...22 NOTES ...

Page 23: ......

Page 24: ...BLE LLENE ESTA TARJETA Y DEVUELVALA DENTRO DE LOS 10 DIAS DE LA COMPRA PARA EL SERVICIO DE GARANTIA ES NECESARIO QUE PRESENTE SU COMPROBANTE DE COMPRA CONSERVE LA FACTURA ESTA GARANTIA ES INTRANSFERIBLE VEUILLEZ COMPLETER CETTE CARTE ET LA RETOURNER DANS LES 10 JOURS SUIVANT L ACHAT POUR OBTENIR LE SERVICE SOUS GARANTIE UNE PREUVE D ACHAT DOIT ETRE PRESENTEE VEUILLEZ CONSERVER VOTRE FACTURE LA PRE...

Reviews: