background image

CHA RXL 

Page 10 


Table Top Installation.

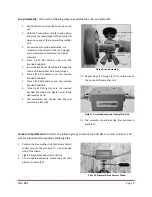
  Peel off the adhesive backing on each of the Rubber Feet and stick one in 

each corner of the Mounting Plate on the bottom of the Preamplifier Unit (b).  The CHA RXL can be 
placed on a table top or other flat surface inside your building.  Performance of the CHA RXL may be 
degraded by the building construction material or proximity to interior sources of Radio Frequency 
Interference (RFI).   

Other Mounting Options. 


Chameleon Antenna

TM 

sells an optional adapter (CHA SS ADAPTER) that converts 

the ¼” X 20 camera tripod mount to a 3/8” X 24 antenna mount.  Using this adapter, you can mount the CHA RXL 

on any of the optional


Chameleon Antenna

TM

 antenna mounts, such as the Universal Clamp Mount (CHA UCM). 


Connecting the Receive Loop Antenna. 

Perform the following procedure to connect the CHA RXL to your LF/MF/HF Radio Receiver. 


1.


Connect  one  end  of  the  Coaxial  Cable 

(not 

supplied)

 to the Remote Antenna Connection (c) 

on the Preamplifier Unit (b). 

2.


Connect the other end of the Coaxial Cable to the 
Local Antenna Connection (m) on the BIAS-T Unit 
(j). 

Because  the  BIAS-T  supplies  12V  DC  power  to  the 
Loop Preamplifier through the Coaxial Cable, do not 
install  any  other  electrical  device,  such  as  an 
antenna  switch,  duplexer,  rotor  controller,  etc. 
between the BIAS-T Unit and the Loop Preamplifier.  

3.


Connect one end of a Coaxial Jumper Cable 

(not 

supplied)

  to  the  Radio  Connection  (m)  on  the 

BIAS-T Unit. 

4.


Connect  the  other  end  of  the  Coaxial  Jumper 
Cable to the Radio Receiver.  

5.


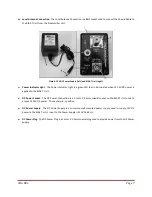
Connect the DC Power Plug (q) to the DC Power 
Socket (o) on the BIAS-T Unit (j). 

6.


Plug  the  DC  Power  Supply  (p)  into  120V  AC 
electrical  outlet.    The  Power  Indicator  Light  (n) 
will illuminate green. 

7.


Perform an operational test.  

IMPORTANT: This is a RECEIVE-ONLY antenna - 
DO NOT TRANSMIT using this antenna, as doing 
so  will  permanently


damage  the  electronic 

preamplifier!


The Receive Loop must be installed a minimum 
of  25  feet  from  other  antennas  in  use  by 
transmitters transmitting 100 Watts or more. 


Troubleshooting 

1.


Ensure the Power Indicator Light is illuminated green.  Replace Power Supply if Power Indicator Light is not 
illuminated.  If the problem is not resolved by replacing the Power Supply, replace the BIAS-T Unit. 

2.


Ensure Loop Flange connections are securely tightened. 

3.


Ensure all Coaxial Cable Connections are securely tightened. 

4.


Inspect Coaxial Cable and Coaxial Jumper Cable for cuts in insulation, exposed shielding, or loose connectors.  
Replace if damaged.  

Most problems with antenna systems are caused by the coaxial cables and connectors. 

5.


If still not operational, contact us for technical support at 

[email protected]

. 

Summary of Contents for CHA RXL

Page 1: ...LF MF HF Receive Loop Antenna CHA RXL Operator s Manual Nevada USA WWW CHAMELEONANTENNA COM VERSATILE DEPENDABLE STEALTH BUILT TO LAST...

Page 2: ...s that kill Never trust insulation to protect you Stay away from all power lines Photographs and diagrams in this manual may vary slightly from current production units due to manufacturing changes th...

Page 3: ...ical antennas Field trials demonstrated that with the CHA RXL mounted outside signals were typically only around one to two S units lower than a full size dipole antenna but that interference was less...

Page 4: ...oop Directivity A high level block diagram of the CHA RXL is shown in figure 1 Figure 1 Receive Loop High Level Block Diagram Antennas built by Chameleon AntennaTM are versatile dependable stealthy an...

Page 5: ...mbly and is used as the mount for the Receive Loop and Camera Tripod Attachment c Remote Antenna Connection The Remote Antenna Connection is a BNC socket used to connect the Coaxial Cable from the Pre...

Page 6: ...cket is not used if the CHA RXL is mounted on a camera tripod or placed on a table top Plate 5 CHA RXL Mounting Bracket and Hardware h Preamplifier Mounting Holes The two Preamplifier Mounting Holes a...

Page 7: ...lluminated when 12 14V DC power is applied to the BIAS T Unit o DC Power Socket The DC Power Connection is a 2 1mm X 5 5mm coaxial socket on the BIAS T Unit used to accept 12 14V DC power The center p...

Page 8: ...late 7 3 Place a Flat Washer over each of the four threaded bolts of the inserted U Bolts 4 Place a Split Washer over each of the four threaded bolts of the inserted U Bolts 5 Thread a Nut over each o...

Page 9: ...Split Washer over the inserted Knurled Knob Bolt 8 Thread a 10 Wing Nut onto the inserted Knurled Knob Bolt and tighten until firmly tightened by hand 9 The assembled end should look like that picture...

Page 10: ...n antenna switch duplexer rotor controller etc between the BIAS T Unit and the Loop Preamplifier 3 Connect one end of a Coaxial Jumper Cable not supplied to the Radio Connection m on the BIAS T Unit 4...

Page 11: ...rtwave broadcast bands Diameter 36 inches Gain Frequency dependent see figure 2 RF Connections o Radio Receiver UHF Socket SO 239 for Coaxial Jumper to Radio Receiver o BIAS T and Preamplifier Unit BN...

Page 12: ...Clamp Mount CHA UCM heavy duty antenna mount suitable for portable or semi permanent use Coaxial Cables in 12 25 and 50 lengths with BNC Male connectors at each end Chameleon AntennaTM Products Pleas...

Reviews: