background image

16

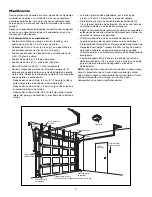
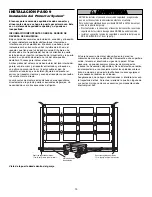
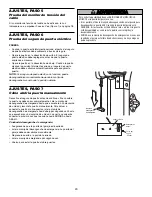
Sensor

Sensor de reversa de seguridad

Área de protección
del rayo de luz invisible 

Motor

Sensor de reversa de seguridad

Cable del timbre

Cable del timbre

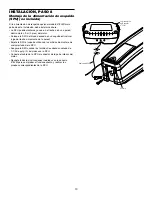
Seguro eléctrico

Terminales de conexión rápida

BCO/NGO

BCO

BCO/ROJO

BCO

Conexiones
del sensor 

Al seguro
eléctrico 

Al monitor de tensión del cable

Al control de la puerta

Conecte el cable
a las terminales de
conexión rápida 

Para introducir o soltar el cable, empuje la lengüeta 
hacia dentro con la punta de un destornillador

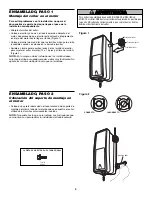
Perno de coche de
1/4-20x1/2 de pulg.

Elemento
óptico

Tuerca mariposa de
1/4 de pulg.-20

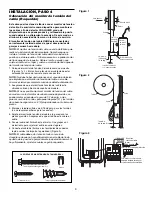
Figura 5

Figura 6

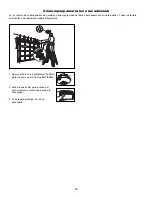
MONTAJE Y CABLEADO DE LOS SENSORES DE REVERSA 
DE SEGURIDAD

 •  Deslice un perno con cabeza redonda de 1/4 de pulg. de 

20x1/2 de pulg. en la ranura de cada sensor. Utilice tuercas 
mariposa para sujetar los sensores de reversa de seguridad a 
los soportes, de modo que los cristales se enfrenten de un 
extremo al otro de la puerta. Asegúrese de que las extensiones 
de soporte no obstruyan el cristal (Figura 5).

•  Apriete con los dedos las tuercas mariposa. 

•  Pase los cables de ambos sensores de reversa de seguridad al 

abre-puertas. Utilice grapas con aislamiento para sujetar los 
cables a la pared y al techo.

•  Pele 11 mm (7/16 de pulg.) de cada juego de cables. Separe el 

cable blanco del blanco y negro lo suficiente como para 
conectarlos a los terminales de conexión rápida del
abre-puertas: el blanco al blanco y el blanco y negro al gris 
(Figura 6).

ALINEACIÓN DE LOS SENSORES DE REVERSA DE 
SEGURIDAD

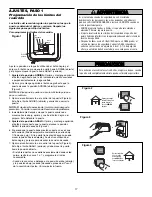
 •  Enchufe el abre-puertas. Las luces indicadoras del emisor y del 

receptor se 

iluminarán continuamente

 si las conexiones del 

cableado y la alineación son correctas.

La luz indicadora de color ámbar del 

emisor

 se iluminará 

independientemente de la alineación o de si hay obstrucción. Si 
la luz indicadora de color verde del 

receptor

 está apagada, es 

débil o parpadea (y el trayecto del rayo de luz invisible no está 
obstruido), se requiere alineación.

•  Afloje la tuerca mariposa del 

emisor

 y reajústelo para que 

apunte directamente al 

receptor

. Sujételo en el lugar correcto.

•  Afloje la tuerca mariposa del 

receptor

 y ajuste el sensor de 

reversa de seguridad hasta que reciba el rayo del emisor. 
Cuando la luz indicadora color verde se 

ilumine continuamente

apriete la tuerca mariposa.

RESOLUCIÓN DE PROBLEMAS DE LOS SENSORES DE 
REVERSA DE SEGURIDAD

1.  Si la luz indicadora del 

emisor

 no se 

ilumina continuamente


luego de la instalación, revise:

 • 


Si el abre-puertas recibe energía eléctrica.

 • 


Si hay un cortocircuito en el cable blanco o en el blanco y 
negro. Esto puede suceder en las grapas o en las 
conexiones del abre-puertas.

 • 


Si el cableado entre los sensores de reversa de seguridad y 
el abre-puertas es incorrecto.

 • 


Si hay un cable roto.

2.  Si la luz indicadora del emisor se 

ilumina continuamente

, pero 

la luz indicadora del receptor no lo hace:

 • 


Revise la alineación.

 • 


Revise si un cable abierto se conecta al 

receptor

.

3.  Si la luz indicadora del 

receptor

 es débil, realinee cualquiera 

de los sensores.

NOTA: 

Cuando el trayecto del rayo invisible esté obstruido o 

desalineado mientras la puerta se esté cerrando, la puerta 
retrocederá. Si la puerta ya está abierta, no se cerrará. Las luces 
del luz remota van a parpadear 10 veces. (Si las bombillas no 
están instaladas, se podrán escuchar 10 chasquidos.) Consulte 
la página 11.

Summary of Contents for LiftMaster Security+ 3800E

Page 1: ...less The Protector System and cable tension monitor are connected and properly aligned Periodic checks of the opener are required to ensure safe operation The model number label is located behind the...

Page 2: ...nit 6 Installation 7 16 Installation safety instructions 7 Position the opener 7 Attach the emergency release rope and handle 8 Install the power door lock 8 Attach the cable tension monitor Required...

Page 3: ...below Must have minimum of 2 1 2 6 4 cm between the garage wall and the center of the torsion bar Must have minimum of 3 7 6 cm between the ceiling and the center of torsion bar Must have minimum of...

Page 4: ...oid malfunction and damage Do NOT exceed 10 complete cycles of door operation per hour To prevent possible SERIOUS INJURY or DEATH ALWAYS call a trained door systems technician if garage door binds st...

Page 5: ...Connector Remote Light Opener Light with Hardware Bag Smart Control Panel LOCK L G I HT Carton Inventory Your garage door opener is packaged in one carton which contains the motor unit and the parts i...

Page 6: ...t 12 14 ft lbs of torque Figure 2 NOTE For most installations the screws should be facing up for easy access Do not tighten set screws until indicated 6 Collar Screw Collar Screw Set Screw ASSEMBLY ST...

Page 7: ...under EXTREME tension ALWAYS call a trained door systems technician if garage door binds sticks or is out of balance An unbalanced garage door might not reverse when required Operator MUST be mounted...

Page 8: ...and Knot Rope Motor Unit Emergency Release Cable To prevent possible SERIOUS INJURY or DEATH from a falling garage door If possible use emergency release handle to disengage door ONLY when garage door...

Page 9: ...ble it on the opposite side of the cable tension monitor 1 Position the cable tension monitor as shown Figures 1 and 2 The cable tension monitor should be located as close to the drum as possible NOTE...

Page 10: ...en snap cover in place 3 For standard installations ONLY Run bell wire up wall and across ceiling to motor unit Use insulated staples to secure wire in several places Do NOT pierce wire with a staple...

Page 11: ...total 7 Install the light lens by hooking one end of the lens over the hinge and pressing up on the other end to latch into place Figure 3 8 Plug in the light to outlet NOTE Light will not operate unt...

Page 12: ...Install a 90o conduit or flex cable adapter to the 7 8 hole Reinstall opener to torsion bar Run wires through conduit cut to proper length and strip insulation Attach with wire nuts provided Properly...

Page 13: ...nit Position the SPU as desired to a structural support ceiling joist or wall stud Attach the SPU to the support using the mounting holes on either side of the SPU Secure the SPU using the 1 1 2 lag s...

Page 14: ...other across the door no more than 6 15 cm above the floor Either can be installed on the left or right of the door as long as the sun never shines directly into the receiving eye lens The mounting b...

Page 15: ...with the lip hugging the back edge of the track as shown in Figure 1 If your door track will not support the bracket securely wall installation is recommended Wall installation Figure 2 and 3 Place th...

Page 16: ...ng eyes will glow steadily if wiring connections and alignment are correct The sending eye amber indicator light will glow regardless of alignment or obstruction If the green indicator light in the re...

Page 17: ...indicator light starts flashing slowly then release 2 Push and hold the black button until the door reaches the desired UP open position Figure 2 NOTE Check to be sure the door opens high enough for...

Page 18: ...d to open and close your door The door must travel through a complete cycle UP and DOWN in order for the force to be set properly If the unit cannot open and close your door fully inspect your door to...

Page 19: ...est The Protector System Press the remote control push button to open the door Place the opener carton in the path of the door Press the remote control push button to close the door The door will not...

Page 20: ...down on the emergency release handle until a click noise is heard from the unit and lift the door manually To reconnect the door to the opener pull down the emergency release handle straight down a s...

Page 21: ...ol Panel is activated Bulb size is A19 Bulb power is 100 watts maximum Security light feature Lights will also turn on when someone walks through the open garage door With a Smart Control Panel this f...

Page 22: ...able the motion sensor when using the opener lights as working lights Otherwise they will turn off automatically if you are working beyond the sensors range Lock feature Designed to prevent operation...

Page 23: ...n metallic surface This allows the sensor to recalibrate itself Dim LED lights Replace two 3V2016 batteries with same type 3V2016 coin cells No rapid LED blinking after pressing a button Replace two 3...

Page 24: ...to match the remote control code Refer to instructions on the motor unit panel Repeat with all Remote 4 The remote control has short range Change the location of the remote control in your car Check t...

Page 25: ...e power door lock 12 The opener won t operate due to power failure Manually open the power door lock Use the emergency release handle to disconnect the door The door can be opened and closed manually...

Page 26: ...on the Smart Control Panel Pressing the Prog LEARN button again will allow the user to program an additional remote control to the opener Meaning This message will appear when the Prog learn button ha...

Page 27: ...mentarily short across red and white terminals with jumper wire If motor unit activates replace door control wires Symptom Sending indicator light glows steadily receiving indicator light is dim or fl...

Page 28: ...s 2 Within 30 seconds press and hold the button on the hand held remote that you wish to operate your garage door 3 Release the button when the motor unit lights blink It has learned the code If light...

Page 29: ...d hold the button The opener light will blink three times Release the button 2 Press the temporary 4 digit PIN you have chosen then press Enter The opener light will blink four times 3 To set the numb...

Page 30: ...emote wall control or keyless entry 3 It has learned the code and the light turns on Reprogramming Light or Additional Light Your garage door opener remote light has already been programmed at the fac...

Page 31: ...4 1 2 Conductor bell wire white white red 8 41A6104 Cable tension monitor 9 41C0902 Mounting bracket 10 41A5034 Safety sensor kit receiving and sending eyes with 3 9 m 2 conductor bell wire attached K...

Page 32: ...DESCRIPTION 1 41DJ001 Logic board complete with plate 2 41A6408 Absolute Encoder System 3 41C168 Transformer KEY PART NO NO DESCRIPTION 4 41A6095 Motor with bracket 5 41B122 Power cord 6 41A6348 3 Co...

Page 33: ...er lights on or off from the control panel Garage Door Monitor Security for the largest door of your home Tells you if your garage door is open or closed Monitors up to 4 garage doors by adding additi...

Page 34: ...34 OPERATOR NOTES...

Page 35: ...35 OPERATOR NOTES...

Page 36: ...be defective and covered by this limited warranty will be repaired or replaced at Seller s sole option at no cost to you and returned pre paid Defective parts will be repaired or replaced with new or...

Page 37: ...m y el monitor de tensi n del cable est n conectados y adecuadamente alineados Se deben realizar revisiones peri dicas del abre puertas para asegurar su operaci n segura La calcoman a con el n mero de...

Page 38: ...6 Instalaci n 7 16 Instrucciones de seguridad para la instalaci n 7 Colocaci n del abre puertas 7 Montaje de la cuerda y la manija de desenganche de emergencia 8 Instalaci n del seguro de puerta el ct...

Page 39: ...lan a continuaci n Debe haber como m nimo 6 4 cm 2 1 2 de pulg entre la pared del garaje y el centro de la barra de torsi n Debe haber como m nimo 7 6 cm 3 pulg entre el techo y el centro de la barra...

Page 40: ...6 pulg Taladro Cinta de medir 2 1 Escalera L piz Llave Allen hexagonal de 3 16 de pulg y 1 8 de pulg Pinzas de punta Brocas para taladro de 5 32 de pulg 3 16 de pulg y 3 4 de pulg Puerta seccionada P...

Page 41: ...tario del empaque Su abre puertas de garaje viene empacado en una caja de cart n que contiene el motor y las piezas que se muestran en la siguiente ilustraci n Tenga en cuenta que los accesorios van I...

Page 42: ...hacia arriba para poder acceder a ellos m s f cilmente No apriete los tornillos de fijaci n hasta que se le indique 6 Tornillo del collar Tornillo del collar Tornillo de fijaci n ENSAMBLADO PASO 2 Col...

Page 43: ...BE estar montado a un ngulo correcto de la barra de torsi n para evitar el desgaste prematuro del collar Motor Grapa Barra de torsi n PR A ADVERTENCIA ADVERTENCIA Tornillo hexagonal de 14 10x1 7 8 de...

Page 44: ...erda Cuerda Motor Cable de desenganche de emergencia Para evitar la posibilidad de una LESI N GRAVE o INCLUSO LA MUERTE si la puerta del garaje se cae Si es posible utilice la manija de desenganche de...

Page 45: ...tire el anillo a presi n que sujeta el rodillo en su lugar y vuelva a montarlo del lado opuesto del monitor de tensi n del cable 1 Coloque el monitor de tensi n del cable como se muestra Figuras 1 y 2...

Page 46: ...i n est ndar Hacer el tendido del cable de timbre por la pared y el techo hasta el motor Fije el cable usando grampas con aislaci n y tome precauciones para no perforar el cable y causar un cortocircu...

Page 47: ...cia arriba el otro extremo para que se sujete en su lugar Figura 3 8 Enchufe la luz a la toma de corriente NOTA La luz no funcionar hasta que se active la consola Para evitar un posible SOBRECALENTAMI...

Page 48: ...exible en el orificio de 7 8 de pulg Reinstale el abre puertas a la barra de torsi n Pase los cables a trav s del conducto c rtelos a la medida adecuada y p lelos Suj telos con los empalmes para cable...

Page 49: ...porte estructural viga del techo o montante de la pared Sujete la SPU al soporte utilizando los orificios de montaje de cualquier lado de la SPU Asegure la SPU usando los tornillos de cabeza cuadrada...

Page 50: ...n que se instalen izquierdo o derecho el emisor y el receptor siempre y cuando el receptor nunca reciba luz solar en forma directa Las m nsulas de montaje est n dis adas para engancharse directamente...

Page 51: ...asegurado al borde posterior de la gu a como se muestra en la Figura 1 Si la gu a de su puerta no sostiene firmemente el soporte se recomienda la instalaci n en la pared Instalaci n en la pared Figur...

Page 52: ...el receptor se iluminar n continuamente si las conexiones del cableado y la alineaci n son correctas La luz indicadora de color mbar del emisor se iluminar independientemente de la alineaci n o de si...

Page 53: ...abierta y el p rpura mueve la puerta hacia ABAJO cerrada 1 Ajuste de la posici n ARRIBA Oprima y mantenga oprimido el bot n negro hasta que la luz indicadora amarilla comience a parpadear lentamente l...

Page 54: ...o para que la fuerza se ajuste adecuadamente Si la consola no puede abrir ni cerrar su puerta completamente inspeccione su puerta para asegurarse de que est bien equilibrada y no est atascada ni atora...

Page 55: ...em Oprima el bot n del control remoto para abrir la puerta Coloque la caja del abre puertas en el trayecto de la puerta Oprima el bot n del control remoto para cerrar la puerta La puerta no se mover m...

Page 56: ...e unidad y levante la puerta manualmente Para volver a conectar la puerta al abre puertas jale la manija de desenganche de emergencia hacia abajo por segunda vez hasta que escuchar n un clasquido de u...

Page 57: ...n cuando alguien pase por la puerta abierta del garaje En un Smart Control PanelTM esta funci n se puede desactivar de la siguiente manera Con las luces apagadas mantenga oprimido durante 10 segundos...

Page 58: ...el abridor como luces de trabajo De lo contrario se apagar n autom ticamente si est trabajando m s all de la gama del sensor Seguro Esta funci n est dise ada para evitar la operaci n de la puerta con...

Page 59: ...Coloque el control remoto en un lugar sin interferencias durante 60 segundos sobre una superficie que no sea met lica Esto permite al sensor volver a calibrarse Reduzca la intensidad de las luces LED...

Page 60: ...el seguro de puerta el ctrico Hay algo que est obstruyendo la puerta Est desequilibrada o los resortes est n rotos Elimine la obstrucci n o repare la puerta SI TIENE ALG N PROBLEMA RESOLUCI N DE PROB...

Page 61: ...sostendr en cualquier punto del recorrido con s lo el soporte de sus resortes Si esto no ocurre desconecte el abre puertas y llame a un t cnico especializado en sistemas de puertas 11 El motor del ab...

Page 62: ...nversi n de seguridad Significado Este mensaje aparecer cuando se haya oprimido el bot n de Prog PROGRAMACI N del Smart Control Panel Al oprimir nuevamente el bot n de Prog PROGRAMACI N se permitir qu...

Page 63: ...les del control de la puerta Una moment neamente el terminal rojo y el terminal blanco con un cable conector Si el motor se activa reemplace los cables del control de la puerta S ntoma La luz indicado...

Page 64: ...suelte el bot n de aprendizaje p rpura del motor La luz indicadora de ese bot n se iluminar continuamente durante 30 segundos 2 Dentro de los 30 segundos oprima y mantenga oprimido el bot n del contr...

Page 65: ...oprimiendo la nueva clave y luego oprima Enter La puerta debe moverse Para poner una clave temporal Usted puede autorizar el acceso a sus visitas o al personal de servicio con una clave temporal de cu...

Page 66: ...sando el control remoto el control de pared o la llave digital 3 Ya aprendi el c digo La luz se encender C mo reprogramar la luz o luz adicional La luz remota de su abre puertas de garaje ya viene pro...

Page 67: ...1A5034 Juego de sensores de seguridad receptor y emisor con 9 m 3 pies de cable de 2 conductores N M N M DE DE CLAVE PIEZA DESCRIPCI N 11 41A6388 Collar con tornillos de fijaci n 2 12 41A6102 Seguro d...

Page 68: ...PCI N 1 41DJ001 Tablero l gico completo con placa 2 41A6408 Sistema de codificador absoluto 3 41C168 Transformador N M N M DE DE CLAVE PIEZA DESCRIPCI N 4 41A6095 Motor con soporte 5 41B122 Cable de c...

Page 69: ...rtas desde el panel de control Monitor de la puerta del garaje Seguridad para la puerta m s grande de su casa Le dice si la puerta de su garaje est abierta o cerrada Puede controlar hasta 4 puertas de...

Page 70: ...34 NOTAS DEL OPERADOR...

Page 71: ...35 NOTAS DEL OPERADOR...

Page 72: ...efectuosos y que est n cubiertos por esta garant a limitada ser n reparados o reemplazados a opci n nica del Vendedor sin costo para usted y ser n devueltos con franqueo prepagado Las piezas defectuos...

Reviews: