


Chapter 2
Chapter 2 Hardware Setup
If your motherboard has already been installed in your computer you may still
need to refer to this chapter if you plan to upgrade your system's hardware.
This motherboard is electrostatic sensitive. Do not touch without wearing
proper safety gadget and make sure to disconnect the power cable from the
power source before performing any work on your motherboard. Not doing so
may result in electrical shock!
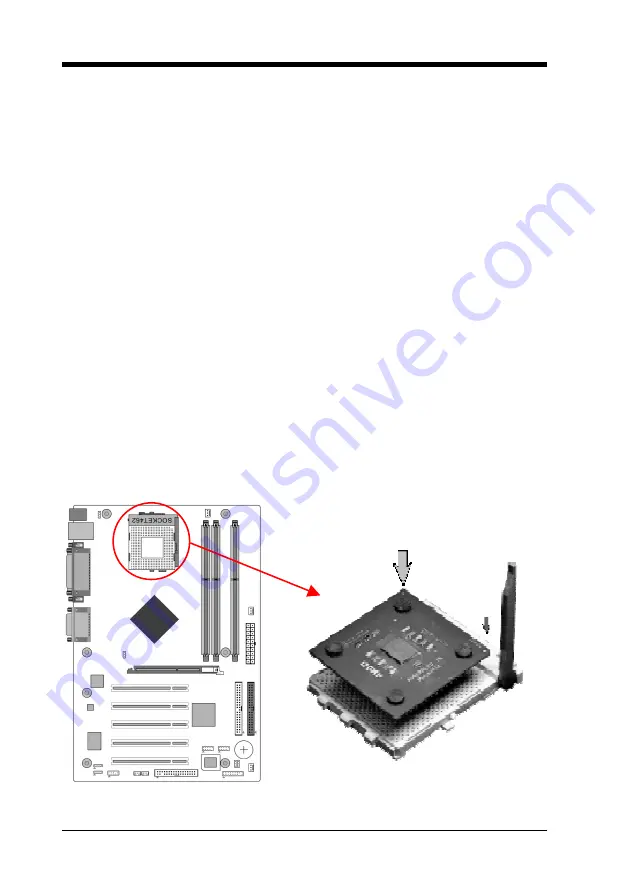
2.1 Installing a CPU Processor in Socket A
The Socket A, designed for AMD Duron/Athlon/Athlon XP processors, has
been incorporated as a standard motherboard specification. To insert your CPU
into Socket A please do the following:
1. Locate a cut edge on the top surface of the CPU, which is close to one of the
CPU corners. The same corner will also be cut off, leaving a noticeable notch in
the CPU's corner. These markings indicate Pin 1 on the CPU.
2. Pull up the lever of Socket A so that it is perpendicular with the surface of
the motherboard. Gently insert the CPU with Pin 1 at the same corner of Socket
A, which is located close to the end of the lever. Allow the weight of the CPU to
push itself into place. Do not apply extra pressure as doing so may result in
damaging your CPU. Snap the lever back into place.
Installing an AMD approved heat sink with cooling fan is necessary for proper
heat dissipation from your CPU. Failing to install these items may result in
overheating and possible burnout of your CPU.
Notes:
In order to boot up with a newly installed CPU,
AC Power must be switched off
before installation.
4
Summary of Contents for 7NJL3
Page 7: ...Chapter 1 1 3 7NJL3 Motherboard Layout 3...
Page 41: ...Chapter 4 3 Please select OK to continue 4 Please select Finish to restart your computer 37...
Page 43: ...Chapter 4 3 Please select Next to continue 4 Please select Next to continue 39...
Page 44: ...Chapter 4 5 Please select Next to continue 6 Please select Continue Anyway to continue 40...
Page 47: ...Chapter 5 Chapter 5 C Media 3D Audio Configuration 5 1 Speaker Out 1 Earphone 43...
Page 48: ...Chapter 5 2 Two Channel 44...
Page 49: ...Chapter 5 3 Four Channel 45...
Page 50: ...Chapter 5 4 Six Channel 46...
Page 51: ...Chapter 5 5 2 S PDIF 1 S PDIF Out Source Format 5 3 Volume Control 47...


