background image

Cetetherm Midi Wall IQHeat 

Installation, service and operating instruction


29 


11 

Maintenance and repairs 


Maintenance work must be carried out by an authorized service technician.


11.1  Change the pumps 

 
Either change the complete pump or just the pump motor. 


Maintenance work must be carried out by an authorized service technician. 


Disconnecting the power feed to the pump and the substation. 


Before starting out repairs always close the primary supply and return shutoff valves and drain 
the system. 
After finishing repair; open the shutoff valves. Start with primary supply and then the return lines, 
to avoid pollutions in the system. Open the valves slowly to avoid pressure surges.  
Do the same on the heating side open first heat return and then supply. Fill up the system, start 
the pump and vent. 


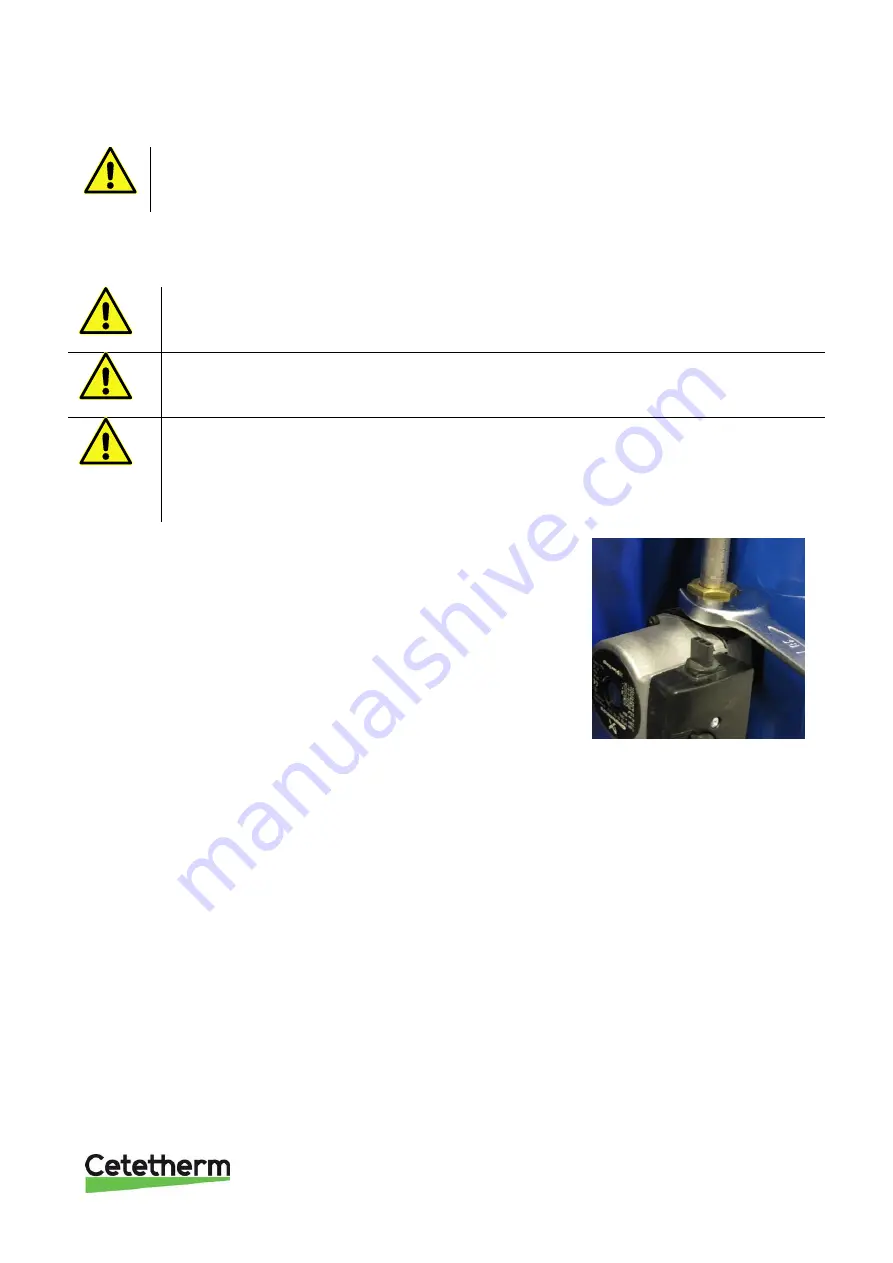
1.  Release the brass nuts with a wrench and replace the pump. 

2.  Reattach the power feed.  

3.  If only changing the motor, release it by unscrewing four socket 

head cap screws and replace the motor. 

4.  Reattach the power feed. 


Picture 21 


Summary of Contents for Midi Wall IQHeat

Page 1: ...DOC 1560 Rev 2019 10 17 Installation service and operating instruction Cetetherm Midi Wall IQHeat Heating and domestic hot water substation for apartment houses 10 30 apts...

Page 2: ...anges and improvements to the content in this manual if it is necessary due to printing mistakes wrong information or changes in the hardware or software All these types of changes will be included in...

Page 3: ...ng 14 5 1 Fault indication for IQHeat 14 6 Electrical installation 15 6 1 General 15 6 2 Connection to internet 15 6 3 Installation of outdoor temperature sensor 15 6 4 Electrical circuit diagram 16 7...

Page 4: ...ng of the expansion vessel 28 11 Maintenance and repairs 29 11 1 Change the pumps 29 11 2 Change the heating and hot water actuator 30 11 3 Change the heating or hot water valve 30 11 4 Change the tem...

Page 5: ...tion Well planned pipe work and readymade electrical wiring make installation very simple A pre programmed controller and plug and socket connection provide further simplification so that the substati...

Page 6: ...opped up with water Starting up the system without water will damage the circulation pump The substation comes prepared with an electrical plug to be connected to the main supply The strain relief cli...

Page 7: ...g valve 27 Temperature sensor outdoor 8 Hose 28 Temperature sensor district heating supply 9 Safety valve cold water 29 Temperature sensor district heating return 10 Shutoff valve DHWC 30 Temperature...

Page 8: ...the heat exchanger may increase 2 2 Safety equipment inspection Daily inspection to check for leaks from pipes or components Weekly inspection to make sure that the operation of the heating and hot wa...

Page 9: ...stance between floor and screw bracket should be 1420 mm Note that distance between screws are 400 mm Mount the floor support on the central use the middle mounting hole Raise the central and mount it...

Page 10: ...t Start the heating circulation pump at the strongest flow setting during some minutes The pressure should be at least 100 kPa during winter and at least 60 kPa during summer Set the pump capacity of...

Page 11: ...idi Wall IQHeat Installation service and operating instruction 9 3 8 Connection overview Picture 3 1 Heat Supply G1 1 4 5 DHW G1 2 Heat Return G1 1 4 6 DH Supply DN25 weld 3 CW G1 7 DH Return DN255 we...

Page 12: ...Cetetherm Midi Wall IQHeat Installation service and operating instruction 10 3 9 Measure sketch Midi Wall IQHeat Picture 4...

Page 13: ...circuit and one hot water circuit Communication with the processing unit takes place with ModBus or TCP IP Different methods of communication are available depending on the external communication mod...

Page 14: ...sers read access to all menus except configuration menus write access to the main set points Setpoints Settings Setpoints alarms and alarm history can be acknowledged and reset Service level level 4 p...

Page 15: ...The controller s clock includes the functions for summer and winter time changes and leap years The clock has a backup function to cover at least 24 hours of power cuts 4 2 1 Reading date and time 1 P...

Page 16: ...into three classes A or 1 Alarm High B or 2 Alarm Low C or 3 Alarm Warning Active alarms alarm symbol in the display flashes alarm button on the control panel flashes Acknowledged but still active al...

Page 17: ...his must be done by a duly qualified electrician The substation must be connected to a grounded power outlet 6 2 Connection to internet For connection to internet the control panel has a cable with RJ...

Page 18: ...Cetetherm Midi Wall IQHeat Installation service and operating instruction 16 6 4 Electrical circuit diagram Picture 6...

Page 19: ...ruction 17 7 Schematic diagram main components Picture 7 7 1 Option 3 point HB metering Picture 8 1 Welded filter 2 Shut off valves 3 Manometer clock 4 Sensor pocket energy meter primary in 5 Sensor p...

Page 20: ...e for the hot water circulation DHWC pump and one for the heating circuit The DHWC pump is a traditional three speed circulation pump The DHWC pump has a switch where the speed capacity can be set The...

Page 21: ...eat Installation service and operating instruction 19 8 3 Heating circuit pump Grundfos UPMXL 25 125 180 Auto GFJOC settings and capacity Picture 11 Settings MAX Hnom CP1 7 5 m CP2 10 m CP3 12 5 m PP1...

Page 22: ...g fast PP3 Flashing slow CP1 Flashing slow CP2 Flashing slow CP3 Picture 12 LED indication of the curve setting 8 3 1 Changing pump curve setting Picture 13 Serial curve setting 1 Push the button for...

Page 23: ...Cetetherm Midi Wall IQHeat Installation service and operating instruction 21 8 4 Heating circuit pump Grundfos Magna3 25 100 capacity Picture 14...

Page 24: ...r circuit District heating strainer clogged See 10 1 Check if the district heating strainer is blocked Hot water valve and actuator does not work See 10 2 Check the function of the heating and hot wat...

Page 25: ...sensor for correct placement and function The two temperatures can be monitored on the control panel display see document User instruction IQHeat Doc 1552 chapter General Functions section Reading the...

Page 26: ...entire pump See chapter 11 Maintenance and repairs 9 2 4 Heating temperature unstable Reason Action Pending differential pressure Check available differential pressure and the primary inlet temperatur...

Page 27: ...turn shutoff valves and drain the system After finishing repair open the shutoff valves Start with primary supply and then the return lines to avoid pollutions in the system Open the valves slowly to...

Page 28: ...Testing the valves Service actions must be carried out by an authorized service technician Before the hot water valve can be checked the actuator must be dismantled Unscrew the screws on the shackle...

Page 29: ...e the strainer holder and remove the cartridge Clean the strainer in water and refit the cartridge Screw the strainer holder with a momentum of 10 20 Nm 10 4 Check DHWC pump Service actions must be ca...

Page 30: ...he actuator Flick down the red knob and open the valve enough to supply the house property s heating demand This is to be regarded as a temporary solution until the control unit problem is solved Pict...

Page 31: ...epairs always close the primary supply and return shutoff valves and drain the system After finishing repair open the shutoff valves Start with primary supply and then the return lines to avoid pollut...

Page 32: ...e Maintenance work must be carried out by an authorized service technician Disconnecting the power feed to the pump and the substation Before starting out repairs always close the primary supply and r...

Page 33: ...ce with a new sensor Picture 25 11 5 Change the outdoor temperature sensor 1 Disconnect the electrical power supply 2 Unscrew the lid by turning it anti clockwise 3 Unscrew the cables 4 Loosen the cab...

Page 34: ...let and return 2 Unscrew the nut preceding the energy meter and remove energy meter and pipe 3 Unscrew the nut following primary inlet and remove the filter and welding end 4 Thread the metering profi...

Page 35: ...rs of turns In this example 2 3 turns 4 Using a 3 mm Allen key turn the inner spindle clockwise until stop 5 The valve is now set To check the setting Close the valve the indicator shows 0 0 Open it t...

Page 36: ...Cetetherm Midi Wall IQHeat Installation service and operating instruction 34 Picture 34 recommended area 25 dB A 35 dB A...

Page 37: ...Cetetherm Midi Wall IQHeat Installation service and operating instruction 35 13 Technical data and performance 13 1 Operation data Midi Wall 70...

Page 38: ...Cetetherm Midi Wall IQHeat Installation service and operating instruction 36 13 2 Operation data Midi Wall 100...

Page 39: ...ice and operating instruction 37 13 3 Operation data Midi Wall 130 13 4 Technical data Electrical data 230V 50Hz 1 phase 290 315W Noise level 70dB A 1 6 m above floor level 1 m from source Main measur...

Page 40: ......

Reviews: