background image

8

model no. 060-0750-0 I contact  us: 1-844-428-7277

Safety instructions

Training

1.     Read the instructions carefully. Be familiar 

with the controls and the proper use of the 
equipment.

2.    Never allow children or people unfamiliar 

with these instructions to use the 
lawnmower. Local regulations can restrict 
the age of the operator.

3.    Never mow while people, especially 

children, or pets are nearby.

4.    Keep in mind that the operator or user 

is responsible for accidents or hazards 
occurring to other people or their property.

Preparation

1.     While mowing, always wear substantial 

footwear and long trousers. Do not operate 
the equipment when barefoot or wearing 
open sandals.

2.    Thoroughly inspect the area where the 

equipment is to be used and remove 
all objects which can be thrown by the 
machine.

3.    Warning - gas is highly flammable.

-      Store fuel in containers specifically 

designed for this purpose.

-      Refuel outdoors only and do not smoke 

while refueling.

-      Add fuel before starting the engine. 

Never remove the cap of the fuel tank 
or add gas while the engine is running 
or when the engine is hot.

-      If gas is spilled, do not attempt to 

start the engine but move the machine 
away from the area of spillage and 
avoid creating any source of ignition 
until gas vapours have dissipated.

-      Replace all fuel tank and container 

              caps securely.
4.    Replace faulty mufflers.

5.    Before using, always visually inspect to 

see that the blades, blade bolts and cutter 
assembly are not worn or damaged. Replace 
worn or damaged blades and bolts in sets 
to preserve balance.

6.    On multi-bladed machines, take care as 

rotating one blade can cause other blades 
to rotate.

Operation

1.     Do not operate the engine in a confined 

space where dangerous carbon monoxide 
fumes can collect.

2.    Mow only in daylight or in good artificial 

light.

3.    Avoid operating the equipment in wet 

grass, where feasible.

4.    Always be sure of your footing on slopes,
5.    Walk, never run.
6.    For wheeled rotary machines, mow across 

the face of slopes, never up and down.

7.     Exercise extreme caution when changing 

direction on slopes.

8.    Do not mow excessively steep slopes.
9.    Use extreme caution when reversing or 

pulling the lawnmower towards you.

10.   Stop the blade(s) if the lawnmower has to 

be tilted for transportation when crossing 
surfaces other than grass, and when 
transporting the lawnmower to and from 
the area to be mowed.

11.    Never operate the lawnmower with 

defective guards, or without safety 
devices, for example deflectors and/or 
grass catchers, in place.

12.   Do not change the engine governor settings 

or over speed the engine.

13.   Disengage all blade and drive clutches 

before starting the engine.

14.   Start the engine or switch on the motor 

carefully according to instructions and 
with feet well away from the blade(s).

SAFETY INFORMATION

Summary of Contents for 060-0750-0

Page 1: ...ivement ce guide d utilisation avant d utiliser cette tondeuse à essence et le conserver aux fins de consultation ultérieure INSTRUCTION MANUAL GUIDE D UTILISATION 21 53 CM 2 IN 1 PUSH LAWN MOWER MULCHING SIDE DISCHARGE TONDEUSE À POUSSER 2 IN 1 DE 21 PO 53 CM DÉCHIQUETAGE ET ÉJECTION LATÉRALE model number 060 0750 0 English version Page 2 French version Page 30 ...

Page 2: ...DD For problems or ques ons DO NOT RETURN TO STORE Please contact one of our Customer Service Agents who would be happy to assist you For Customer Assistance Please Call CANADA 1 844 428 7277 STOP ...

Page 3: ... safety and operating instructions Read all instructions and follow them with use of this product TABLE OF CONTENTS Technical Specifications 3 Parts List 4 Intended Use 6 Safety Information 7 Assembly 10 Adjustment 15 Operation 16 Storing and Maintenance 20 Troubleshooting 25 Warranty 27 TABLE OF CONTENTS ...

Page 4: ... Engine max power Engine speed Cutting path Max Torque Height adjustments Wheel diameter Ignition Fuel tank Oil tank Spark plug type Single cylinder 4 stroke 150 cc 2 5 kW 3600 RPM 3100 100 RPM 20 51 cm 5 8 ft lbs 2500 rpm 1 1 4 to 3 1 4 3 1 to 8 3 cm 7 18 cm TCI 1 L 0 4 L K7RTC TORCH ...

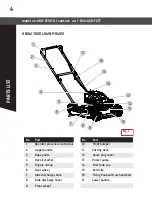
Page 5: ... Rope guide 4 Recoil starter 5 Engine oil cap 6 Rear wheel 7 Side discharge chute 8 Side discharge cover 9 Front wheel No Part 10 Front bumper 11 Cutting deck 12 Spark plug cover 13 Primer pump 14 Fuel tank cap 15 Cord clip 16 Fixing knob with arc head bolt 17 Lower handle 2018 11 6 14 07 42 1 2 3 4 5 6 7 8 9 17 16 15 14 13 12 11 10 Fig 1 ...

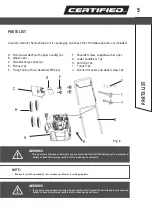
Page 6: ...p 1 pc I Funnel 1 pc J Wrench for spark and wheel screw 1 pc D C B A H Fig 2 G F E WARNING If any parts are damaged or missing do not operate this tool until the missing parts are replaced Failure to heed this warning could result in serious personal injury WARNING If any parts are damaged or missing do not operate this tool until the missing parts are replaced Failure to heed this warning could r...

Page 7: ...rpose Any other use is deemed to be a case of misuse The user operator and not the manufacturer will be liable for any damage or injuries of any kind caused as a result of this Please note that our equipment has not been designed for use in commercial trade or industrial applications Our warranty will be voided if the machine is used in commercial trade or industrial businesses or for equivalent p...

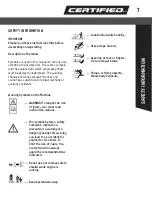
Page 8: ... accidents Warning Symbols on the Machine WARNING To reduce the risk of injury user must read instruction manual This symbol before a safety comment indicates a precaution a warning or a danger Ignoring this warning can lead to an accident for yourself or for others To limit the risk of injury fire or electrocution always apply the recommendations indicated Do not open or remove safety shields whi...

Page 9: ...uel tank and container caps securely 4 Replace faulty mufflers 5 Before using always visually inspect to see that the blades blade bolts and cutter assembly are not worn or damaged Replace worn or damaged blades and bolts in sets to preserve balance 6 On multi bladed machines take care as rotating one blade can cause other blades to rotate Operation 1 Do not operate the engine in a confined space ...

Page 10: ...ower If lawnmower starts to vibrate abnormally check immediately 20 Stop the engine and disconnect the spark plug wire making sure that all moving parts have come to a complete stop and where a key is fitted remove the key Whenever you leave the lawnmower Before refueling 21 Reduce the throttle setting during engine shut down and if the engine is provided with a shut off valve turn the fuel off at...

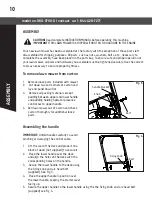
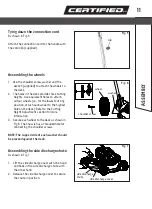
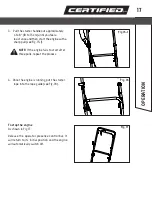
Page 11: ...arton and lay end panel down flat 3 Remove all packing materials except padding between upper and lower handle and padding holding operator presence control bar to upper handle 4 Roll lawn mower out of carton and check carton thoroughly for additional loose parts Assembling the handle IMPORTANT Unfold handle carefully to avoid pinching or damaging the control cable 1 Lift the rear of the deck and ...

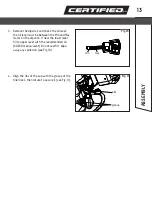
Page 12: ...st hole on the deck Refer to the Cutting Height Adjustment section for more information 3 Secure each wheel to the deck as shown in Fig 6 The chassis has a threaded hole for connecting the shoulder screws NOTE The cupped side of each washer should be pressed against the deck Assembling the side discharge chute As shown in Fig 7 1 Lift the side discharge cover with one hand and hook in the side dis...

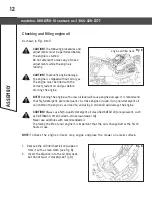
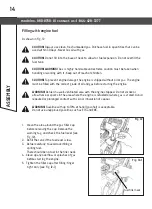
Page 13: ...h detergent premium quality 4 stroke engine oil used Using non detergent oil can shorten the engine s service life and using 2 stroke oil will damage the engine CAUTION Always use high quality detergent oil classified SAE30 oil or equivalent such as SAE 10W 30 often called 4 stroke lawnmower oil Never use additives with recommended oil To prolong the life of your engine it is important that the oi...

Page 14: ...s on the dipstick If near the lower level fill to upper lever with the recommended oil SAE30 or equivalent Do not overfill Wipe away any spilled oil see Fig 10 4 Align the ribs of the cap with the groove of the filler neck then rotate to secure it see Fig 11 ASSEMBLY Fig 10 Fig 11 min max ribs groove ...

Page 15: ...g the engine WARNING Refuel in a well ventilated area with the engine stopped Do not smoke or allow flame or sparks in the area where the engine is refueled or where gas is stored Avoid repeated or prolonged contact with skin or inhalation of vapour WARNING Gasoline with up to 10 ethanol gasohol is acceptable Do not use unapproved gasoline such as E15 and E85 1 Clean the area around the gas filler...

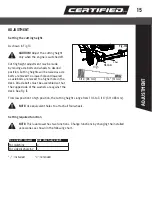
Page 16: ... deck All axle bolts must be assembled so that the cupped side of the washers are against the deck See Fig 13 From low position to high position the cutting heights range from 1 1 4 to 3 1 4 31 to 83 mm NOTE Use equivalent holes to attach all four wheels Setting required function NOTE This lawnmower has two functions Change functions by changing the installed accessories as shown in the following ...

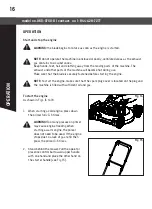
Page 17: ... before starting the engine NOTE to start the engine make sure that the spark plug cover is located on the plug and the machine is filled with sufficient oil and gas To start the engine As shown in Figs 14 to 16 1 When starting a cold engine press down the primer fully 3 5 times WARNING Too many presses on primer may cause engine flooding When starting a warm engine the primer does not need to be ...

Page 18: ...1 NOTE If the engine fails to start after three pulls repeat the process 4 Once the engine is running put the starter rope into the rope guide see Fig 16 To stop the engine As shown in Fig 17 Release the operator presence control bar It will return to its initial position and the engine will automatically switch off Fig 15 1 Fig 16 Fig 17 OPERATION ...

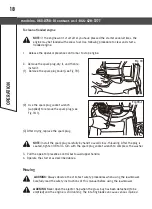
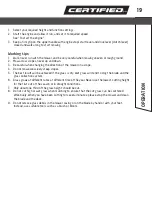
Page 19: ...e Fig 18 1 3 After drying replace the spark plug NOTE Install the spark plug carefully by hand to avoid cross threading After the plug is seated tighten 1 8 to 1 4 turn with the spark plug socket wrench to compress the washer 3 Pull the operator presence control bar toward upper handle 4 Operate the starter as described above Mowing WARNING Always observe the strictest safety procedures when using...

Page 20: ...steep slopes 5 The best result will be achieved if the grass is dry Wet grass will tend to clog the blade and the grass collection system 6 Grass grows at different rates at different time of the year Never use the lowest cutting height for the first cut of the season or in drought conditions 7 Only about one third of the grass height should be cut 8 Do not cut high or wet grass when mulching to e...

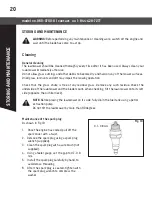
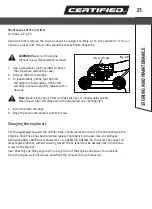
Page 21: ...such residue Check the underside of the lawnmower and the blade mount When checking tilt the lawnmower onto its left side opposite the oil filler neck NOTE Before placing the lawnmower on its side fully drain the fuel tank using a petrol extraction pump Do not tilt the lawnmower by more than 90 degrees Maintenance of the spark plug As shown in Fig 19 1 Once the engine has cooled pull off the spark...

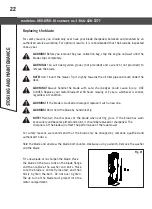
Page 22: ...able solvents Clean the air filter cartridge only with compressed air or by tapping it 4 Install the filter cartridge 5 Close the cover and secure it with the screw Changing the engine oil Tilt the lawnmower towards the oil filler Have a container ready to catch the oil and remove the dipstick Once the oil has been emptied replace the dipstick and wipe clean any spillages Refill with 400 mL SAE30 ...

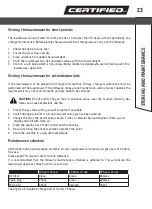
Page 23: ...hever is sooner regardless of condition WARNING If the blade is cracked or damaged replace it with a new one WARNING Don t hold the blade by hand directly NOTE Maintain the sharpness of the blade when cutting grass If the blade has worn excessively and become pitted and blunt it should be replaced or sharpened The sharpness of the blade will affect the performance of the lawnmower For safety reaso...

Page 24: ... the gas tank in enclosed areas near fire or when smoking Gas fumes can cause explosions and fire 1 Empty the gas tank with a gas suction pump if available 2 Start the engine and let it run until any remaining gas has been used up 3 Change the oil at the end of every season To do so remove the used engine oil from a warm engine and refill with fresh oil 4 Clean the cooling fins of the cylinder and...

Page 25: ...lways let the engine run until it has used up the remainder of gas in the tank Empty the engine oil from the warm engine Remove the spark plug cover from the spark plug Clean the cooling fins of the cylinder and the housing Use the original packaging to ship whenever possible STORING AND MAINTENANCE ...

Page 26: ...ults which cannot be rectified with the aid of following table may be rectified by a specialist company only customer service centre Please be aware that any improper repairs will also invalidate the warranty and additional costs may be incurred Use only genuine spare parts Only these spare parts are designed and suitable for the product The use of other spare parts not only voids the warranty you...

Page 27: ... stop lever not pressed Spark plug is defective Cutting blade is worn or damaged Fuel tank is empty Engine may be flooded Press start stop lever Replace spark plug Replace it through the customer service centre Refill with fuel Remove plug and dry Engine runs unsteadily Air filter is soiled Spark plug is soiled Clean the air filter Clean the spark plug Uneven mowing results Blade is blunt Cutting ...

Page 28: ...e period of use d this warranty will not apply to routine maintenance and consumable items such as but not limited to fuel lubricants vacuum bags blades belts sandpaper bits fluids tune ups or adjustments e this warranty will not apply where damage is caused by repairs made or attempted by others i e persons not authorized by the manufacturer f this warranty will not apply to any product that was ...

Page 29: ...y have other rights which may vary from province to province The provisions contained in this warranty are not intended to limit modify take away from disclaim or exclude any statutory warranties set forth in any applicable provincial or federal legislation Made in China Imported by Trileaf Distribution Trifeuil Toronto Canada M4S 2B8 ...

Page 30: ...s avez des ques ons NE RETOURNEZ PAS L ARTICLE AU MAGASIN Contactez plutôt un de nos agents du service à la clientèle qui se fera un plaisir de vous aider Pour le service à la clientèle veuillez composer CANADA 1 844 428 7277 ARRÊT ...

Page 31: ...de sécurité et d utilisation importantes Lisez toutes les instructions et suivez les avant d utiliser cet appareil TABLE DES MATIÈRES Fiche technique 31 Liste des pièces 32 Utilisation prévue 34 Consignes de sécurité 35 Assemblage 38 Réglage 43 Fonctionnement 44 Entreposage et entretien 48 Dépannage 53 Garantie 55 TABLE DES ...

Page 32: ...eur de coupe Couple max Réglages de la hauteur Diamètre des roues Allumage Réservoir de carburant Réservoir d huile Type de bougie d allumage Cylindre unique à quatre temps 150 cm3 2 5 kW 3 600 tr min 3 100 100 tr min 20 po 51 cm 5 8 pi lb 2500 rpm 1 1 4 po à 3 1 4 po 3 1 à 8 3 cm 7 po 18 cm TCI 1 L 0 4 L K7RTC TORCH ...

Page 33: ...à rappel 5 Bouchon du réservoir à huile 6 Roue arrière 7 Conduit d éjection latéral 8 Rabat du conduit d éjection latéral 9 Roue avant N Pièce 10 Pare choc avant 11 Plateau de tonte 12 Cache de la bougie d allumage 13 Poire d amorçage 14 Bouchon du réservoir de carburant 15 Bride du cordon 16 Molette avec boulon à tête hexagonale 17 Guidon inférieur 2018 11 6 14 07 42 1 2 3 4 5 6 7 8 9 17 16 15 14...

Page 34: ...le pour bougie d allumage 1 pce D C B A H Fig 2 G F E AVERTISSEMENT Si des pièces sont endommagées ou manquantes n utilisez pas cet appareil avant d avoir installé de nouvelles pièces Le non respect de cet avertissement pourrait entraîner de graves blessures AVERTISSEMENT Cet appareil doit être soulevé par deux personnes pour le retirer de son emballage Assurez vous d avoir suffisammentd espace po...

Page 35: ...isation est considérée comme une mauvaise utilisation L utilisateur et non le fabricant sera responsable de tout dommage ou toute blessure de toute nature découlant d une telle mauvaise utilisation Veuillez noter que notre appareil n a pas été conçu pour des usages commerciaux au détail ou industriels Notre garantie sera annulée si la machine est utilisée dans des entreprises commerciales au détai...

Page 36: ... Afin de réduire le risque de blessure l utilisateur doit lire le guide d utilisation Ce symbole placé devant un commentaire relatif à la sécurité indique une précaution un avertissement ou un danger Le non respect de cet avertissement peut causer un accident vous impliquant ou impliquant d autres personnes Pour limiter le risque de blessure d incendie ou d électrocution suivez toujours les recomm...

Page 37: ... chaud En cas de déversement de carburant ne tentez pas de mettre le moteur en marche mais éloignez l appareil du site de déversement et évitez de créer une source d inflammation jusqu à ce que les vapeurs de carburant se soient dissipées Replacez et serrez solidement tous les bouchons sur le réservoir de carburant et le bidon 4 Remplacez tout silencieux d échappement défectueux 5 Avant d utiliser...

Page 38: ...e ou de déboucher la goulotte avant de contrôler de nettoyer ou de travailler sur la tondeuse à gazon après avoir frappé un objet étranger CONSIGNES DE SÉCURITÉ Vérifiez si la tondeuse à gazon est endommagée et effectuez les réparations avant de redémarrer et d utiliser la tondeuse à gazon Si la tondeuse à gazon commence à vibrer d une manière anormale vérifiez immédiatement 20 Arrêtez le moteur e...

Page 39: ...1 Retirez les pièces détachées fournies avec la tondeuse 2 Coupez les deux coins du carton et posez le panneau d extrémité à plat 3 Enlevez tous les matériaux d emballage sauf la mousse entre les guidons supérieur et inférieur et la mousse tenant la barre de commande au guidon supérieur 4 Sortez la tondeuse à gazon du carton et vérifiez soigneusement le carton pour des pièces détachées Assemblage ...

Page 40: ...Utilisez les trous correspondants lors de la fixation des quatre roues c à d pour la position de coupe la plus basse assemblez chaque roue au trou le plus haut du plateau Reportez vous à la section Réglage de la hauteur de coupe pour plus d informations 3 Fixez chaque roue au plateau de tonte comme indiqué à la figure 3 REMARQUE Le côté creux de chaque écrou borgne doit être fixé solidement contre...

Page 41: ...L utilisation d une huile non détersive peut réduire la durée de vie du moteur et l utilisation d une huile adaptée aux moteurs à deux temps endommagera le moteur ATTENTION Utilisez toujours de l huile détersive de haute qualité classée sous SAE30 ou de classe équivalente tel que SAE 10W 30 souvent décrite comme de l huile pour tondeuse à essence à quatre temps N utilisez pas d additifs avec l hui...

Page 42: ...eur remplissez le réservoir d huile jusqu au niveau supérieur avec de l huile recommandée SAE30 ou équivalent Ne mettez pas trop d huile Essuyez toute huile renversée Voir figure 10 4 Alignez les nervures du bouchon avec la rainure de la goulotte puis faites le tourner d un quart de pour le fixer voir figure 11 ASSEMBLAGE Fig 10 Fig 11 min max nervures rainure ...

Page 43: ...et d essence avant la mise en marche AVERTISSEMENT Faites le plein dans un endroit bien ventilé et lorsque le moteur est arrêté Ne fumez pas et ne permettez pas la présence de toute flamme ou de toute étincelle dans l endroit où vous faites le plein du moteur ou où l essence est entreposée Évitez le contact répété ou prolongé de l essence avec la peau ou l inhalation de vapeurs AVERTISSEMENT L ess...

Page 44: ...sure que les boulons d axe sont déplacés vers un trou plus élevé sur le plateau de tonte Tous les boulons d axe doivent être assemblés de sorte que le côté creux des écrous borgnes se trouve contre le plateau de tonte Consultez la figure 13 De la position basse à la position haute Les hauteurs de coupe varient de 1 1 4 po à 3 1 4 po 31 à 83 mm REMARQUE Utilisez les trous correspondants lors de la ...

Page 45: ...et que la tondeuse est suffisamment remplie d huile et d essence Pour mettre en marche le moteur Comme illustré dans les figures 14 à 16 1 Lors d une mise en marche d un moteur froid appuyez fermement sur l injecteur de départ 3 5 fois AVERTISSEMENT Une pression excessive sur la poire d amorçage peut provoquer une inondation du moteur Lors du démarrage d un moteur chaud l utilisation de la poire d...

Page 46: ...teur ne démarre pas après trois tirs répétez la procédure 5 Une fois le moteur en marche placez le câble de démarreur dans le guide câble voir figure 16 Pour arrêter le moteur Comme illustré dans la figure 17 Relâchez la commande de démarrage d arrêt du moteur La commande retournera à sa position d origine et le moteur s arrêtera immédiatement UTILISATION Fig 15 1 Fig 16 Fig 17 ...

Page 47: ...ARQUE Installez la bougie d allumage avec précaution à la main afin d éviter de croiser le filetage Une fois la bougie bien en place resserrez avec 1 8 à 1 4 de tour de la clé à douille de la bougie d allumage pour comprimer la rondelle 3 Tirez avec une main la commande de démarrage d arrêt du moteur vers la poignée supérieure 4 Actionnez le démarreur comme décrit ci dessus Tont AVERTISSEMENT Resp...

Page 48: ...hiquetant pour permettre au gazon coupé d être éparpillé efficacement Après quelques minutes de tonte veuillez arrêter la tondeuse et nettoyez la lame et le châssis 9 N utilisez pas vos mains ou vos pieds pour enlever les débris d herbes qui se trouvent sur le carter de la tondeuse ou sur la lame Utilisez plutôt un outil approprié comme une brosse ou un balai Vidage du sac à herbe Dès que les déch...

Page 49: ... lame Pour vérifier basculez la tondeuse à gazon sur la gauche de l autre côté de la goulotte de remplissage de l huile REMARQUE Avant de placer la tondeuse sur son côté vidangez complètement le réservoir de carburant à l aide d une pompe d extraction à essence Ne basculez pas la tondeuse à gazon à plus de 90 degrés Entretien de la bougie d allumage Comme illustré dans la figure 19 1 Une fois le m...

Page 50: ...yez la cartouche filtrante d air seulement avec de l air comprimé ou en tapotant la cartouche 4 Installez la cartouche filtrante 5 Fermez le couvercle et fixez le à l aide de la vis Changement de l huile moteur Basculez la tondeuse à gazon vers l orifice de remplissage d huile Ayez un récipient prêt à récupérer l huile et retirez la jauge Une fois l huile vidée replacez la jauge et nettoyez tout d...

Page 51: ...elon la date la plus proche des deux conditions AVERTISSEMENT Si la lame est fracturée ou endommagée remplacez la avec une nouvelle lame AVERTISSEMENT Ne tenez pas la lame directement avec vos mains REMARQUE Maintenez la lame affûtée lors de la tonte du gazon Si la lame a subi de l usure excessive et est devenue piquée et émoussée elle devrait être remplacée ou affûtée L interrupteur de la lame af...

Page 52: ...ès d un feu ou en fumant Les émanations de gaz peuvent causer des explosions et des incendies 1 Videz le réservoir d essence à l aide d une pompe aspirante si possible 2 Mettez le moteur en marche et laissez le rouler jusqu à ce que l essence restante soit utilisée 3 Changez l huile à la fin de chaque saison Pour ce faire retirez l huile moteur usée d un moteur chaud et faites le plein avec de l h...

Page 53: ...e moteur rouler jusqu à ce qu il ait utilisé l essence restante dans le réservoir Retirez l huile moteur du moteur chaud Retirez la cache de la bougie d allumage de la bougie d allumage Nettoyez les ailettes de refroidissement du cylindre et du boîtier Dans la mesure du possible utilisez l emballage d origine pour expédier ENTREPOSAGE ET ENTRETIEN ...

Page 54: ... à l aide du tableau ci dessous ne peuvent être corrigés que par une entreprise spécialisée centre de service à la clientèle Veuillez noter que toute réparation non conforme pourrait entraîner l annulation de la garantie et des frais additionnels N utilisez que des pièces de rechange d origine Seules ces pièces de rechange sont conçues pour votre produit et lui conviennent L utilisation d autres p...

Page 55: ...remplacer par un centre de service Faites le plein d essence Retirez la bougie et séchez Le moteur roule de façon instable Le filtre à air est sale La bougie d allumage est sale Nettoyez le filtre à air Nettoyez la bougie d allumage Résultat de coupe irrégulier La lame est émoussée La hauteur de la coupe est trop basse Affûtez la lame Réglez la bonne hauteur Le sac à herbe n est pas suffisamment r...

Page 56: ...aux pièces d usure ou aux accessoires qui pourraient être fournis avec le produit qui doivent cesser de fonctionner ou est devenir inutilisable après une période d utilisation raisonnable d la présente garantie ne couvre pas l entretien de routine ni les articles consommables notamment le carburant les lubrifiants les sacs d aspirateur les lames les courroies le papier abrasif les forets les liqui...

Page 57: ...rêts punitifs découlant de la vente l utilisation ou l incapacité d utiliser ce produit Avis au consommateur La présente garantie vous confère des droits spécifiques reconnus par la loi Vous pourriez disposer de droits supplémentaires qui varient d une province à l autre Les dispositions figurant dans cette garantie ne visent pas à limiter à modifier àéliminer à rejeter ni à exclure toute garantie...

Reviews: