background image

Installation Guide for FibeAir IP-20S, FibeAir IP-20S Assured  


Page 59 of 105 


Ceragon Proprietary and Confidential


4.4


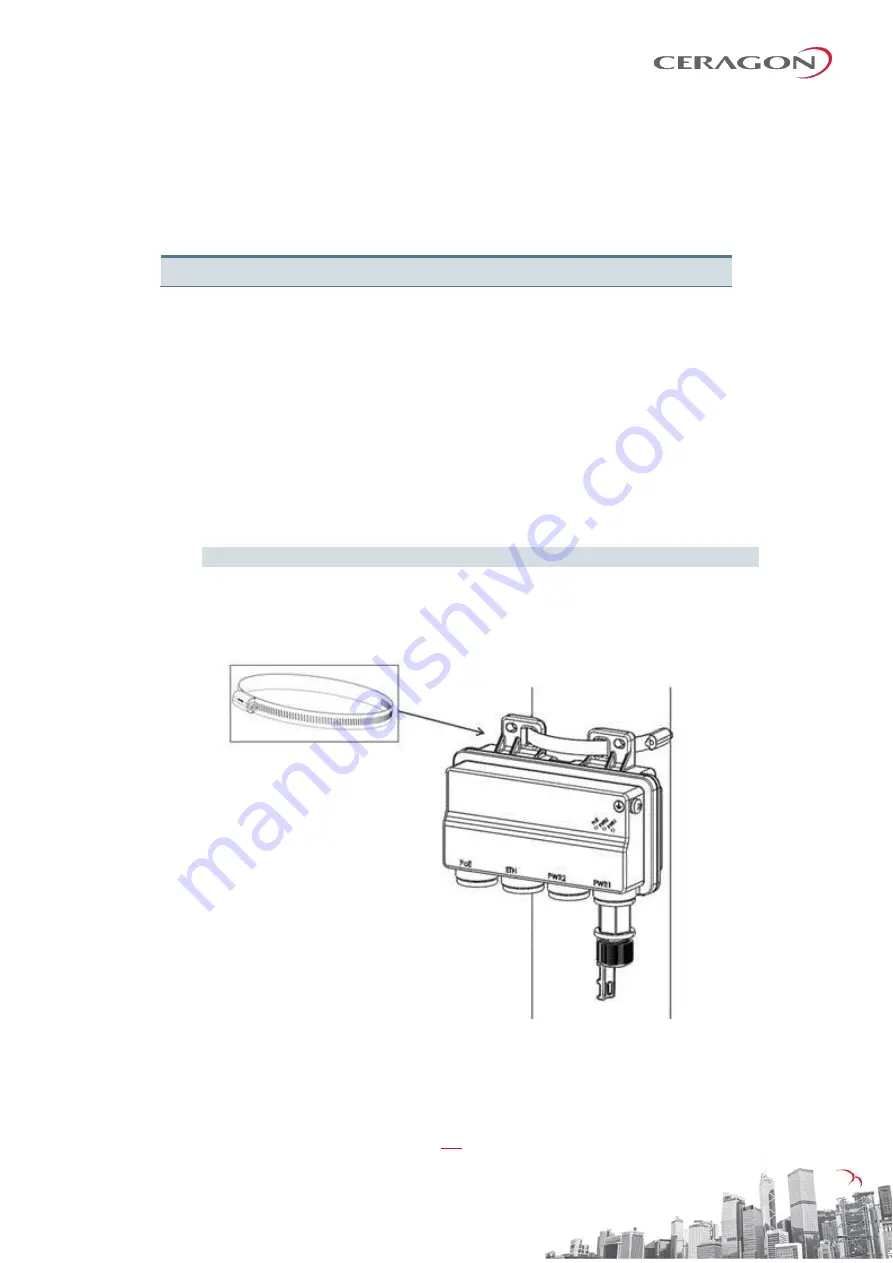
PoE Injector Pole Mount Installation


List of Items 

Item 

Description 

Quantity  Remarks 

PoE Injector 


Required Tools 


Slot Screwdriver 

Procedure 

To mount the PoE Injector on a pole: 

1  Mount and tighten the PoE Injector to a pole with a diameter of 114 mm using 

a stainless steel hose clamp. 

2  Pass the hose clamp through the pole mount slots. 

Note!


The Hose Clamp is not supplied with PoE injector kit. 

3  Attach the PoE injector to the pole. 
4  Connect the ends of the hose clamp. 
5  Tighten the hose clamp using the captive screw. 


Summary of Contents for FibeAir IP-20S

Page 1: ...Installation Guide FibeAir IP 20S FibeAir IP 20S Assured Part ID BM 0280 0 Doc ID DOC 00038494 Rev D 04 June 2017 Copyright 2017 by Ceragon Networks Ltd All rights reserved...

Page 2: ...Statement The Product may use open source software among them O S software released under the GPL or GPL alike license Open Source License Inasmuch that such software is being used it is released und...

Page 3: ...Overview 13 2 1 1 IP 20S Interfaces 14 2 2 PoE Injector 15 2 2 1 PoE Injector Interfaces 15 2 3 System Components 16 2 4 Adaptors and Installation Kits 17 2 5 Antenna Connection 23 2 6 Power Specific...

Page 4: ...3 PoE Injector Wall Mount Installation 57 4 4 PoE Injector Pole Mount Installation 59 4 5 PoE Injector 19 Rack Installation 60 4 6 PoE Injector ETSI Rack Installation 62 5 Generic Installation Proced...

Page 5: ...Confidential 8 Appendix A Mediation Device Losses 94 9 Appendix B Acceptance Commissioning Procedures 95 9 1 Site Acceptance Procedure 96 9 2 Site Acceptance Checklist Notes 99 9 3 Radio Link Commiss...

Page 6: ...11 4 0 4 4 Extender 16 Figure 12 Twist 16 Figure 13 Remote Mount for 4 0 16 Figure 14 PoE Injector 16 Figure 15 Tightening the Front Portion of the Gland 45 Figure 16 Tightening the Rear Portion of th...

Page 7: ...lor Code 31 Table 2 Ethernet Cable Electrical Requirements 32 Table 3 Ethernet Cable Mechanical Environmental Requirements 32 Table 4 Outdoor DC Cable Electrical Requirements 33 Table 5 Outdoor DC Cab...

Page 8: ...ystem parts and frequency bands What You Should Know For the warranty to be honored install the unit in accordance with the instructions in this manual Target Audience This guide contains technical in...

Page 9: ...Precautions To avoid malfunctioning or personnel injuries equipment or accessories kits plug in unit installation requires qualified and trained personnel Changes or modifications not expressly approv...

Page 10: ...elsesjord via nettplugg og eller via annet jordtilkoplet utstyr og er tilkoplet et kabel TV nett kan for rsake brannfare For unng dette skal det ved tilkopling av utstyret til kabel TV nettet installe...

Page 11: ...chgef hrt werden als die hier angegebenen kann dies gef hrliche Strahlung verursachen Beachten Sie beim Arbeiten mit IP 20S das folgende Stromschlag und Gefahrenrisiko Durch Abtrennen einer Stromquell...

Page 12: ...riginal packing case If intermediate storage is required the packed equipment must be stored in a dry and cool environment and out of direct sunlight in accordance with ETS 300 019 1 1 Class 1 2 1 3 3...

Page 13: ...tion FIPS 197 over radio links The FibeAir IP 20 Assured platform also provides Secured communication and protocols for management interface Centralized user authentication management via RADIUS Advan...

Page 14: ...roprietary and Confidential 2 Product Hardware Description 2 1 IP 20S Hardware Overview FibeAir IP 20S features an all outdoor architecture consisting of a single unit directly mounted on the antenna...

Page 15: ...affic Electric 10 100 1000Base T Supports PoE Optical 1000Base X optional Data Port 2 for GbE traffic Electric10 100 1000Base T Optical 1000Base X optional Data Port 3 for GbE traffic Electric 10 100...

Page 16: ...DC power connectors Figure 4 PoE Injector Two models of the PoE Injector are available PoE_Inj_AO_2DC_24V_48V Includes two DC power ports with power input ranges of 18 60 V each PoE_Inj_AO Includes o...

Page 17: ...components used in the IP 20S installation procedures NOTE In general the IP 20S utilizes the exact same mediation devices as the RFU C unless stated otherwise Figure 6 IP 20S Figure 7 Coupler Figure...

Page 18: ...13 Sym cplr kit RFU C15 Sym cplr kit RFU C18 Sym cplr kit RFU C23 Sym cplr kit RFU C26 Sym cplr kit RFU C28 Sym cplr kit NA RFU C38 Sym cplr kit NA RFU C TWIST KIT RFU C6 TWST Kit RFU C7_8 TWST Kit RF...

Page 19: ...le Mount RFU C ADAPTOR REMOTE MOUNT KIT RFU C6 RM_ADAPT RFU C7_8 RM_ADAPT RFU C10_11 RM_ADAPT RFU C13 RM_ADAPT RFU C WG Kit Flx WG 4FT 6 Flx WG 4FT 7_8 Flx WG 4FT 10_11 Flx WG 3FT 13 Flx WG 3FT 15 Flx...

Page 20: ..._1500 P ADPT_RF U C32 DM_1500 P ADPT_RF U C38 DM_1500 P NA Imperial to mm Transitions 6GHz 7 8GHz 10 11GHz 13GHz 15GHz 18GHz 23GHz 26GHz 28 31GHz 32GHz 38GHz 42GHz RFU C ADAPTOR KIT TO IMPERIAL ANT AD...

Page 21: ...OMT INT 1_6FT R NA Radio Waves RFU C6L OMT INT RW RFU C6H OMT INT RW RFU C7_8 OMT INT RW RFU C10_11 OMT INT RW RFU C13 OMT INT RW RFU C15 OMT INT RW RFU C18 OMT INT RW RFU C23 OMT INT RW RFU C26 OMT...

Page 22: ..._8 OMT INT CR RFU C10_11 OMT INT CR RFU C13 OMT INT CR RFU C15 OMT INT CR RFU C18 OMT INT CR RFU C23 OMT INT CR RFU C26 OMT INT CR RFU C28 OMT INT CR RFU C32 OMT INT CR RFU C38 OMT INT CR NA Xian Puti...

Page 23: ...Description PoE_Inj_AO PoE Injector all outdoor 48VDC Default offering PoE_Inj_AO_2DC_24V_48V POE Injector all outdoor redundant DC input 24VDC support and 48VDC support PoE_Inj_19inch_Rack_Mnt_kit P...

Page 24: ...e Flange Des Flex WG Side A Flange Des Flex WG Side B Flange Des Antenna Remote Flange Des 6 L U GHz 5 8 7 1 31 8 mm WR137 UDR70 PDR70 PDR70 UDR70 7 8 GHz 7 1 8 5 26 mm WR112 UBR84 PBR84 PBR84 UBR84 1...

Page 25: ...ages on telecommunication networks for host equipment users The RSL interface connector is intended for technician use only Disconnect device circuit breaker in the building installation Shall be read...

Page 26: ...to all glands on both the IP 20S unit and the PoE Injector 3 2 Cable Grounding Cables must be grounded as follows For optical SFP cable see Connecting an Optical Fiber Cable and SFP on page 37 no grou...

Page 27: ...should be connected to the main ground bar or terminal ground bar of the site 5 Perform a resistance test between the 2 lugs of the GND cable Verify that the result is 0 2 ohms Notes The unit s earthi...

Page 28: ...ected to the positive pole in the IP 20S power supply Any other connection may cause damage to the system Note For the warranty to be honored you must install the IP 20S in accordance with the instruc...

Page 29: ...PEN END M28 GLAND ARMORED O IP 20_FO_SM_LC2LC_ARM_30m CABLE FO DUAL LC LC 30M SM 55mm OPEN END M28 GLAND ARMORED O IP 20_FO_SM_LC2LC_ARM_50m CABLE FO DUAL LC LC 50M SM 55mm OPEN END M28 GLAND ARMORED...

Page 30: ...M_30m CABLE FO DUAL LC LC 30M MM 55mm OPEN END M28 GLAND ARMORED O IP 20_FO_MM_LC2LC_ARM_50m CABLE FO DUAL LC LC 50M MM 55mm OPEN END M28 GLAND ARMORED O IP 20_FO_MM_LC2LC_ARM_80m CABLE FO DUAL LC LC...

Page 31: ...RIAL CAT 5E SFUTP 4X2X24AWG UV RESISTANCE 305M CAT5E_Arm_50m CABLE RJ45 TO RJ45 STR 50M CAT 5E M28 GLAN ARM UV RESISTANCE CAT5E_Arm_70m CAT5E_Arm_75mCABLE RJ45 TO RJ45 STR 70M CAT 5E M28 GLAN ARM UV R...

Page 32: ...FibeAir IP 20S FibeAir IP 20S Assured Page 31 of 105 Ceragon Proprietary and Confidential Table 1 Ethernet Cable Color Code Pair Wire A Wire B 1 WHITE blue BLUE 2 WHITE orange ORANGE 3 WHITE green GRE...

Page 33: ...able type CAT 5e SFUTP 4 pairs according to ANSI TIA EIA 568 B 2 Wire gage 24 AWG Stranding Solid Voltage rating 70V Shielding Braid Foil Pinout Table 3 Ethernet Cable Mechanical Environmental Require...

Page 34: ...V Spark test 4KV Dielectric strength 2KV AC min Mechanical Environmental Requirements Jacket PVC double UV resistant Outer diameter 7 10 mm Operating Storage temperature range 40 C 85 C Flammability r...

Page 35: ...special care to apply the proper amount of force in order to avoid damage to the cable This is especially important for optical SFP cables The following cable clamps are available Table 6 Cable Clamps...

Page 36: ...ve glands each Table 7 Glands Kit Marketing Model Marketing Description IP 20_Glands_kit IP 20_Glands_x5_kit In addition gland caps can be ordered to protect the cable and connector from damage when e...

Page 37: ...r FibeAir IP 20S FibeAir IP 20S Assured Page 36 of 105 Ceragon Proprietary and Confidential In order to remove the plastic plugs for the unit you can use the flange of supplied glands to disconnect th...

Page 38: ...ecting an Optical Fiber Cable and SFP To connect an optical fiber cable and the SFP transceiver 1 Use a pre assembled cable 2 Split the connector into two separate LC connectors one for each fiber 3 R...

Page 39: ...ial 6 Insert the wires with the connectors one by one into the cable gland 7 Secure the cable to the lip of the gland using a tie wrap Important Note If you are raising the cable to a radio unit on a...

Page 40: ...click to ensure that it is fully inserted 9 Remove the tie wrap securing the cable to the gland Note A new tie wrap must be used to secure the cable to the gland at the end of the procedure as describ...

Page 41: ...d hole in the unit Tightening the gland at an angle can ruin the thread on the gland and prevent proper sealing of the interface Tighten the gland gently and make sure there is no resistance If there...

Page 42: ...nstallation Procedure This procedure applies to all cable types and explains how to install the cables using long glands The gland is supplied assembled 1 Before inserting a cable you must disassemble...

Page 43: ...sing a gland cap see Step 5 make sure to leave enough space for the gland cap to fit into the gland without disturbing the cable 5 Optionally after securing the cable into the body of the gland you ca...

Page 44: ...gland you can connect a rope to the hook and use this to lift the gland and cable up to the radio unit Before screwing the gland into the radio unit you must remove the gland cap 7 If you used an M28...

Page 45: ...t is fully contained between the gland and the radio and cannot be seen Tighten the gland gently and make sure there is no resistance If there is resistance stop immediately and thread out the gland V...

Page 46: ...FibeAir IP 20S Assured Page 45 of 105 Ceragon Proprietary and Confidential Figure 15 Tightening the Front Portion of the Gland Figure 16 Tightening the Rear Portion of the Gland 12 Secure the cable to...

Page 47: ...or must be ordered separately See DC Cable and Connector on page 29 To connect a DC power cable 1 Strip off 45 mm from the cable jacket 2 Expose 10 mm at the edge of each of the two wires 3 Insert the...

Page 48: ...r FibeAir IP 20S FibeAir IP 20S Assured Page 47 of 105 Ceragon Proprietary and Confidential 6 Tighten the two top screws 7 Plug the power cable with connector into the IP 20S power connector 8 Tighten...

Page 49: ...nd make sure the gland is even with the cover Tighten the gland gently and make sure there is no resistance If there is resistance stop immediately and verify that the gland is not being inserted at a...

Page 50: ...e to IP 20S Note To ensure proper grounding and connectivity it is recommended to use pre assembled Ethernet cables 3 10 1 Preparing the Ethernet Cable and Plug in Field Important Note To ensure prope...

Page 51: ...ch wire is fully inserted into the front of the RJ45 plug and in the correct order according to the pinouts shown in Section 3 5 5 Outdoor Ethernet Cable Specifications The sheath of the Ethernet cabl...

Page 52: ...back the CAT5E plug cover on the connector plug Note It is recommended that the newly prepared cable be tested with a Cable Analyzer such as the FLUKE DTX 1800 or the equivalent to make sure the cabl...

Page 53: ...105 Ceragon Proprietary and Confidential 3 10 3 Connection of Ethernet Cable to IP 20S To connect the Ethernet cable to the IP 20S 1 Remove the relevant cap from the IP 20S radio You can use the side...

Page 54: ...nd make sure the gland is even with the cover Tighten the gland gently and make sure there is no resistance If there is resistance stop immediately and verify that the gland is not being inserted at a...

Page 55: ...s to each unit The Protection signaling cables are available pre assembled from Ceragon in various lengths but users can also prepare them in the field The following sections explain how to prepare an...

Page 56: ...nagement port Mng A standard CAT5E cable should be connected to the splitter s management port in order to utilize out of band external management Note Even for systems that use in band management ini...

Page 57: ...t refer to Connecting a DC Power Cable on page 46 This cable is not supplied with the PoE Injector The total length of the cable between the IP 20S port and the Switch Router the device is connected t...

Page 58: ...ty Remarks 1 PoE Injector 1 1 Glands Kit 1 For outdoor installations Note Glands are required for outdoor installations The glands kit three or five glands is not supplied with the PoE Injector and mu...

Page 59: ...Installation Guide for FibeAir IP 20S FibeAir IP 20S Assured Page 58 of 105 Ceragon Proprietary and Confidential 4 Place the washers on the bolt 5 Tighten the nuts...

Page 60: ...Required Tools Slot Screwdriver Procedure To mount the PoE Injector on a pole 1 Mount and tighten the PoE Injector to a pole with a diameter of 114 mm using a stainless steel hose clamp 2 Pass the hos...

Page 61: ...Quantity Remarks 1 PoE Injector 1 2 PoE Injector 19 Rack Mount Kit 1 Required Tools Philips Screwdriver To mount the PoE Injector on a rack 1 Mount the PoE Injector to a 19 rack using a 19 rack adapt...

Page 62: ...Installation Guide for FibeAir IP 20S FibeAir IP 20S Assured Page 61 of 105 Ceragon Proprietary and Confidential...

Page 63: ...ation List of Items Item Description Quantity Remarks 1 PoE Injector 1 2 PoE Injector ETSI Rack Mount Kit 1 Required Tools Philips Screwdriver To mount the PoE Injector to an ETSI rack 1 Mount the PoE...

Page 64: ...oprietary and Confidential 3 Mount the PoE Injector on the adaptor through the wall mounting holes using M6 screws and washers t 4 Mount the 19 rack adaptor with the ETSI ears on the ETSI rack using f...

Page 65: ...he radio or mediation device use the following torque according to frequency and screw type 6 GHz M5 10 32 3 5 Nm 7 8 15 GHz M4 8 32 2 5 Nm 18 42 GHz M3 4 40 1Nm 5 2 Pole Mount Installation The pole d...

Page 66: ...Installation Guide for FibeAir IP 20S FibeAir IP 20S Assured Page 65 of 105 Ceragon Proprietary and Confidential Figure 18 Mount IP 20S DC Pole Mount to Pole...

Page 67: ...TO FLEXIBLE WG IMPERIAL 1 3 RFU C POLE MOUNT KIT 1 4 FLEXIBLE WAVEGUIDE IMPERIAL KIT 1 Required Tools Metric offset hexagon key wrench set Imperial offset hexagon key wrench set Phillips 1 2 screwdriv...

Page 68: ...s and washers that are assembled to the IP 20S radio Pay attention that the O rings are mounted on the RFU C Adaptor plate 3 Connect the Flexible Waveguide and Sealing Gasket supplied with the Flexibl...

Page 69: ...tor supplied with the RFU C Remote Pole Mount kit using the four flat screws supplied with the RFU C Adaptor kit 2 Mount the IP 20S using the four captive screws and washers supplied assembled in the...

Page 70: ...aveguide 18 42 GHz 1 Loosen the 2 screws and remove the twist 2 Mount the IP 20S Radio to the RFU C Pole Mount Bracket using the four captive screws and washers supplied assembled in the IP 20S 3 Conn...

Page 71: ...Installation Guide for FibeAir IP 20S FibeAir IP 20S Assured Page 70 of 105 Ceragon Proprietary and Confidential...

Page 72: ...1 IP 20S RADIO 1 Required Tools The following tools are required for the IP 20S installation Metric offset hexagon key wrench 6 Phillips 2 screwdriver Procedure To install the IP 20S in a direct moun...

Page 73: ...Installation Guide for FibeAir IP 20S FibeAir IP 20S Assured Page 72 of 105 Ceragon Proprietary and Confidential Figure 21 Horizontal Vertical Pole Figure 22 Twist Orientation...

Page 74: ...cate the twist with the letter H vertical to the hook cover and fasten the two screws For vertical polarization locate the twist with the letter V vertical to the hook cover and fasten the two screws...

Page 75: ...Installation Guide for FibeAir IP 20S FibeAir IP 20S Assured Page 74 of 105 Ceragon Proprietary and Confidential Note Make sure the polarization mounting direction of the IP 20S is correct...

Page 76: ...2 0DP configuration List of Items Item Description Quantity Remarks 1 IP 20S RADIO 1 2 RFU C OMT kit 1 Required Tools Metric offset hexagon key set Metric wrench key set Procedure 1 Prior to the insta...

Page 77: ...e of the O ring Figure 24 Connect OMT Kit to Antenna 3 Mount the two O Rings supplied with the RFU C OMT kit on the OMT body Make sure the mounting direction is correct as shown in the section view 4...

Page 78: ...e 77 of 105 Ceragon Proprietary and Confidential 5 Tilt the entire assembly as described in the dual polarization link alignment procedure to achieve maximum XPD Cross Polar Differentiation After link...

Page 79: ...t Note This procedure can also be used for 1 0DP HW ready for 2 0DP configuration List of Items Item Description Quantity Remarks 1 IP 20S RADIO 1 2 RFU C OMT kit 1 3 FLEXIBLE WG KIT 2 4 RFU C POLE MO...

Page 80: ...installation follow the antenna manufacturer s instructions to use the circular adaptor Remove the existing rectangular transition swap the O ring and install the circular transition instead Figure 2...

Page 81: ...n the section view This procedure is applicable for all remote mount configurations that involve an OMT 1 For 6Ghz UDR70 i Mount the O Ring supplied with the OMT kit ii Mount OMT Adaptor 1 on the OMT...

Page 82: ...e OMT kit ii Mount the OMT adaptor with its installed sealing gasket on the OMT and tighten using the four M4 screws and washers supplied with the OMT Adaptor kit iii Mount the flexible waveguide with...

Page 83: ...C Pole Mount Bracket using the four captive screws and washers supplied assembled in the IP 20S 6 Connect the Flexible Waveguide and sealing O Ring supplied with the Flexible Waveguide Imperial kit Ti...

Page 84: ...tools are required for the installation Metric offset hexagon key wrench 6 Phillips 2 screwdriver Metric offset hexagon key wrench 2 5 and 3 Procedure In 1 1 direct mount installation the IP 20S is a...

Page 85: ...ietary and Confidential Important Make sure the polarization mounting direction of the twist to the coupler is according to the antenna polarization 2 Mount the coupler radio on the antenna using the...

Page 86: ...tallation Guide for FibeAir IP 20S FibeAir IP 20S Assured Page 85 of 105 Ceragon Proprietary and Confidential 3 Mount the two O Rings supplied with the RFU C Coupler kit as shown in the following figu...

Page 87: ...20S FibeAir IP 20S Assured Page 86 of 105 Ceragon Proprietary and Confidential 4 Mount the IP 20S to the body of the coupler using the four M8 captive screws and washers that are supplied assembled in...

Page 88: ...ration a coupler should be used 5 FLEXIBLE WG METRIC KIT 1 Required Tools The following tools are required for the installation Metric offset hexagon key wrench 6 Phillips 2 screwdriver Metric offset...

Page 89: ...Mount the two O Rings supplied with the Coupler kit according to the Coupler kit instructions 3 Mount the IP 20S radio to the body of the coupler using the four M8 captive screws and washers that are...

Page 90: ...5 Mount the flexible waveguide on the coupler and tighten the screws and washers Note For 6 GHz only4 screws should be used as shown in the pictures below 6 Place the O Ring in the other end of the f...

Page 91: ...ric single pol RFU C interface From this moment forth it is ready for any subsequent IP 20S configuration The following table describes available adaptors Other Vendors Antennas 6GHz 7 8GHz 10 11GHz 1...

Page 92: ...nd RFU C Dragonwave Adapter Kit ADPT CIRC RFU C_11 DW ADPT CIRC RFU C_13 DW ADPT CIRC RFU C_18 DW ADPT CIRC RFU C_23 DW RFU C INTRACOM ADAPTOR KIT ADPT_RF U C18 INTRACO M _ANT IP 20C s and RFU C REMEC...

Page 93: ...tion ADPT_RF U C18_SIAE _ANT_DP Kit for converting a ValuLine 3 antenna for integration with RFU C ValuLine 3 antennas only For important information on when these kits can be used refer to Special No...

Page 94: ...ndrew s ValuLine 3 antennas 1 6ft However since there are some unique cases in which Andrew provided special antennas which are not supported by these adaptors it is recommended that you supply your C...

Page 95: ...ennas are to be used an adaptor with a 0 1 dB loss should be considered The numbers above represent the typical loss per component Configuration Interfaces 6 8 GHz 11 GHz 13 15 GHz 18 26 GHz 28 42 GHz...

Page 96: ...procedure is to verify correct installation and operation of the installed link and the interoperability with customer end equipment Ceragon s Acceptance and Commissioning procedure includes the follo...

Page 97: ...ANTENNA MOUNTING Antenna mount type Mount is of sufficient height to clear local obstructions OK Mount is safely positioned to not cause a safety hazard OK Mount is secure and perpendicular OK Mount...

Page 98: ...veguide bolts are secured using washers and lock washers as appropriate OK Flexible waveguide is secured to the pole OK 6 CAT5 Fiber Optic CABLE Overall cable length Cable type CAT5 connectors assembl...

Page 99: ...ntervals 0 5 m recommended OK Flexible WG has no sharp bends kinks or crushed areas All bends are per manufacturer specifications OK Flexible WG point of entry to building shelter is weather proof OK...

Page 100: ...t to cause a safety hazard No person should be able to walk in front of or look directly into the path of the microwave radio beam Where possible the pole should be away from the edge of the building...

Page 101: ...should be removed All other plugs should be left in position 3 ODU Outdoor Unit The ODU is grounded as per installation instructions See the third point in the Antenna Mounting section above The ODU...

Page 102: ...Ethernet Line Interfaces Test Connect Ethernet Packet Analyzer to the GbE port Use physical loop at remote end or connect second analyzer Run Packet Loss test for at least one hour load rate as per Ce...

Page 103: ...the link and that you are able to perform changes to the link configuration frequency channel Tx power system name time date etc Verify that correct parameters are reported when performing the above...

Page 104: ...ning the Commissioning Log is important for tracking your installations and to provide essential data for Ceragon Networks Upon completing the Commissioning Log send the log to Ceragon support center...

Page 105: ...Main dBm RSL Diversity dBm Deviation from exp RSL 4 dB 5 COMMISSIONING TESTS Site 1 Site 2 Line loopback Pass Pass ODU loopback Pass Pass Radio BER Pass Pass FE test Pass Pass GbE test Pass Pass 6 MAN...

Reviews:

Related manuals for FibeAir IP-20S