background image

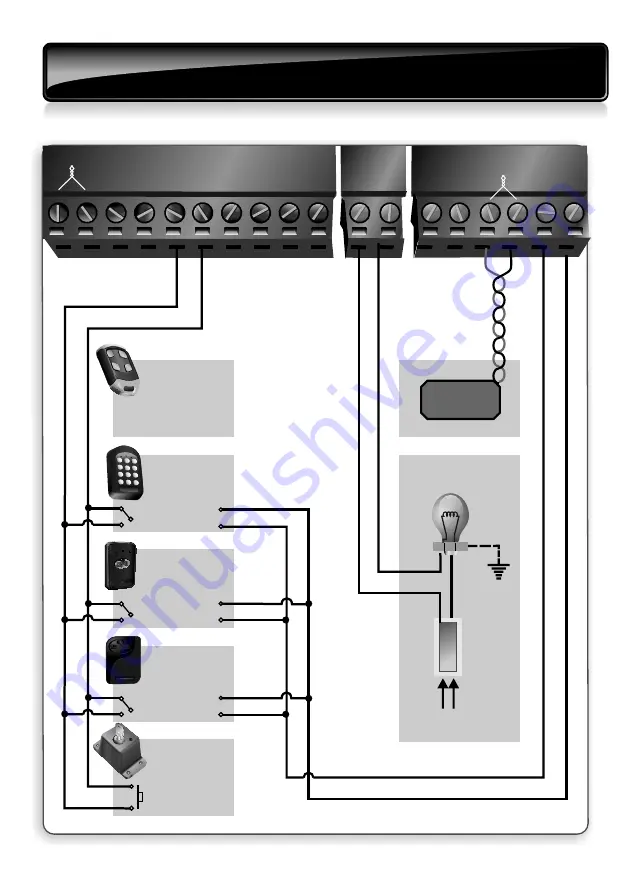
15. Simplex Mode: Option 1 (Recommended) 
    - electrical connections

Safety  Beam

FRX

COM

MI

COM

2

3

4

1

5

NMI

Lower

Raise

Status

TVI

TVI

LCK

-12V Out

+12V Out

A

UX Out

Close

7

8

9

10

13

14

11 12

6

15

16

17

18

OPTION 1

SOLO or Lattice

proximity access

control system

COM

N/O

1

2

abc 

3

abc 

3

Efg

4

Hij 

5

klm 

6

nop 

7

qrs 

8

tuv 

9

wxvz 

10

*

#

OPTION 2

CENTURION 

transmitter with 

onboard receiver

SMARTGUARD

keypad

COM

N/O

External 

CENTURION 

receiver

COM

N/O

Normally-open

Pushbutton

COM

N/O

Page 31

12V+

OPTION 3

12V-

OPTION 4

OPTION 5

Safety

loop

N

L

Courtesy

light

Earth

L  N  E

Two pole 

mains 

isolator

L

N

AC supply

220V AC 50HZ

ON

OFF

FIGURE 37. SIMPLEX MODE ELECTRICAL WIRING

12V+

12V-

12V+

12V-

Summary of Contents for SECTOR 3

Page 1: ...SECTOR installation manual HIGH VOLUME INDUSTRIAL TRAFFIC BARRIER TM...

Page 2: ...ranties with respect to this manual No part of this document may be copied stored in a retrieval system or transmitted in any form or by any means electronic mechanical optical or photographic without...

Page 3: ...op detectors and associated functionality FLUX OB features FLUX OB diagnostics 9 Selecting Operating Mode Simplex Mode Complex Mode PLC Mode 10 Cabling requirements Simplex Mode Complex Mode basic Fre...

Page 4: ...ting up the limits and features for the SECTOR barrier Setting up the limits 21 SECTOR menu navigation 22 SECTOR controller features 23 Diagnostics Diagnostic LEDs LCD display Buzzer feedback 24 Facto...

Page 5: ...Page 26 SECTOR enclosure positioning Page 26 Fit the pole Page 27 Level the boom pole Page 28 Balance the spring Page 28 These abbreviated instructions are for the experienced installer who needs a c...

Page 6: ...Page 39 Page 41 Page 61 step 9 Electrical setup Page 2 step 10 Set the limits and features step 12 Carry out professional handover to client Commissioning and handover step 1 1 Set additional features...

Page 7: ...s danger to safety Before attempting any work on the system cut electrical power to the operator and disconnect the batteries The mains power supply of the automated system must be fitted with an all...

Page 8: ...leave packing materials plastic polystyrene etc within reach of children as such materials are potential sources of danger Dispose of all waste products like packaging materials worn out batteries etc...

Page 9: ...CLASS B Radiated emissions 150MHz to 1GHz CISPR 22 CLASS B Conducted emissions 150 KHz to 1GHz Immunity IEC 61000 4 2 Electrostatic discharge IEC 61000 4 3 Radiated immunity 80MHz to 1000MHz IEC 6100...

Page 10: ...ontroller are Interactive graphical user interface via a backlit LCD display to facilitate and simplify the installation process Fully automated single button limit setup Independent Memory Input Non...

Page 11: ...20 240V AC 10 50Hz 12V DC Battery driven standard capacity 7Ah CP84SM 2A 13 8V 170mA Allan key operated from outside unit 3000 80 3000 3000 Electronic 15 C to 65 C CENTURION code hopping multichannel...

Page 12: ...el with epoxy coating Grade 430 stainless steel with epoxy coating Grade 316 brushed stainless steel SECTOR 3 Base frame surface protection Mild steel hot dip galvanised Grade 316 brushed stainless st...

Page 13: ...uld be useful during the installation This icon indicates warning caution or attention Please take special note of critical aspects that MUST be adhered to in order to prevent injury This icon denotes...

Page 14: ...2 Gearbox assembly 3m 4 5m and 6m 3 Spring locating washer 4 Spring bush 3m 4 5m and 6m 5 Counterbalance assembly 3m 4 5m and 6m 6 Retaining bracket 7 Floor spacer 8 Boom pole 3m 4 5m and 6m 9 Boom c...

Page 15: ...and pin lugs Self locking pliers vice grip Pliers Side cutters Masonry bits 6mm 20mm for sites with rawlbolt foundation plates Steel bits 8 5mm 5 0mm 4 0mm Spade Spirit level Measuring tape Welding m...

Page 16: ...ge duty cycle of the site and the length of the boom pole required are within the barrier specifications Check that there is sufficient clearance on the side of the roadway to mount the barrier Check...

Page 17: ...N DIP 17 18 PWR DIA DETECTED LEVEL 5 LEVEL 4 LEVEL 3 LEVEL 2 LEVEL 1 FAULT RUN FREQ HI LO ASB PERM PRES 0 0 0 0 1 1 1 1 UNI DIR FRX 0 0 0 0 1 1 1 1 0 0 0 0 1 1 1 1 12V Out 12 13 14 15 16 FRX LOOP Free...

Page 18: ...maintained as long as a vehicle remains on the loop The danger in using this setting is that any change in the environment for example the introduction of metal into the vicinity of the loop will not...

Page 19: ...ng the number of turns Check that there is no short circuit on the loop feeder wiring of the loop If there is no short circuit then the inductance is too small and more turns of wire should be added t...

Page 20: ...t where required must be soldered and made waterproof Faulty joints will lead to unreliable operation The loop should be either square or rectangular in shape with a minimum distance of 1m between opp...

Page 21: ...cle moving past the barrier However the closing loop is always recommended in preference to beams as it operates more reliably when used with barriers In this Mode of Operation it will act purely as a...

Page 22: ...adjustable period of time afterwards 2a Free exit typically applicable to Complex Mode It is possible to use the free exit facility on the controller to automatically raise the barrier for vehicles e...

Page 23: ...ommends installing Inductive Loop Detectors in preference to infrared beams 1 Simplex Mode Guard hut Courtesy light To mains supply Direction of travel 2 3 4 1 To mains supply 1 Direction of travel 6...

Page 24: ...p detector for specific details or refer to page nine for information on the FLUX OB onboard inductive loop detector Number of cores and type of cable could vary depending on brand of access control s...

Page 25: ...the left hand side of the road from which the vehicle approaches The door always faces oncoming traffic Access door Direction of traffic Changed orientation Left hand orientation It is possible to cha...

Page 26: ...l view of barrier Right hand configuration when the pole is raised at up right position The default orientation is the operator on the right hand side of the roadway with the pole pointing to the left...

Page 27: ...he pivot and related parts to the hole in the output plate designated for the LH configuration Fit the counterbalance spring 9 Push the taper bush through the slot in the cross beam and rotate it 90 s...

Page 28: ...rry on loosening the cap screw until it releases the boom coupler FIGURE 15 REMOVING THE COUPLER FIGURE 16 REMOVING THE COUPLER FIGURE 17 REMOVING THE COUPLER FIGURE 18 REMOVING THE COUPLER SECTOR enc...

Page 29: ...boom coupler output shaft splines so that the boom coupler is in its closest vertical position 20 Fit the washer and cap screw and then tighten using an 8mm Allen Key Boom coupler Boom coupler SECTOR...

Page 30: ...le entry Holding down bar Access door 110 190mm M12 anchor bolts 70mm 200mm minimum minimum 2 Prepare hole for concrete foundation 3 Install cable conduits making sure that the conduits exit in cable...

Page 31: ...Spring washer and nuts Boom coupler 7 Mark and drill the 8 5mm holes in the boom pole according to the measurements 8 Slide the boom pole retainer piece into the boom pole and push the mounting bolts...

Page 32: ...at least three times before the new adjustments will be registered by the controller 5 It is much easier to perform the tensioning operation while the boom pole is in the vertical raised position as...

Page 33: ...he event of a system failure the boom pole can be raised or lowered by hand When the barrier is in Lock Mode it can be manually released as follows 1 Insert the 8mm Allen Key provided into the release...

Page 34: ...rding to the requirements of all applicable local electrical codes It is recommended that a licensed electrical contractor perform such work Page 30 Connect all wiring 1 Connect all cables as required...

Page 35: ...ty access control system COM N O 1 2 abc 3 abc 3 Efg 4 Hij 5 klm 6 nop 7 qrs 8 tuv 9 wxvz 10 OPTION 2 CENTURION transmitter with onboard receiver SMARTGUARD keypad COM N O External CENTURION receiver...

Page 36: ...boom pole Raise A dedicated input to only raise the boom pole TVI Potential free contact that can be used for a courtesy or security light The light illuminates when the barrier is operated and remai...

Page 37: ...uv 9 wxvz 10 OPTION 2 CENTURION transmitter with onboard receiver SMARTGUARD keypad COM N O External CENTURION receiver COM N O Normally open Pushbutton COM N O 12V 12V _ 12V 12V 12V OPTION 3 12V OPTI...

Page 38: ...n alternative to an inductive loop but not recommended MI In this mode the memory input acts simply to raise and lower the boom pole with sequential activations Lower A dedicated input to only lower t...

Page 39: ...1 12 6 15 16 17 18 OPTION 1 COM N O COM N O COM N O 12V OPTION 2 12V OPTION 3 Safety loop N L Courtesy light Earth L N E Two pole mains isolator L N AC supply 220V AC 50HZ ON OFF Magnetic card reader...

Page 40: ...osing signals are applied to the closing input or the Autolower time expires NMI Typically used with ticket vending machines refer to Option 2 Lower A dedicated input to only lower the boom pole Raise...

Page 41: ...d approximately 500 millimetres horizontally apart MI Typically not used NMI Non memory input responds only when the trigger signal to the input is removed It does not react when the signal is given C...

Page 42: ...0 millimeters otherwise it may cause magnetic interference Proceed to Menu level 6 3 and set the free exit loop direction to UNI Safety Beam Although not recommended this input can be used if a closin...

Page 43: ...owering up at any stage after this press and hold the oblong enter button for two seconds Select the Limits Menu by pressing the oblong enter button Follow the onscreen instructions to complete the se...

Page 44: ...etting has been programmed into the controller Referred to as an Operating Standard or Profile these defaults have been determined to suit the requirements of the specific region where the installatio...

Page 45: ...raised 3 4 2 Autolower partly raised 3 4 3 Autolower partly lowered 2 Safety 2 1 Collision force 2 2 Collision count 2 3 Alarm output 2 4 LCK input as ESTOP 2 5 External boom status indication 4 Mode...

Page 46: ...8 2 Time periods 8 3 Exclusions 8 4 Delete all Time periods and exclusions 8 2 1 Add Time period 8 2 2 Delete Time period 8 2 3 Edit review Time period 8 3 1 Add exclusion 8 3 2 Delete exclusion 8 3 3...

Page 47: ...u locked 10 1 Add remotes 10 2 Delete remotes 10 3 Edit remote button 10 4 Autolearn remotes 10 5 Tx menu locked 10 6 Onboard receiver enable disable 10 2 1 Delete by ID 10 2 2 Delete button 10 2 3 De...

Page 48: ...pole reaches lowered position A valid trigger input will clear the shutdown Alarm output An alarm is activated if the multiple collision shutdown is triggered This menu item configures the different...

Page 49: ...ince XIO has been configured to be active for CLOSED only the circuit will be completed and Operator 2 will be allowed to operate Menu 3 Autolower Autolower Status If enabled the boom pole will automa...

Page 50: ...not selected Raise When Mains Fail If enabled the boom pole will raise in event of a mains power failure Boom pole will remain raised until mains power is restored Spike Interface If enabled this fac...

Page 51: ...e while the closing loop is activated and for a period of 30 seconds thereafter This time is fixed Alarm Output This menu item configures the different alarm outputs Crawl Distance Sets the final craw...

Page 52: ...y any of the following inputs outputs during a Time period Inputs Barrier Raise Barrier Lower Barrier Disable Lck also referred to as Holiday Lockout Closing Loop ILD Outputs Aux Out this is a switchi...

Page 53: ...ions Factory Defaults Restore only defaults for the operating standard profile chosen no other settings affected Delete All Remotes Delete all the remotes stored in the system no other settings affect...

Page 54: ...Menu Locked Lock the Remote controls menu and prevent unauthorized addition of new transmitters Once enabled the Remote controls menu can only be accessed by pressing a valid transmitter button It is...

Page 55: ...seconds Pillar Light override is activated Two flashes every two seconds No mains present Three flashes every two seconds Battery voltage is low Four flashes every two seconds Multiple collisions have...

Page 56: ...the Autolower function Displays off if Autolower is not selected OVR if Autolower is overridden and the remaining Autolower Time if Autolower is active 4 Pillar Light TVI information Displays the rem...

Page 57: ...for 30 seconds 5 beeps periodically for 30 seconds 5 beeps periodically for 30 seconds 5 beeps periodically for 30 seconds 4 beeps periodically for 10 seconds Periodic until condition is cleared by u...

Page 58: ...00 00 00 00 10 deg sec 10 deg sec 3 deg 3 deg 5 deg 5 deg 1 deg 5A Parameter Description Menu 1 not applicable Menu 2 Raising collision force Lowering collision force Collision count Alarm output LCK...

Page 59: ...00 15 04 00 09 59 59 Minimum 00 01 01 00 00 02 00 Parameter Description Menu 6 ILAC control Rollback time FRX loop direction Presence alarm status Presence time Break in Alarm Alarm output Menu 7 TVI...

Page 60: ...obtain a trigger signal Momentarily connecting the input to Com will cause the boom pole to raise stop or lower depending on the operating mode selected Each trigger impulse received will cause the ba...

Page 61: ...ally When this connection is broken i e a vehicle drives onto the inductive ground loop it will prevent the barrier from lowering if it is stationary and will stop and raise the barrier if it is lower...

Page 62: ...t shaft Check physical condition of battery and terminals check battery charge state and charging voltage on diagnostic screen See procedure A Ensure that nothing is hindering the trajectory of the bo...

Page 63: ...g voltage right hand voltage This should indicate XV Check that the mains power is turned on check 220 240V AC on the mains connector Check that the red LED on the side of the charger is lit Check the...

Page 64: ...be fitted to the SECTOR barrier boom pole 3m and 4 5m poles only to facilitate pedestrian access control The fence consists of a series of vertical poles which not only cover the area beneath the boo...

Page 65: ...or can also be installed to add an extra level of safety to any installation The FLUX 11 is a single channel stand alone highly sensitive inductive loop detector designed for vehicle access applicatio...

Page 66: ...bstructions NO ONE MAY GO UNDER A MOVING BARRIER Always keep people and objects away from the barrier NEVER LET CHILDREN OPERATE OR PLAY WITH THE BARRIER CONTROLS and do not allow children or pets nea...

Page 67: ...Notes...

Page 68: ...www centsys com 0 07 A 0012 SECTOR Installation manual...

Reviews:

Related manuals for SECTOR 3