background image

REVEX 

2PH from 120A to 210A


User’s manual

45

Save

: save the recipe in a fi le 

Save as

: save a copy of the recipe in a fi le 

Download to unit

: send the current recipe parameters in the connected 

power controller 

Print

: print the recipe (see sample at right) 

Print report

: print the recipe (see sample at right) 

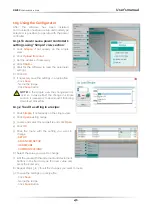
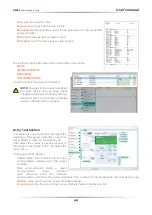
To edit the actual recipe values click a parameter menu name: 

SETUP


ADVANCED SETUP


HARDWARE


COMMUNICATIONS


and after click on the value and modify it.

NOTE!

 Changes to the values here aff ect 

the open recipe only. To apply these 
changes to the power controller settings, 
download them to the power controller 
using the Download to unit option. 

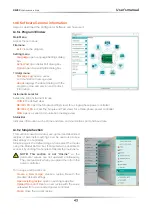
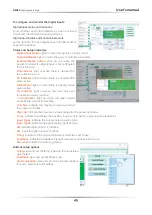
10.6.3  Test Section 

This section is used to monitor and adjust the 
operation of the power controller in real time 
using  RS485 or USB communication port. 
After select the model, is possible access to 
this section clicking the “TEST” tab below the 
main menu.

Operating on TEST Section:

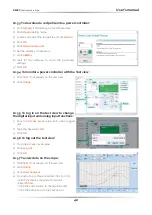
Online

 button: is the button to start or stop 

communication updates with the power 
controller.
After communication starts, a green 
communication status indicator 
spins clockwise when the software 
communicates correctly with a power controller, if the connection link is broken the color will become red

Address

: value used to set the power controller address

Access Level:

 click the value to log in or out. Default Password address is “1111”. 

To confi gure and monitor the digital inputs: 

Digital input states and functions

:    

show whether each input detects an open or closed 
circuit and the function the input performs. 

Digital Input States and Function Selectors

:  

set the function for each digital input. Click DI1 or DI2 to 
expand the options. 

Status and Setup Indicators: 

Digital input status

: light on when the input is a closed circuit 

Enable indicator

: light on when the power controller is enabled 

Enable/Disable  button:

 click on to enable the 

power controller if a digital input is not confi gured 

for this function 

ON indicator

: light on when there is demand for 

the output to be on 

SC indicator

: light on when there is a shorted SCR 

alarm active

HB indicator

: light on when there is a heater break 

alarm active

TH indicator

: light on when the heat sink over 

temperature alarm is active

I Lim indicator

: light on when the load current 

exceeds the current limit setting 

Unit Size

: Indicate the maximum rated current of 

the power controller 

Max Volt

: indicate the maximum rated voltage for the power controller 

V Aux

: indicate the voltage the auxiliary input is set to use for powering the electronics 

Input Type1

: indicate the signal analog input 1’s type 

Input Type2

: indicate the signal analog input 2’s type

DI1

: indicate digital input 1’s function 

DI2

: indicate digital input 2’s function 

Firing

: indicate the fi ring type the power controller is set to use 

Feedback

: indicate the feedback type the power controller is set to use 

Data Log

: indicate the Data Log status. 

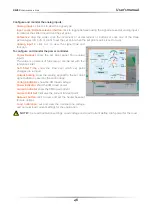
Buttons setup options: 

Firing

: view and set the fi ring type and the associated 

parameters 

Feedback

: view and set feedback type

Communication

: view and set communication options 

for ports, protocols and fi eldbus

Summary of Contents for REVEX 2PH RX2 280 Series

Page 1: ...ANUAL Rev 05 2022 013 M RX2 120 210 2PH from 120A to 210A CD Automation S r l Via Picasso 34 36 20025 Legnano MI Italy Tel 39 0331 577479 Fax 39 0331 579479 E mail info cdautomation com Web www cdautomation com ...

Page 2: ...y Standard EN60947 1 2007 A1 2011 A2 2014 EN60947 4 3 2014 Generic Emission standard EN60947 4 3 2014 Group 1 Class A emissions Generic Immunity standard EN60947 4 3 2014 Industrial Immunity SODDISFA I REQUISITI DELLA NORMA Specifica di sicurezza EN60947 1 2007 A1 2011 A2 2014 EN60947 4 3 2014 Specifica sulle emissioni EN60947 4 3 2014 gruppo 1 emissioni classe A Specifica sulle Immunità EN60947 4...

Page 3: ...y Standard EN60947 1 2007 A1 2011 A2 2014 EN60947 4 3 2014 Generic Emission standard EN60947 4 3 2014 Group 1 Class A emissions Generic Immunity standard EN60947 4 3 2014 Industrial Immunity SODDISFA I REQUISITI DELLA NORMA Specifica di sicurezza EN60947 1 2007 A1 2011 A2 2014 EN60947 4 3 2014 Specifica sulle emissioni EN60947 4 3 2014 gruppo 1 emissioni classe A Specifica sulle Immunità EN60947 4...

Page 4: ...l Control Switches and equivalent to CSA C22 2 14 For more detail search for File E231578 on www ul com ESD Sensitive product use proper grounding and handling techniques when installing or servicing product Do not throw in trash use proper recycling techniques or consult manufacturer for proper disposal A NOTE marks a short message to alert you to an important detail A CAUTION safety alert appear...

Page 5: ...ironment and application AVERTISSEMENT L indice de protection du régulateur de puissance est de IP20 lorsque les couvercles sont installés et fermés L appareil doit être installé dans une enceinte qui assure toute la protection supplémentaire nécessaire pour l environnement et l application WARNING Ground the power controller via the provided protective earth grounding terminal Verify ground is wi...

Page 6: ...AUTION The thyristor units here described have been designed for use with sinusoidal networks with nominal frequency 50 60 Hz Any application with NON SINUSOIDAL distorted or disturbed networks could compromise the correct operation of the unit ATTENTION Les unités de thyristors décrites ici ont été conçues pour être utilisées avec des réseaux sinusoïdaux d une fréquence nominale de 50 à 60 Hz Tou...

Page 7: ... must first complete a Return Material Authorisation RMA form to obtain an RMA number from the Service Department A full repair service is available for customers Prior to submitting the RMA form and returning products customers are recommended to contact the technical support team to determine whether the issue can be resolved with telephone support How the RMA service works The RMA form and deta...

Page 8: ... General features 16 6 2 Input features 16 6 3 Output features power device 16 6 4 Environmental installation conditions 16 6 5 Fan Specification 17 6 6 Derating Curve 17 6 7 Calculating flow capacity of the fan 17 Installation 18 7 1 Dimensions and weight 19 7 2 Fixing holes 19 Wiring instructions 20 8 1 Terminal Positions 20 8 2 Power Terminals 20 8 3 Control Terminals 22 8 4 Schematic 23 8 5 Co...

Page 9: ...9 11 2 Analog Input 1 Set Point 49 11 3 Analog Input 2 Set Point or Feedback 49 11 4 Alarms and Alarm Relay Output 50 Alarm description 51 12 1 Heater Break Alarm 51 12 2 AUX High 52 12 3 AUX Low 52 12 4 ComError 52 12 5 AUX Line Loss 52 12 6 Line Loss 52 12 7 SHRT 52 12 8 SCR Temp 52 Firing type 53 13 1 Zero Crossing 53 13 2 Burst Firing 53 Control Mode feed back 54 Electronic boards 55 15 1 Supp...

Page 10: ...ide range of options from simple single phase to complex three phase loads to 600V 100KA short circuit current rating SCCR Not reviewed by UL Enables greater protection in the event of a short circuit c UL 508 Listed PRELIMINARY to be tested Shortens project schedules agency testing and expenses Control modes contactor voltage current or power Satisfies a wide range of demanding thermal applicatio...

Page 11: ...he program and follow the instructions on the screen Run the software configurator and set the correct serial port number by menu setting serial com port number 2 To connect the unit at the PC it s necessary to use the micro USB 2 0 Modbus RTU cable USB connection need a driver to work properly you can find it from our site However the configuration software installer will install as default the c...

Page 12: ...d Nominal Current of the load by a REVEX Display version Option code 0 4 5 6 on Digit 12 using the frontal keypad Operator menu or Thyristor configurator software b REVEX NO Display version Option code 1 2 3 7 on Digit 12 using Thyristor configurator software The Unit is ready to work The auxiliary voltage supply of the REVEX unit must be synchronized with load voltage power supply If the Auxiliar...

Page 13: ...resistive load control on two phases V Nominal voltage of the load I Nominal current of the load P Nominal power of the load Delta wiring with resistive load control on two phases V Nominal voltage of the load I Nominal current of the load P Nominal power of the load I P 1 73V I P 1 73V 4 V V ...

Page 14: ...he product has a fault please contact the dealer from which you purchased the product The identification label give all the information regarding the factory settings of the Thyristor unit this label is on the unit like represented in figure Verify that the product is the same thing as ordered 5 with display Option code 0 4 5 6 on digit 12 without display Option code 1 2 3 7 on digit 12 ...

Page 15: ... No Soft Start Z CONTROL MODE 11 description code Open Loop 0 Voltage U Voltage Square Q Current I Current Square A Power VxI W External feedback X OPTION 12 description code Option code see below table FAN VOLTAGE 13 description code Fan 24Vdc 3 APPROVALS 14 description code CE EMC For European Market 0 LOAD TYPE 15 description code Normal Resistive Load with 3 Phase Star without neutral Connecti...

Page 16: ...Leakage current Fuse I2 t value Suggested A2s at 500V Frequency range Power loss Thyristor Fuse Isolation Voltage Ui A V 480V 600V mAeff 10 msec A mAeff tp 10msec Hz I Inom W Vac 120 24 600 1200 1600 600 1900 15 14280 47 70 398 3000 150 24 600 1200 1600 300 5000 15 17500 47 70 409 3000 180 24 600 1200 1600 300 5000 15 30800 47 70 486 3000 210 24 600 1200 1600 300 5000 15 53900 47 70 598 3000 6 4 E...

Page 17: ...e power loss 0 100 meters f 3 1 m3k Wh ta ambient temperature C 100 250 meters f 3 2 m3k Wh tc cabinet temperature C 250 500 meters f 3 3 m3k Wh V fan air mass flow m3 h 500 750 meters f 3 4 m3k Wh f altitude coefficient see table on right The formulas used are for information only and is not a substitute for a proper thermal rating done by a qualified person 6 5 Fan Specification Supply 24Vdc Pow...

Page 18: ...m distances inverticaland in horizontal as represented this area must be free from obstacle wire copper bar plastic channel When more unit has mounted inside the cabinet maintain the air circulation like represented in figure without obstacle for the air flow Is necessary to install a fan to have better air circulation as calculated previously 7 30 cm 20 cm 2 cm AIR FLOW IN V AIR FLOW OUT V FAN in...

Page 19: ...REVEX 2PH from 120A to 210A User s manual 19 W D H Size SR16 120 210A W mm 186 D mm 170 H mm 273 Weight kg 7 REVEX 2PH SR16 7 2 Fixing holes 7 1 Dimensions and weight 5 5 5 5 165 260 ...

Page 20: ...wire ranges AWG wire terminal type ZMVV terminal tightening torque in the table below Power cable torque suggested Type Connector Type Torque Lb in N m Wire Range mm AWG MAX Current Terminals Wire Terminals UL Listed ZMVV 120 Screw M6 70 8 8 0 35 2 150 Fork Spade Terminal Copper Tube Crimp Lug 150 180 210 Screw M8 141 6 16 0 50 0 70 00 90 000 250 Fork Spade Terminal Copper Tube Crimp Lug Cable dim...

Page 21: ...EX 2PH from 120A to 210A User s manual 21 Suggested wiring mode connect the cables below not above Correct Not correct Maintain adequate distance to avoid obstructing the air flow See the figure on page 18 ...

Page 22: ...put 1 0 10Vdc 4 20mA Analog Setpoint 6 Analog Input 1 0 10Vdc 4 20mA Analog Setpoint 7 Output 10Vdc stabilized 1 mA MAX 8 Analog Input2 0 10Vdc 4 20mA Reference ext feed back 9 Slave Output 10 Not connected 11 RS485 A 12 RS485 B 13 0V GND 14 C Common contact alarm relay output 15 NC Normally Close contact alarm relay output Thermal or SC HB 16 NO Normally Open contact alarm relay output Thermal or...

Page 23: ...hematic 3 IMPORTANT Starting Strategy Enable 1 Feed the unit with L1 L2 L3 power voltage supply 2 Feed the auxiliary supply 3 Close the Enable contact to start with the regulation 8 4 1 SSR Control Input schematic For SSR input use follow the schematic below and configure Digital Input 1 as Fast Enable SSR Input 4 30Vdc 5mA Max ON 4Vdc OFF 1Vdc 3HZ Max on time min 100 ms Indicative connection diag...

Page 24: ...e Ext Feedback Analog Inp 1 0 10VDC 4 20mA ANALOG SET POINT T1 T2 T3 T1 T2 T3 Load Type Delta Star 1 The user installation must be protecting by electromagnetic circuit breaker or by fuse isolator The Fuse must be branch circuit protection Warning ItisnotpossibletoremovetheM3connectorwhentheunitispowered Remove the AUX 24Vdc power supply before extracting the M3 connector Extracting the M3 connect...

Page 25: ...arms Output Power Average On the home page the keys are used as follows Press to Function Scroll through the parameters on the home page Local Remote Switch between local and remote set point for power demand Up Increment power demand set point when set to local Down Decrement power demand set point when set to local Press and hold for about two seconds to access the menus To view the status param...

Page 26: ...ew measured values and basic settings including current voltage and set point Setup 2 Configure the power controller for the load Adv Setup 10 Configure the operation and performance of the power controller in the application Hardware 5 Configure the functions of the analog and digital inputs and outputs and the re transmission parameters Comm 3 Configure field bus communicating parameters Monitor...

Page 27: ...ine Loss Auxiliary voltage 24V not present Line Loss Line power not detected SHRT Short Circuit on SCR SCR Temp Thermal Switch over temperature If you have the version without display all the functions shown on the display can be viewed via the configurator 1 Local Remote Flashing Power output set locally or via communications Off Power output set remotely via analog input 2 Enable On Output enabl...

Page 28: ...ng pages for descriptions and other details of each parameter Operator Setup Advanced Setup Hardware Communication Monitoring Set Point Out Scale Firing Type Analog in 1 Port 1 Baud Dig in 1 Volts Out Nom Line V Min Cycle Analog in 2 Port 1 Addr Dig in 2 Current Nominal I Cycle Time An2 Funct Watchdog Enable Power SP Select Feedback DI1 Functn WD Reset SP Source Volts In Pb Power DI2 Functn Analog...

Page 29: ...ll phases 0 to 1023 V 11 Read Only Power Indicates the average RMS power output 0 to 100 12 Read Only Volts In Indicates the average RMS voltage input 0 to 65535 V 47 Read Only Frequency Indicates frequency of the power input 0 to 655 35 Hz 9 Read Only Pwr Factor Indicates power factor of the output power 0 to 1000 102 Read Only Load Ω Indicates the resistance of the load 0 to 655 35 Ω 46 Read Onl...

Page 30: ...viding the set point is 5V and output scaling is 80 then the effective set point is 40 0 to 100 0 16 Read Write Parameter Name Description Default Range Unit Modbus Address Par Type Nom Line V Set the nominal value for the line voltage input 220V 0 to 1023 V 37 Read Write Nominal I Set the nominal load current Maximum current 0 to 999 9 A 38 Read Write SP select Choose the source for the remote se...

Page 31: ...alue Zero Cross 1 Burst fire 3 DEFAULT Burst Fire 3 Parameter Name Description Default Range Unit Modbus Address Par Type Min Cycles Set the minimum number of On cycles and off cycles for burst firing 8 0 to 999 9 n 20 Read Write Cycle time Set the duration of one on off cycle in increments of 50mSec Applies to zero crossing 60 3 sec 0 to 255 0 to 12 75 sec 24 Read Write Feedback Choose the feed b...

Page 32: ...hm acts A larger settings yields a larger adjustment for a given deviation over a given time 50 0 to 255 27 Read Write HB Sense Set the threshold of resistance that activates the Heater Break alarm This setting is in percentage of the nominal load resistance 100 0 to 100 0 29 Read Write HB Delay Set a delay between when the resistance drops below the value set for a heater break sensitivity and wh...

Page 33: ...ue 0 10V 0 to 10 Vdc or 10 000Ω 1 4 20mA 4 to 20 mAdc 2 0 20mA 0 to 20 mAdc 3 DEFAULT 0 10V 1 Parameter Name Description Default Modbus Address Par Type Analog In 2 Choose the type of signal to be measured by analog input 2 1 105 Read Write Option Description Value 0 10V 0 to 10 Vdc or 10 000Ω 1 4 20mA 4 to 20 mAdc 2 0 20mA 0 to 20 mAdc 3 DEFAULT 0 10V 1 Parameter Name Description Default Modbus A...

Page 34: ...when on 5 FastEn Fast Enable 8 DEFAULT Voltage Feed back 2 SSR Input 4 30Vdc 5mA Max ON 4Vdc OFF 1Vdc 3HZ Max on time min 100 ms Parameter Name Description Default Modbus Address Par Type DI2 Functn Choose how the signal detected by digital input 2 is used 0 33 Read Write Option Description Value Enable Enable power output 0 V Feedback Use voltage feed back when on 2 Local Rmt Local when on Remote...

Page 35: ...is an alarm Note The power controller monitors for heater break or short circuit condition only when included in the option selected for Alarm Output Function 1 34 Read Write Option Description Bit Heater Break Heater Break 0 Short Circuit Short circuit 1 Therm SCR is over temperature 3 Communication Communication watchdog error 4 DEFAULT None Alarm Bitwise is allowed Parameter Name Description De...

Page 36: ...alue 9600 0 19 2K 1 38 4K 2 115 2K 3 DEFAULT 38 4K 2 Parameter Name Description Default Range Modbus Address Par Type Port 1 Addr Set the address for the primary serial port 1 0 to 255 31 Read Write Watchdog Enable or disable the watchdog on the primary serial port 0 142 Read Write Option Value Off 0 On 1 DEFAULT Off 0 Parameter Name Description Default Range Unit Modbus Address Par Type WD Reset ...

Page 37: ...alue Off 0 On 1 Parameter Name Description Modbus Address Par Type Dig In 2 Indicate the state of the signal to digital input 2 13 bit9 Read Only Option Value Off 0 On 1 Parameter Name Description Modbus Address Par Type Enable Indicate whether or not the power controller is enabled The enable signal must be on for the unit to output power to the load 14 bit2 Read Only Option Value Off 0 On 1 Para...

Page 38: ...ngle Phase 7 RC 2 Two Leg three phase 8 RC 3 Three Leg three phase 9 RC 3P Three Leg three phase with phase angle capability 9999 Parameter Name Description Range Unit Modbus Address Par Type Max Voltage Indicates the maximum voltage rating of the power controller 0 to 1023 V 41 Read Only Max Current Indicates the maximum current capacity of the power controller 0 to 9999 A 62 Read Only Aux Voltag...

Page 39: ...efore applying power NOTE the power of the USB port is limited and not designed to power industrial cards so it manages to feed only the essential parts of the electronics For complete control you need to power up the auxiliaries of the power controller 10 3 Recipes A recipe is a file that store the settings of power controller s internal parameter It is used to save a power controller configurati...

Page 40: ...or 2 or 3 phase power controller 4 Choose Serial Port From Setting Serial Port menu 5 In value Port select the COM port connected to the power controller see the note below 6 To verify communications click Test 7 Click OK NOTE to determine which port is connected to the power controller you can in the Windows Device Manager under Ports COM LPT looking for the COM port named LPC USB VCOM Port COMx ...

Page 41: ...pe Click Save button NOTE In the simple view the change are not live so to take effect the change in simple section is necessary to download it following download procedure 10 5 2 To edit a setting in a recipe 1 Click Simple if not already on the simple view 2 Click Open existing recipe 3 Locate and select the recipe file and click Open 4 Click OK 5 Click the menu with the setting you want to chan...

Page 42: ...st view 1 Click Test if not already on the test view 2 Click Online 10 5 5 To log in on the test view to change the digitalinput and analog input functions 1 Click the Access Level value zero when logged out 2 Type the password 1111 3 Click OK 10 5 6 To log out the test view 1 Click the Access Level value 2 Click Log out 3 Click OK 10 5 7 To view data on the scope 1 Click Test if not already on th...

Page 43: ...ee phase power controller MSG opens a serial communication message view Status Bar Indicates information such as time and date communications port and baud rate 10 6 2 Simple Section This section is used to create save upload and download recipes of parameters settings Can be used also to see the settings in a controller Simple page is the default page when select the model using the Model Button ...

Page 44: ... them to the power controller using the Download to unit option 10 6 3 Test Section This section is used to monitor and adjust the operation of the power controller in real time using RS485 or USB communication port After select the model is possible access to this section clicking the TEST tab below the main menu Operating on TEST Section Online button is the button to start or stop communication...

Page 45: ... a heater break alarm active TH indicator light on when the heat sink over temperature alarm is active I Lim indicator light on when the load current exceeds the current limit setting Unit Size Indicate the maximum rated current of the power controller Max Volt indicate the maximum rated voltage for the power controller V Aux indicate the voltage the auxiliary input is set to use for powering the ...

Page 46: ...ller Power Request show the set point signal from analog input 1 The value is a percent of full scale or can be set with the reference slider Soft Start Time show the time over which set point changes are ramped Output Scaling show the scaling applied to the set point signal before it is used by the control loop Voltage indicator show the RMS load voltage Power indicator show the RMS load power Cu...

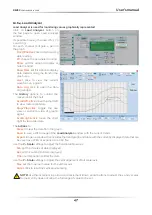
Page 47: ...nt data Stop Play click toggle the live view or Hystorical view of graphic signal Scroll right click move the chart right to view older data The Actions to Clear to clear the data from the graph Save to save a JPEG image of the Load Analyzer window with the current trends Export to open a window that includes the trend graph and table with the currently displayed data that can be saved as a JPEG o...

Page 48: ...oose user settable options for the Configurator software Language Available Languages choose the language used in the software NOTE to activate the language change you need to close and open again the Configurator software Serial Port Set the serial port parameter Test click to test for communication with a power controller via the selected port Port select the computer s COM port to use to commun...

Page 49: ... point when the remote set point is in effect When this signal is off analog input 1 is the source of the remote set point When the signal is on analog input 2 is the source of the remote set point Logging this signal turns data logging on or off When the signal is on data is logged When the signal is off data is not logged When this signal is on it supersedes the setting of the Logging parameter ...

Page 50: ...elay is de energized The alarm relay is energized when power is supplied to the controller s electronics via the auxiliary power input and there are no alarms Choose which conditions determine the alarm relay output with the Alarm Function setting on Paragraph 9 4 4 Hardware menu NOTE The alarm relay output indicates an alarm whenever the temperature of the heat sink is too high even when Alarm Fu...

Page 51: ...ee parameters on pages 32 Alarm description 12 1 Heater Break Alarm This option allows you to diagnose any load breakage The diagnostics is based on the comparison of the value of the nominal resistance of the load with respect to the resistance measured in real time The nominal resistance is calculated using the Operative Load Voltage Nom Line V and Nominal Current of the load Nominal I parameter...

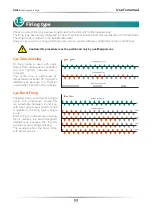
Page 52: ...munication watchdog function is enabled watchdog ON this alarm is activated when there is no data passage within the time established by the WD reset parameter 12 5 AUX Line Loss This alarm is activated when there is no auxiliary voltage 12 6 Line Loss This alarm is activated when L1 and L2 are not detected 12 7 SHRT This alarm is activated if the unit detects a short circuit in one of the power d...

Page 53: ...utput from temperature controllers and the Thyristor operates like a contactor The Cycle time is performed by temperature controller ZC minimizes interferences because the Thyristor unit switches ON OFF at zero voltage 13 2 Burst Firing The Burst Firing is similar to the Single Cycle but consecutive cycles ON are selectable between 2 and 255 with input signal equal at 50 When is specified 1 the fi...

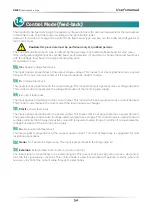
Page 54: ...age demand This control mode compensates the voltage fluctuation of the incoming line supply I Current feed back The input signal is proportional to the current output This means that input signal becomes a current demand This control mode maintain the current also if the load impedance changes P VxI Power feed back The input signal is proportional to the power output This means that input signal ...

Page 55: ... 1 Supply the Electronic Board The REVEX thyristor unit to work requires a voltage supply for the electronic boards of 24Vdc 1A on terminal M3 Warning Before connecting or disconnecting the unit check that power and control cables are isolated from voltage sources 15 ...

Page 56: ...al Code 00 is used for different configurations 1 2 3 4 5 6 7 8 9 10 11 12 13 14 15 16 ORDER CODE T U R S 4 8 5 _ _ _ _ _ _ _ _ _ Addendum Manual available here https www cdautomation com download cd automation revex comm manuals ENG REVEX_14RX_profinet pdf Field Bus or Communication 8 9 10 description code note N 1 Modbus TCP N 1 Modbus RTU slave T C P N 1 ProfiNet IO N 1 Modbus RTU slave P N T N...

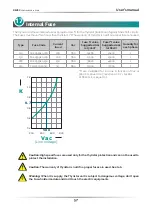
Page 57: ... t for the thyristor protection of against the short circuits The Fuses must have I t 20 less than thyristor s I t The warranty of thyristor is null if no proper fuses are used Type Fuse Code Current ARMS Vac Fuse I2 t value Suggested A2s at 500V Fuse I2 t value Suggested A2s at 660V Quantity for each phase 120 FU2055920 180 180 660 14280 20400 1 150 FU2055920 200 200 660 17500 25000 1 180 FU20559...

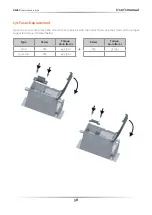
Page 58: ...uses Replacement Open the cover and remove the screws then replace it with the correct fuse use the screws with a proper suggested torque indicated below Type Screw Torque Lb in N m Screw Torque Lb in N m 120A M6 44 2 5 0 M5 31 3 5 150 210A M6 44 2 5 0 ...

Page 59: ...CD Automation S r l Via Picasso 34 36 20025 Legnano MI Italy Tel 39 0331 577479 Fax 39 0331 579479 E mail info cdautomation com Web www cdautomation com ...

Reviews: