background image

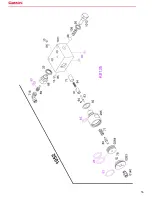
ESPLOSI

EXPLODED DRAWINGS

EXPLOSIONSZEICHNUNGEN

VUES ÉCLATÉES

DIBUJOS DE DESPIECE

51

Summary of Contents for YAK 135

Page 1: ...YAK 135 Ultima revisione 09 2010...

Page 2: ...IO 5 MESSA IN SERVIZIO 5 UTILIZZO 6 GARANZIA 7 MANUTENZIONE RISERVATA ALL UTENTE FINALE 7 SPURGO DELL ARIA 7 MANUTENZIONE RISERVATA AD UN TECNICO PROFESSIONALMENTE QUALIFICATO 8 SCHEDA TECNICA 10 DISE...

Page 3: ...YAK 135 I 3...

Page 4: ...ente proibito lavorare od operare in qualsiasi maniera sotto al mezzo che si sta sollevando fintanto che lo stesso non sia collocato sugli appositi cavalletti di sostegno DIS 2 Prima di procedere ad u...

Page 5: ...n 1295 0303 1083 e 0304 avendo l accortezza di mantenerli assemblati 4 Inserire il manubrio il distributore dell aria deve essere rivolto verso i pistoni con l innesto nell apposita scanalatura inseri...

Page 6: ...cco sotto il punto di appoggio previsto come indicato sul manuale del costruttore del mezzo La ditta costruttrice declina ogni responsabilit per qualsiasi rottura del mezzo sollevato ed a danni a pers...

Page 7: ...iungere dell olio nel serbatoio accertarsi che sia compatibile con l olio gi presente per non compromettere l i ntegrit della macchina DIS 14 Se il livello dell olio pi alto del previsto anche di poco...

Page 8: ...ripetere l operazione di spurgo illustrata nella pagina precedente poi rimettere il sollevatore in posizione normale e riaprire il rubinetto Controllare il blocchetto idraulico n 1052 facendo particol...

Page 9: ...depressore n 935 controllare l eccessiva quantita di olio nel serbatoio Nel caso che il cricco sia stato capovolto o rovesciato la perdita si arrestera dopo poco tempo Nel caso in cui la perdita d oli...

Page 10: ...I 10...

Page 11: ...14 PUTTING INTO OPERATION 14 USE 15 WARRANTY 16 MAINTENANCE JOBS FOR THE END USER 16 AIR BLEEDING 16 MAINTENANCE RESERVED TO A PROFESSIONALLY QUALIFIED ENGINEER 16 TECHNICAL DATA SHEET 19 DRAWINGS 47...

Page 12: ...YAK 135 EN 12...

Page 13: ...aintenance handbook The jack is an apparatus for lifting only and not for supporting it is therefore absoltely forbidden to work in any way under the vehicle being lifted until it is placed on the rel...

Page 14: ...r distributor must be facing the pistons inserting the coupling in the groove put the parts removed previously into the hole of the handle tighten screw 1289 and then tighten nut 1296 5 Connect the tw...

Page 15: ...topping system is released so the worker can then choose one of the three possible handle positions DWG 12 3 When control B is in the perfectly central position the jack is in the idle status 4 By tur...

Page 16: ...he level by a lot it is advisable to remove some until it is back in the norm AIR BLEEDING Each time the jack is serviced removing and refitting parts connected to the tank and motorpump it is advisab...

Page 17: ...its seat with a light blow with a hammer If it is not possible to obtain a seal on the pin replace the valve KIT0265 complete with the pin 83 If the load still falls even after fitting the jack carry...

Page 18: ...ft up very slowly check that the tap 843 between the tank and motor pump is open If the jack is malfunctioning when lifting or lowering check the spring 1046 the rubber ball seal 429 and the smooth sl...

Page 19: ...EN 19...

Page 20: ...EN 22 VERPACKUNG 23 INBETRIEBNAHME 23 BENUTZUNG 24 GARANTIE 25 DEM BENUTZER VORBEHALTENE WARTUNG 25 ENTL FTUNG 25 WARTUNG DURCH EINEN GESCHULTEN WARTUNGSTECHNIKER 26 TECHNISCHES DATENBLATT 28 ZEICHNUN...

Page 21: ...YAK 135 DE 21...

Page 22: ...liegenden Bedienungs und Wartungshandbuchs kennt Der Heber ist ausschlie lich ein Ger t zum Anheben und nicht zum St tzen es ist daher absolut verboten auf irgendeine Weise unter dem Fahrzeug das man...

Page 23: ...dem Karton nehmen 2 Die beiden Muttern Nr 1296 aus dem Inneren des Chassis lo sen ABB 9 3 Die Schraube Nr 1289 aus dem Chassis lo sen und die Teile Nr 1295 0303 1083 und 0304 entfernen und sie dabei...

Page 24: ...m Installationsort geltenden Umweltschutzvorschriften erfolgen Die Verschrottung vom Heber und seiner Bauteile muss unter Beachtung der am Installationsort geltenden Bestimmungen erfolgen BENUTZUNG Di...

Page 25: ...s wird empfohlen die Kolben alle f nfzehn Tage von au en zu reinigen Mindestens 2 Mal pro Jahr den lpegel im Tank kontrollieren Diese Kontrolle muss mit ganz abgesenkten Kolben erfolgen Der lpegel mus...

Page 26: ...Dichtungen 760 auf den Kolben 755 bewegen sich mit Mu he Zylinder und Kolben ausbauen und schmieren DER HEBER HEBT DIE LAST NICHT Den O lstand durch die Schraube 1401 kontrollieren Es befinden sich Ve...

Page 27: ...schmiert oder gefettet werden den Schallda mpfer 267 abschrauben gegebenenfalls reinigen und dann wieder anschrauben LVERLUST Falls der Heber O l durch den Schallda mpfer 719 auswirft so bedeutet dies...

Page 28: ...DE 28...

Page 29: ...2 MISE EN SERVICE 32 UTILISATION 33 GARANTIE 34 MAINTENANCE RE SERVE E A L UTILISATEUR FINAL 34 PURGE D AIR 34 ENTRETIEN RESERVE A UN TECHNICIEN PROFESSIONNELLEMENT QUALIFIE 35 FICHE TECHNIQUE 37 DESS...

Page 30: ...YAK 135 FR 30...

Page 31: ...support il est donc rigoureu sement interdit de travailler et d intervenir de quelque manie re qui soit sous le ve hicule en cours de levage tant que celui ci n est pas positionne sur les be quilles...

Page 32: ...83 et 0304 en veillant a maintenir le tout ensemble 4 Introduisez la barre le distributeur d air doit e tre tourne vers les pistons avec l enclenchement dans la rainure pre vue a cet effet introduisez...

Page 33: ...acez le cric sous la be quille de soutien comme le montrent les indications sur le manuel du fabricant du ve hicule le fabricant du cric ne sera pas tenu pour responsable des e ventuelles ruptures du...

Page 34: ...e est compatible avec l huile qui s y trouve de ja afin de ne pas compromettre le bon fonctionnement de la machine FIG 14 Si le niveau d huile est plus haut que pre vu me me de peu ou bien si le cric...

Page 35: ...521 re pe tez l ope ration de vidange illustre e a la page pre ce dente puis remettez le cric en position normale et rouvrez le robinet Contro lez le petit bloc hydraulique 1052 en faisant particulie...

Page 36: ...e Perte d huile du dispositif de de pression 935 contro lez la quantite excessive d huile dans le reservoir Si le cric a e te renverse la perte s arre tera rapidement Si la fuite d huile concerne le s...

Page 37: ...FR 37...

Page 38: ...EN SERVICIO 41 EMPLEO 42 GARANTI A 43 MANTENIMIENTO RESERVADO AL USUARIO FINAL 43 PURGADO DE AIRE 43 MANTENIMIENTO RESERVADO A UN TE CNICO PROFESIONALMENTE CUALIFICADO 44 SCHEDA TECNICA 46 DIBUJOS 47...

Page 39: ...YAK 135 Es 39...

Page 40: ...e soporte por lo tanto queda absolutamente prohibido trabajar u operar de cualquier modo debajo del medio que se esta levantando hasta que el mismo se coloque sobre los relativos caballetes de soporte...

Page 41: ...ncio n a mantenerlas ensambladas 4 Introducir el manubrio el distribuidor del aire debe estar dirigido hacia los pistones con la muesca en la ranura relativa introducir las piezas antes desmontadas en...

Page 42: ...declina cualquier responsabilidad por rotura del medio levantado asi como por dan os a personas o cosas debidos a un uso erro neo del gato 2 La palanca de posicionamiento del manubrio A se encuentra...

Page 43: ...l previsto incluso si es so lo un poco o bien si el gato ha sido dado vuelta suele suceder a menudo durante el transporte el aceite es expulsado a trave s del depresor en forma de niebla Este feno men...

Page 44: ...epetir la operacio n de purgado indicada en la pa gina anterior luego volver a colocar el elevador en la posicio n normal y reabrir el grifo Comprobar el bloque hidra ulico 1052 teniendo cuidado en qu...

Page 45: ...e rdida de aceite del depresor 935 Controlar si hay exceso de cantidad de aceite en el depo sito Si el gato se ha dado vuelto o se ha cai do la pe rdida se detendra pasado un breve lapso de tiempo Si...

Page 46: ...Es 46...

Page 47: ...47...

Page 48: ...48...

Page 49: ...MENGE REQUESTING SPARE PARTS WHEN ORDERING SPARE PARTS THE FOLLOWING MUST BE SPECIFIED 1 LIFT MODEL 2 SERIAL NUMBER 3 PART NUMBER 4 PART DESCRIPTION 5 QUANTITY DESIRED DOMANDE PIECES DE RECHANGE LA D...

Page 50: ...50...

Page 51: ...51...

Page 52: ...52...

Page 53: ...53...

Page 54: ...54...

Page 55: ...55...

Page 56: ...56...

Page 57: ...57...

Page 58: ...58...

Page 59: ......

Page 60: ......

Reviews: