background image

EN-11

To adjust the metronome volume

• You can adjust the metronome value within the range of 0 

(muted) and 42 (maximum). Always input two digits. To 
specify a one-digit value, input zero (0) for the unused 
leading digit.

1.

While holding down 

3

FUNCTION

, perform 

steps (1) and (2) below.

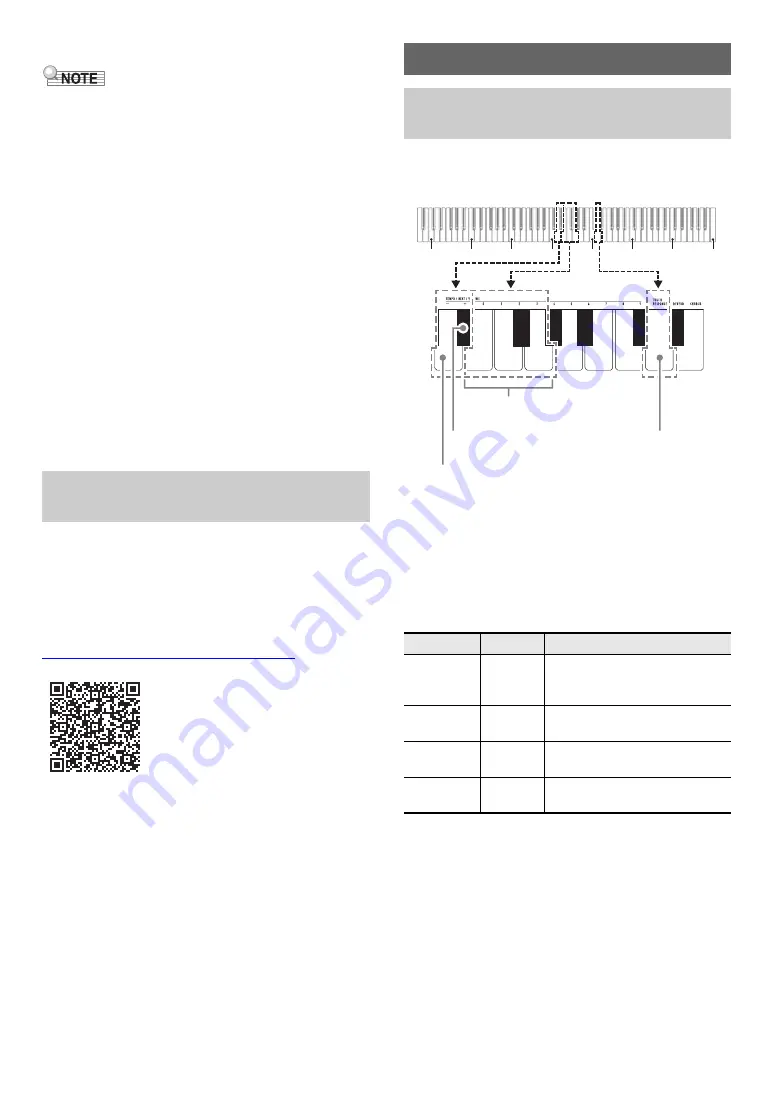
(1) Press the METRONOME VOLUME keyboard key 

(C

{

4).

(2) Use the [0] (E4) through [9] (C

{

5) keyboard keys to 

input a two-digit volume value. 
For example, to specify a volume value of 8, press 
keyboard keys in the following sequence: [0] (E4) 

3


[8] (C5). Inputting the second and final digit will 
cause a short and then long beep to sound, 
indicating that the value you input was applied.

• You can also raise or lower the volume by 

pressing the keyboard [+] key (E

}

4) or [–] key 

(D4).

• To return to the initial default setting (36), hold 

down the keyboard [+] (E

}

4) and [–] (D4) keys at 

the same time until a long beep sounds.

2.

Release 

3

FUNCTION

.

After you link the Digital Piano with a smartphone, tablet, or 
other smart device, you can control the Digital Piano with the 
linked smart device (Piano Remote Controller).

To download the smart device app

Download the Chordana Play for Piano app from the CASIO 
website and install it on the smart device.

https://support.casio.com/global/en/emi/manual/CDP-S90/

To link to a smart device

After installing the Chordana Play for Piano app on a smart 
device, use a commercially available USB cable to connect 
the smart device’s USB port with the Digital Piano’s USB port.
After connecting the smart device to the Digital Piano, use the 
smart device app to perform operations. For details about 
operations, refer to the user documentation of the app.

You can select from among four Touch Response settings, 
which determine how Digital Piano volume changes in 
accordance with how strongly keyboard keys are pressed.

To change the Touch Response setting

1.

While holding down 

3

FUNCTION

, perform 

procedure (A) or (B) below.

(A) Press the TOUCH RESPONSE keyboard key (D5).

• Each press changes the setting. A beep will sound 

indicating the setting selected by a key press.

• You can also change the setting by pressing the 

keyboard [+] key (E

}

4) or [–] key (D4).

• To return to the initial default setting, hold down 

the keyboard [+] (E

}

4) and [–] (D4) keys at the 

same time until a long beep sounds.

Linking with a Smart Device (APP 
Function)

Configuring Settings

Changing the Keyboard Touch 
Response

Beep

Setting

Description

Once low

Off

Touch Response is turned off.
Sound volume is fixed, 
regardless of key press speed.

Once high

Light

Strong sound, even with light 
pressure

Twice high

Normal 
(Default)

Normal Touch Response

Three times 
high

Heavy

Normal sound, even with strong 
pressure

C1

C2

C3

C4

C5

C6

C7

C8

0

1

3

2

[0] (E4) to [3] (G4) keys

[+] key (E

}

4)

[–] key (D4)

TOUCH RESPONSE key (D5)

Summary of Contents for CDP-S90

Page 1: ...Power Supply Turning Power On or Off Connecting a Pedal Using Headphones Selecting a Tone Changing the Pitch in Semitone Steps Transpose Fine Tuning a Pitch Tuning Listening to Demo Play Using Effects...

Page 2: ...e with this Digital Piano Use of unauthorized accessories creates the risk of fire electric shock and personal injury You can get information about accessories that are sold separately for this produc...

Page 3: ...P Power button 2 VOLUME knob 3 FUNCTION button 4 GRAND PIANO button 5 USB port 6 DAMPER PEDAL jack 7 PHONES OUTPUT jack 8 AUDIO IN jack 9 DC 12V terminal bk Functions assigned to keys 2 5 bk C1 C2 C3...

Page 4: ...to the Keyboard Function List page EN 22 Preparing the Music Stand Your Digital Piano uses an AC adaptor for power Though this Digital Piano supports battery operation use of an AC adaptor is generall...

Page 5: ...ptor does not become covered with a newspaper table cloth curtain or any other type of fabric If you do not plan to use the Digital Piano for a long time unplug the AC adaptor from the power outlet Th...

Page 6: ...l Piano for a long time or if there is a lightning storm in your area be sure to unplug the AC adaptor from the power outlet Turning off power causes the Digital Piano settings to return to their init...

Page 7: ...PEDAL jack makes it possible to use the pedal as a damper pedal Pressing the damper pedal while playing will cause the notes you play to reverberate Back Using headphones cuts off output from the bui...

Page 8: ...no has 10 built in tones In addition to using a single tone you can also select two different tones and sound them together Use the Tone keyboard keys C3 through A3 to select a tone For information ab...

Page 9: ...F 3 and then the STRINGS key G3 Pressing the first keyboard key for the first tone will cause a short beep to sound and press the key for the second tone will cause a short and then long beep to soun...

Page 10: ...ou pressed is now enabled Pressing a keyboard key outside the range of setting keys will cause a high and then low beep to sound indicating that the setting was not changed 2 Release 3 FUNCTION To add...

Page 11: ...tempo You can specify a metronome tempo in the range of 20 to 255 beats per minute bpm Always input three digits To specify a two digit value input zero 0 for the unused leading digit 1 While holding...

Page 12: ...evice After installing the Chordana Play for Piano app on a smart device use a commercially available USB cable to connect the smart device s USB port with the Digital Piano s USB port After connectin...

Page 13: ...spose setting within the range of 12 semitones to 0 to 12 semitones To change the transpose setting in semitone steps 1 While holding down 3 FUNCTION press the TRANSPOSE keyboard key F5 to lower the p...

Page 14: ...ifies the frequency of the A4 note You can set a frequency within the range of 415 5 to 465 9 Hz The initial default setting is 440 0 Hz The setting you configure is retained even if you turn off the...

Page 15: ...e keyboard key causes a beep to sound The beep becomes higher whenever a key operation causes the setting value to become an integer You can specify a value in the range of 415 5 through 465 9 Hz To r...

Page 16: ...ollowing sequence 0 E4 3 8 C5 Inputting the second and final digit will cause a short and then long beep to sound indicating that the value you input was applied You can also raise or lower the channe...

Page 17: ...on requires commercially available connecting cords supplied by you The connecting cords should have a 3 pole stereo mini plug on one end and a plug that matches the configuration of the external devi...

Page 18: ...ive impossible 1 Turn off the Digital Piano and then start up your computer Do not start up the music software on your computer yet 2 After starting up your computer use a commercially available USB c...

Page 19: ...topping Turn power off and then back on to initialize all Digital Piano settings page EN 5 Replace the batteries with new ones or switch over to AC adaptor power page EN 3 Some notes are cut off while...

Page 20: ...cable is connected to the Digital Piano and computer and that the device is selected correctly with your computer s music software settings page EN 17 Turn off the Digital Piano and then exit the musi...

Page 21: ...6 channel multi timbre receive Inputs Outputs PHONES OUTPUT jack Stereo mini jack 3 5mm Output Voltage 1 2V RMS MAX Power 12V DC AUDIO IN jack Stereo mini jack 3 5mm Input impedance 10k Input voltage...

Page 22: ...st Tone Name Program Change Bank Select MSB GRAND PIANO STANDARD 0 0 GRAND PIANO MELLOW 1 0 GRAND PIANO BRIGHT 2 0 ELEC PIANO 1 3 0 ELEC PIANO 2 4 0 ELEC PIANO 3 5 0 HARPSICHORD 6 0 STRINGS 7 0 PIPE O...

Page 23: ...Strings STRINGS A 3 Pipe Organ PIPE ORGAN A3 Jazz Organ JAZZ ORGAN B 3 Metronome METRONOME On Off ON OFF B3 Tempo TEMPO C4 Beat BEAT C 4 Volume VOLUME D4 Tempo Beat Volume TEMPO BEAT VOLUME E 4 E4 0...

Page 24: ...Ch s Velocity O 9nH v 1 127 O 9nH v 0 8nH v O 9nH v 1 127 O 8nH v 64 Note ON Note OFF Mode Mode 3 X Mode 3 X Default Messages Altered 0 1 5 6 38 7 10 11 64 65 66 Bank select Modulation Portamento Tim...

Page 25: ...93 100 101 Soft pedal Filter resonance Release time Attack time Brightness Portamento Control Reverb send level Chorus send level RPN LSB MSB Mode 1 OMNI ON POLY Mode 3 OMNI OFF POLY Mode 2 OMNI ON M...

Page 26: ...MA2008 A...

Reviews: