


37
Table 6 —
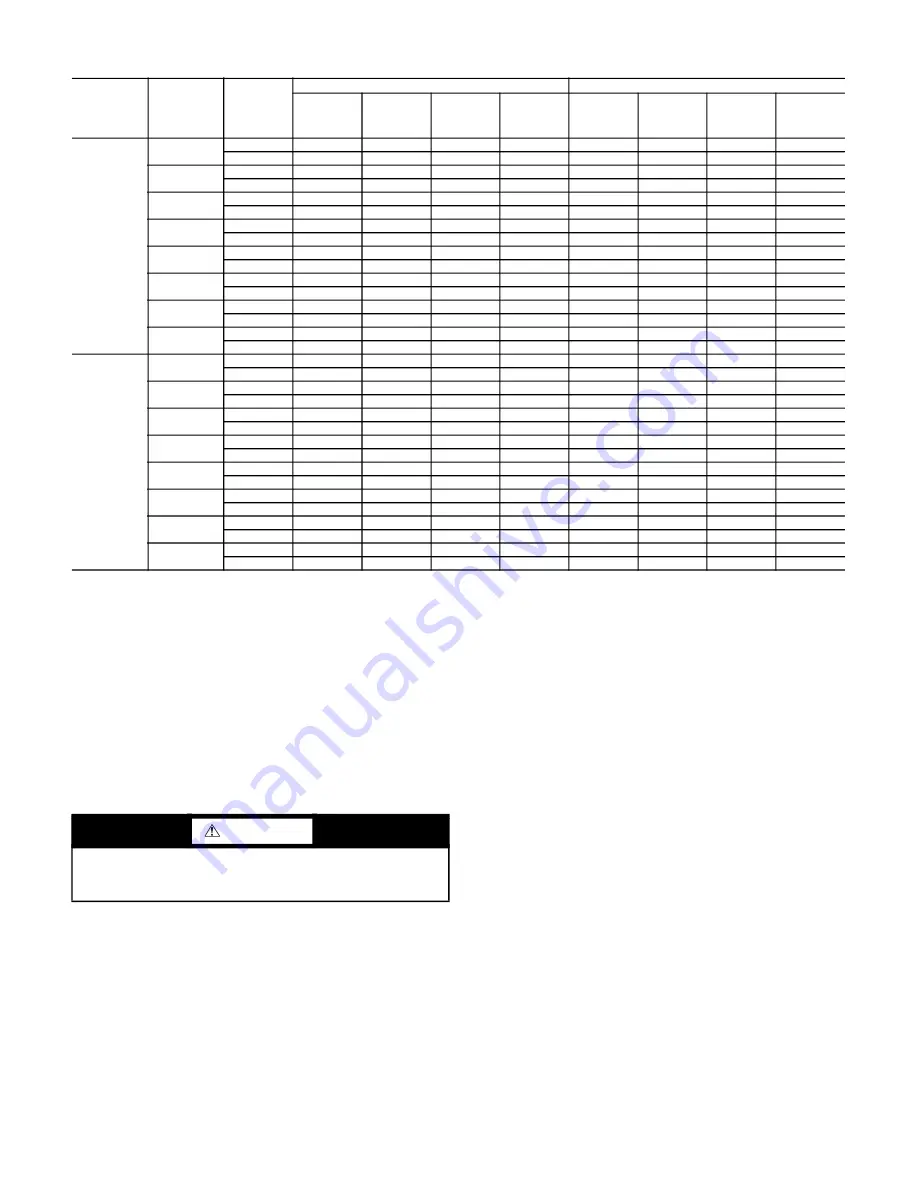
50HQP,VQP Typical Unit Operating Pressures and Temperatures (cont)
Flow Regulation
Flow regulation can be accomplished by two methods. Most water
control valves have a flow adjustment built into the valve. By
measuring the pressure drop through the unit heat exchanger, the
flow rate can be determined. Adjust the water control valve until
the flow of 1.5 to 2 gpm is achieved. Since the pressure constantly
varies, two pressure gages may be needed in some applications.
An alternative method is to install a flow control device. These
devices are typically an orifice of plastic material designed to al
-
low a specified flow rate that are mounted on the outlet of the wa
-
ter control valve. Occasionally these valves produce a velocity
noise that can be reduced by applying some back pressure. To ac
-
complish this, slightly close the leaving isolation valve of the well
water setup.
Flushing
Once the piping is complete, final purging and loop charging is
needed. A flush cart pump of at least 1.5 hp is needed to achieve
adequate flow velocity in the loop to purge air and dirt particles
from the loop. Flush the loop in both directions with a high vol
-
ume of water at a high velocity. Follow the steps below to properly
flush the loop:
1. Verify power is off.
2. Fill loop with water from hose through flush cart before
using flush cart pump to ensure an even fill. Do not allow
the water level in the flush cart tank to drop below the
pump inlet line to prevent air from filling the line.
3. Maintain a fluid level in the tank above the return tee to
avoid air entering back into the fluid.
4. Shutting off the return valve that connects into the flush
cart reservoir will allow 50 psig surges to help purge air
pockets. This maintains the pump at 50 psig.
5. To purge, keep the pump at 50 psig until maximum pump
-
ing pressure is reached.
6. Open the return valve to send a pressure surge through the
loop to purge any air pockets in the piping system.
7. A noticeable drop in fluid level will be seen in the flush
cart tank. This is the only indication of air in the loop.
NOTE: If air is purged from the system while using a 10 in. PVC
flush tank, only a 1 to 2 in. level drop will be noticed since liquids
are incompressible. If the level drops more than this, flushing
should continue since air is still being compressed in the loop. If
level is less than 1 to 2 in., reverse the flow.
1. Repeat this procedure until all air is purged.
2. Restore power.
Antifreeze may be added before, during or after the flushing pro
-
cess. However, depending on when it is added in the process, it
can be wasted. Refer to the Antifreeze section for more detail.
Loop static pressure will fluctuate with the seasons. Pressures will
be higher in the winter months than during the warmer months.
This fluctuation is normal and should be considered when
charging the system initially. Run the unit in either heating or cool
-
ing for several minutes to condition the loop to a homogenous
temperature.
When complete, perform a final flush and pressurize the loop to a
static pressure of 40 to 50 psig for winter months or 15 to 20 psig
for summer months.
50HQP,
50VQP
UNIT
SIZE
ENTERING
WATER
TEMP
(F)
WATER
FLOW
(GPM/ton)
COOLING
HEATING
Suction
Pressure
(psig)
Discharge
Pressure
(psig)
Water
Temp
Rise
(F)
Air Temp
Drop
(F) DB
Suction
Pressure
(psig)
Discharge
Pressure
(psig)
Water
Temp
Drop
(F)
Air Temp
Rise
(F) DB
300
30
45.0
—
—
—
—
68- 84
256-313
5- 7
19-23
75.0
—
—
—
—
73- 89
261-319
4- 5
20-25
40
45.0
117-143
210-256
15-19
21-26
81- 99
277-339
7- 8
22-26
75.0
114-139
196-239
11-14
22-27
86-105
283-346
5- 6
23-28
50
45.0
120-147
243-297
15-18
20-25
93-114
299-365
8- 9
24-29
75.0
117-143
227-277
11-14
21-26
99-121
305-373
6- 7
25-31
60
45.0
123-150
276-337
14-17
20-24
106-129
321-392
9-11
26-32
75.0
119-146
258-315
11-13
21-25
113-138
327-400
7- 8
28-34
70
45.0
126-154
309-378
14-17
19-24
118-145
342-418
10-12
29-35
75.0
122-149
289-353
10-13
20-25
126-154
349-427
8- 9
30-37
80
45.0
129-157
343-419
13-16
19-23
131-160
364-444
11-14
31-38
75.0
125-153
320-391
10-12
19-24
139-170
371-454
8-10
33-40
90
45.0
132-161
376-459
13-16
18-22
143-175
385-471
12-15
33-41
75.0
128-156
351-429
10-12
19-23
152-186
393-480
9-11
35-43
100
45.0
134-164
409-500
12-15
17-21
—
—
—
—
75.0
131-160
382-467
9-11
18-22
—
—
—
—
360
30
50.0
—
—
—
—
65- 80
282-344
6- 7
14-17
90.0
—
—
—
—
73- 89
294-359
3- 4
15-18
40
50.0
121-148
184-225
17-21
18-22
80- 98
299-365
7- 9
16-20
90.0
117-143
167-204
10-13
19-23
89-108
311-380
4- 5
17-21
50
50.0
123-151
222-271
17-20
17-21
95-116
315-385
9-11
19-23
90.0
119-145
202-247
10-12
18-23
105-128
329-402
5- 7
20-24
60
50.0
125-153
260-318
16-19
17-21
109-133
332-406
11-13
21-26
90.0
120-147
237-289
10-12
18-22
121-148
346-423
6- 8
22-27
70
50.0
127-155
298-365
15-19
17-20
124-151
349-427
12-15
23-28
90.0
122-149
271-331
9-11
18-21
138-168
364-444
7- 9
25-30
80
50.0
129-158
336-411
14-18
16-20
138-169
366-447
14-17
26-31
90.0
124-152
306-374
9-11
17-21
154-188
381-466
8-10
27-33
90
50.0
131-160
374-458
14-17
16-19
153-187
383-468
16-19
28-34
90.0
126-154
340-416
8-10
17-20
170-208
399-487
9-12
29-36
100
50.0
133-162
413-504
13-16
15-19
—
—
—
—
90.0
128-156
375-458
8-10
16-20
—
—
—
—
WARNING
To avoid possible injury or death due to electrical shock, open
the power supply disconnect switch and secure it in an open
position before flushing system.
Summary of Contents for Aquazone 50HQP 072
Page 23: ...23 Fig 20 Single Phase with WSHP Open ...
Page 26: ...26 Fig 23 3 Phase with WSHP Open ...
Page 28: ...28 Fig 25 3 Phase Deluxe D Control Package with 1 Speed VFD and Hot Gas Reheat ...
Page 29: ...29 Fig 26 3 Phase with WSHP Open Hot Gas Reheat Water Economizer and SAVTM ...
Page 31: ...31 Fig 28 WSHP Open W2A Wiring Diagram ...


