


41
up or down to produce the required CFM. If at any time the CO
2
sensor fails or IAQ reads 0ppm, the DCV minimum outside air
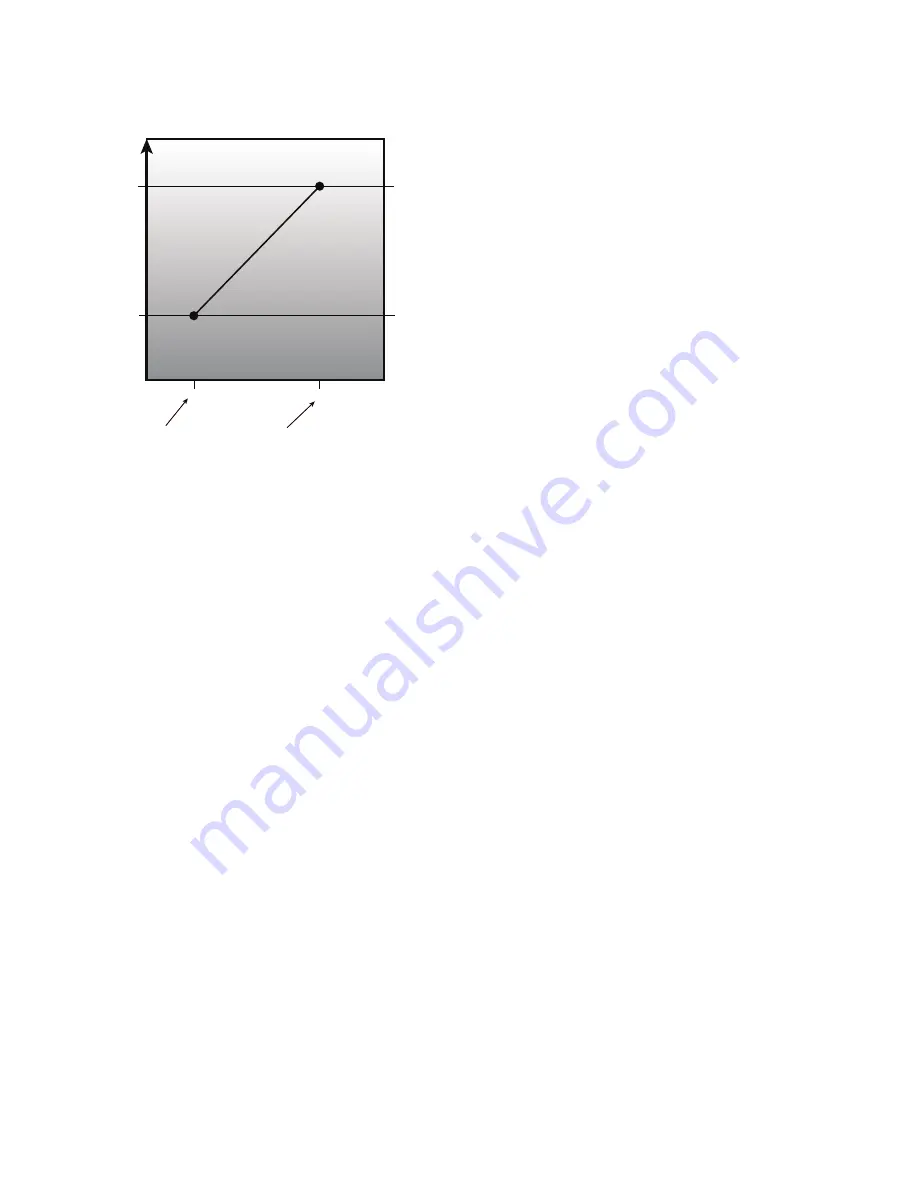
requirement will be forced to the maximum value (
OA.MN
).
Fig. 16 shows the DCV minimum outside air CFM determina-
tion curve.
Fig. 16 — IAQ DCV Control
Switch Demand Controlled Ventilation (DCV) uses the indoor
air quality levels (High/Low) to determine how much outside
air is required for ventilation. The ERV monitors the IAQ
switch (I
nputs
→
AIR.Q
→
IAQ.S
) reading from the rooftop’s
installed CO
2
switch. The minimum outside air CFM will be
equal to one of the following: Min DCV outside air CFM
(
Configuration
→
OAU
→
DCV.M
) setpoint, or the minimum
outside air CFM (
Configuration
→
OAU
→
OA.MN
) set-
point. If the CO
2
switch reads low the outside air CFM require-
ment will be DCV.M. If the switch reads high the outside air
CFM requirement will be OA.MN. The outside air fan(s) will
ramp its speed % up or down to produce the required CFM.
OA Tempering Mode (OA.OP = 3)
OA Tempering Mode is only available when the optional elec-
tric heater is field-installed in the ERV and enabled (
Configu-
ration
→
OAU
→
OA.TM = Enable
). The ERV can only be
set to OA Tempering mode when the ERV is occupied and the
rooftop is not running cooling or heating. The rooftop must be
in Ventilation (Fan-Only) mode (NVO_MODE = 9) and the
outside air temperature (
Inputs
→
AIR.T
→
OAT
) must be
less than the OA Tempering Lockout Temp (
Configuration
→
OAU
→
TM.LO
) to allow the ERV to run OA Tempering
Mode. The electric heater will then be turned on and modulat-
ed 0 to 100% based on the supply air temperature (
Inputs
→
AIR.T
→
SAT
) relative to the OA Tempering SAT setpoint
(
Configuration
→
OAU
→
TM.SP
).
When in OA Tempering Mode, the ERV runs as standard ERV
(DCV) mode: 2 position damper will be open and the wheel
will be rotating. The outside air fan(s) will ramp to maintain
correct outside air CFM. The exhaust fan(s) will ramp for the
required offset CFM. Additionally the ERV’s Electric Heater
will ramp up 1% every 2 seconds and ramp down 2% every 1
second based on how far the SAT is away from the setpoint. If
the SAT equals the setpoint then the electric heater will remain
at current percentage.
EXHAUST CONTROL
When the Power Exhaust control is set of Offset CFM (
Config-
uration
→
OAU
→
PEX.C = 0
), the ERV exhaust fan(s) oper-
ate to offset the outside air being introduced to the building.
The required exhaust offset CFM is determined based on the
exhaust offset setpoint (
Configuration
→
OAU
→
PE.OF
).
The exhaust offset setpoint can be set as a negative or positive
number to accommodate a requirement of positive or negative
building pressure. A positive setpoint will produce a negative
building pressure. A negative setpoint will produce a positive
building pressure.
The ERV will determine the required amount of outside air
CFM based on setpoints and current mode of operation. The
commanded exhaust air CFM (
Run Status
→
OAU
→
C.EX
)
is then calculated by the sum of the actual outside air CFM
(
Run Status
→
OAU
→
A.OA
) and the exhaust air offset set-
point (
PE.OF
). During defrost mode the exhaust will run the
same as if the outside air fan(s) were still running.
When the Power Exhaust Control is set for Building pressure
control (
Configuration
→
OAU
→
PEX.C = 1
), the ERV ex-
haust fan(s) operate to maintain a building pressure. A building
pressure transducer must be purchased separately and properly
field-installed in the ERV. A desired building pressure is set as
Building Pressure Setpoint (
Configuration
→
OAU
→
BP.SP
). The actual building pressure (
Run Status
→
OAU
→
BP
) is compared to the setpoint (
BP.SP
). The exhaust fan
will then be ramped up and down at the rate of 1% every 2 sec-
onds to try and maintain the desired building pressure. The ex-
haust fan(s) will slow to increase the building pressure and
speed up to decrease the building pressure.
WHEEL STOP/JOG
During free cooling the wheel utilizes a “stop-jog” operation to
periodically rotate the wheel and minimize potential dirt build-
up and excess wear on one section of the wheel. The wheel will
rotate for 5 seconds then stop for 5 minutes.
STATUS POINTS
The ERV updates points within the
Comfort
Link controller to
represent its running status. These points are shown in Table 13
and can be viewed on the scrolling marquee or handheld Naviga-
tor™ display under the run status outside air menu (
Run Status
→
OAU
). These points include but not limited to: commanded
and actual outside air CFM, commanded and actual exhaust air
CFM, ERV outputs, software versions, and internal ERV air
temperatures.
TROUBLESHOOTING
The scrolling marquee display shows the actual operating con-
ditions of the unit while it is running. If there are alarms or
there have been alarms, they will be displayed in either the cur-
rent alarm list or the history alarm list. (See Table 14.) The Ser-
vice Test mode allows proper operation of the compressors,
fans, and other components to be checked while the unit is not
operating. See Service Test.
Complete Unit Stoppage
There are several conditions that can cause the unit not to pro-
vide heating or cooling:
• If an alarm is active which causes the unit to shut down, di-
agnose the problem using the information provided in
Alarms and Alerts section below.
• Cooling and heating loads are satisfied.
• Programmed occupancy schedule.
• General power failure.
• Tripped 24-volt transformer circuit breakers.
• Blown fuse or circuit breakers
• Unit is turned off through the CCN network.
• If supply-air temperature is less than the Minimum SAT
Lower Level (
SAT.L
) configuration value, unit cannot
cool.
VENTILATION FOR PEOPLE
VENTILATION FOR SOURCES
INCREASING VENTILA
TION
ECON MIN
AT MAX
FANSPEED
POSITION
(MP.MX)
MINIMUM
IAQ
DAMPER
POSITION
(AQ.MN)
O
C
E
D
I
S
T
U
O
/
E
D
I
S
N
I
0
0
7
0
0
1
2
DIFFERENTIAL
AQ
DIFFERENTIAL
LOW
(AQD.L)
AQ
DIFFERENTIAL
HIGH
(AQD.H)
Summary of Contents for /50HC 04-28
Page 69: ...69 Fig 24 Typical Control Diagram for 48HC 04 14 Units 48HC 08 09 shown ...
Page 70: ...70 Fig 25 Typical Power Diagram for 48HC 04 14 Units 48HC 08 09 shown ...
Page 71: ...71 Fig 26 Typical Control Diagram for 50HC 04 14 Units 50HC 14 shown ...
Page 72: ...72 Fig 27 Typical Power Diagram for 50HC 04 14 Units 50HC 14 Non Humidi MiZer shown ...
Page 73: ...73 Fig 28 Typical Control Diagram 48HC 17 28 Units ...
Page 74: ...74 Fig 29 Typical Control Diagram 50HC 17 28 Units ...
Page 75: ...75 Fig 30 Typical Humid MiZer Power Diagram and Component Arrangement 48 50HC 17 28 Units ...
Page 76: ...76 Fig 31 Typical Non Humid MiZer Power Diagram and Component Arrangement 48 50HC 17 28 Units ...
Page 89: ...89 Fig 42 Modulating ERV Wiring Schematic ...
Page 90: ...90 Fig 43 EnergyX ERV Control Box Component Layouts ...
Page 101: ...101 Fig 59 Exhaust Fan Assembly Removal Exhaust Fan Assembly ...
Page 141: ......