


62-11785
5–16
5.4
TRU-TECH & TRU-VIEW
The TRU-Tech & TRU-View program allows the user to access and download data using a computer, when the unit
is not running and without starting the eight-hour DataLink data recorder timer. The application interface will pro-
vide additional programming and configuring capabilities that will not be available using the display mounted keys.
The DataLink data recorder may also be configured using the TRU-Tech program.
For complete instructions on using TRU-Tech & TRU-View, refer to the manual supplied with the TRU-Tech/TRU-
View software.
5.4.1
TRU-Tech
TRU-Tech enables the user to do the following:
• Monitor in real-time via the USB interface port the current status of the APX Control System inputs, outputs,
refrigeration, electrical, and temperature sensors and alarms.
• Record sensor data to a file for diagnostic purposes.
• Display, edit and send unit model number, unit serial number and trailer ID to the main microprocessor.
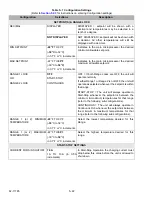
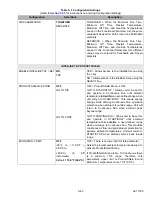
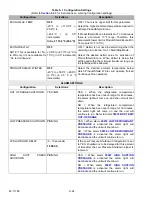
• Display, edit and send Functional Parameters and Configuration settings to the System (including the Data-
Link data recorder) or to a Data Transfer USB memory device.
• Write hour meter values to a replacement main microprocessors (during the first 25 hours).
• Initiate Pretrip and Defrost operations.
• Support Download, Configuration and Program USB operations.
• Provide a security log on a system controlled by a System Administrator.
5.4.2
TRU-View
TRU-View enables the user to do the following:
• Read download files from the System.
• Create various customized text reports that include setpoint, sensors, and events.
• Create various customized graphical reports.
• Print numerical, graphical, and event reports.
• View and print refrigeration system historical settings and changes.
• Filter download data by date range and desired sensors and events.
• Search for a sensor or event of interest.
• Synchronize multiple graphical and numerical windows to better understand historical operation.
• PC Setup enables the user to select how to display various parameters for use in the graph and text window.
• Easily adjust x and y axis and color scheme to accommodate various data.
• Export data to a user friendly format such as PDF.
5.4.3
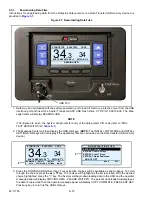
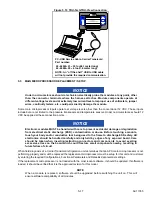
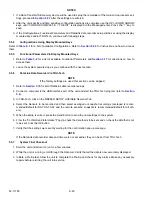
Connecting Computer and APX Control System
To connect the APX Control System and computer:
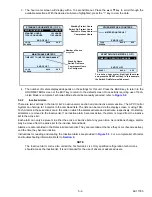
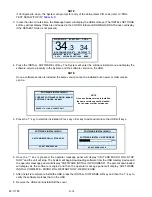
1. Locate the USB interface port (
) and remove the protective cover to gain access.
2. Plug a PC-USB service cable into the port and a USB port on the computer (
). If SROS is off, the
System will power up, and display “PC MODE”. If Configured to do so, the System will prompt for entry of
the data protect PIN code (refer to “PROTECT DATA WITH PIN”,
3. Start the TRU-Tech & TRU-View program by double clicking on the icon on your computer desktop and enter-
ing the required password. Verify that the correct COM port is selected in the PC Setup. For complete instruc-
tions on using TRU-Tech & TRU-View, refer to the manual supplied with the TRU-Tech/TRU-View software.
4. When work is complete, remove the interface cable and install the protective cover back onto the USB port.
The APX Control System will return to normal operation.
Summary of Contents for VECTOR 8100
Page 2: ......
Page 4: ......
Page 12: ...62 11785 viii ...
Page 16: ...62 11640 12 ...
Page 18: ...62 11785 ...
Page 24: ...62 11785 1 6 1 3 SAFETY DECALS ...
Page 25: ...1 7 62 11785 ...
Page 26: ...62 11785 1 8 ...
Page 27: ...1 9 62 11785 ...
Page 28: ...62 11785 1 10 ...
Page 30: ...62 11785 ...
Page 50: ...62 11785 ...
Page 82: ...62 11785 ...
Page 96: ...62 11785 4 14 ...
Page 98: ...62 11785 ...
Page 129: ...5 31 62 11785 ...
Page 130: ...62 11785 5 32 ...
Page 134: ...62 11785 6 4 ...
Page 138: ...62 11785 ...
Page 230: ...62 11785 ...
Page 271: ...8 41 62 11785 ...
Page 272: ...62 11785 8 42 ...
Page 274: ...62 11785 ...
Page 286: ......
Page 287: ......
Page 288: ...62 11785 10 8 ...
Page 292: ......
Page 293: ......