background image

G2300 Instruction Guide  


21 | 

P a g e


CAROLINA · MILANO


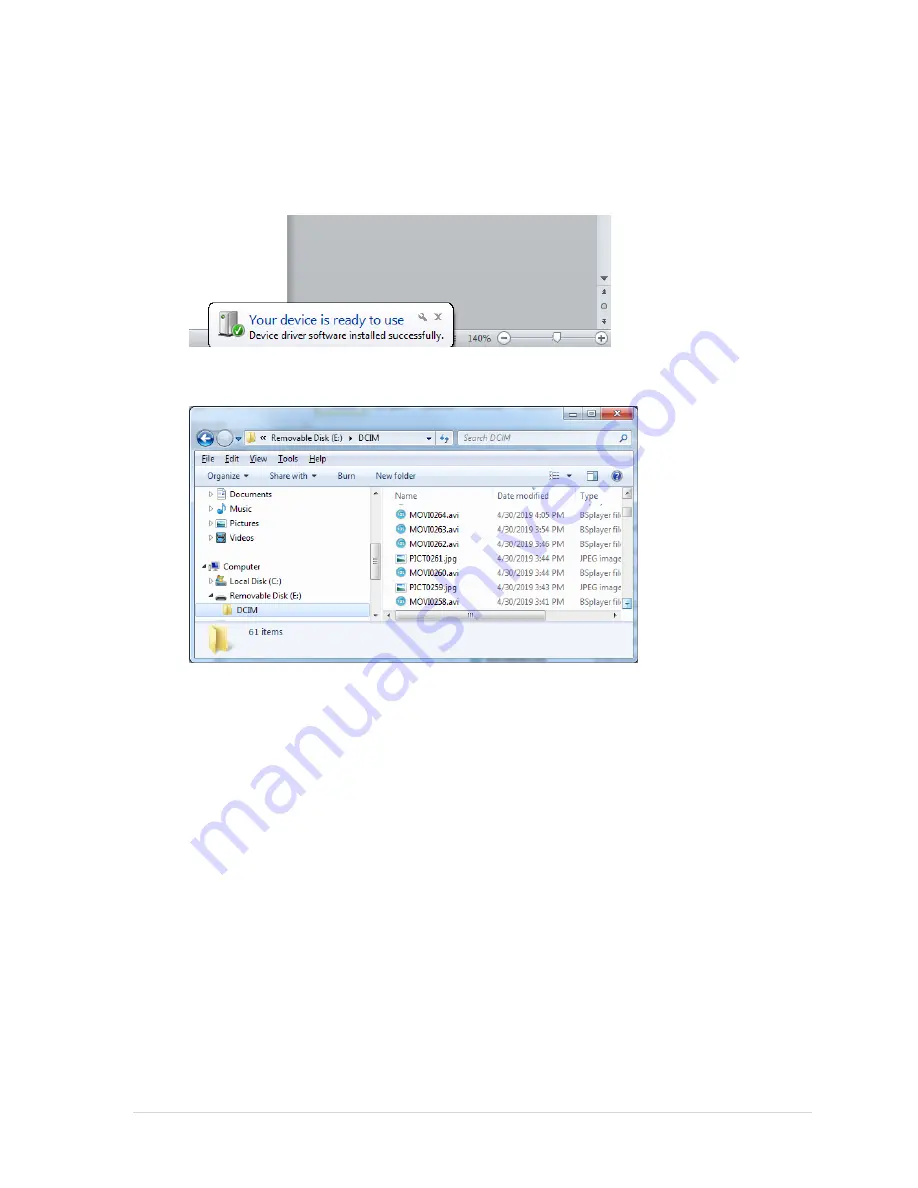
Copy Camera Videos and Photos to the computer 

Remark:  
Connecting the camera to a computer USB port enables only charging and file coping. 


1.


Connect the camera to the computer with the USB cable 

2.


Wait until the computer successfully identifies the new device 


3.


Run File explorer 

4.


Select 

Removable Disk 


5.


Select 

DCIM

 directory  

AVI Files are video file, JPG files are photo image files 
 

6.


Copy the files to your computer 


Summary of Contents for G2300

Page 1: ...G2300 Instruction Guide 1 P a g e CAROLINA MILANO Full HD 1080P Security Night Vision Hidden Spy Camera Instruction Guide Model G2300 CAROLINA MILANO ...

Page 2: ...xplosion or fire DO NOT dry the camera with an active heat source such as a hair dryer microwave oven or oven DO NOT place direct flame sources such as gas flames or lighted candles near the camera DO NOT handle the camera charger or the USB cable plugs with wet hands During charging place it in a well ventilated location away from heat sources Failure to comply with these precautions can result i...

Page 3: ...mera with a Memory Card 16 Taking a photo 16 Recording a Video Start Stop 16 Start Recording 16 Stop Recording 16 Recording a Video with Infrared Night Vision Start Stop 16 Start Recording 16 Revert from Video with Infrared Night Vision to regular recording 17 Stop Infrared Night Vision Recording 17 Operating the Camera with the Sports DV App 17 Connecting your Device to the G2300 Camera 17 Gettin...

Page 4: ...ut a memory card 22 Turning on the camera in No Memory card installed mode 22 Monitoring Taking Photos Recording with the Sports DV App 22 Monitoring 22 Taking Photos 23 Recording Videos 23 Viewing Photos and Videos with the Sports DV App 23 Viewing Photos and Videos from the Device 23 Troubleshooting 24 App does not reconnet to the camera 24 Technical Specifications 25 ...

Page 5: ...o part of this guide may be reproduced stored in a retrieval system or transmitted in any form or by any means without the prior written permission of the Publisher Every effort has been made in the preparation of this guide to ensure the accuracy of the information presented First published March 2019 Production reference 1191016 Published by Carolina Milano www carolinamilano com ...

Page 6: ...camera please read this instruction guide Set Content The G2300 Night Vision Action Camera set includes the following 1 x G2300 Camera 1 x Waterproof Camera case 1 x Magnetic Bracket 1 x Bike Handle Bar Pole mounts 1 x Base Mount Strap Handle 1 x USB Cable G2300 Main Features G2300 Night Vision Action Camera main Features FH 1080P Video recording 12MP image capturing Record during charging Night V...

Page 7: ...G2300 Instruction Guide 7 P a g e CAROLINA MILANO G2300 Camera layout G2300 Camera in its Waterproof protective case ...

Page 8: ...lities b Operating time with 10 000 mAh battery pack about 35 hours 4 With USB Connector to computer a Charging only cannot record or take photos b File copy from camera to computer Camera light indicators Red Fixed light Power on standby Battery fully charged Flashing light Charging low power Blue Fixed light Taking a photo Flashing light Video recording Yellow Fixed light Infrared video recordin...

Page 9: ... to a USB charger or Computer Remark Connecting the camera to a computer USB port enables only charging and file coping Charging status Flashing Power LED charging the battery Steady Power LED the battery is fully charged Charging time for a new battery is 2 3 hours depends on the charger Turning on off the G2300 camera Note If charged from a Computer USB port you must disconnect the camera from t...

Page 10: ...re 2 Turn on the camera 3 Turn on the camera s Wi Fi i Click on the Mode button for 3 seconds ii verify that green Wi Fi indicator is on 4 from your device connect to the following Wi Fi network that starts with SQ23_ like SQ23_D0EE can be changed later 5 Type the following password 12345678 can be changed later 6 On your device run the Sports DV Application 7 Verify that you are connected your de...

Page 11: ...G2300 Instruction Guide 11 P a g e CAROLINA MILANO 8 Click the Settings icon right bottom ...

Page 12: ...ecording resolution 1080FHD 1920x1080 30fps 1080P 1440x1080 30fps 720P 1280x720 30fps 9 Loop Recording Select the required video loop recording Off 3 Minutes 5 Minutes 10 Minutes 10 Record Audio Select the required settings Yes Blue icon No Grey icon 11 Time Stamp Select the required settings Yes Blue icon No Grey icon ...

Page 13: ...for Capture taking Photos Resolution Select the image resolution 12M 4023X3024 10M 3648X2736 8M 3264X2448 5M 2592X1944 3M 2048X1536 2MHD1920X1080 1 3M 1280X960 Date Time Select the following options Off Date Date Time System Settings Auto Power off Off 1 Minute ...

Page 14: ... remove all the info from the memory card Click Green V for Yes Click Red X for No Default Settings Be careful with this option since if you select Yes this option will reset the camera settings to the original factory default settings Click Green V for Yes Click Red X for No Setting the Wireless Network Wi Fi WifiName The default camera s wifi name is SQ23 it is recommended to change the wifi nam...

Page 15: ... the camera Click on Mode for 3 second Wi Fi is on with the new name Password To change the Wi Fi password click on Password Type the new password must be 8 characters Click OK Green V Turn off the camera Turn on the camera Click on Mode for 3 second Connect to the camera s Wi Fi with the new password Wi Fi s password is on with the new name ...

Page 16: ...y status Recording a Video Start Stop Start Recording From standby status Shortly press 1sec the Mode button Blue light starts flashing Starting Video recording For loop recording continue recording as required Stop Recording Shortly press 1sec the Mode button Camera retunes to standby status Recording a Video with Infrared Night Vision Start Stop Start Recording From standby status Shortly press ...

Page 17: ...s DV App Please note the Wi Fi range up to 50ft Connecting your Device to the G2300 Camera 1 Turning on the G2300 camera Press on the Power button for 2 3 seconds and the Power led will turn on 2 Turn on the Wi Fi Click on the Mode button for 3 seconds Verify that green Wi Fi indicator is on 3 Connect to the camera s Wi Fi from your device connect to the camera s wifi as you have configured in the...

Page 18: ...on Guide 18 P a g e CAROLINA MILANO 5 Run the Camera s App On your device run the Sports DV Application 6 Wait for the connection to complete V on the screen as shown in this snapshot 7 Click PLAY to start monitoring ...

Page 19: ...ra 4 Record Video save on Camera 5 View saved Photos and Videos on Camera TF Memory Card Monitoring Taking Photos Recording with the Sports DV App Note in order to monitor record video and take photos the Sports DV App must be on all the session hence if you will switch to another app on your device the recording will be terminated For Loop recording start the recording procedure directly on the c...

Page 20: ...ed dot and record time on the screen Tap on Video Camera icon to stop recording Camera icon returns to monitoring state Recording Videos on the Device Left side Commands Tap on Video Camera icon to start recording Camera icon indicating red dot and record time on the screen Tap on Video Camera icon to stop recording Camera icon returns to monitoring state Viewing Photos and Videos with the Sports ...

Page 21: ...omputer USB port enables only charging and file coping 1 Connect the camera to the computer with the USB cable 2 Wait until the computer successfully identifies the new device 3 Run File explorer 4 Select Removable Disk 5 Select DCIM directory AVI Files are video file JPG files are photo image files 6 Copy the files to your computer ...

Page 22: ...k for the memory card and if not installed the camera automatically will turn itself off after about 10 seconds Hence to avoid this start the camera with the following procedure 1 Press on the Power button for 2 3 seconds and the Power led will turn on 2 Immediately after the Power led is on Press on the Mode button to start the Wi Fi 3 Connect to the camera s Wi Fi as described previously in this...

Page 23: ... will be captured and saved on the Device Recording Videos Recording Videos on the Device Left side Commands Tap on Video Camera icon to start recording Camera icon indicating red dot and record time on the screen Tap on Video Camera icon to stop recording Camera icon returns to monitoring state Viewing Photos and Videos with the Sports DV App Viewing Photos and Videos from the Device 4 Tap on the...

Page 24: ...ction Guide 24 P a g e CAROLINA MILANO Troubleshooting App does not reconnet to the camera 1 Stop Turn off the App 2 Verify that you are connected to the camera s Wi Fi If not reconnect 3 Restart the Sports DV App ...

Page 25: ...X1944 3MP 2048X1536 2MP 1920X1080 1 3M 1280X960 Shooting Mode Single image Continuous Loop Recording Audio System Built in Microphone Image Format JPG Memory Card Micro SD up to 32GB class 10 WiFi Yes Languages English Chinese USB Micro USB to USB cable included Battery type Lithium Polymer Battery capacity 300mAh 3 7V 1 11Wh Charge Time 2 3 hours depend on the charger Operating System Windows XP ...

Page 26: ...ROLINA MILANO The manufacturer does not accept responsibility for any personal loss and or injury if the defect was caused by misuse or mishandling by the user in any way Visit carolinamilno com camera for more information CAROLINA MILANO ...

Reviews: