O
PERATION
M
ANUAL
- M
ODEL
97XX-Series
4-4
SECTION 4 - CURRENCY HANDLING
TRITON SYSTEMS, INC.
Replenishing Cassettes
1.
Open the Cash Dispenser security container via
the enclosure lock on the front of the unit. The
combination lock must then be opened to gain
access to the security container.
2.
To remove the cassette, grasp the handle on the
front of the Cash Dispenser mechanism with one
hand while holding the mechanism in place with
the other hand and pull sharply. Do not allow the
cassette to swing freely when it is pulled out.
It may strike a near by object or person caus-
ing damage to or injury to what it strikes!
3.
The cassette must be primed with the cassette
key before it can be inserted onto the loading tray.
Insert the key and turn clockwise to show the
green indicator in the window on the side of the
cassette.
***CAUTION***
If RED is indicated in the window on the side of the
currency cassette, NEVER attempt to insert the cas-
sette into the Cash Dispenser or the loading tray!
4.
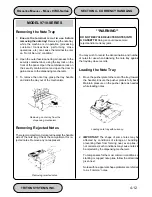
Place the cassette onto the loading tray with the
back of the cassette facing the probes on the tray.
The shutter is unlocked as the cassette is pushed
into the probes.
5.
Lift the cassette lid to expose the reject tray. Re-
move any rejected notes. Lift the reject tray to
gain access to the currency compartment.
Cassette opened.
Loading Tray.
Cassette on Loading Tray.
Removing cassette.
**WARNING**
DO NOT RECYCLE REJECTED NOTES
INTO A CASSETTE! Doing so could cause
more rejects and/or currency jams.
MODEL 9700-SERIES
Summary of Contents for Triton 9700
Page 1: ...Owner s manual Triton Owner s Manual 9700...
Page 12: ...SECTION 1 INTRODUCTION...
Page 22: ...SECTION 2 BASIC OPERATION...
Page 28: ...SECTION 3 INITIAL SETUP...
Page 36: ...SECTION 4 CURRENCY HANDLING...
Page 55: ......
Page 56: ...SECTION 5 MANAGEMENT FUNCTIONS...
Page 213: ......
Page 214: ...SECTION 6 MAINTENANCE...
Page 220: ...SECTION 7 JOURNAL ENTRIES...
Page 223: ......
Page 224: ...SECTION 8 ERROR RECOVERY...
Page 246: ...SECTION 9 CUSTOMER TRANSACTIONS...
Page 251: ......
Page 252: ...APPENDIX A MECHANICAL LOCK...
Page 255: ......
Page 256: ...APPENDIX B ELECTRONIC LOCK...
Page 259: ......
Page 260: ...APPENDIX C WARRANTY POLICY...


