Contact Caple on 0117 938 7420 for spare parts or www.caple.co.uk
P r e m i u m B u i l t - I n F r i d g e
I n s t r u c t i o n M a n u a l
R I L 1 8 0 0
Page 1: ...Contact Caple on 0117 938 7420 for spare parts or www caple co uk Premium Built In Fridge Instruction Manual RIL1800...
Page 2: ...al Connection 12 Ventilation Requirements 13 Product Overview 14 Using The Appliance 15 Operating Your Fridge 17 Humidity Controlled Drawer 22 Easy Adjustable Door Shelf 23 The Turbo Fan 23 Caple Fres...
Page 3: ...ccordance with all applicable local and international standards and regulations This appliance is intended to be used in household and similar applications such as Staff kitchen areas in shops offices...
Page 4: ...ce Never allow children to play with the appliance Cleaning and user maintenance should not be carried out by children without supervision Children aged from 3 to 8 years are allowed to load and unloa...
Page 5: ...iance malfunctioning To maintain the efficiency and safety of your appliance we recommend you always use original spare parts and to call only our authorised Caple Service agents in case of need Multi...
Page 6: ...e refrigerator plug it must be replaced by the manufacturer a service agent or similarly qualified persons in order to avoid a hazard A specially grounded plug has been connected to the power cable of...
Page 7: ...xt to a deep fridge there must be at least 2cm between them to prevent humidity forming on the outer surface Do not cover the body or top of fridge with lace This will affect the performance of your f...
Page 8: ...nce against atmospheric effects Do not expose it to effects such as sun rain snow etc D U R I N G U S E Do not store explosive substances such as aerosol cans with a flammable propellant in this appli...
Page 9: ...ppliance thoroughly before use Always switch off the appliance from the mains isolating the electrical supply before any cleaning or maintenance WARNING Do not use mechanical devices or other means to...
Page 10: ...accident Be careful to avoid damaging the pipework before disposal e g by puncturing coolant channels bending pipework scratching the surface coating Warning Risk of fire flammable materials The appli...
Page 11: ...hold waste disposal service or the retailer where you purchased the product CE DECLARATIONS OF CONFORMITY This appliance has been manufactured to the strictest standards and complies with all applicab...
Page 12: ...nnels bending pipework scratching the surface coating Warning Risk of fire flammable materials IMPORTANT Do not use the appliance without the fuse cover in position The appliance is supplied with a st...
Page 13: ...ww caple co uk To ensure the correct operation of the appliance it is important the top of the housing is not blocked off The top of the cabinet needs to be vented into the room the recommended minimu...
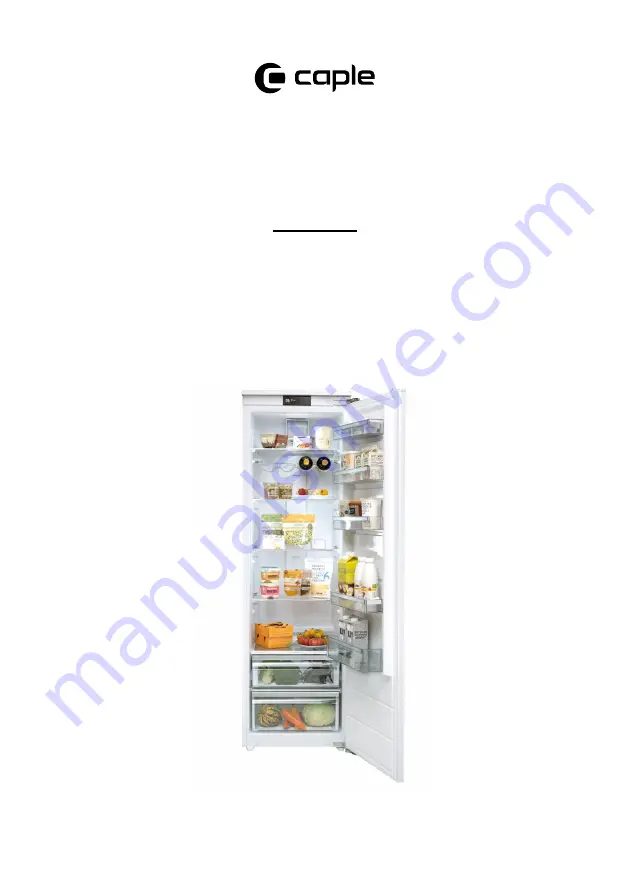
Page 14: ...0 12 11 1 Control panel 2 Turbo fan 3 Wine rack 4 Fridge shelves 5 Upper crisper cover 6 Upper crisper 7 Crisper cover 8 Crisper 9 Bottle shelf 10 Easy adjustable door shelf 11 Door shelves 12 Egg hol...
Page 15: ...stable and proper way You can adjust the legs by turning them clockwise or in the opposite direction This should be done before placing food in the fridge Install the distance adjustment plastic the p...
Page 16: ...ature Set Button To select a temperature setting and Super Cool mode to be activated if desired Fridge may be set to 8 6 5 4 2 C and Super Cool mode 3 Mode button Enables the economy mode to be activa...
Page 17: ...COOL MODE PURPOSE To cool and store a large quantity of food in the fridge compartment To quickly cool drinks HOW TO USE Press the Fridge set button until Super Cool symbol can be seen on the screen T...
Page 18: ...USE Push the mode button until the eco symbol appears Eco symbol will blink 3 times When mode is set the buzzer will sound Fridge temperature segments will show E Economy symbol and E will light till...
Page 19: ...ton for 3 seconds To activate this mode press on the Mode button for 3 seconds FRIDGE TEMPERATURE SETTINGS The initial temperature value for the fridge is 4 C Press the Temperature Set button once Whe...
Page 20: ...seconds The display will show St bY on the screen DURING THIS MODE All components will be disabled If you push the display button display will show St bY on the screen to show stand by mode is active...
Page 21: ...e fridge and the ambient temperature in the location of your fridge In order to allow your fridge to reach the operating temperature after being connected to mains do not open the doors frequently or...
Page 22: ...rawer is totally full the humidity controller should be opened By means of this the air in the draw and humidity rate will be controlled and endurance life will be increased If you see any condensatio...
Page 23: ...in below Whilst pulled down move the door shelf to the appropriate height there are 6 height positions Once set at the correct height release the buttons to lock it into position NOTE Please ensure th...
Page 24: ...draw By this method it maximises the fresh foods shelf life especially green vegetables Caple Fresh also blocks the bad smells produced in the refrigerator The Caple Fresh filter must be cleaned once...
Page 25: ...re the air is cooler as this provides the best storage conditions Store loose fruit and vegetable items in the crisper containers Storing fruit and vegetables separately helps prevent ethylene sensiti...
Page 26: ...ish 2 3 days Wrap in plastic foil bags or in a meat container and store on the glass shelf Fresh Cheese 3 4 days On the designated door shelf Butter and margarine 1 week On the designated door shelf B...
Page 27: ...cal components The appliance should be cleaned regularly using a solution of bicarbonate of soda and lukewarm water Clean the accessories separately by hand with soap and water Do not wash accessories...
Page 28: ...vice caple co uk 1 Carefully remove the 2 screws that secure the light 2 Remove the LED light from its housing Unplug the unit from the power supply before starting the process LIGHT SOURCE ENERGY CLA...
Page 29: ...ff 2 Remove the LED light from its housing 3 Disconnect the connector and change the LED light 4 Implement the steps in reverse order 5 After waiting 5 minutes plug the unit HOLIDAY SHORT HOLIDAYS Lea...
Page 30: ...back to required levels This warning will turn off after the voltage gets to the required level If this warning continues contact Caple service E10 Fridge compartment is not cold enough Likely to occu...
Page 31: ...the rear and side walls for ventilation WHY IS MY FRIDGE OPERATING LOUDLY CRACKING ICE CRACKING During automatic defrosting When the appliance is cooled or warmed due to expansion of appliance materi...
Page 32: ...appliance completely unplug from main socket for cleaning and when the door is left open If the problem persists or more help is required please contact our Caple service team on 0117 938 7420 or via...
Page 33: ...is thawing This will save energy Frozen food left to thaw outside of the appliance will result in a waste of energy 4 Drinks or other liquids should be covered when inside the appliance If left uncov...
Page 34: ...34 Instruction manual RiL1800 Please keep this instruction manual for future reference NOTES...
Page 35: ...35 Instruction manual RiL1800 Please keep this instruction manual for future reference NOTES...
Page 36: ...Caple Service Fourth Way Avonmouth Bristol BS11 8DW T 0117 938 1900 E service caple co uk www caple co uk...