background image


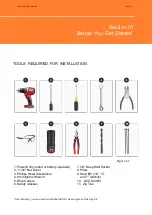
TOOLS  REQUIRED  FOR  INSTALLATION 


1. Power Drill (corded or battery operated) 
2. 11/32" Nut Driver 
3. Phillips Head Screwdriver 
4. 8mm Metric Wrench 
5. Wire Cutters 
6. Safety Glasses 


7. 3/4" Deep Wall Socket 
8.  Pliers 
9. 

Step Bit* (1/2”, ¾”, 
and 1” drill bits) 

10.   

5/32” Drill Bit 

11.  Zip Ties 

Figure 1.1 


*Alternatively, you can use the individual drill bit sizes in place of the step bit. 

EPORT  ENGAGE  COMBO 
INSTALLATION 

PAGE  5 

Section 01 

Before You  Get  Started


Summary of Contents for ePort Engage Combo

Page 1: ...ePort Engage Combo Installation Guide THE COMPLETE INSTALLATION OPERATIONS REFERENCE GUIDE...

Page 2: ...pe s new ePort Engage Combo Device This installation guide has been created to help you get up and running Please be sure to read this manual thoroughly and refer to the pre installation information c...

Page 3: ...HE EPORT ENGAGE DEVICE 8 DRILLING INTO YOUR VENDING EQUIPMENT 9 INSTALLING THE EPORT ENGAGE DEVICE 10 SYSTEM CONNECTION TO THE DEVICE 11 EXPECTED START UP BEHAVIORS 12 START UP SEQUENCE NO ISSUES 13 C...

Page 4: ...gage Combo device may need to download and process software updates when it is first installed and powered on Please allow the system to fully complete all updates before attempting any test swipes Pl...

Page 5: ...iver 4 8mm Metric Wrench 5 Wire Cutters 6 Safety Glasses 7 3 4 Deep Wall Socket 8 Pliers 9 Step Bit 1 2 and 1 drill bits 10 5 32 Drill Bit 11 Zip Ties Figure 1 1 Alternatively you can use the individu...

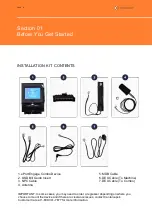
Page 6: ...Cable 6 DEX Cable To Machine 7 DEX Cable To Combo IMPORTANT In some cases you may need to order a regressor depending on where you choose to mount the device and if there are clearance issues contact...

Page 7: ...1 4748 if you need activation documents or have any technical issues with your device You must have a signed ePort Connect Services Contract and bank account assigned to this device for it to be able...

Page 8: ...o visit our ePort Engage Combo Accessories FAQ page Here you will find information on the types of accessories available and a compatibility chart of machines that require additional accessories Pleas...

Page 9: ...e ePort Engage Combo SECTION 02 DRILLING INTO YOUR VENDING EQUIPMENT INSTALLING THE EPORT ENGAGE DEVICE SYSTEM CONNECTION TO THE DEVICE EPORT ENGAGE COMBO INSTALLATION PAGE 9 Section 02 ePort Engage C...

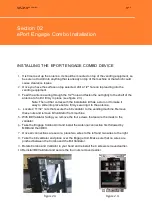
Page 10: ...to the antenna 4 Locate 4 11 32 nuts that secure the bill validator to the vending machine Remove these nuts and remove bill validator from machine 5 With Bill Validator facing you remove the four sc...

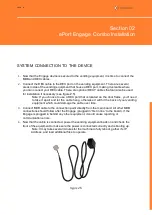
Page 11: ...let the cable hang otherwise it will hit the back of your vending equipment which could damage the cable over time 3 Connect MDB cable to the connection point directly from the main board All other MD...

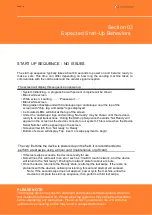
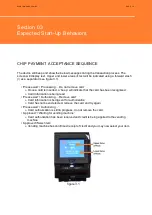
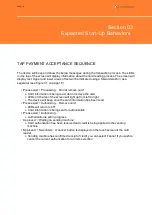
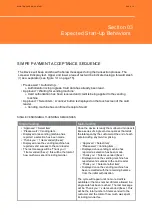
Page 12: ...viors SECTION 03 START UP SEQUENCE NO ISSUES CHIP PAYMENT ACCEPTANCE SEQUENCE TAP PAYMENT ACCEPTANCE SEQUENCE SWIPE PAYMENT ACCEPTANCE SEQUENCE EPORT ENGAGE COMBO INSTALLATION PAGE 12 Section 03 Expec...

Page 13: ...ll switch from Not ready to Ready Bottom of screen will display Tap insert or swipe payment to begin The very first time the device is powered up in the field it is recommended to perform a test swipe...

Page 14: ...formation is being read Please wait Authorizing Remove card Card information is being sent for authorization Card has not been detected remove the card and try again Please wait Authorizing Card autho...

Page 15: ...en will light up from left to right The device will beep once the card information has been read Please wait Authorizing Remove card LEDs will return to off Card information is being sent for authoriz...

Page 16: ...s to the card reader The last message will be Thank you 1 item vended x xx this will be the total of how much was spent including two tier Once the device is ready the multi vend mode acts like a seri...

Page 17: ...2022 Cantaloupe Inc All Rights Reserved...

Reviews: