background image

Video Configuration: Re

s

olution, Bit Rate and Frame Rate

46

Video Configuration: Resolution, Bit Rate and Frame Rate

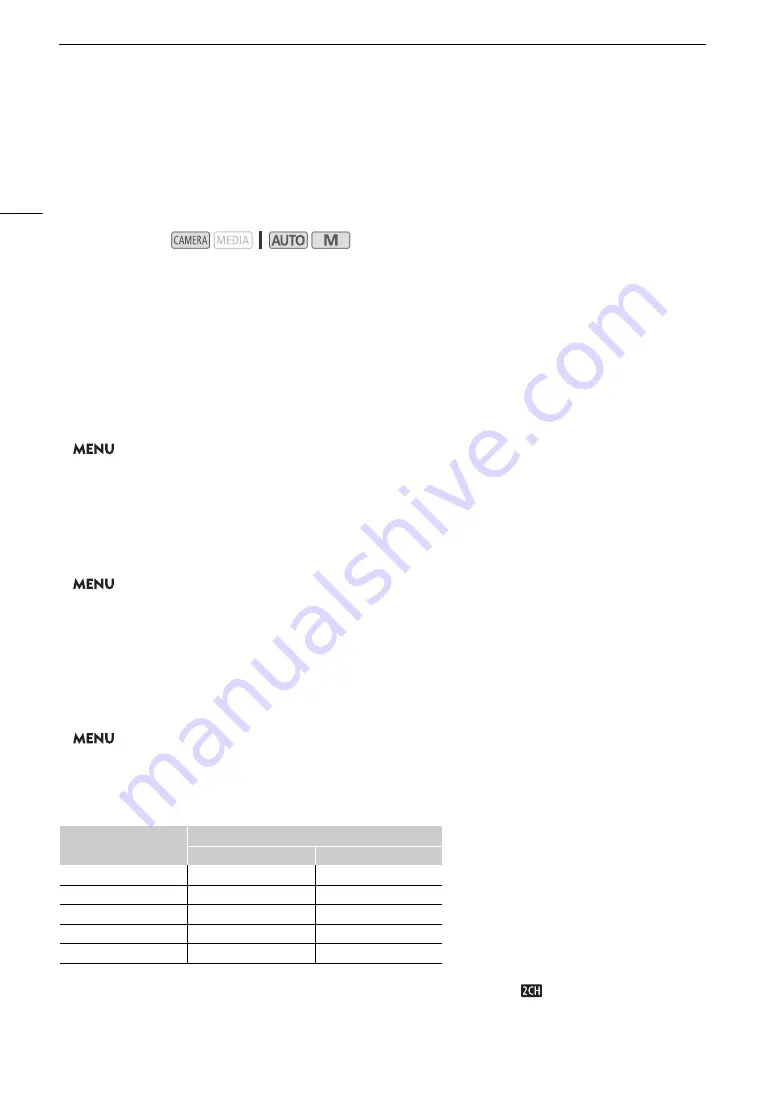
With the following procedures you can set the video configuration used for recording clips on an SD card in the 
camcorder. Select the combination of resolution/bit rate and frame rate settings that best matches your creative 
needs. Available options for some settings may change depending on previous selections for other settings. See 
the table following the procedures for a summary.

Selecting Internal Recording

By default, the camcorder is configured to allow internal recordings on an SD card. If the camcorder was set to 
external recording-only mode, follow the procedure below to enable internal recording. For details about setting 
the video configuration for recordings using an external recorder connected to the camcorder's SDI OUT 
terminal (

m

 only) or HDMI OUT terminal, refer to 

Connecting to an External Monitor or Recorder

 (

A

 107).

1

S

elect [Internal/External Rec].


>

 [

3


!

 Recording Setup] 

>

 [Internal/External Rec] 

2 Touch [

v

 Internal Rec Priority] and then touch [

X

].

Selecting the Resolution and Bit Rate

1

S

elect [Re

s

olution].


>

 [

3


!

 Recording Setup] 

>

 [Resolution]

2 Touch the de

s

ired option and then touch [

X

].

• The selected resolution and bit rate will appear at the right of the screen.

Selecting the Frame Rate

1

S

elect [Frame Rate].


>

 [

3


!

 Recording Setup] 

>

 [Frame Rate]

2 Touch the de

s

ired option and then touch [

X

].

• The icon of the selected frame rate will appear at the right of the screen.

Available video configuration 

s

etting

s

* The camcorder uses a variable bit rate (VBR).
**The frame rate is fixed and cannot be changed. Also, the audio format is automatically set to [

 AAC 16bit 2CH].

Operating modes:

Resolution (Bit rate*)

Frame rate

50.00P

25.00P

3840x2160 (150 Mbps)

1920x1080 (35 Mbps)

1920x1080 (17 Mbps)

1280x720 (8 Mbps)**

1280x720 (4 Mbps)**

Summary of Contents for XF400

Page 1: ...4K Camcorder PUB DIE 0518 000 Instruction Manual PAL ...

Page 2: ...trademarks of the Wi Fi Alliance WPS as used on the camcorder s settings onscreen displays and in this manual signifies Wi Fi Protected Setup The Wi Fi Protected Setup Identifier Mark is a mark of the Wi Fi Alliance JavaScript is a trademark or registered trademark of Oracle Corporation its affiliates or subsidiaries in the United States and other countries Other names and products not mentioned a...

Page 3: ...d in darkness using infrared recording A 88 With the built in infrared light on the handle unit you can record nocturnal animals in their natural environment or other such scenes SD card recording options The camcorder can record 4K video in MP4 format on an SD card It is equipped with 2 SD card slots allowing you to use dual recording A 47 to record the same clip on two SD cards or relay recordin...

Page 4: ... looks offered The Wide DR look for example applies a gamma curve with a very wide dynamic range and an appropriate color matrix Other Features Battery packs compatible with Intelligent System give you an estimate in minutes of the remaining recording time Compatibility with the optional GP E2 GPS Receiver to geotag your recordings A 90 Multiple image stabilization options A 61 to match your recor...

Page 5: ...C Menu 35 Setup Menus 36 3 Recording 39 Recording Video and Photos 39 Preparing to Record 39 Basic Recording 40 Reviewing the Latest Clip Recorded 41 Using the Fan 42 Onscreen Displays 42 Video Configuration Resolution Bit Rate and Frame Rate 46 Selecting Internal Recording 46 Selecting the Resolution and Bit Rate 46 Selecting the Frame Rate 46 Dual Recording and Relay Recording 47 Slow Fast Motio...

Page 6: ...00 Displaying Clip Information 100 Clip and Photo Operations 101 Deleting Clips and Photos 101 Trimming Clips 102 Copying Clips and Photos 103 Recovering Clips 104 6 External Connections 105 Video Output Configuration 105 Video Output Configuration by Terminal Internal Recording Priority 105 Video Output Configuration by Terminal External Recording Only 106 Connecting to an External Monitor or Rec...

Page 7: ... List of Messages 145 Safety Instructions and Handling Precautions 149 Maintenance Others 153 Optional Accessories 154 Specifications 156 Reference Tables 159 Charging Times 159 Approximate Recording Time on an SD Card 159 Approximate Recording Times with a Fully Charged Battery Pack 159 Index 161 ...

Page 8: ...8 ...

Page 9: ...corded with a single recording operation for example from the point when the REC button is pressed to start recording until it is pressed again to stop Network device refers to a device like a smartphone or tablet connected to the camcorder via Wi Fi or through a wired network using the Ethernet terminal The photos included in this manual are simulated pictures taken with a still camera Unless ind...

Page 10: ...enu Options A 133 This indicates to press the MENU button Brackets indicate text as it appears on the camcorder s screen menu options onscreen buttons messages etc This arrow indicates a deeper level in the menu hierarchy or the next step in a procedure 1 Select Internal External Rec 3 Recording Setup Internal External Rec 2 Touch v Internal Rec Priority and then touch X The menu page number is gi...

Page 11: ...essories are supplied with the camcorder CA 946 AC Adapter incl power cord BP 828 Battery Pack Microphone holder unit incl screws Handle unit incl screws Lens hood with lens barrier Lens cap WL D89 Wireless Controller incl CR2025 lithium button battery Quick Guide ...

Page 12: ...recording button A 41 Assignable button 4 A 94 4 Lens barrier switch A 39 5 Lens hood A 23 6 Focus Zoom ring A 49 56 7 CUSTOM customizable dial A 93 8 CUSTOM customizable button A 93 9 Focus Zoom ring switch A 49 56 10 INFRARED switch A 88 11 DISP onscreen display button A 42 BATT INFO battery information button A 21 1 7 8 9 10 11 2 3 4 5 6 ...

Page 13: ...n the SD card compartment cover switch A 33 4 Air intake vent A 42 5 Lens hood release button A 23 6 Grip belt A 25 7 USB terminal A 90 8 HDMI OUT terminal A 107 9 Ethernet indicator A 121 10 Ethernet terminal A 121 11 MIC terminal A 79 12 m SDI OUT terminal A 107 2 3 1 4 5 6 8 10 11 12 7 9 ...

Page 14: ...A 24 8 Dioptric adjustment lever A 24 9 Strap mount A 25 10 MAGN magnification button A 52 Assignable button 5 A 94 11 REC start stop recording video button A 39 12 Battery attachment unit A 19 13 Serial number 14 REMOTE terminal For connecting the optional RC V100 Remote Controller A 89 or commercially available remote controllers 15 headphones terminal A 85 110 16 DC IN terminal A 19 1 7 8 9 10 ...

Page 15: ...ng indicator A 19 3 Power switch A 28 4 Cold shoe Handle attachment unit A 22 5 Built in stereo microphone A 77 6 ACCESS indicator A 39 7 Zoom rocker A 56 8 Mode switch A 29 9 SD card compartment cover A 33 10 SD card slot 2 A 33 11 SD card slot 3 A 33 1 7 9 8 10 11 2 3 4 5 6 ...

Page 16: ...Names of Parts 16 1 Socket for tripod s anti rotation pin 2 Tripod socket A 27 3 BATTERY RELEASE switch A 20 4 Eye cup A 24 2 1 3 4 ...

Page 17: ...Audio input selection switches for CH1 left and CH2 right A 80 8 INPUT terminals XLR INPUT 1 right INPUT 2 left A 79 9 Infrared light A 88 10 Tally lamp A 40 11 Audio controls cover A 81 12 Handle unit front screw A 22 13 Handle unit rear screws A 22 14 INPUT 1 left INPUT 2 right switches audio source selection A 80 Microphone Holder Unit A 22 79 1 Microphone lock screw 2 Microphone holder 3 Micro...

Page 18: ... camcorder used to start stop recording video 2 G open the index selection screen button A 98 3 MENU button A 36 4 DISP onscreen display button A 42 5 SET button 6 Ñ stop button A 98 7 PHOTO button A 40 8 Zoom buttons A 59 9 Navigation buttons Í Î Ï Ð 10 Ò play pause button A 98 1 7 8 9 10 2 3 4 5 6 ...

Page 19: ... approximate remaining battery usage time in minutes on the screen For more accurate readings when using a battery pack for the first time charge it fully and then use the camcorder until the battery pack is completely exhausted Charging the Battery Pack Charge battery packs using the supplied CA 946 AC Adapter 1 Make sure the power switch is set to OFF 2 Connect the AC adapter s DC plug to the ca...

Page 20: ... POWER CHG indicator starts flashing refer to Troubleshooting A 141 7 When charging has completed disconnect the AC adapter in the order shown in the illustration To remove the battery pack 1 Slide the BATTERY RELEASE switch in the direction of the arrow and hold it pressed down 2 Slide the battery pack down and then pull it out 햷 POWER CHG battery charging indicator 햸 1 햸 햸 3 햸 4 햸 햲 햳 ...

Page 21: ...attery pack will be charged only when the camcorder is off If the power supply was disconnected while charging a battery pack make sure the POWER CHG indicator has gone out before restoring the power supply If remaining battery time is an issue you can power the camcorder using the AC adapter so the battery pack will not be consumed For approximate charging times and recording times with a fully c...

Page 22: ... Use a commercially available Phillips head crosshead screwdriver to attach the microphone holder unit to the handle unit with the two supplied screws Attaching the Handle Unit The camcorder is functional even if you remove the handle unit However to use the INPUT terminals A 79 infrared light A 88 and tally lamp A 40 the handle unit must be correctly attached to the camcorder 1 Align the handle u...

Page 23: ...d and place the lens cap back on the camcorder 1 Remove the lens cap The lens cap and lens hood cannot be used simultaneously 2 Place the lens hood on the front of the lens so that the groove on the lens hood is aligned with the top of the lens 햲 and then turn the lens hood clockwise until it stops with a click 햳 Be careful not to deform the lens hood Make sure that the lens hood is aligned with t...

Page 24: ...A 28 3 Adjust the viewfinder using the dioptric adjustment lever NOTES Make sure you keep the eye cup attached when using the camcorder If you wear glasses you may find the viewfinder easier to use if you flip back the outer edge of the eye cup toward the camcorder body Using the LCD Screen Open the LCD panel 90 degrees You can rotate the panel 90 degrees downward and 180 degrees toward the lens 햲...

Page 25: ...isplay Setup LCD Mirror Image in the setup menus to i On to flip the image horizontally so it shows a mirror image of the subject For details about how to take care of the LCD screen and viewfinder refer to Handling Precautions A 150 Cleaning A 153 About the LCD and viewfinder screens The screens are produced using extremely high precision manufacturing techniques with more than 99 99 of the pixel...

Page 26: ...battery into the wireless controller 1 Press the tab in the direction of the arrow and pull out the battery holder 2 Place the lithium button battery with the side facing up 3 Insert the battery holder To attach an optional WS 20 Wrist Strap To attach an optional SS 600 SS 650 Shoulder Strap Tab ...

Page 27: ...e camcorder NOTES When the camcorder cannot be operated with the wireless controller or when it can only be operated at very close range replace the battery The wireless controller may not work properly when the remote sensor is situated under strong light sources or direct sunlight Using a Tripod You can mount the camcorder on a tripod but do not use tripods with mounting screws longer than 6 mm ...

Page 28: ...rdings Select the operating mode using the power switch To turn on the camcorder Set the power switch to CAMERA for mode A 39 or MEDIA for mode A 97 To turn off the camcorder Set the power switch to OFF NOTES When you turn on the camcorder the POWER CHG indicator will illuminate in green You can set B System Setup POWER LED in the setup menus to j Off so the power indicator does not illuminate mod...

Page 29: ...ch to n With this mode you can enjoy full access to menus settings and advanced functions Using the MENU Button and Joystick You can navigate some of the camcorder s menus and screens using the MENU button and joystick instead of using the touch screen Joystick SET button When making a menu selection push the joystick to move the orange selection frame in the menu Then press the joystick itself in...

Page 30: ...k to select the desired button and press SET to confirm The same is true for the rest of the steps in this procedure In some screens the date will be displayed in short form numbers instead of month names or only the day and month but it will still follow the order you selected 6 Touch 24H to use 24 hour clock or leave it unselected to use 12 hour clock AM PM 7 Touch OK to start the clock and clos...

Page 31: ...me zone to match your location The default setting is Paris In addition the camcorder is able to retain the date and time of an additional location This is convenient when you travel so that you can set the camcorder to match the time of your home location or that of your travel destination The following procedure is explained using only the touch screen and an abbreviated notation explained in th...

Page 32: ...0 150 Mbps A 46 or using slow fast motion recording A 48 we recommend using SD cards rated UHS Speed Class U3 IMPORTANT About SDXC cards You can use SDXC cards with this camcorder but SDXC cards are initialized by the camcorder using the exFAT file system When using exFAT formatted cards with other devices digital recorders card readers etc make sure that the external device is compatible with exF...

Page 33: ...SS indicator is illuminated in red Failure to do so may result in permanent data loss Do not disconnect the power source or turn off the camcorder Do not open the SD card compartment cover Do not change the camcorder s operating mode Turn off the camcorder before inserting or removing an SD card Inserting or removing a card with the camcorder on may result in permanent data loss SD cards have fron...

Page 34: ... option you can touch Cancel to cancel the initialization while it is in progress You can use the SD card but all data will be erased 4 When the confirmation message appears touch OK and then touch X IMPORTANT Initializing an SD card will permanently erase all recordings Lost data cannot be recovered Make sure you save important recordings in advance A 111 Depending on the SD card the complete ini...

Page 35: ...con of the desired function on the left column If necessary touch to scroll up down 3 Touch the icon of the desired setting on the bottom row 4 Touch X to close the FUNC menu or L to return to the left column To use the joystick 1 On the shooting screen push the joystick to select FUNC and then press SET 2 Push the joystick Ý to select the desired icon from the left column and then press SET 3 Pus...

Page 36: ...directly the desired menu page 4 Touch the desired setting option and then touch X to close the menu You can touch L to return to the previous menu page To use the joystick 1 Press the MENU button 2 Push the joystick Þ to select the icon of the desired setup menu In the example the B icon corresponding to the System Setup menu If one of the icons in the top row is not selected when you open the me...

Page 37: ...the Menus NOTES You can use the MENU button on the supplied wireless controller to open the setup menus Touching X or pressing the MENU button at any time closes the menu Unavailable items may appear grayed out ...

Page 38: ...Using the Menus 38 ...

Page 39: ...ate correctly refer to Troubleshooting A 141 Clip refers to a single movie unit recorded with a single recording operation Preparing to Record 1 Attach a charged battery pack to the camcorder A 19 2 Insert a card into an SD card slot To use relay recording or dual recording A 47 insert SD cards into both slots 3 Open the lens barrier Set the lens barrier switch to OPEN 4 If you need to use the vie...

Page 40: ...T STOP button on the supplied wireless controller To take photos Touch the onscreen assignable button A 94 By default the Photo function is assigned to the onscreen assignable button A green g icon will appear at the bottom of the screen Also at the upper right of the screen Ð will appear with the icon of the card selected for recording photos You can also press the PHOTO button on the supplied wi...

Page 41: ...e video stream file in the clip will be split approximately every 4 GB Playback with the camcorder will be continuous The maximum continuous recording time of a single clip is 6 hours After that a new clip will be created automatically and recording will continue as a separate clip When recording in bright places it may be difficult to use the LCD screen In such case use the viewfinder or adjust t...

Page 42: ...hat actually appear at any time will vary depending on the current menu settings and operating mode k Automatic The fan runs while the camcorder is not recording and it is automatically turned off while the camcorder is recording video while the Ü icon appears at the top of the screen However if the internal temperature of the camcorder is too high the fan will be activated automatically in that c...

Page 43: ... one Depending on the conditions of use the actual battery charge may not be indicated accurately Ð6 Ð7 in red in red Photo recorded A 40 When or is displayed the photo cannot be recorded because of a problem with the SD card Icon Display Description Infrared light A 88 F00 Aperture value A 65 65 1 00000 Shutter speed A 64 65 AE 0 0 0 in orange Exposure compensation A 68 0 0 0 in orange Exposure l...

Page 44: ...rd status and remaining recording time A 32 In green can record in yellow SD card almost full in white reading the SD card When the SD card is full 6 End or 7 End will appear with the icon in red and recording will stop in red in red No SD card or cannot record on the SD card Relay recording A 47 ø m only ù External recording mode A 107 t 00bit Color sampling of the external recording A 107 Zoom b...

Page 45: ...e All displays on Only onscreen markers when activated A 138 Minimal displays recording operation etc Icon Display Description FUNC Opens the FUNC menu A 35 133 Ä œ B z Onscreen assignable button A 94 By default the Photo function take a photo is assigned to the button Tracking A 54 Exposure bar A 65 Audio level meter A 81 in red Wireless controller disabled A 139 ...

Page 46: ...l recorder connected to the camcorder s SDI OUT terminal m only or HDMI OUT terminal refer to Connecting to an External Monitor or Recorder A 107 1 Select Internal External Rec 3 Recording Setup Internal External Rec 2 Touch v Internal Rec Priority and then touch X Selecting the Resolution and Bit Rate 1 Select Resolution 3 Recording Setup Resolution 2 Touch the desired option and then touch X The...

Page 47: ...ecording 2 Touch 4 Dual Recording or Relay Recording or Relay Recording and then touch X When dual recording is activated the status of both SD cards will appear at the top right of the screen When relay recording is activated the SD card icon will change to or Touch Standard Recording to not use either function NOTES NOTES If an SD card becomes full during dual recording recording on both cards w...

Page 48: ...ng is activated The time code mode can be set to Regen or to Preset with Rec Run running mode If the time code running mode was set to Free Run the time code running mode will be changed automatically to Rec Run when slow fast motion recording is activated When slow fast motion recording is turned off the time code running mode will return to its previous setting The time code signal cannot be out...

Page 49: ...focus 1 Set the focus zoom ring switch to FOCUS 2 Activate the manual focus FUNC Focus n Manual Alternatively you can press the AF MF button to switch between autofocus and manual focus without using the FUNC menu When D appears on the screen skip to step 5 3 You can touch a subject inside the frame to focus on it automatically The Touch AF mark I will flash and the camcorder will focus automatica...

Page 50: ...nge the distance units used with the Display Setup Distance Units setting Using the Focus Assistance Functions In order to focus more accurately you can use the following focus assistance functions Dual Pixel Focus Guide an onscreen guide that shows you if the subject is in focus peaking which creates a clearer contrast by emphasizing the outlines of the subject and magnification which enlarges th...

Page 51: ...y depending on the direction in which the face is turned If you set an assignable button to Focus Guide A 94 you can press the button to turn focus guide on off Peaking When peaking is activated the edges of objects in focus will be highlighted in red blue or yellow on the screen In addition you can choose to switch the screen to black white while peaking is activated further emphasizing the edges...

Page 52: ...t your recordings Magnification is not available while the color bars are displayed AF Boosted MF With this focus mode you can focus manually most of the way and let the camcorder finish focusing automatically This is very convenient when you want to make certain that your 4K recordings are in sharp focus Additionally with this mode if the camcorder cannot evaluate how to adjust the focus it will ...

Page 53: ...screen 2 Set the AF mode to Continuous v Camera Setup AF Mode Continuous X NOTES NOTES When v Camera Setup AF Frame Size is set to r Large or s Small a white AF frame will appear on the screen Changing the AF Frame Size By default the camcorder focuses on a subject at the center of the screen You can change the size of the AF frame to display an AF frame and select a specific area or subject for a...

Page 54: ... to G and cannot be changed Autofocus may not work well on the following subjects or in the following cases In such case focus manually When FUNC Looks is set to Wide DR When subjects at different distances appear inside the AF frame Face Detection Tracking When face detection tracking is activated and the camcorder detects a face it can automatically adjust the focus and exposure for that person ...

Page 55: ...he camcorder may mistakenly detect the faces of non human subjects In such case turn face detection tracking off When face detection is activated the slowest shutter speed used by the camcorder is 1 25 Touching somewhere with a color or pattern unique to the subject will make it easier to track However if there is another subject in the vicinity that shares similar characteristics to the selected ...

Page 56: ... Digital zoom is not available in mode or when v Camera Setup Conversion Lens is set to WA U58 Using the Focus Zoom Ring 1 Set the focus zoom ring switch to ZOOM 2 Turn the focus zoom ring to adjust the zoom Turn the focus zoom ring slowly for a slow zoom turn it faster for faster zooms The zoom bar that appears on the screen indicates the approximate zoom position NOTES NOTES With the v Camera Se...

Page 57: ... zoom speed is too fast the camcorder may have more trouble focusing automatically while zooming 1 Select the overall zoom speed level v Camera Setup Zoom Speed Level Desired zoom speed level L You can select one of three levels Z Fast Normal or Slow 2 Select whether to use a variable or constant zoom speed Zoom Rocker Zoom Speed Y variable or X constant If you selected Y skip to step 4 3 Touch Ï ...

Page 58: ...cord standby mode Setting the Zoom Speed for the Handle s Zoom Rocker Refer to the following table for approximate zoom speeds Handle s zoom rocker Approximate zoom speeds time required to zoom end to end When the zoom speed is too fast the camcorder may have more trouble focusing automatically while zooming 1 Select the overall zoom speed level step 1 A 57 2 Enable the use of the zoom rocker at a...

Page 59: ...te controller s ZOOM dial At default settings turn the dial right to zoom in S and left to zoom out T Using the Touch Screen s Zoom Controls 1 Open the onscreen zoom controls FUNC R Zoom The zoom controls appear at the bottom the screen 2 Touch the zoom controls to operate the zoom Touch anywhere within the V area to zoom out or anywhere within the U area to zoom in Touch closer to the center for ...

Page 60: ...d then touch X The center of the screen will be enlarged approximately 2 times and the icon will appear at the lower left of the screen Touch again before closing the screen to turn off the digital tele converter NOTES NOTES You can attach the optional TL U58 Tele converter and use it in conjunction with this function to increase the effect The digital tele converter cannot be activated while reco...

Page 61: ...g natural looking scenes Powered IS Ç Powered IS is most effective when you are stationary and zooming in on far subjects using high zoom ratios the more you approach the telephoto end This mode is not suitable for tilting and panning shots Dynamic IS or Standard IS 1 Select Image Stabilizer v Camera Setup Image Stabilizer 2 Touch Standard Standard IS or Dynamic Dynamic IS and then touch X Touch O...

Page 62: ... compensate fully Powered IS is available even when Image Stabilizer is set to Ì Off You can change the operation of the POWERED IS button long press or toggle on off with the v Camera Setup Powered IS Button setting When using Dynamic IS the edges of the picture may be adversely affected ghosting artifacts and or dark areas may appear when compensating for a high degree of camcorder shake ...

Page 63: ...n Touch n again to return the camcorder to automatic gain control 2 Touch Ï or Ð or drag your finger along the dial to set the desired maximum gain value You can select an AGC limit from 0 0 dB to 38 0 dB If FUNC Looks is set to Wide DR the lowest AGC limit that can be set will be 9 0 dB 3 Touch X When an AGC limit is set and the maximum gain value will appear at the left of the screen NOTES NOTES...

Page 64: ...e other functions that are not available in mode Set the shooting mode to Programmed AE Shutter Priority AE With this shooting mode you set the shutter speed manually for example to capture fast moving subjects in sharp focus or to obtain a brighter image in low light situations The camcorder will automatically adjust other settings to obtain the best exposure 1 Set the shooting mode to Shutter Pr...

Page 65: ...gives you the most control over shooting settings as you can set the aperture shutter speed and gain to get the exposure that you want 1 Set the shooting mode to n Manual Exposure A 64 The aperture value shutter speed and gain value will appear at the left of the screen 2 Set the aperture and shutter speed as described previously Aperture FUNC Aperture A 65 from step 2 Shutter speed FUNC Shutter S...

Page 66: ...ght T Fireworks To avoid camcorder blur blur due to the camcorder moving we recommend using a tripod The exposure bar When the shooting mode is set to n the exposure bar will appear on the screen showing the optimal automatic exposure and current exposure When the difference between current and optimal exposure is larger than 2 EV the indicator will flash at the edge of the exposure bar H Portrait...

Page 67: ...lable and the available exposure compensation range may differ 4 Touch X The exposure value that was locked and will appear in orange at the left of the screen Touch Exposure You can touch the screen to optimize the exposure for a specific subject or area The camcorder will automatically adjust the exposure for the selected point and lock the exposure settings You can even touch a bright area of t...

Page 68: ...ensation levels from 2 to 2 3 Touch X AE and the exposure compensation value will appear in orange at the left of the screen NOTES NOTES If you set B System Setup CUSTOM Dial Button to y Exposure Comp A 93 you can compensate the exposure with the CUSTOM dial and button Backlight Correction When you need to record a scene with constant backlight conditions you can use backlight correction to make t...

Page 69: ...identified while 70 will identify also areas that are dangerously close to losing detail 1 Open the exposure screen FUNC y Exposure 2 Select the desired zebra level z 70 or 100 X To turn off the zebra pattern touch Off instead To return to the exposure screen and change other exposure settings touch L instead of X The zebra pattern will appear on the overexposed areas of the picture NOTES NOTES Di...

Page 70: ...ting in the following order ND 1 4 ND 1 16 ND 1 64 ND filter off no onscreen display The ND FILTER button cycles through the settings in reverse order The selected ND filter setting will appear at the left of the screen NOTES NOTES Depending on the scene the color may change when turning the ND filter on off Setting a custom white balance A 71 may be effective in such case About changing the ND fi...

Page 71: ...t the color temperature Color Temperature 3 Touch i An adjustment dial will appear on the screen 4 Drag your finger along the dial to set the color temperature value 5 Touch X To set a custom white balance Set 1 or Set 2 3 Touch i 4 Point the camcorder at a gray card or white object so that it fills the frame at the center of the screen and then touch Set WB When the Å icon stops flashing the proc...

Page 72: ...es Very rarely and depending on the light source Šmay keep flashing it will change to a slow flashing The result will still be better than with à Automatic Using a custom white balance may provide better results in the following cases Changing lighting conditions Close ups Subjects in a single color sky sea or forest Under mercury lamps certain types of fluorescent lights and LED lights ...

Page 73: ... your finger along the adjustment bar The sharpness contrast and color depth can be adjusted as follows Sharpness 0 softer image to 7 sharper image Contrast 4 low contrast to 4 high contrast Color Depth 4 shallower colors to 4 richer colors 4 Touch X Not available for Wide DR Not available for Monochrome Options NOTES NOTES When using the Wide DR look the lowest available gain setting is 9 0 dB As...

Page 74: ... and then touch X Options Operating modes Preset The time code starts from an initial value you can select in advance The default initial time code is 00 00 00 00 See the following procedures to select the time code running mode and set the initial time code Regen The camcorder will read the selected SD card and the time code will continue from the last time code recorded on the card The time code...

Page 75: ...the fields of the time code touch OK Touch Cancel to close the screen without changing the time code If the running mode is set to Free Run the time code will start running from the time code entered the moment you touch OK 4 Touch X NOTES NOTES When slow fast motion recording is activated you cannot select the Free Run running mode Conversely when pre recording is activated Free Run is set automa...

Page 76: ...screen 3 Recording Setup User Bit Type Setting i The user bit setting screen appears with an orange selection frame on the leftmost digit Touch Reset to reset the user bit to 00 00 00 00 and return to the previous screen 2 Touch Í or Î to set the first character and then touch the field next to it to select it Change the rest of the characters in the same way 3 After completing all the characters ...

Page 77: ...y and HDMI OUT terminal You can record this audio signal on an external recorder Requires that the handle unit be correctly attached to the camcorder Selecting the Audio Recording Format You can set the audio recording format to MPEG 4 AAC LC 2 channels 16 bit or linear PCM 4 channels 16 bit 1 Select MP4 Audio Format 3 Recording Setup MP4 Audio Format 2 Touch the desired option and then touch X Op...

Page 78: ...rminal INPUT 1 terminal INPUT 2 terminal INPUT1 INPUT2 INPUT 1 INPUT Terminal INPUT 1 terminal Yes INPUT1 INPUT2 INPUT 2 Built in Mic MIC Terminal INPUT 2 terminal MIC terminal L MIC terminal R INPUT1 INPUT2 INPUT 1 Built in Mic MIC Terminal INPUT 1 terminal INPUT1 INT MIC MIC MIC terminal mono INT MIC MIC INPUT2 MIC terminal mono INPUT 2 terminal No INPUT1 INPUT2 INPUT 2 Built in Mic MIC Terminal...

Page 79: ...illustration To connect an external device to the camcorder plug the device s cable into the desired INPUT terminal 햵 1 Loosen the microphone lock screw 햲 open the microphone holder and insert the microphone 햳 2 Tighten the lock screw and put the microphone cable through the microphone cable clamp under the microphone holder 햴 3 Plug the microphone cable into the desired INPUT terminal 햵 or the MI...

Page 80: ...wer make sure to set the corresponding INPUT switch to MIC or LINE respectively If you set the switch to MIC 48V the microphone or device may be damaged To record the same audio input to two audio channels By default when using the INPUT terminals each audio input is recorded to a separate audio channel INPUT 1 to CH1 and INPUT 2 to CH2 If necessary for example as an audio backup recording you can...

Page 81: ...adjust the audio recording level of the various audio channels using the audio controls on the handle unit or the audio screen in the FUNC menu The audio screen shows an overview of the audio channels used and for each audio channel the audio input currently selected whether the audio recording level is adjusted automatically or manually and the audio level indicator Automatic Audio Level Adjustme...

Page 82: ...CH2 or CH3 CH4 as necessary to change the pair of audio channels you wish to adjust 3 Touch Automatic or ö Manual If you selected automatic adjustment skip to step 5 If you selected manual adjustment continue the procedure to adjust the audio recording level 4 Touch and hold Ï or Ð to adjust the recording level as necessary As a guideline adjust the audio recording level so that the audio level me...

Page 83: ...you can select the external microphone s sensitivity 1 Select the desired INPUT terminal s sensitivity C Audio Setup INPUT 1 Mic Trimming or INPUT 2 Mic Trimming 2 Touch the desired option and then touch X You can select one of 5 sensitivity levels from 12 dB to 12 dB Microphone Attenuator INPUT Terminals When one of the audio channels is set to the INPUT terminals and the corresponding INPUT1 or ...

Page 84: ...unds we recommend turning off the low cut filter 1 Select Built in Mic Low Cut C Audio Setup Built in Mic Low Cut 2 Touch i On and then touch X Microphone Attenuator MIC Terminal When one of the audio channels is set to the built in microphone MIC terminal you can activate the microphone attenuator 20 dB for an external microphone connected to the MIC terminal to prevent audio distortions when the...

Page 85: ...o Setup Headphone Volume Page in mode 2 Touch Ô or Õ to adjust the volume and then touch X You can also drag your finger along the volume bar To adjust the volume during playback During playback you can also adjust the headphones volume in the same way you adjust the speaker s volume A 100 IMPORTANT When using headphones make sure to lower the volume to an appropriate level Operating modes ...

Page 86: ...ars 2 Touch the desired option and then touch X The selected color bars appear on the screen and will be recorded when you press the REC button NOTES NOTES You cannot change the type of color bars while recording or when pre recording is activated Recording an Audio Reference Signal The camcorder can output a 1 kHz audio reference signal with the color bars 1 Select 1 kHz Tone 3 Recording Setup 1 ...

Page 87: ...ior to pressing the REC button if the button was pressed within 3 seconds of having turned on pre recording or having finished the previous recording Pre recording will be deactivated in the following cases If the position of the mode switch was changed If the menu was opened If the shooting mode white balance or look was changed About the time code when pre recording is activated The time code of...

Page 88: ...nges take place The camcorder switches to automatic gain shutter speed and aperture adjustment The camcorder switches to autofocus initially but you can change the focus mode to manual focus The AGC limit white balance exposure compensation backlight correction both automatic and constant shooting mode face detection tracking AF mode and look settings cannot be changed The ND filter is retracted a...

Page 89: ...rn off the camcorder and connect the optional RC V100 Remote Controller to the camcorder 2 Turn on the camcorder and select REMOTE Terminal B System Setup REMOTE Terminal 3 Touch RC V100 REMOTE A and then touch X Options NOTES NOTES The following controls on the remote controller will not operate the camcorder Operating modes RC V100 REMOTE A Select this option to use the optional RC V100 Remote C...

Page 90: ...y or region Be particularly careful when traveling outside your home country Be careful about using GPS functions where the operation of electronic devices is restricted The GPS information recorded with clips and photos may contain data that can lead others to locate or identify you Be careful when sharing geotagged recordings with others or when uploading them to the Web Do not leave the GPS rec...

Page 91: ...e Setting setting Initial GPS signal reception will take longer after replacing the power source or when first turning on the camcorder after a period of having been turned off The GPS information recorded with clips corresponds to the location at the start of the recording Do not lay cables connected to the SDI OUT terminal m only or HDMI OUT terminal near the receiver Doing so may negatively aff...

Page 92: ...Using the Optional GP E2 GPS Receiver 92 ...

Page 93: ... then press the CUSTOM button Operating modes Tv Av M When the shooting mode is set to or turn the CUSTOM dial to adjust the shutter speed or aperture value respectively When the shooting mode is set to n press the CUSTOM button repeatedly to select the value you wish to adjust aperture value shutter speed gain value While the desired value is highlighted in orange turn the dial to adjust it AGC L...

Page 94: ...ENU button and while holding it pressed down press the assignable button whose function you wish to change Onscreen assignable button Open the function selection screen with the menu setting B System Setup Onscreen Assignable Button A list of available functions appears with the current function assigned to the button highlighted You can use the menu also for physical assignable buttons The corres...

Page 95: ...e current white balance setting and a priority white balance setting registered with the v Camera Setup Set WB Priority setting 135 IR Light When infrared recording is activated turns the camcorder s infrared light on off 88 œ Monitor Channels Changes the audio channels output from the headphone terminal 110 B AF MF Switches between autofocus and manual focus 49 Powered IS Turns powered IS on off ...

Page 96: ...ngs 4 When the confirmation message appears touch OK Loading Camcorder Settings 1 Insert an SD card that contains previously saved camcorder settings into SD card slot B 2 Select Load B System Setup Backup Menu Settings 7 Load 3 Touch Yes The camcorder s menu settings will be replaced by the settings saved on the card Then the screen will turn black momentarily and the camcorder will restart NOTES...

Page 97: ...back Swipe left right or touch Ï Ð to check other index pages To view photos or play back recordings on the other SD card change the index screen 3 Touch the thumbnail of the desired clip to start playback A 98 Operating modes 3 4 5 6 1 2 2 1 y Clip index screen Photo index screen 2 Display the next previous index page You can also swipe left right on the screen 3 Index screen button Touch to chan...

Page 98: ...ayback pause or for photos touch the screen again to hide the playback controls Only when the optional GP E2 GPS receiver was used when recording the photo 6 y Movies Clips recorded on SD card A 7 y Movies Clips recorded on SD card B 6 Photos Photos recorded on SD card A 7 Photos Photos recorded on SD card B 1 9 10 11 12 13 14 15 16 17 4 5 2 3 6 7 8 13 14 17 18 19 20 1 FUNC button Clip photo opera...

Page 99: ...k buttons on the supplied wireless controller Clip playback controls There is no audio during this playback mode Photo playback controls Playback type Operation Onscreen icon Fast playback During playback touch Ø Touch repeatedly to increase the playback speed to approximately 5x 15x 60x the normal speed During fast playback touch Ð to return to playback at normal speed x00 Øx00 Slow playback Touc...

Page 100: ...g your finger along the respective volume bar NOTES You can select the audio channels output from the headphone terminal and built in speaker A 110 Displaying Clip Information 1 In the clip index screen touch I and then touch the desired clip The Clip Info screen will be displayed Touch Ï Ð to view the information for the previous next clip 2 Touch L twice to return to the index screen Only when t...

Page 101: ... A checkmark will appear on the recordings you touch The total number of selected clips photos will appear next to the icon Touch a selected clip or photo to remove the checkmark To remove all checkmarks at once touch Remove All Yes 2 After selecting all the desired recordings touch OK Options Deleting a Single Clip 1 Play back the desired clip A 98 2 Touch the screen to display the playback contr...

Page 102: ...m 3 Bring the clip to a precise point if necessary The point at which the clip will be trimmed is indicated by the marker Playback controls will appear on the screen A 99 Use any special playback modes as necessary to locate the desired point 4 Select the desired trimming options and trim the clip Trim Trim Before Marker or Trim After Marker Save as New or Overwrite With the first set of options y...

Page 103: ...e All Yes 2 After selecting all the desired recordings touch OK Options IMPORTANT Observe the following precautions while the ACCESS indicator is illuminated in red Failing to do so may result in permanent data loss Do not open the SD card compartment cover Do not disconnect the power source or turn off the camcorder Do not change the camcorder s operating mode NOTES In the following cases you wil...

Page 104: ...tead of a thumbnail image 3 When Attempt to recover the data is displayed touch Yes The camcorder will attempt to recover the corrupted data 4 When the confirmation message appears touch OK NOTES In the index screen recovered clips appear with a special playback icon instead of the usual thumbnail This procedure may delete clips shorter than 0 5 seconds in length In some cases it may not be possib...

Page 105: ...rd A 46 or the video configuration of the clip being played back 1 Display Setup Output Terminal setting 2 Display Setup HDMI Max Resolution setting 3 YCbCr 4 2 0 8 bit when the frame rate is set to 50 00P 4 Only when the frame rate is set to 50 00P Operating modes Video configuration of the clip m Output terminal1 HDMI maximum resolution2 Video output configuration Resolution Frame rate m SDI OUT...

Page 106: ...eo Config setting Internal external recording1 Video configuration for external recording2 m SDI OUT terminal HDMI OUT terminal m ø External Rec Only SDI 1920x1080 50 00P YCC422 10bit 1920x1080 YCbCr 4 2 2 10 bit 1920x1080 25 00P YCC422 10bit 1920x1080 YCbCr 4 2 2 10 bit ù External Rec Only HDMI 3840x2160 50 00P YCC420 8bit 3840x2160 YCbCr 4 2 0 8 bit 3840x2160 25 00P YCC422 8bit 3840x2160 YCbCr 4...

Page 107: ...inal you must set the camcorder in external recording only mode Refer also to the external recorder s instruction manual for details on how to record For details about the audio channels that are output refer to Audio Output A 110 1 Select Internal External Rec 3 Recording Setup Internal External Rec 2 Touch the desired option depending on the terminal you wish to use and then touch L Touch ø Exte...

Page 108: ...s output from the SDI OUT terminal m only includes the video signal audio signal up to 4 channels time code and recording command You can output also the onscreen displays A 138 The HDMI OUT terminal also offers a digital connection and outputs both the video and audio signals You can output also the time code signal and onscreen displays A 138 The audio output signal will be 2 channel linear PCM ...

Page 109: ...sing the SDI OUT terminal You can set both 3 Recording Setup Rec Command and HDMI Time Code to i On to use the camcorder s REC button to control also the recording operation of an external recorder connected to the HDMI OUT terminal The camcorder s time code signal will be output as well The time code signal will not be output from the HDMI OUT terminal in the following cases In mode During SD 720...

Page 110: ...l of the following settings are available for Monitor Channels only ƒ CH1 CH2 and CH3 CH4 are available for HDMI channels In mode these options are available only when 3 Recording Setup MP4 Audio Format is set to LPCM 16bit 4CH NOTES If you set an assignable button to œ Monitor Channels A 94 you can press the button to change the audio channels output from the headphone terminal MP4 audio format1 ...

Page 111: ...reader Join relay clips A 47 that were saved on separate SD cards and save them as a single clip Join clips split at the 4 GB maximum file size and save them as a single clip For more details including system requirements and how to install the software check the Data Import Utility Software Guide a PDF file in the Manual folder of the downloaded compressed file that contains the software IMPORTAN...

Page 112: ...Working with Clips on a Computer 112 ...

Page 113: ...devices you plan to use Configuring the network settings requires adequate knowledge about configuring and using wired Ethernet and or wireless Wi Fi networks Canon cannot provide support regarding network configurations IMPORTANT Data transmitted over networks is not encrypted Canon shall not be liable for any loss of data or damage resulting from incorrect network configuration or settings Addit...

Page 114: ...nna with your hand or other object Covering it may interfere with wireless signals Do not lay cables connected to the SDI OUT terminal m only or HDMI OUT terminal near the Wi Fi antenna Doing so may negatively affect the wireless communication over Wi Fi Do not open the SD card compartment cover while using network functions Wi Fi antenna ...

Page 115: ...upported Wi Fi enabled devices The functionality is not the same as that of commercially available access points Infrastructure connection WPS button If your wireless router supports Wi Fi Protected Setup WPS setup will be easy and require minimal configuring and no passwords To check if your wireless router has a WPS button and for details about how to activate the Wi Fi protected setup refer to ...

Page 116: ...equency band for the Wi Fi connection For Europe only Only the 2 4 GHz frequency band is available for Camera Access Point connections Skip to step 5 5 Touch Í or Î to select the desired channel and then touch OK Available channels will differ depending on the selected frequency band Not applicable in Europe 6 Touch Open No encryption or WPA2 PSK AES to select the encryption method If you selected...

Page 117: ... Review the access point s configuration and then touch OK Drag your finger up down or touch Í Î to scroll and review all the information 2 Enter a name for the new network configuration profile Edit Enter the desired name using the keyboard screen A 116 OK If you wish you can give the network configuration profile a more descriptive name to make it easier to identify 3 Touch OK to save the networ...

Page 118: ...s assignment A 117 NOTES NOTES The WPS Button method may not work correctly if there are several active access points in the area In such case try using WPS PIN Code or Search for Access Points A 119 instead WPS Using a PIN Code 1 After you select WPS PIN Code the camcorder will generate and display an 8 digit PIN code on the screen 2 Enter the PIN code into the wireless router s WPS PIN code setu...

Page 119: ...rch for active access points in the vicinity and display a list of available options on the screen 2 Touch the desired access point Drag your finger up down or touch Í Î to scroll up down If the access point is not encrypted C icon is not displayed continue with the procedure to configure the IP address assignment A 117 3 If necessary depending on the access point s encryption touch one of the but...

Page 120: ...hentication mode Shared Key WEP Touch one of the buttons to select the WEP index WPA PSK WPA2 PSK Touch TKIP or AES 4 Enter the encryption key password Edit Enter the password using the keyboard screen A 116 OK 5 Continue with the procedure to configure the IP address assignment A 117 NOTES NOTES Valid passwords vary depending on the encryption method 64 bit WEP encryption 5 ASCII characters or 10...

Page 121: ...le to the Ethernet terminal on the camcorder and an Ethernet port on a network device 2 Select Connection Settings B System Setup Network Settings Connection Settings 3 Select the desired network configuration profile and then select Ethernet Network configuration profile 1 to 4 i Edit Ethernet You can save up to 4 network configuration profiles in the camcorder If necessary touch Í Î to scroll up...

Page 122: ...tly selected network configuration profile even after the initial setup Changing settings manually requires more advanced knowledge of Wi Fi and network settings 1 Select Connection Settings B System Setup Network Settings Connection Settings 2 Select the desired network configuration profile Network configuration profile 1 to 4 i The current network settings will be displayed Drag your finger up ...

Page 123: ...ng Up Browser Remote You can set a unique camcorder identification code and designate the port that the Browser Remote application should use when accessing the camcorder through the network The port number HTTP protocol used by Browser Remote is usually set to port 80 but you can change it if necessary The camcorder ID will appear on the Browser Remote screen making it easy to identify which camc...

Page 124: ...he camcorder is ready to accept commands from the Browser Remote application 3 If necessary display the camcorder s settings to complete the connection L View Information The current Browser Remote and network settings will be displayed If necessary touch Í Î to scroll up down You will need the camcorder s SSID network name to connect a Wi Fi device using a Camera Access Point connection You will ...

Page 125: ...page 6 When you have finished using Browser Remote turn it off on the camcorder B System Setup Network Settings Activate Off The network icons will turn yellow and then disappear from the screen and the connection with the application will be terminated NOTES NOTES The live view image will not be displayed in Browser Remote while color bars are displayed on the camcorder Depending on the network u...

Page 126: ...creen v When using a computer tablet and other devices with larger screens this screen offers all the controls available for operating the camcorder remotely via Browser Remote Onscreen display indication only The content or value cannot be changed using Browser Remote 1 Live view screen Shows the camcorder s live view image When the live view image is not turned on the camcorder ID will appear he...

Page 127: ...selected SD card is indicated with a Ð mark next to the icon Remaining recording times are approximate and calculated based on the current video configuration used 12 SLOT SELECT button Touch the button to select the other SD card when both SD card slots contain a card 13 Shooting mode A 64 Infrared recording A 88 AUTO mode A 29 When infrared recording is activated or the camcorder is set to mode ...

Page 128: ...d value from the list and then touch To change exposure related settings Touch the Exposure tab in the detailed camcorder settings panel 1 Mode shooting mode button Touch the button touch the icon of the desired shooting mode A 64 and then touch 2 ND Filter buttons Touch or to change the density of the ND filter displayed above the buttons You can also touch the current ND filter setting select th...

Page 129: ...cus Guide Off button 2 Touch On to display the focus guide A 50 and then touch Touch focus In autofocus mode you can touch on a subject that appears in the Browser Remote s live view screen in order to select it for focusing 1 Make sure the touch focus function has been unlocked and the D icon appears in the button A 127 2 Touch the desired subject in the live view screen Depending on the focus mo...

Page 130: ...reen When using a smartphone or other device with a smaller screen this screen offers only a small live image screen for final confirmation zoom controls and the REC button to start and stop recording To open the basic screen touch the icon at the top of the Browser Remote screen ...

Page 131: ...port number touch OK 5 Select whether to activate the passive mode i button next to Passive Mode On or Off L Off is the standard setting for most cases On passive mode is more appropriate for FTP transfers within a network behind a firewall 6 Select whether to create a new folder for every recording date i button next to New Folder by Date On or Off L 7 Select how to handle file transfers when a f...

Page 132: ...pears touch OK To select individual clips 1 Touch on the individual clips you want to transfer A checkmark will appear on the clips you touch The total number of selected clips will appear next to the icon Touch a selected clip to remove the checkmark To remove all checkmarks at once touch Remove All Yes 2 After selecting all the desired clips touch OK Options Select You can select the individual ...

Page 133: ...Gain Gain value adjustment dial 0 0 dB to 39 0 dB Zebra pattern button Off z 70 100 A 65 AGC Limit n set a limit Turn on off off when n is on AGC limit adjustment dial 0 0 dB to 38 0 dB 0 0db A 63 y Exposure Comp Touch AE frame i Touch AE settings Normal Highlights Zebra pattern button Off z 70 100 AE lock Turn on off off when is on exposure compensation adjustment dial AE 0 A 67 White Balance à A...

Page 134: ...mines the operation of the digital zoom The color of the zoom indicator indicates the zoom ratio With the digital zoom the image is digitally processed so the image resolution will deteriorate the more you zoom in This setting is not available when Conversion Lens is set to WA U58 Advanced is not available in the following cases When Æ Recording Setup Resolution is set to 3840x2160 150 Mbps When Æ...

Page 135: ...e focusing distance displayed on the screen will change depending on the setting If you are not using an optional conversion lens select j Off When a setting other than j Off is selected the v Camera Setup AF Mode setting will not be available Image Stabilizer Off Standard Dynamic A 61 Powered IS Button Î Press and Hold Ï Toggle On Off Determines the operation mode of the POWERED IS button A 61 Î ...

Page 136: ...ce in Memory 6 SD card A 7 SD card B Displays a screen where you can check the total space available on the SD card and the SD card s speed class In mode the screen shows also the available space on the card and an estimate of the remaining recording time and the remaining number of photos ª based on current settings In mode the screen shows also the amount of space currently used by recordings In...

Page 137: ...umbers An example file number is 101 0107 The first 3 digits indicate the folder number where the clip photo is stored and the last 4 digits indicate the consecutive number assigned to the recording from 0001 to 9999 The file number also indicates the name and location of the file on the SD card For example an MP4 clip numbered 101 0107 that was recorded on November 3 is located in the DCIM 101_11...

Page 138: ...s of the screen Changing the brightness of the screen does not affect the brightness of your recordings or the brightness of the playback image on a TV Bright is not available for LCD Backlight when infrared recording is activated LCD Mirror Image i On j Off When this setting is set to i On this function reverses the image on the screen horizontally when you rotate the LCD panel 180 degrees toward...

Page 139: ...ord Password up to 32 characters Destination Folder Destination folder s path up to 152 characters Default is the root folder Port No 1 to 65535 21 Passive Mode On Off New Folder by Date On Off Same Named Files Skip Overwrite View Information A 124 131 Fan k Automatic i On A 42 Wireless Remote Control i On j Off Allows the camcorder to be operated with the wireless controller POWER LED Tally Lamp ...

Page 140: ...le A 90 GPS Information Display When the optional GP E2 GPS Receiver is attached to the camcorder the following settings become available GPS Auto Time Setting You can have the camcorder automatically set the time based on the information acquired from GPS For more details refer to Setting Time from GPS on the Camera in the receiver s instruction manual GPS Information Display Displays the current...

Page 141: ... or initialize the card A 34 to free some space The file numbers have reached their maximum value Insert a new SD card into the camcorder and set 3 Recording Setup File Numbering to Reset The point where the REC button was pressed does not match the beginning end of the recording There may be a slight interval between pressing the REC button and the actual start end of recording This is not a malf...

Page 142: ...selected for recording Delete some recordings A 101 to free some space or replace the card 6 7 appears in red on the screen The SD card is full Delete some recordings A 101 to free some space or replace the card appears in red on the screen A card error occurred Turn off the camcorder Remove and reinsert the SD card Initialize the SD card if the display does not change back to normal Even after st...

Page 143: ...xhausted The audio recording level is not set correctly A 81 Sound is distorted or is recorded at lower levels When recording near loud sounds such as fireworks shows or concerts sound may become distorted or it may not be recorded at the actual levels Activate the microphone attenuator A 83 or adjust the audio recording level manually The picture is displayed correctly but there is no sound from ...

Page 144: ...15 Cannot establish a Camera Access Point connection with a network device There are other devices in the vicinity interfering with the wireless signal Refer to Precautions Regarding Wi Fi Networks A 145 When you reset all the camcorder s settings all network settings are lost as well Set up the Camera Access Point settings again A 116 Cannot connect with a wired Ethernet network Use a category 5e...

Page 145: ...message appears on the screen The messages in this section appear in alphabetical order Note that for some messages an indication of the SD card involved 6 7 etc may appear above the message itself For error messages related to network connections refer to Network Functions A 147 Accessing the memory card Do not remove the memory card You opened the SD card compartment cover while the camcorder wa...

Page 146: ...re Change the position of the LOCK switch No clips There are no clips on the SD card selected No memory card Insert a compatible SD card into the camcorder A 33 No photos There are no photos to play back Operation canceled Clips cannot be recorded because the control data is corrupted or an encoder error has occurred Control data cannot be recovered with the camcorder Turn the camcorder off and th...

Page 147: ... available space in the data storage device hard disk etc that contains the destination folder on the FTP server IP address conflict Another device on the same network has the same IP address assigned to the camcorder Change the IP address of the conflicting device or the camcorder LAN cable not connected You attempted to connect to a wired network but the Ethernet cable is not connected Check tha...

Page 148: ... DNS server s IP address and the name for that address are correctly configured If you are using a wireless gateway router make sure all of the devices in the network including the camcorder are configured with the correct gateway address Wi Fi authentication unsuccessful Make sure the camcorder and access point are using the same authentication encryption method and encryption key If the access p...

Page 149: ... When disposing of batteries battery packs insulate the terminals with tape or other means This may cause electric shock explosion or fire Use only power sources specified in this instruction manual for use with the product Observe the following instructions when using a battery charger or AC adapter Do not plug in or unplug the product with wet hands Do not use the product if the power plug is no...

Page 150: ...int the camcorder or viewfinder toward an intense light source such as the sun on a sunny day or an intense artificial light source Doing so may damage the image sensor or the camcorder s internal components Be careful especially when using a tripod or shoulder strap When the camcorder is not in use keep the lens barrier closed Do not carry the camcorder by the LCD panel Be careful when closing th...

Page 151: ...c electricity Canon shall not be liable for lost or corrupted data Do not touch or expose the terminals to dust or dirt Do not use SD cards in places subject to strong magnetic fields Do not leave SD cards in places subject to high humidity and high temperature Do not disassemble bend drop or subject SD cards to shocks and do not expose them to water Check the direction before inserting the SD car...

Page 152: ...y Do not pick up the battery using tweezers or other metal tools as this will cause a short circuit Wipe the battery with a clean dry cloth to ensure proper contact WARNING The battery used in this device may present a fire or chemical burn hazard if mishandled Do not disassemble modify immerse in water heat above 100 C or incinerate the battery Do not insert the battery into the mouth If swallowe...

Page 153: ...cold temperatures may cause condensation water droplets to form on its internal surfaces Stop using the camcorder if condensation is detected Continued use may damage the camcorder Condensation may form in the following cases When the camcorder is moved quickly from cold to warm places When the camcorder is left in a humid room When a cold room is heated rapidly To avoid condensation Do not expose...

Page 154: ...ote that this warranty does not apply to repairs arising out of the malfunction of non genuine Canon accessories although you may request such repairs on a chargeable basis availability differs from area to area RC V100 Remote Controller SS 600 SS 650 Shoulder Strap WS 20 Wrist Strap WA U58 Wide Attachment Protect Filter 58 mm ND4L Filter 58 mm ND8L Filter 58 mm HTC 100 S High Speed HDMI Cable IFC...

Page 155: ...ers and chargers compatible with Intelligent System CG 800E Battery Charger Use the battery charger to charge the battery packs TL U58 Tele Converter The minimum focusing distance at full telephoto with the tele converter is 1 3 m The tele converter cannot be used together with the supplied lens hood WA U58 wide attachment The wide attachment cannot be used together with the supplied lens hood Thi...

Page 156: ...cording times refer to the Reference Tables A 159 SD SDHC SD High Capacity or SDXC SD eXtended Capacity card 2 slots Image Sensor 1 0 type single plate CMOS sensor Effective pixels 8 290 000 pixels 3840x2160 LCD Touch Screen 8 92 cm 3 5 in color LCD 16 9 aspect ratio 1 560 000 dots 100 coverage capacitive touch screen operation Viewfinder 0 61 cm 0 24 in equivalent to 1 560 000 dots 100 coverage M...

Page 157: ...huania Luxembourg Malta Netherlands New Zealand Norway Poland Portugal Romania Slovakia Slovenia Spain Sweden Switzerland United Kingdom Terminals m SDI OUT Terminal BNC jack output only 0 8 Vp p 75 Ω unbalanced 3G SDI SMPTE 424 SMPTE 425 SMPTE ST 299 2 HD SDI SMPTE 292 SMPTE ST 299 1 Embedded audio time code VITC LTC HDMI OUT Terminal HDMI mini connector output only USB Terminal mini B receptacle...

Page 158: ...216 x 267 mm Weight Camcorder body only including the grip belt m 1 150 g n 1 145 g Typical recording configuration m 1 670 g n 1 665 g Camcorder with lens hood handle unit and microphone holder BP 828 battery pack and one SD card CA 946 AC Adapter Rated Input 100 240 V AC 50 60 Hz Rated Output 65 VA 100 V AC 85 VA 240 V AC Operating Temperature 0 40 C Dimensions 73 x 40 x 139 mm Weight 465 g BP 8...

Page 159: ... AC adpater 230 min 350 min Using the CG 800E Battery Charger 190 min 260 min Resolution SD card capacity 8 GB 16 GB 32 GB 64 GB 128 GB 3840x2160 150 Mbps 5 min 10 min 25 min 55 min 1 h 50 min 1920x1080 35 Mbps 25 min 55 min 1 h 55 min 4 h 8 h 5 min 1920x1080 17 Mbps 55 min 2 h 4 h 5 min 8 h 15 min 16 h 35 min 1280x720 8 Mbps 2 h 4 h 15 min 8 h 40 min 17 h 35 min 35 h 20 min 1280x720 4 Mbps 4 h 5 ...

Page 160: ...115 min 175 min 25 00P Recording maximum 100 min 150 min Recording typical 45 min 70 min Playback 130 min 200 min 1920x1080 35 Mbps 50 00P Recording maximum 90 min 140 min Recording typical 45 min 65 min Playback 135 min 210 min 25 00P Recording maximum 110 min 165 min Recording typical 50 min 80 min Playback 140 min 215 min 1280x720 8 Mbps 50 00P Recording maximum 95 min 145 min Recording typical...

Page 161: ...ormation 100 Copying 103 Deleting 101 Playback 97 Recording 40 Recovering 104 Color bars 86 Condensation 153 Connection to external devices 107 Copying recordings 103 CUSTOM button 93 CUSTOM dial 93 D Data Import Utility download 111 Date and time 30 DC IN terminal 19 Deleting recordings 101 Digital tele converter 60 Dual Pixel Focus Guide 50 Dual recording 47 E Exposure Exposure compensation 68 E...

Page 162: ...2 98 138 Onscreen markers 138 P P shooting mode 64 Peaking 51 Phantom power microphone 80 Photos Copying 103 Deleting 101 Recording 40 Viewing 97 PIN code connection mode WPS 118 Playback 97 Portrait shooting mode 66 Powered IS 61 Pre recording 87 R Recording 40 Reference tables charging usage and recording times 159 Relay recording 47 Remote controller 89 Remote sensor 27 Resolution frame size 46...

Page 163: ... 141 Tv shooting mode 64 U USB terminal 107 User bit 76 V Video configuration 46 Video output configuration 105 Viewfinder 24 Volume 100 W White balance 71 Wide DR 73 Wireless controller 18 26 WPS Wi Fi Protected Setup 118 Z Zebra pattern 69 Zoom 56 High speed zoom 58 Zoom speed 57 59 ...

Page 164: ...G 020 7660 0186 Canon Inc 30 2 Shimomaruko 3 chome Ohta ku Tokyo 146 8501 Japan Canon Europa N V Bovenkerkerweg 59 1185 XB Amstelveen The Netherlands http www canon europe com The information in this document in verified as of July 2017 Subject to change without notice Visit your local Canon Web site to download the latest version ...

Reviews: