background image

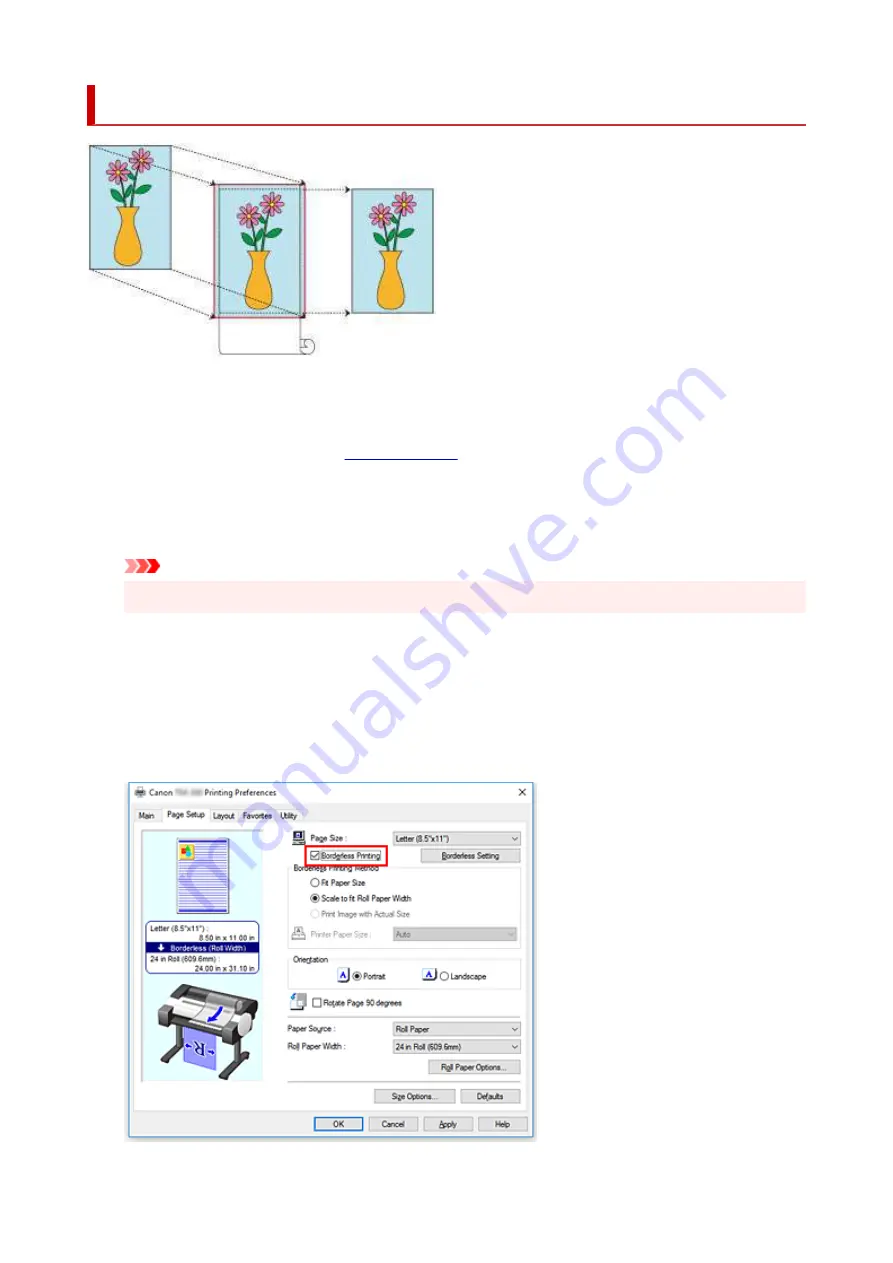
Printing without Margins to Match Roll Paper Width

Procedure for printing borderless (without white margins around the edges) by enlarging/reducing
documents to match roll paper width.

1.

In the printer driver, open the 

settings screen

2.

Select a feeding method

In 

Paper Source

, select 

Roll Paper

.

Important

• The feeding methods you can choose from vary depending on paper settings.

3.

Select paper roll width

For paper roll width, enter the same value set in the printer under 

Roll Width

.

4.

Select borderless printing

In the 

Page Setup

 tab, place a checkmark next to the 

Borderless Printing

 option.

545

Summary of Contents for TM-5300

Page 1: ...TM 5300 Online Manual English ...

Page 2: ...rmation 50 Handling rolls 51 Loading Rolls on the Roll Holder 52 Loading Rolls in the Printer 56 Changing the Type of Paper 61 Specifying the Paper Length 64 Removing the Roll from the Printer 65 Removing Rolls From the Roll Holder 68 Feeding Roll Paper Manually 70 Keeping Track of the Amount of Roll Paper Left 71 Specifying the Ink Drying Time for Rolls 74 Specifying the Cutting Method for Rolls ...

Page 3: ...s from Operation Panel 141 Setting Items on Operation Panel 143 Job management 144 Test print 145 Print settings 146 HP GL 2 Settings 147 LAN settings 148 Other device settings 156 Language selection 158 Paper related settings 159 Auto maintenance settings 161 Administrator password setting 162 Setting Administrator Password on Operation Panel 163 Monitoring service settings 165 Printer informatio...

Page 4: ...d size and Auto rotation and Enlarge Reduce Fit paper size 208 Detect image size and Oversize 211 Detect image size and Print centered 213 Standard Size Table 214 Status Print 216 Changing Printer s Setting Using Web Browser 218 Configuration Changes Using Web Browser 219 Changeable Setting Items Using Web Browser 222 Setting Password 224 Registering Printer s Root Certificate to Web Browser for S...

Page 5: ...ion of Network Settings using the Remote UI 287 Network Status and Troubleshooting 288 IJ Network Device Setup Utility Windows 290 IJ Network Device Setup Utility 291 Starting Up IJ Network Device Setup Utility 292 Diagnosing and Repairing Network Settings 293 Performing Changing Network Settings 294 Canon IJ Network Device Setup Utility Screen 295 Performing Network Settings 299 Performing Changi...

Page 6: ...0 List of Devices Which May Interfere with Wi Fi Communication 341 Sharing the Printer on a Network Windows 342 Setting Up a Shared Printer 343 Restrictions on Printer Sharing 345 Connecting Smartphone Tablet to Printer via Wi Fi 347 Connecting Smartphone Tablet to Printer via Wireless Router 348 Adjustments for Better Print Quality 351 Adjusting the Print Head 352 Adjusting the Print Head 353 Adj...

Page 7: ...ntenance Cartridge 401 Maintenance Cartridge 402 Replacing the Maintenance Cartridge 403 Checking the Remaining Maintenance Cartridge Capacity 407 When to Replace the Maintenance Cartridge 408 Cutter Blade 409 Cutter Blade 410 Replacing the Cutter Blade 411 Performing Maintenance Functions from Your Computer Windows 414 Cleaning the Print Heads 415 Printing a Nozzle Check Pattern 416 Cleaning the ...

Page 8: ...lls 467 Loading and Printing on Sheets 470 Printing in Windows 472 Printing from macOS 474 Canceling print jobs 476 Canceling Print Jobs from the Operation Panel 477 Canceling Print Jobs from Windows 478 Canceling Print Jobs from macOS 480 Pausing Printing 481 Pausing Printing 482 Enhanced Printing Options 483 Printing from Your Computer Windows 487 Printing with Easy Setup 488 Setting the Number ...

Page 9: ...rios 541 Printing without Margins to Match Paper Size 542 Printing without Margins to Match Roll Paper Width 545 Printing Full Size without Margins 548 Printing Hanging and Horizontal Banners Large Format Printing 551 Printing by Dividing Joining Documents 554 Lining Up and Printing Multiple Documents to Cut Sheets 555 Printing by Connecting Multiple Pages 557 Printing Multiple Pages All on One Pa...

Page 10: ... Driver 599 Setting Accounting Information 601 Deleting the Undesired Print Job 603 Canon IJ Status Monitor 604 Checking the Ink Status from Your Computer 606 Instructions for Use Printer Driver 607 Printer Driver Description 611 Main Tab Description 612 Page Setup Tab Description 619 Layout Tab Description 624 Favorites Tab Description 630 Maintenance Tab Description 632 Device Settings Tab Descr...

Page 11: ...ed on the Touch Screen 661 Can I perform duplex printing 662 I want to perform enlargement printing 663 Network Settings and Common Problems 664 Problems Regarding Paper 665 Remove Jammed Roll Paper 666 Remove a Jammed Sheet 671 Remove Jammed Paper Paper Feed Slot 675 Roll paper cannot be inserted into the Paper Feed Slot 678 Roll Paper Remains Lacks under Quantity Management 679 Cannot load sheet...

Page 12: ...rs occurs 715 Colors in printed images are uneven 717 Image edges are blurred or white banding occurs 719 The contrast becomes uneven during printing 720 The length of printed images is inaccurate in the feeding direction 721 Images are printed crooked 722 Documents are printed in monochrome 723 Line thickness is not uniform 724 Lines or colors are misaligned 725 Borders appear in borderless print...

Page 13: ...are printed 6 mm larger than specified 756 HP GL 2 jobs are printed at maximum size even if a standard size is specified 757 HP GL 2 printing takes a long time 758 The printer stops when printing a HP GL 2 job the carriage stops moving 759 Other Problems 760 Printer does not turn on 761 If the Printer Makes a Strange Sound 762 Messages advising to check the maintenance cartridge are not cleared 76...

Page 14: ...13 788 1214 789 1300 790 1306 791 1317 792 1322 793 1323 794 1324 795 1401 796 1403 797 1408 798 1409 799 140A 800 140B 801 140C 802 140F 803 1468 804 1477 805 1478 806 1480 807 1481 808 1485 809 1492 810 1494 811 1495 812 1500 813 1551 814 1552 815 ...

Page 15: ...21 821 1722 822 1730 823 1731 824 1752 825 1753 826 1756 827 1757 828 2130 829 2131 830 2132 831 3000 832 3001 833 3200 834 3201 835 3250 836 3300 837 3301 838 3302 839 3303 840 3304 841 3306 842 3311 843 3312 844 3313 845 3314 846 3315 847 3316 848 ...

Page 16: ...40 854 3341 855 3414 856 3415 857 3416 858 3417 859 3418 860 3419 861 3420 862 3421 863 3422 864 3423 865 3424 866 3448 867 4111 868 4113 869 4114 870 4115 871 4116 872 4117 873 4801 874 4803 875 4905 876 4910 877 4911 878 4913 879 4920 880 4931 882 ...

Page 17: ...50 888 4951 889 4952 890 4953 891 4954 892 4955 893 4956 894 4957 895 5106 896 5200 897 5B16 898 5B20 899 5B21 900 5C00 901 6502 902 6700 903 6702 904 6820 905 6900 906 6901 907 6902 908 6910 909 6911 910 6920 911 6921 912 6930 913 6931 914 6932 915 ...

Page 18: ...6933 916 6940 917 6941 918 6942 919 6943 920 6944 921 6945 922 6946 923 7050 924 7051 925 7052 926 8200 927 9000 928 9110 929 B20A 930 B510 931 ...

Page 19: ...ust be observed for safe operation Important Instructions including important information that must be observed to avoid damage and injury or improper use of the product Be sure to read these instructions Note Instructions including notes for operation and additional explanations Basics Instructions explaining basic operations of your product Note Icons may vary depending on your product Touch ena...

Page 20: ...iliates in the USA and or other countries Note The formal name of Windows Vista is Microsoft Windows Vista operating system Copyright c 2003 2015 Apple Inc All rights reserved Redistribution and use in source and binary forms with or without modification are permitted provided that the following conditions are met 1 Redistributions of source code must retain the above copyright notice this list of...

Page 21: ...s indicated by a copyright notice that is included in or attached to the work an example is provided in the Appendix below Derivative Works shall mean any work whether in Source or Object form that is based on or derived from the Work and for which the editorial revisions annotations elaborations or other modifications represent as a whole an original work of authorship For the purposes of this Li...

Page 22: ... excluding those notices that do not pertain to any part of the Derivative Works and 4 If the Work includes a NOTICE text file as part of its distribution then any Derivative Works that You distribute must include a readable copy of the attribution notices contained within such NOTICE file excluding those notices that do not pertain to any part of the Derivative Works in at least one of the follow...

Page 23: ...g such obligations You may act only on Your own behalf and on Your sole responsibility not on behalf of any other Contributor and only if You agree to indemnify defend and hold each Contributor harmless for any liability incurred by or claims asserted against such Contributor by reason of your accepting any such warranty or additional liability END OF TERMS AND CONDITIONS Part 1 CMU UCD copyright ...

Page 24: ...mbridge Broadband Ltd copyright notice BSD Portions of this code are copyright c 2001 2003 Cambridge Broadband Ltd All rights reserved Redistribution and use in source and binary forms with or without modification are permitted provided that the following conditions are met Redistributions of source code must retain the above copyright notice this list of conditions and the following disclaimer Re...

Page 25: ...TS OR BUSINESS INTERRUPTION HOWEVER CAUSED AND ON ANY THEORY OF LIABILITY WHETHER IN CONTRACT STRICT LIABILITY OR TORT INCLUDING NEGLIGENCE OR OTHERWISE ARISING IN ANY WAY OUT OF THE USE OF THIS SOFTWARE EVEN IF ADVISED OF THE POSSIBILITY OF SUCH DAMAGE Part 5 Sparta Inc copyright notice BSD Copyright c 2003 2012 Sparta Inc All rights reserved Redistribution and use in source and binary forms with...

Page 26: ...ECIAL EXEMPLARY OR CONSEQUENTIAL DAMAGES INCLUDING BUT NOT LIMITED TO PROCUREMENT OF SUBSTITUTE GOODS OR SERVICES LOSS OF USE DATA OR PROFITS OR BUSINESS INTERRUPTION HOWEVER CAUSED AND ON ANY THEORY OF LIABILITY WHETHER IN CONTRACT STRICT LIABILITY OR TORT INCLUDING NEGLIGENCE OR OTHERWISE ARISING IN ANY WAY OUT OF THE USE OF THIS SOFTWARE EVEN IF ADVISED OF THE POSSIBILITY OF SUCH DAMAGE Part 7 ...

Page 27: ... DISCLAIMED IN NO EVENT SHALL APPLE OR ITS CONTRIBUTORS BE LIABLE FOR ANY DIRECT INDIRECT INCIDENTAL SPECIAL EXEMPLARY OR CONSEQUENTIAL DAMAGES INCLUDING BUT NOT LIMITED TO PROCUREMENT OF SUBSTITUTE GOODS OR SERVICES LOSS OF USE DATA OR PROFITS OR BUSINESS INTERRUPTION HOWEVER CAUSED AND ON ANY THEORY OF LIABILITY WHETHER IN CONTRACT STRICT LIABILITY OR TORT INCLUDING NEGLIGENCE OR OTHERWISE ARISI...

Page 28: ...s in binary form must reproduce the above copyright notice this list of conditions and the following disclaimer in the documentation and or other materials provided with the distribution Neither the name of Adobe Systems Incorporated nor the names of its contributors may be used to endorse or promote products derived from this software without specific prior written permission THIS SOFTWARE IS PRO...

Page 29: ...copy of this software and associated documentation files the Software to deal in the Software without restriction including without limitation the rights to use copy modify merge publish distribute sublicense and or sell copies of the Software and to permit persons to whom the Software is furnished to do so subject to the following conditions The above copyright notice and this permission notice s...

Page 30: ...ight notice this list of conditions and the following disclaimer Redistributions in binary form must reproduce the above copyright notice this list of conditions and the following disclaimer in the documentation and or other materials provided with the distribution Neither the name of the University nor the names of its contributors may be used to endorse or promote products derived from this soft...

Page 31: ...ifications in commercial products We disclaim all warranties covering The FreeType Project and assume no liability related to The FreeType Project Finally many people asked us for a preferred form for a credit disclaimer to use in compliance with this license We thus encourage you to use the following text Portions of this software are copyright year The FreeType Project www freetype org All right...

Page 32: ...l copies of source files o Redistribution in binary form must provide a disclaimer that states that the software is based in part of the work of the FreeType Team in the distribution documentation We also encourage you to put an URL to the FreeType web page in your documentation though this isn t mandatory These conditions apply to any software derived from or based on the FreeType Project not jus...

Page 33: ...ute sublicense and or sell copies of the Software and to permit persons to whom the Software is furnished to do so subject to the following conditions The above copyright notice and this permission notice shall be included in all copies or substantial portions of the Software THE SOFTWARE IS PROVIDED AS IS WITHOUT WARRANTY OF ANY KIND EXPRESS OR IMPLIED INCLUDING BUT NOT LIMITED TO THE WARRANTIES ...

Page 34: ...T HOLDER OR CONTRIBUTORS BE LIABLE FOR ANY DIRECT INDIRECT INCIDENTAL SPECIAL EXEMPLARY OR CONSEQUENTIAL DAMAGES INCLUDING BUT NOT LIMITED TO PROCUREMENT OF SUBSTITUTE GOODS OR SERVICES LOSS OF USE DATA OR PROFITS OR BUSINESS INTERRUPTION HOWEVER CAUSED AND ON ANY THEORY OF LIABILITY WHETHER IN CONTRACT STRICT LIABILITY OR TORT INCLUDING NEGLIGENCE OR OTHERWISE ARISING IN ANY WAY OUT OF THE USE OF...

Page 35: ...rinter supports wireless direct in which you can connect to the printer wirelessly from devices e g smartphone or tablet without a wireless router Switch to wireless direct to print wirelessly Connecting Smartphone Tablet to Printer Directly Wireless Direct 35 ...

Page 36: ...ss router Wired LAN Connection Ethernet Cable USB Connection USB Cable Wi Fi Connection There are two methods for connecting the printer to your device e g smartphone or tablet One method is to connect using a wireless router and the other method is to connect without using a wireless router The two connection methods cannot be used at the same time 36 ...

Page 37: ...e device to the printer using the wireless router Connection without Using a Wireless Router Connect the printer and a device without using a wireless router Connect the device and the printer directly using the printer s wireless direct If you connect a device connected to the Internet via a wireless router to the printer that is in the wireless direct the connection between the device and wirele...

Page 38: ...on Ethernet Cable Connect the printer and a hub or router with an Ethernet cable Prepare an Ethernet cable USB Connection USB Cable Connect the printer and a computer with a USB cable Prepare a USB cable Restrictions 38 ...

Page 39: ...tion Handling rolls Loading Rolls on the Roll Holder Loading Rolls in the Printer Changing the Type of Paper Specifying the Paper Length Removing the Roll from the Printer Removing Rolls From the Roll Holder Remove Jammed Roll Paper Feeding Roll Paper Manually Keeping Track of the Amount of Roll Paper Left Specifying the Ink Drying Time for Rolls Specifying the Cutting Method for Rolls Cutting the...

Page 40: ...Loading Sheets in the Printer Changing the Type of Paper Printing From a Desired Starting Point Removing Sheets Remove a Jammed Sheet Basket Using the Basket Media Configuration Tool Guide 40 ...

Page 41: ...Paper and feed confirmed Paper Printing on Paper Other Than Genuine Paper and feed confirmed Paper Using Existing Settings Printing on Paper Other Than Genuine Paper and feed confirmed Paper by Adding a Media Type Paper Information List Updating paper information 41 ...

Page 42: ... on using paper not included in the Paper Information List see Using Paper Other Than Genuine Paper and feed confirmed Paper Method of Updating Supported Paper Paper that is supported by the printer may be newly released on the Canon website To use newly released paper register the latest paper information on the printer with the Media Configuration Tool See Updating paper information Important Ev...

Page 43: ... 600 0mm Possible 3 23 39 inches 594 0 mm A1 A2 Roll 594 0mm Recommended 2 20 28 inches 515 0 mm B2 B3 Roll 515 0mm Recommended 2 20 00 inches 508 0 mm 20 in Roll 508 0mm Possible 3 19 69 inches 500 0 mm 500mm Roll 500 0mm Possible 3 17 00 inches 431 8 mm 17 in Roll 431 8mm Recommended 2 16 54 inches 420 0 mm A2 A3 Roll 420 0mm Possible 3 16 00 inches 406 4 mm 16 in Roll 406 4mm Possible 3 14 00 i...

Page 44: ... 19 02 inches 329 0 x 483 0 mm A4 8 27 x 11 69 inches 210 0 x 297 0 mm ISO B1 27 83 x 39 37 inches 707 0 x 1000 0 mm ISO B2 19 69 x 27 83 inches 500 0 x 707 0 mm ISO B3 13 90 x 19 69 inches 353 0 x 500 0 mm ISO B4 9 84 x 13 90 inches 250 0 x 353 0 mm JIS B1 28 66 x 40 55 inches 728 0 x 1030 0 mm JIS B2 20 28 x 28 66 inches 515 0 x 728 0 mm JIS B3 14 33 x 20 28 inches 364 0 x 515 0 mm JIS B4 10 12 ...

Page 45: ...x 458 0 mm DIN C4 9 02 x 12 76 inches 229 0 x 324 0 mm 20 x24 20 00 x 24 00 inches 508 0 x 609 6 mm 18 x22 18 00 x 22 00 inches 457 2 x 558 8 mm 14 x17 14 00 x 17 00 inches 355 6 x 431 8 mm 12 x16 12 00 x 16 00 inches 304 8 x 406 4 mm 10 x12 10 00 x 12 00 inches 254 0 x 304 8 mm 10 x15 10 00 x 15 00 inches 254 0 x 381 0 mm US Photo 16 x20 16 00 x 20 00 inches 406 4 x 508 0 mm Poster 30 x40 30 00 x...

Page 46: ... Borderless printing is not supported on sheets 46 ...

Page 47: ... For Canon genuine paper feed confirmed paper see Paper Information List After loading the paper in the printer select the media type in the control panel and printer driver and then perform the printing For the media type you can select easily from existing settings or you can create and use settings for the paper you are using Printing Using Existing Settings You can print easily by selecting fr...

Page 48: ...aper settings Note For an overview of the media types see Types of Paper For instructions on selecting the media type with the control panel see Types of Paper For instructions on selecting the media type with the printer driver see How to Open the Printer Driver Setup Window Windows or How to Open the Printer Driver Setup Dialog macOS Choosing General Purpose Paper Settings These settings anticip...

Page 49: ... panel and printer driver For details on Media Configuration Tool refer as follows Media Configuration Tool Guide Windows Media Configuration Tool Guide macOS Important For details on how to select the added media type in the control panel see Changing the Type of Paper You can select the media type to be used in printing from Media Type in the Main sheet Windows or Quality Media macOS in the prin...

Page 50: ...edure for applying the Media Information File refer to the following Media Configuration Tool Guide Windows Media Configuration Tool Guide macOS Important If you are using the Media Configuration Tool the new Media Information File is downloaded automatically when released on the Canon website A computer connected to the Internet is required to download the Media Information File 50 ...

Page 51: ...er Removing Rolls From the Roll Holder Remove Jammed Roll Paper Feeding Roll Paper Manually Keeping Track of the Amount of Roll Paper Left Specifying the Ink Drying Time for Rolls Specifying the Cutting Method for Rolls Cutting the Leading Edge of Roll Paper Automatically Reducing Dust from Cutting Rolls Detecting Roll Paper was Replaced While the Power was Off 51 ...

Page 52: ...e careful not to soil the printing surface This may affect the printing quality We recommend wearing clean cloth gloves when handling rolls to protect the printing surface Cut the edge of the roll paper if it is uneven dirty or has tape residue Otherwise it may cause feeding problems and affect the printing quality Be careful not to cut through any barcodes printed on the roll Align the edges of t...

Page 53: ...er stopper from the roll holder 2 If using 3 inch core paper align 3 inch paper core attachment tabs A with roll holder holes B and insert firmly 3 With leading edge of roll paper facing forward as shown insert Roll Holder from right side of roll Insert firmly until roll paper touches flange A of roll holder 53 ...

Page 54: ...r may be damaged 4 If using 3 inch core roll paper attach 3 inch paper core attachment to holder stopper Align the tabs A of the attachment with the holes B of the holder stopper and insert firmly 5 Insert holder stopper from left into roll holder as shown and then while holding in position B push firmly until holder stopper flange A touches roll paper Lock the holder stopper lever C by rotating i...

Page 55: ...55 ...

Page 56: ... See Cleaning Inside the Top Cover 1 Tap Load paper or Replace paper on the Home screen of the operation panel Note If the Home screen does not appear tap the HOME button 2 Tap Load roll paper Note If any paper has been advanced that will not be used a message is shown requesting you to remove it After following the instructions on the screen to remove the paper go to the next step 3 Positioning y...

Page 57: ...s time position the holder as shown in the illustration so that the R label C on the roll holder flange is aligned with the R label D on the printer 5 Holding the roll holder flange A guide the holder along the slide guides b on both ends keeping the holder level as you load it in the roll holder slot 57 ...

Page 58: ...ur fingers between the slide guides B and the roll holder shaft C when loading rolls Important If the leading edge of the roll paper is cut crooked or folded it may not be fed correctly Cut the leading edge of the roll paper with scissors or the like and straighten it Load the roll paper so that it is not loaded in the opposite direction 6 Insert the edge of the roll in the feed slot A and advance...

Page 59: ...lder 7 After paper feeding has started do the following operations based on the Manage remaining roll amount setting and the barcode printed on the roll paper see Keeping Track of the Amount of Roll Paper Left When selecting Disable or Warning message only in Manage remaining roll amount A menu for selecting the media type appears on the operation panel Operate the operation panel and select the m...

Page 60: ...thod for Rolls When selecting the media type on the operation panel make sure the media type set in the printer driver and the media type loaded on the printer match Note For details on media types that you can select see Paper Information List 8 Holding it at the positions indicated close the roll paper cover Note Cut the edge of the roll after the paper is advanced if it is soiled or if there ar...

Page 61: ...h type of paper the margins and the size of printed images may vary depending on the type of paper used If margins and the size of images are not as you expected adjust the paper feed amount See Adjusting Feed Amount Rolls and sheets have different printing areas and sheets having a larger bottom margin than rolls See Print Area Changing the Type of Paper Note When you load roll paper a menu for s...

Page 62: ...pe When the release lever is operated the settings automatically return to the last selected media type Using the Same Type of Paper Regularly Configure this setting so that current media type settings will be automatically selected when you load the same type of paper later 1 Tap Setup on Home screen of operation panel Note If the Home screen does not appear press the HOME button 2 Tap Device set...

Page 63: ...pe of paper specified by the print job If a barcode is printed on the roll paper and you have set Manage remaining roll amount to Barcodes in the operation panel menu the media type setting is updated to match the media type specified by the barcode To change the media type setting see Changing the Type of Paper 63 ...

Page 64: ...of the Amount of Roll Paper Left 1 Tap paper settings display area on Home screen of operation panel Note If the Home screen does not appear press the HOME button 2 Tap Paper settings 3 Tap Advanced 4 Tap Length 5 Enter roll paper length Specify the roll length as follows 1 Tap the numerical input field 2 Tap the keypad appearing on the operation panel enter the roll paper length and then tap OK 3...

Page 65: ...ion panel Note If the Home screen does not appear press the HOME button 2 Tap Remove paper 3 Tap Yes The roll is rewound Important If Manage remaining roll amount is set to Barcodes in the operation panel menu a barcode is printed on the leading edge of the roll paper Do not remove the roll before the barcode is printed You will be unable to keep track of the amount of roll paper left See Keeping ...

Page 66: ...5 Using both hands rotate the roll holder toward the back to rewind the roll 6 Hold roll holder by its flanges A and remove from roll holder slot 66 ...

Page 67: ...ing Rolls From the Roll Holder 7 Holding it at the positions indicated close the roll paper cover Note To load new roll paper in the printer at this point see Loading Rolls in the Printer Clean inside the top cover before loading paper See Cleaning Inside the Top Cover 67 ...

Page 68: ...opper lever A towards to release the lock and while holding it in position B remove holder stopper from the roll holder 2 Remove roll holder from roll paper 3 To remove 3 inch paper core attachment press tabs A inward and remove attachment roll holder Side 68 ...

Page 69: ...tore the roll in the original bag or box away from high temperature humidity and direct sunlight If paper is not stored properly the printing surface may become scratched which may affect the printing quality when you use it again 69 ...

Page 70: ...ess the HOME button 2 Tap Feed Cut 3 Tap or touch Advance and Rewind to move roll paper forward or back Note Tapping Advance or Rewind moves the roll paper approximately 0 04 inch 1 mm Touching Advance or Rewind moves the roll paper until you release the key If Cannot advance the paper any more appears on the operation panel release the key 4 Tap OK when you have determined position of roll paper ...

Page 71: ... with a printed barcode the media type and remaining amount are automatically detected after the roll paper is loaded The barcode will be cut off after it has been read Important If the barcode on the roll is not detected enter the type and length of paper on the operation panel The length of the paper at this time can be set in Roll length change default Setting the Default Value of the Amount of...

Page 72: ...efault Value of the Amount of Roll Paper Left when Managing by the Barcode When you select Barcodes in Manage remaining roll amount and if you feed roll paper on which no barcode is printed such as new roll paper the screen to enter the roll paper length remaining amount appears In this screen the length remaining amount of default value appears If the length is not correct tap the screen and ente...

Page 73: ... time to display warning message can be set in Roll amount warning setting If you increase the level in Roll amount warning setting the warning message appears sooner Important If the type of paper is not selected correctly the amount of roll paper left may not be estimated correctly When using the types of paper which are not displayed on Paper Information List set the paper thickness and the siz...

Page 74: ...may rub when the paper falls and the surface may become soiled To wait for the ink to dry without allowing printed materials to fall after printing set Cutting mode on the printer menu to Eject cut See Specifying the Cutting Method for Rolls The settings can also be made from the operation panel on the printer From Setup on the Home screen select Device settings Paper related settings Advanced pap...

Page 75: ... box displayed next select the desired values from the lists for Between Pages and Between Scans in Drying Time and then click OK See Main Tab Description macOS 1 Choose Print in the application menu 2 Select Paper Detailed Settings panel 75 ...

Page 76: ...3 Select desired values from lists for Dry Time Between Pages and Dry Time Between Scans See Paper Detailed Settings 76 ...

Page 77: ... to avoid damage to the paper Also you can prevent paper that has not dried from dropping by visually checking the ink has dried and then cutting the paper After printing tap Cut paper and cut the roll paper on the cutter blade Printer Setting Tap paper settings display area Paper settings Advanced Cutting mode Eject cut Driver Setting Automatic Cutting Yes See Cutting Roll Paper after Printing Wi...

Page 78: ...eset selection in Cutting mode for some types of paper For this paper we recommend keeping the preset cutting mode If documents printed using Automatic Eject or manual cutting are short rolls are advanced a specific amount before cutting to prevent problems with cutting and paper ejection This may create a wider bottom margin in some cases Cut rolls manually in the following cases Eject when the p...

Page 79: ...printed document from the bottom edge to prevent it from dropping tap Cut paper to cut the roll paper Manual when using media that cannot be cut with the cutter blade Note Once the following step has been performed the procedure can be started from step 8 the next time Printing the second and subsequent times Printing after replacing with the same type of paper 1 Tap paper settings display area on...

Page 80: ... 6 When Do you want to set to detect the leading edge of the paper is displayed select Detect recommended 7 Print the job The printer stops advancing the paper after printing 8 Tap Advance paper Roll paper is fed to the specified cut position and then automatically stopped 9 Cut the roll paper manually with scissors or the like 80 ...

Page 81: ...your specified position 1 Tap Feed Cut on Home screen of operation panel Note If the Home screen does not appear press the HOME button 2 Tap or touch Advance or Rewind to feed roll paper to desired cutting position 3 Tap Cut paper 4 Tap Yes After the roll paper is cut it is rewound automatically 81 ...

Page 82: ...or the leading edge precut length see Paper Information List On Input Length The amount to cut from the leading edge of paper is specified in the control panel The amount to cut from the leading edge can be specified in the range of lengths displayed in the control panel The range of lengths differs according to the media type Note The amount to cut from the leading edge of paper cannot be set sho...

Page 83: ...the Home screen does not appear press the HOME button 2 Tap Paper settings 3 Tap Advanced 4 Tap Trim edge first 5 Tap desired Trim edge first settings This setting takes effect the next time you load a roll 83 ...

Page 84: ...ccording to the media type Important Do not set Cut dust reduction to ON for paper that wrinkles easily such as Plain Paper or lightweight paper If not cut properly the paper may jam Borderless printing is not available when Cut dust reduction is set to ON When performing borderless printing set Cut dust reduction to OFF Follow these steps to set Cut dust reduction to ON 1 Tap paper settings displ...

Page 85: ...5 Tap ON 85 ...

Page 86: ...er determines that the roll paper has been replaced and then starts feeding paper automatically to detect the paper width and the barcode for the management of unused roll paper Note Setting Auto feed at power on to Enable causes the operations that can be done after turning on the power to take longer since the printer must detect the leading edge of the roll paper Follow these steps to set Auto ...

Page 87: ...Handling sheets Loading Sheets in the Printer Changing the Type of Paper Printing From a Desired Starting Point Removing Sheets Remove a Jammed Sheet 87 ...

Page 88: ...ore loading cut sheets check whether or not the inside of the top cover or the output guide is soiled If these areas are dirty we recommend cleaning them in advance See Cleaning Inside the Top Cover Store unused paper in the original package away from high temperature humidity and direct sunlight 1 Select sheets as the paper source If a print job was received Sheets are automatically selected and ...

Page 89: ... a single sheet printing side up in the feed slot with the right edge aligned with the paper alignment line A to the right of the roll paper cover Insert the paper until the leading edge makes contact 4 Move the width guide A carefully to match the size of paper loaded Set the width guide against the edge of the paper to prevent the paper from becoming crooked or wrinkled 89 ...

Page 90: ... feed the paper and begin printing If no print job was received A menu for selecting the media type appears Select the media type loaded and tap OK The printer now starts feeding the paper Note For details on media types that you can select see Paper Information List 90 ...

Page 91: ...ition to start printing from Follow these instructions to load paper at the desired starting position for printing when Detect paper width is set to Disable 1 If you did not send a print job in advance a menu for selection of the type of paper is displayed Tap media type loaded Note If a print job was received before the paper was fed the media type and size specified by the job are shown on the o...

Page 92: ...ent position close the top cover To reposition the paper push the release lever back 4 Load paper keeping right edge of paper aligned with extended line of paper alignment line A on right side of printer and position from which to start printing aligned with groove B at far end of platen 92 ...

Page 93: ...5 Pull the release lever forward and close the top cover 6 When screen for selecting paper size appears select size of paper loaded 93 ...

Page 94: ...reen of operation panel Note If the Home screen does not appear press the HOME button 2 Tap Remove paper 3 Check operation panel message and tap Yes The paper is ejected from the front of the printer 4 Holding the paper push the release lever back and remove the sheet 5 Pull the release lever forward 94 ...

Page 95: ...95 ...

Page 96: ...Basket Using the Basket 96 ...

Page 97: ... printed documents on the basket Use position 1 For details on how to use the Extended position which is a useful function for retrieving printed matter refer to the note regarding the Extended position See Convenient basket usage When the basket is not used when loading paper or when moving the printer Use position 2 When moving the printer always lift the Support Rod to Extended position A befor...

Page 98: ... also at two kinds of extended positions convenient for catching printed material In these extended positions the basket can collected up to approximately 20 sheets of printed material The paper sizes that can be used with these extended positions are shown in the table below Use the best position that suits the paper size and orientation Important Use the regular position in the following situati...

Page 99: ...D 24 x36 610x914mm A0 841x1189mm A1 594x841mm ARCH E 36 x48 914x1219mm ARCH D 24 x36 610x914mm A0 841x1189mm A1 594x841mm B Landscape Unsupported ARCH D 36 x24 914x610mm ARCH C 24 x18 610x457mm A1 841x594mm A2 594x420mm Regular position Extended position A Extended position B SD 32 only 99 ...

Page 100: ... position A as follows 1 Lift the Support Rod to the position shown A and switch the stacker to Extended position A 2 When using 24 inch or A1 portrait roll paper pull out the Adjustable Stopper A This completes the procedure for switching to Extended position A 100 ...

Page 101: ...ing has finished use the following procedure to return to the regular position 1 Lower the Support Rod to the position shown A to return to the regular position If the Adjustable Stopper B is extended retract it 101 ...

Page 102: ...rn to the regular position Switching to Extended position B SD 32 only Switch the stacker to Extended position B as follows 1 Grasp the basket handle A and pull out the basket so that it tilts towards you 102 ...

Page 103: ... A This completes the procedure of switching to Extended position B Once the printing has finished use the following procedure to return to the regular position 1 Push the Basket Ejection Guides A closed until it clicks into place 103 ...

Page 104: ...2 Hold onto the basket handle A and pull the basket release lever B towards you 3 While continuing to hold the basket handle A slowly lower the basket 104 ...

Page 105: ...4 Return to the regular position 105 ...

Page 106: ...el Setting Items on Operation Panel HP GL 2 Settings Status Print Changing Printer s Setting Using Web Browser Configuration Changes Using Web Browser Changeable Setting Items Using Web Browser Setting Password Registering Printer s Root Certificate to Web Browser for SSL Communication Remote UI Registering Printer s Root Certificate to Local Computer for SSL Communication Generating Server Certif...

Page 107: ...Operations and Touch Screen Operation Panel Touch Screen Checking Instructions During Printer Operations 107 ...

Page 108: ...Touch Screen Shows printer menus as well as the printer status and messages You can select menu items and display buttons by gently touching the screen with your fingertip Touch Screen F Status lamp Flashing white During printing this lamp flashes when the printer is receiving or processing print jobs Otherwise this lamp flashes when the print job is paused or the printer is updating the firmware ...

Page 109: ...estore the display press the buttons on the operation panel or touch the touch screen When Operation panel lock is enabled touch screen operations are invalid For details on Operation panel lock see Changeable Setting Items Using Web Browser 109 ...

Page 110: ...es B Paper Setting Display Area Displays the information on loaded paper on the upper area Tapping this option displays the menu relating paper and allows the paper settings Replace paper and Feed Cut frequently used in the menu appears on the lower area and you can directly select C Network Displays the current network status Select to display the basic network information or to change the networ...

Page 111: ...ment Select when setting up print job managements or printing data on a USB flash drive Basic Touch Screen Operations You can select various functions and settings by gently touching and swiping the touch screen with your fingertip Important Take the following precautions when operating the touch screen Otherwise the touch screen may malfunction or become damaged Do not forcibly press the touch sc...

Page 112: ...the directional mark Flick Drag and release your finger up down left or right Use this to quickly scroll through a menu or list Drag Move your finger up down left or right while gently keeping it in contact with the touch screen Use this to move a menu or list while viewing it 112 ...

Page 113: ...ice appears in the printer information display area Tap this to display the Notice list screen to view messages with the newest one appearing first Tap a message to display the message details screen to view the details and take action Example Notices on the maintenance cartridge 113 ...

Page 114: ...iew instructions Once you complete an action described in the instructions the printer detects the action and switches to the next instruction screen Operation screens are switched every 3 seconds and the sequence of operations is shown repeatedly For actions the printer cannot detect tap OK to display the instruction screen for the next step Example Ink tank replacement 114 ...

Page 115: ...115 ...

Page 116: ...Changing Settings from Operation Panel Printer Menu Operations Menu Operations Menu Structure Changing Settings from Operation Panel Setting Items on Operation Panel HP GL 2 Settings Status Print 116 ...

Page 117: ...information Displays the current paper information It is grayed out during printing Tap to display Paper menu C Replace paper It is grayed out during printing Tap this button to change the roll paper or to set the cut paper D Feed Cut It is grayed out when paper feed mode is cut paper or during printing Tap this button to feed or cut roll paper E Jobs Tap to display Job management menu F Setup Tap...

Page 118: ...urrent status of the LAN as an icon It is grayed out during printing Tap to display LAN settings menu Note The values set in the menu on the operation panel are applied to all print jobs However if the same setting item exists in the printer driver the setting value of the printer driver takes precedence 118 ...

Page 119: ...veral buttons B Flick the touch screen and tap the displayed button or item with your finger to select a menu Example of Using Touch Screen Example Operation to change the setting of automatic power off time 1 On the HOME screen tap Setup 2 Tap Device settings 119 ...

Page 120: ...3 Flick up and down and tap Other device settings 4 Tap Energy saving settings 5 Tap Auto power off 120 ...

Page 121: ... want to set 7 Tap OK When the setting is completed press the HOME button to return to the HOME screen You can also go back to the screen one level higher by pressing the Back button and continue with other settings 121 ...

Page 122: ... Advanced Paper menu when cut sheet is loaded This menu is displayed by tapping paper information area Replace paper Remove paper Paper settings Page size Type Advanced Replace paper Feed Cut This menu is displayed when roll paper is loaded LAN settings This menu is displayed by tapping Network icon Wi Fi Connection Network name SSID Communication mode Channel Wi Fi security IPv4 address IPv4 subn...

Page 123: ...gth 3 IPv6 stateless address 4 IPv6 stateless prefix length 4 DHCPv6 DHCPv6 stateful address DHCPv6 stateful prefix length IPv6 default gateway 1 IPv6 default gateway 2 IPv6 default gateway 3 IPv6 default gateway 4 IPv6 primary DNS server address IPv6 secondary DNS server add IPv6 DNS dyn update manual IPv6 DNS dyn update stateless IPv6 DNS dyn update stateful IPv6 Use IPv4 host domain name IPv6 D...

Page 124: ...munication mode Channel Wi Fi security IPv4 address IPv4 subnet mask IPv4 default gateway IPv4 DNS dynamic setting IPv4 DNS host name IPv4 DNS domain name IPv6 link local address IPv6 link local prefix length MAC address IPsec settings Printer name Bonjour service name Settings Enable disable Wireless Direct Yes No Update SSID password Yes No Wireless Direct device name Connection request confirma...

Page 125: ...stateless prefix length 2 IPv6 stateless address 3 IPv6 stateless prefix length 3 IPv6 stateless address 4 IPv6 stateless prefix length 4 DHCPv6 DHCPv6 stateful address DHCPv6 stateful prefix length IPv6 default gateway 1 IPv6 default gateway 2 IPv6 default gateway 3 IPv6 default gateway 4 IPv6 primary DNS server address IPv6 secondary DNS server add IPv6 DNS dyn update manual IPv6 DNS dyn update ...

Page 126: ... is displayed by tapping Setup icon Device settings Test print Print nozzle check pattern Status print Status print administrator Print LAN details Print setting print Print advanced paper settings Print job history Print menu map Print color list for palettes Print settings Print head movable width setting Data width Maximum movable width Paper width Prioritize paper size Enable Disable JPEG prin...

Page 127: ...Margin 3mm 5mm Border Borderless Bordered Rotate 0 degrees 90 degrees Enlarge Reduce Fit paper size Same size Scaling HP GL 2 print settings Print quality settings Color mode Color perceptual Color saturation Color correct off Mono chrome Monochrome BMP Print quality 5 Fast 4 3 2 1 High Input resolution 600 dpi 300 dpi Print target Photo Line drawing Paper settings Paper src Auto select Roll paper...

Page 128: ...standard size ON OFF Mirror ON OFF Line management Merge ON OFF Smooth Software Smoothing Thicken fine lines ON OFF Adjust faint lines ON OFF Width correction Black gray 20 19 1 0 1 19 20 Color 20 19 1 0 1 19 20 Print color list for palettes Processing options Warning display Enable Disable Detect image size OFF Command priority Direct print settings from FTP 128 ...

Page 129: ... Roll paper Manual Margin 3mm 5mm Border Borderless Bordered Rotate 0 degrees 90 degrees Enlarge Reduce Fit paper size Same size Scaling Print settings 2 Print quality settings Color mode Color perceptual Color saturation Color correct off Mon ochrome Monochrome BMP Print quality 5 Fast 4 3 2 1 High Print target Photo Line drawing Paper settings Paper src Auto select Roll paper Manual Margin 3mm 5...

Page 130: ...get Photo Line drawing Paper settings Paper src Auto select Roll paper Manual Margin 3mm 5mm Border Borderless Bordered Rotate 0 degrees 90 degrees Enlarge Reduce Fit paper size Same size Scaling Print settings 4 Print quality settings Color mode Color perceptual Color saturation Color correct off Mon ochrome Monochrome BMP Print quality 5 Fast 4 3 2 1 High Print target Photo Line drawing Paper se...

Page 131: ...his menu are the same as the lower items of LAN settings displayed by tapping Net work icon Paper related settings Keep media type Enable Disable Manage remaining roll amount Barcodes Warning message only Disable Roll amount warning setting Roll amount 6 earlier warning Roll amount 5 Roll amount 4 Roll amount 3 stand ard Roll amount 2 Roll amount 1 later warning Detect paper setting mismatch Pause...

Page 132: ...tandard Short Print pattern after new head ON OFF Monitoring service settings Enable disable monitoring service Enable Disable Communication test Communication log Other device settings Energy saving settings Auto power off 5 minutes 10 min 30 min 1 hour 4 hours 8 hours 12 hours OFF Sleep timer 5 minutes 10 min 15 min 20 min 30 min 40 min 50 min 60 min 210 min Operation restrictions Job history Re...

Page 133: ...0 minutes Job history sending setting Send Do not send Language selection Firmware update Install update Check current version Update notification setting Yes No DNS server setup Auto setup Manual setup Proxy server setup Use Do not use Administrator password setting Remote UI or other tools LCD Remote UI or other tools Maintenance Print nozzle check pattern Print head cleaning Cleaning All colors...

Page 134: ...accuracy Manual Auto Prioritize print quality Prioritize length accuracy Adjust print quality Auto Manual Adjust feed length Print alignment pattern Roll paper Manual Change adjustment values 0 70 0 68 0 68 0 70 Maintenance cartridge info Maintenance cartridge usage Replace Head replacement Replace cutter blade unit Platen cleaning Prepare to move Move on the same floor Transport outdoors Printer ...

Page 135: ...ounter Head information Serial number Installation date Dot count million dots Head alignment performance log Values applied with auto settings Paper Thickness Head Height Transport unit vacuum strength Total print area Job management This menu is displayed by tapping Jobs icon Print job List of print jobs Delete Job history Display job history Print job history Pause printing Enable Disable Delet...

Page 136: ...ength Manual Cut dust reduction ON OFF Transport unit vacuum strength Auto Strong Medium strong Standard Medium weak Weak Roll paper tension printing High Standard Low Roll paper tension feeding High Standard Low Pause between scans Ink drying wait time OFF 0 5 seconds 1 second 3 seconds 5 seconds 7 sec onds 9 seconds Ink drying target area Overall Leading edge Pause between pages OFF 30 seconds 1...

Page 137: ...Paper with recommended width Large Standard Small Paper with adequate width 6 max 5 4 3 2 1 min Detect paper width Enable Disable Reset paper settings by paper 137 ...

Page 138: ...Auto setup Manual setup DNS server DNS server setup Auto setup Manual setup Dynamic update setting Enable Disable Host name Domain name Proxy server Use Do not use IPv6 Enable disable IPv6 Enable Disable IPsec settings Enable Disable Use DHCPv6 Use Do not use Manual address Use Do not use DNS server DNS server setup Auto setup Manual setup Dynamic update setting IPv6 DNS dyn update manual Enable D...

Page 139: ...tes 10 minutes 5 minutes 1 minute Bonjour settings Enable disable Bonjour Enable Disable Service name IEEE802 1X settings Authentication Do not use TLS TTLS PEAP EAP TTLS internal auth method MSCHAPv2 PAP Weak encryption restriction Restrict Do not restrict Weak certificate restriction Restrict Do not restrict Advanced setup User ID Username Password Authentication server name Last authentication ...

Page 140: ...AW protocol ON OFF LLMNR ON OFF Gigabit Ethernet settings Autonegotiation 10 Mbps half duplex 10 Mbps full duplex 100 Mbps half duplex 100 Mbps full duplex 1 Gbps full duplex Use Dedicated Port ON OFF Wi Fi DRX setting Enable Disable Wired LAN DRX setting Enable Disable Reset SSL certificates Reset LAN settings 140 ...

Page 141: ...he settings taking the steps to specify Print head movable width setting as an example 1 Make sure printer is turned on 2 On the HOME screen tap Setup Menu Operations 3 Tap setting item to adjust The setting screen for the selected item appears 4 Tap setting item 5 Tap setting to specify 141 ...

Page 142: ...For more on setting items on the operation panel Setting Items on Operation Panel 142 ...

Page 143: ...trator password is required Setting Administrator Password on Operation Panel Items for Security Administrator password setting Items for Printer Other device settings Language selection Firmware update Items for Paper Printing Paper related settings Print settings Items for Maintenance Management Job management Printer information Test print LAN settings Auto maintenance settings Monitoring servi...

Page 144: ...r password is required to display the job history if it is enabled for changing settings using the operation panel Display job history Displays the print job history Tapping a print job displays the details Print job history Prints out the print job history Pause printing Selecting Enable while a print job is in progress pauses the print job after the current job is completed Delete all print jobs...

Page 145: ...operation panel Status Print Print LAN details Prints out the network setting information Printing Network Settings Print setting print Prints out the print settings list Print advanced paper settings Prints out the setting values specified by Advanced paper settings Print job history Prints out a record of print jobs including the paper type and size amount of ink consumed and so on Ink consumpti...

Page 146: ... images Note The printed paper length is longer than the actual paper length This is because the printed paper includes the upper lower margins specified by Roll Paper Safety Margin and Leading Edge Margin in the printer driver and excludes the paper margins JPEG print settings Performs JPEG print settings HP GL 2 print settings Performs HP GL 2 print settings HP GL 2 Settings Direct print setting...

Page 147: ...HP GL 2 Settings Menus on HP GL 2 print settings Menu Setting Combinations Standard Size Table 147 ...

Page 148: ...XX XXXXXXXXXXXXXXXX up to 32 characters Communication mode Infrastructure Channel 1 13 Wi Fi security Disable WEP 64 bit WEP 128 bit WPA PSK TKIP WPA PSK AES WPA2 PSK TKIP WPA2 PSK AES IPv4 address XXX XXX XXX XXX 12 characters IPv4 subnet mask XXX XXX XXX XXX 12 characters IPv4 default gateway XXX XXX XXX XXX 12 characters IPv4 DNS dynamic setting Enable Disable IPv4 DNS host name XXXXXXXXXXXX IP...

Page 149: ... XXXX XXXX XXXX XXXX XXXX XXXX 32 characters IPv6 default gateway 3 XXXX XXXX XXXX XXXX XXXX XXXX XXXX XXXX 32 characters IPv6 default gateway 4 XXXX XXXX XXXX XXXX XXXX XXXX XXXX XXXX 32 characters IPv6 primary DNS server address XXXXXXXXXXXX IPv6 secondary DNS server add XXXXXXXXXXXX IPv6 DNS dyn update manual Enable Disable IPv6 DNS dyn update stateless Enable Disable IPv6 DNS dyn update statef...

Page 150: ...er connection types Manual connect adv Select when you perform settings for Wi Fi manually You can specify multiple WEP keys WPS PIN code method Select when you perform settings for Wi Fi using a wireless router supporting a Wi Fi Protected Setup WPS PIN code method Follow the on screen instructions during setup Note By tapping Advanced you can set LAN in detail For the items that can be set see t...

Page 151: ...t Enable to wirelessly connect without wireless router Update SSID password Updates the identifier SSID and password Wireless Direct device name Changes the name device name of the printer displayed on Wi Fi Direct compatible device Connection request confirmation Changes the display non display of the confirmation screen when Wi Fi Direct compatible devices are connected to the printer Note By ta...

Page 152: ...XXXX XXXX XXXX XXXX XXXX 32 characters IPv6 stateless prefix length 3 XXX up to 3 digits IPv6 stateless address 4 XXXX XXXX XXXX XXXX XXXX XXXX XXXX XXXX 32 characters IPv6 stateless prefix length 4 XXX up to 3 digits DHCPv6 Enable Disable DHCPv6 stateful address XXXXXXXXXXXX DHCPv6 stateful prefix length XXX up to 3 digits IPv6 default gateway 1 XXXX XXXX XXXX XXXX XXXX XXXX XXXX XXXX 32 characte...

Page 153: ...ng Advanced Print details Prints out the LAN setting information of the printer with Wi Fi connection wired LAN connection wireless direct connection For the items that can be checked see the following Printing Network Settings Important Important information on your computer is stated on the paper on which the LAN setting information is printed Please handle with care enough Note You can also pri...

Page 154: ...dows 8 1 and Windows 7 Optimize inbound WSD Selecting Enable allows you to receive the WSD printing data faster Timeout setting Specifies the timeout length Bonjour settings Setting items for LAN using Bonjour Enable disable Bonjour Selecting Enable allows you to use Bonjour to perform the network settings Service name Specifies the Bonjour service name You can use up to 48 characters for the name...

Page 155: ...to use a dedicated port for a command sent from a Canon application to the printer Selecting ON allows you to use the dedicated port Wi Fi DRX setting Selecting Enable allows you to activate discontinuous reception when using Wi Fi Wired LAN DRX setting Selecting Enable allows you to activate discontinuous reception when the printer is connected to a device compatible with wired LAN Reset SSL cert...

Page 156: ...f Sleep timer Specifies the length of time to enter sleep mode automatically when no operation is made Operation restrictions Restricts the following operations Job history Restricts to display the print job history Remote UI Restricts to use Remote UI Use USB connection Enables Disables USB connection Date time setting Sets the current date and time Date display format Sets the format of dates di...

Page 157: ...length unit meter or feet inch EOP timer setting Specify the timeout period before cancellation of print jobs that cannot be received by the printer Job history sending setting The printer sends a job history when Send is selected 157 ...

Page 158: ...g Device settings after tapping Setup on the HOME screen Important The administrator password is required to change settings if it is enabled for changing settings using the operation panel Changes the language for the messages and menus on the touch screen 158 ...

Page 159: ...onment you are using the printer selecting this setting may not manage remaining roll amount as precisely as you expected We recommend you select a higher value for this setting item Disable Select to disable managing remaining roll amount Roll amount warning setting Specifies when to warn the remaining roll paper amount Detect paper setting mismatch Selects printer action when you start printing ...

Page 160: ...00 mm or 24 inch is applied when a sheet of an intermediate size is detected Auto feed at power on When Enable is selected the printer judges the existence of paper exchange when starting up and if paper has been exchanged paper feeding operation is performed It may take time to judge paper exchange When Disable is selected the printer does not judge whether or not to change the paper when startin...

Page 161: ...s Disables automatic nozzle checking You can also select the page interval to perform automatic nozzle checking Nozzle check error display Enables Disables displaying the nozzle check error System cleaning frequency Specifies the frequency of automatic system cleaning Note To maintain print quality we recommend you select Short if you use the printer at a higher place Print pattern after new head ...

Page 162: ...administrator password If you specify the administrator password select the range and specify the administrator password Remote UI or other tools Entering the administrator password is required to change the setting items using Remote UI or some software LCD Remote UI or other tools Entering the administrator password is required to change the setting items using the operation panel of the printer...

Page 163: ...r is turned on 2 On the HOME screen tap Setup Menu Operations 3 Tap Device settings 4 Tap Administrator password setting 5 Enter the password on the administrator password input screen and tap OK Important The administrator password is set at the time of purchase The printer s serial number is used as the password For the administrator password refer to Administrator Password If an administrator p...

Page 164: ...racter restrictions apply to the password Set the password by using 4 to 32 characters The allowed characters are single byte alphanumeric characters For security reasons we recommend you use 6 and more alphanumeric characters 9 Tap Apply 10 Enter administrator password you specified again 11 Tap OK The administrator password is enabled When You Want to Disable the Administrator Password After ope...

Page 165: ...f it is enabled for changing settings using the operation panel Enable disable monitoring service Selecting Enable allows the printer to send error details to the service center Communication test Performs a communication test with the service center Communication log Displays the list of error numbers up to 30 error code and time the error occurs Tapping an item displays the error details 165 ...

Page 166: ...for errors which occur during paper feed transfer up to 5 Tapping an error code displays the error details For more on the error code refer to List of Support Code for Error Usage totals Displays the printer s record of use such as total print area or the amount of ink consumption Head information Displays the print head serial number elapsed days since the current print head was installed and dot...

Page 167: ...HP GL 2 Settings Menus on HP GL 2 print settings Menu Setting Combinations Standard Size Table 167 ...

Page 168: ...ion Print target Paper src Margin Oversize Conserve paper Rotate Auto rotation Enlarge Reduce Print centered Cut to standard size Mirror Merge Smooth Thicken fine lines Adjust faint lines Width correction Print color list for palettes Warning display Detect image size 168 ...

Page 169: ... naturally and features smooth gradation In addition selecting this setting allows you to adjust colors easily using an application software Color saturation Initial setting If you select Line drawing for Print target Prints in easy to see colors suitable for line drawing If you select Photo for Print target Reproduces vivid colors on data such as a poster Color correct off Performs printing witho...

Page 170: ...t Select this setting for faster printing 4 Printing speed is faster than that in selecting 3 3 Initial setting Select this setting for standard printing that balances print quality and printing speed 2 Printing quality is higher than that in selecting 3 1 High Select this setting to give print quality priority This causes printing to take longer than other settings but print quality is higher 170...

Page 171: ...tings Print settings HP GL 2 print settings Print quality settings 600 dpi Initial setting Specifies 600 dpi for internal rendering resolution This setting raises the accuracy of internal processes for finer printing 300 dpi Specifies 300 dpi for internal rendering resolution This setting increases the speed of internal processes for faster printing 171 ...

Page 172: ... tapping in the following order Setup Device settings Print settings HP GL 2 print settings Print quality settings Photo Select this setting to print a data which includes illustration or photo Line drawing Initial setting Select this setting to print a drawing data which includes lines 172 ...

Page 173: ...ayed by tapping in the following order Setup Device settings Print settings HP GL 2 print settings Paper settings Auto select Initial setting Select an appropriate paper source automatically Roll paper Select this setting to print on the roll paper Manual Select this setting to print on the sheets 173 ...

Page 174: ...ttings Note If the Leading edge margin roll and or Leading edge margin sheet settings on Advanced paper settings are different from the settings here the larger of the settings is given priority 3mm Initial setting Specifies 3 mm margin However the trailing edge margin for cut sheet paper is 20 mm 5mm Specifies 5 mm margin However the trailing edge margin for cut sheet paper is 20 mm 174 ...

Page 175: ...s margins inside the HP GL 2 data image drawing range Depending on the layout adding margins inside the image drawing range may cause part of the image to be cut off Note Some CAD applications can cause the origin to be out of position and part of the image to be cut off Experiment with the Disable and Enable settings of this function to find the one that works best OVERSIZE SETTING EXAMPLES A Pri...

Page 176: ...ge is not cut off by the margins When Enable is selected Printing is performed based on the image drawing range The origin is specified on the upper left of the paper Margins are added to the outside of the image drawing range B Image drawing range C Margins When you specify the paper size for printing select the size which covers both the image drawing range and margins 176 ...

Page 177: ...D Paper for printing E Image drawing range with margins If you select the paper size which cannot cover the margins the image may be cut off 177 ...

Page 178: ...F Range which cannot be printed G Paper for printing 178 ...

Page 179: ...ng item is displayed by tapping in the following order Setup Device settings Print settings HP GL 2 print settings Paper settings ON Blank space above and below the image is eliminated when printing OFF Initial setting Paper is not conserved CONSERVE PAPER SETTING EXAMPLES Print data image drawing range When OFF is selected When ON is selected 179 ...

Page 180: ...180 ...

Page 181: ...nt settings Paper settings 0 degrees Initial setting Image is not rotated 90 degrees Specified image is rotated by 90 degrees If the part of rotated image is out of the paper width the part is not printed Note When the print data includes HP RTL the HP RTL image part is not rotated Note If ON is selected for Auto rotation priority is given to the Auto rotation setting 181 ...

Page 182: ...dscape orientation and the long side is longer than the paper width and the short side is shorter than the paper width Even if the long edge and short edge of the output page are both longer than the paper width and the output page is in landscape orientation the image is rotated to expand the print range Note The length that the roll paper will be cut to depends on rotation The desired printing r...

Page 183: ... Even if the image runs off the edge of the paper it is rotated to expand the print range 183 ...

Page 184: ...he calculation result exceeds the maximum rate the image is enlarged according to the maximum rate for each model Same size Initial setting Image is not enlarged reduced Scaling Enlarges or reduces the image to the specified scaling value for printing Scaling can be specified within a range of 25 to 400 Note Data line or margin widths are not enlarged or reduced ENLARGE REDUCE Scaling SETTING EXAM...

Page 185: ...left corner Margin widths are not enlarged or reduced Because of this paper size scaling and post processing image scaling may not be the same For example doubling the length and width of A4 size paper results in A2 size paper If there are margins of 3 mm the A4 size output object area measures 291 mm x 204 mm Specifying Fit paper size will result in a post processing size of approximately 588 mm ...

Page 186: ...A Output object area B Fit to long side post processing size 186 ...

Page 187: ...ct area in the center of the paper For roll paper Prints the output object area in the horizontal center of the paper Note The output object area is not printed in the center when the paper size is smaller than the output page size OFF Initial setting The output object area is not printed in the center of the paper PRINT CENTERED EXAMPLES OFF is selected when printing on sheet ON is selected when ...

Page 188: ... ON is selected when printing on roll 188 ...

Page 189: ...Note If ON is selected for Conserve paper and there is blank space above below the image the size will not be standard size When ON is selected for Print centered printing will be in the center of the standard size If there is no standard size corresponding to the roll paper width operation is the same as if OFF is selected No message is displayed For information about supported standard sizes see...

Page 190: ...A Position of cut when OFF B Position of cut when ON 190 ...

Page 191: ...r to be printed the position where the horizontally flipped image is printed varies OFF Initial setting Horizontal flip of the image is not performed HORIZONTAL FLIP MIRROR EXAMPLE When OFF is selected when printing on roll paper When ON is selected when printing on roll paper Do not move the position to print the image on the paper flip the image horizontally When OFF is selected when printing on...

Page 192: ... When ON is selected when printing on cut paper or roll paper cut to standard size Flip the image horizontally for each position where you print the image on the paper 192 ...

Page 193: ...nd is included in the HP GL 2 data If the HP GL 2 data does not include a specification command the operation is performed using the specified selection value ON The section where lines overlap becomes the mixed color of the intersecting lines OFF Initial setting The section where lines overlap becomes the same color as one of the intersecting lines ENABLE MERGE EXAMPLE When OFF is selected A Data...

Page 194: ...anagement Software Initial setting Draws arcs using HP GL 2 data settings Default value of the central angle of an arc in HP GL 2 is 5 Regular 72 sided polygon if the angle is not specified using a HP GL 2 command Smoothing Draws curves that are smoother than arcs with a central angle of 1 SMOOTHING EXAMPLES When Software is selected When Smoothing is selected 194 ...

Page 195: ...in the following order Setup Device settings Print settings HP GL 2 print settings Line management ON Corrects line widths so fine lines are drawn more sharply without breaking The line color is not changed OFF Initial setting Thin lines are not corrected Some line thicknesses may cause them to become broken 195 ...

Page 196: ...re clearly This setting item is displayed by tapping in the following order Setup Device settings Print settings HP GL 2 print settings Line management ON Adjusts the colors of brightly colored fine lines so they are drawn more clearly OFF Initial setting Fine lines are not corrected 196 ...

Page 197: ...ths When this setting is a minus value it is not applied to fine lines of widths that are less than the minimum line width of the printer If the setting value is smaller than 1 dot the value of 1 dot width is applied When ON is selected for Thicken fine lines the resulting line may be thicker than the specified setting Black gray For configuring the correction setting of black and gray line widths...

Page 198: ...198 ...

Page 199: ...t the color pallet which shows how 256 colors of HP GL 2 command appear using the printer s ink This setting item is displayed by tapping in the following order Setup Device settings Print settings HP GL 2 print settings Line management 199 ...

Page 200: ...p Device settings Print settings HP GL 2 print settings Processing options Note Warning is always displayed when one of the errors below occurs regardless of the setting When virtual GL 2 memory exceeds acceptable level When GL 2 display list memory is insufficient When the number of polygon vertexes which GL 2 data has exceeds acceptable level Warning is always displayed on the status monitor or ...

Page 201: ...g that information When a HP GL 2 data does not include image drawing range information the image drawing range use the printer s maximum roll paper width as the horizontal dimension and 1 5 times the maximum roll paper width as the vertical dimension Command priority When select OFF the drawing image is missing or is output as a blank sheet use this setting Note When a HP GL 2 data include image ...

Page 202: ...and Auto rotation Enlarge Reduce Scaling and Auto rotation Print centered and Cut to standard size Cut to standard size and Auto rotation and Enlarge Reduce Fit paper size Detect image size and Oversize Detect image size and Print centered 202 ...

Page 203: ...ion is performed first followed by the Conserve paper process After Auto rotation is applied to the print data the image is printed with upper and lower blank areas removed Conserve paper AND Auto rotation EXAMPLE Print data image drawing range Image after auto rotation A Blank area Printed image 203 ...

Page 204: ...Printed without upper lower blank area 204 ...

Page 205: ...ssible Printing is done without Auto rotation if the size of the image after doing Enlarge Reduce Scaling would cause the image to run off the edge of the paper were Auto rotation executed Enlarge Reduce Scaling AND Auto rotation EXAMPLE Print data image drawing range Printed image with Enlarge Reduce Scaling only Printed image when the image runs off the edge of paper Auto rotation is not perform...

Page 206: ...the standard size Print centered AND Cut to standard size EXAMPLE When A3 width roll paper is loaded A3 portrait is chosen as the optimal standard size based on the roll paper width and image size Next Print centered is performed in accordance with the A3 portrait Print data image drawing range A Virtual area for A3 size portrait B Virtual area for A4 size landscape Printed image when ON is select...

Page 207: ...A Position of cut Printed image when ON is selected for Print centered and ON is selected for Cut to standard size A Position of cut for A3 size portrait 207 ...

Page 208: ...and all candidate sizes Finally Enlarge Reduce Fit paper size process is performed according to the decided standard size SMALL IMAGE EXAMPLE When A3 width roll paper is loaded A4 landscape is chosen as the optimal standard size based on the roll paper width and image size Next Auto rotation is performed in accordance with the A4 landscape Finally the image is enlarged and printed to match A4 size...

Page 209: ...e roll paper width and image size Next Auto rotation is performed in accordance with the A3 portrait Finally the image is reduced and printed to match A3 size paper Print data image drawing range A Virtual area for A3 size Since the image does not fit on A3 size paper A3 portrait is chosen as the maximum standard size Image after auto rotation 209 ...

Page 210: ... Printed image after reduced A Position of cut for A3 size 210 ...

Page 211: ...Oversize Since margins are added outside the image drawing range images will not be chipped due to the margins However you will need to print on paper that is larger than the size of the image drawing range determined based on Detect image size setting plus the top bottom left and right margins Note Not all HP GL 2 data can be supported Detect image size AND Oversize EXAMPLE The example below show...

Page 212: ...selected for Detect image size and Enable is selected for Oversize Since margins are added outside the image drawing range images will not be chipped due to the margins C Position of cut The paper is cut with the length obtained by adding the upper and lower margins to the length of the image drawing range determined based on the Detect image size setting 212 ...

Page 213: ...ect image size setting is printed in the center of the paper Detect image size AND Print centered EXAMPLE A The image drawing range determined based on the Detect image size setting Printed image A Position of cut The image drawing range determined based on the Detect image size setting is printed at the center of the paper 213 ...

Page 214: ...Standard Size Portrait Width mm Height mm Standard Size Landscape Width mm Height mm JIS B0 1030 0 1456 0 JIS B1 1030 0 728 0 JIS B1 728 0 1030 0 JIS B2 728 0 515 0 JIS B2 515 0 728 0 JIS B3 515 0 364 0 JIS B3 364 0 515 0 JIS B4 364 0 257 0 JIS B4 257 0 364 0 No standard Standard Size Portrait Width mm Height mm Standard Size Landscape Width mm Height mm ANSI E 863 6 1117 6 ANSI D 863 6 558 8 ANSI...

Page 215: ... 228 6 ARCH A 228 6 304 8 No standard Standard Size Portrait Width mm Height mm Standard Size Landscape Width mm Height mm DIN C1 648 0 917 0 DIN C2 648 0 458 0 DIN C2 458 0 648 0 DIN C3 458 0 324 0 DIN C3 324 0 458 0 DIN C4 324 0 229 0 DIN C4 229 0 324 0 No standard 215 ...

Page 216: ...st print 5 Tap Status print Note If you specify the administrator password tap Status print administrator 6 Tap Yes The printer starts printing The following information is included Canon xxxxxxxxxxxxxxxxxxxx Status Print Printer model S N Printer serial number Firm Firmware version Boot Boot ROM version Date Date and time when the status print was output Paper Info Roll Media Type of roll paper C...

Page 217: ...s of Enable disable monitoring service Usage Condition Hardware error History information of Hardware error Error History information of Recoverable error Warning Warning history information Jam History information of Paper feed transfer error Maintenance cartridge usage Remaining ink level Values of Ink consumed Duty counter Values of Duty counter PARTS STATUS COUNTER Part status Head information...

Page 218: ...Using Web Browser Setting Password Registering Printer s Root Certificate to Web Browser for SSL Communication Remote UI Registering Printer s Root Certificate to Local Computer for SSL Communication Generating Server Certificate Self signed Certificate Setting Mail Server Receiving Printer Status by E mail 218 ...

Page 219: ...e printer is required to use Remote UI You can use Remote UI on the following OS and the web browser iOS device OS iOS 9 0 or later Web browser iOS standard Web browser Mobile Safari Android device OS Android 4 4 or later Web browser Android standard Web browser Browser or Chrome macOS device OS Mac OS X 10 9 or later Web browser Safari 7 0 or later Windows device OS Windows 7 SP1 or later Web bro...

Page 220: ...wser on your smartphone tablet or computer this step is not necessary after the next time If the root certificate is not registered a message to warn you that the secure connection is not guaranteed may appear 5 Select Log in The password authentication screen appears Note When the standard user mode is enabled choose either administrator mode or standard user mode to log on After choosing a mode ...

Page 221: ...s and change printer settings For changeable setting items see below Changeable Setting Items Using Web Browser 8 When you finish checking printer status and changing printer settings select Log out 9 Close web browser 221 ...

Page 222: ...ties This function allows you to set and execute the printer utility functions such as cleaning Job management This function allows you to display the job history and print it In addition you can delete jobs from this item Note When you are logging on in administrator mode you can restrict this function in standard user mode System info and LAN settings This function allows you to check the system...

Page 223: ...iving Printer Status by E mail You can disable any operations using the operation panel from Operation panel lock on Custom settings Note Some of the menu is available only when you logged on in administrator mode AirPrint settings This function allows you to specify the AirPrint settings such as position information Other Items Printer status This function displays printer information such as the...

Page 224: ... on the sticker attached on the printer It consists of 9 alphanumeric characters four alphabets followed by five numbers 1 Start up Remote UI 2 Select Security 3 Select Administrator password setting 4 Select Change administrator password If an administrator password is not specified the confirmation message appears Confirm the message and select Yes When message appears again confirm it and selec...

Page 225: ...de and set a standard user password by following the steps below 1 Start up Remote UI 2 Select Security The menus appear 3 Select Standard user mode settings 4 When confirmation message appears select Yes 5 Enter password and select OK Important The following character restrictions apply to the password Set the password by using 4 to 32 characters The allowed characters are single byte alphanumeri...

Page 226: ... procedure may differ depending on the version of your web browser For other web browser refer to each help Important Make sure that you have accessed to the printer IP address correctly by checking the URL field of the web browser before registering the root certificate If the printer is connected via IPv6 using Windows you need to generate a server certificate using Remote UI For details see Gen...

Page 227: ...r s thumbprint is displayed in Root cert thumbprint SHA 1 column or Root cert thumbprint SHA 256 column when tapped in the following order Setup Printer information System information 12 If thumbprint on Security Warning screen matches printer s thumbprint select Yes 13 Select OK on Certificate Import Wizard screen The root certificate registration is completed For Safari 1 Select For secure commu...

Page 228: ...et on your device entering a password may be required For Chrome on Android 1 Select For secure communication on Remote UI 2 Select Download Downloading the root certificate is started and then Name the certificate screen is displayed 3 As entering the root certificate name is required enter an arbitrary certificate name and select OK The root certificate registration is completed Note If PIN or p...

Page 229: ...ficate registration is completed If the message to warn you that the secure connection is not guaranteed appears when you select Log in on Remote UI after registering the root certificate restart the web browser The message will not appear on the web browser Note Depending on the Android device a warning may appear even after registering the proper root certificate For Mobile Safari on iOS 1 Selec...

Page 230: ...r Certificate Self signed Certificate For Windows 10 Windows 8 1 For Windows 7 For macOS Operation procedure may differ depending on your OS version For Windows 10 Windows 8 1 The procedure below describes how to import a root certificate in Windows 10 Windows 8 1 1 Start up Remote UI 2 Select For secure communication Note You can download a certificate from Status Monitor 1 Open status monitor Op...

Page 231: ...screen appears 7 Select Place all certificates in the following store 8 Select Trusted Root Certificate Authorities 1 Select Browse to open the Select Certificate Store screen 2 Select Trusted Root Certificate Authorities from the list and select OK 3 Select Next on the Certificate Store screen 9 Select Finish When the Completing the Certificate Import Wizard screen appears check the settings and ...

Page 232: ...Console Enter MMC on Search programs and files in the Start menu and press the Enter key 2 Select Yes on displayed screen 3 Select Add Remove Snap in from File menu The Add or Remove Snap ins screen appears 4 Add Certificate snap in 1 Select Certificates from Available snap ins list and select Add 2 Select Computer account for This snap in will always manage certificates for on the Certificates sn...

Page 233: ... Certificate Import Wizard 1 On the left window open Trusted Root Certificate from Certificate on Console Root 2 Right click Certificates and select Import from All tasks 2 Specify certificate file to import 1 Select Next 2 Specify the certificate file to import on File name and select Next 3 Specify certificate store 1 Select Place all certificates in the following store 2 Select Trusted Root Cer...

Page 234: ...creating the Current user snap in Note When you finish Microsoft Management Console a message asking you whether to save the console setting If you continue to apply the same settings next select Yes to save For macOS The procedure below describes how to import a root certificate in macOS 1 Start up Remote UI 2 Select For secure communication 3 Select Download The root certificate will be download...

Page 235: ...nt of certificate shown on Details corresponds with the root certificate thumbprint of the printer The printer s thumbprint is displayed in Root cert thumbprint SHA 1 column or Root cert thumbprint SHA 256 column when tapped in the following order Setup Printer information System information 7 Select Always Trust If the fingerprint of certificate detail information matches printer s thumbprint dis...

Page 236: ... if you are using Remote UI To reset the IPv6 server certificate tap in the following order from the operation panel Setup Device settings LAN settings Wi Fi Wireless Direct Wired LAN Settings Advanced Reset SSL certificates Yes Checking Printer s IP Address 1 Make sure printer is turned on 2 On the HOME screen tap the Network icon Depending on the type of LAN enabled the icon displayed on the but...

Page 237: ... 4 Select SSL TLS settings 5 Select Generate key and certificate 6 Select Generate self signed cert 7 Specify each setting item Signature algorithm Select SHA256 Public key length bits Select 2048 bits Specify the expiration date Enter the date you generated the server certificate on Valid from Enter the date the server certificate expires on Valid to Enter the common name On Common name enter the...

Page 238: ...10 Select Restart LAN LAN will be restarted When LAN has been restarted Printer status on Remote UI appears Note If you cannot access to Remote UI after you restart LAN reload your web browser Checking Generated Server Certificate 1 Select Security on Remote UI 2 Select SSL TLS settings 3 Select Check key and certificate Make sure the issuer of the root certificate is displayed on Issuer and the v...

Page 239: ...r settings Specify the following items Sender address Enter the e mail address of the sender this printer Outgoing mail server SMTP Enter the address of your SMTP server Port number SMTP Enter the port number of your SMTP server Secure connection SSL Select if you use the secure connection SSL Don t verify certificates Select if you do not verify the certificate Authentication method Select one of...

Page 240: ...e authentication check the Set change password and then enter the password Use APOP authentication Select if you send the password by the encryption transmission Clear mailbox Select if you delete the e mails that remain in the POP3 server Important When this setting is enabled e mail in the Inbox on the server will have all been removed If you specify the e mail address of your everyday be sure t...

Page 241: ...se functions can be set only when you are logged in administrator mode 1 Start up Remote UI 2 Select Device settings 3 Select Status notification e mail 4 Select Notification recipients 5 Specify destination settings Up to 5 destinations can be registered by following the steps below 1 Select number of destination 2 Select Add 3 Enter e mail address and then select printer status to send informati...

Page 242: ...The resending setting is completed 242 ...

Page 243: ...Printer Parts Printer Parts Front Side Top Cover Inside Roll Paper Cover Inside Carriage Ink Tank Cover Inside Stand Operation Panel Optional accessories Roll Holder Set Stand 243 ...

Page 244: ...Printer Parts Front Side Top Cover Inside Roll Paper Cover Inside Carriage Ink Tank Cover Inside Stand Operation Panel 244 ...

Page 245: ... Guide When loading the sheets move the guide to match the paper size D Paper Alignment Line A white line for alignment of paper E Ink Tank Cover Open this cover to replace the ink tank See Ink Tank Cover Inside F Operation Panel Use this screen to operate the printer and check the printer status See Operation Panel G Release Lever When releasing the Paper Retainer push this lever back H Output Gu...

Page 246: ...ses such as head cleaning is absorbed Replace the cartridge when it is full J Maintenance Cartridge Cover Open this cover to replace the maintenance cartridge K Stand A stand that holds the printer Equipped with casters to facilitate moving it See Stand 246 ...

Page 247: ...es Furthermore hold the left and right of these parts when moving the printer with a stand C Wired LAN Connector Connect an Ethernet cable to this port The lamp is lit if the Ethernet cable is connected correctly and communication is possible between the computer and printer D USB Port Connect a USB cable to this port The printer is compatible with Hi Speed USB connections 247 ...

Page 248: ...le in detecting the carriage position D Carriage Shaft The Carriage slides along this shaft E Carriage Moves the print head The carriage serves a key role in printing See Carriage F Cleaning Brush When cleaning inside the printer under the top cover use this brush to sweep away paper dust on the platen G Borderless Printing Ink Grooves For catching ink outside the edges of paper during borderless ...

Page 249: ... H Cutter Blade A round bladed cutter for automatic paper cutting 249 ...

Page 250: ...e A Slide Guide Move the roll holder along this guide B Roll Holder Slot Slide the roll holder into this slot C Holder Stopper Secure the roll on the roll holder with this part D Roll Holder Load the roll on this holder 250 ...

Page 251: ...pped with ink nozzles The carriage serves a key role in printing B Print Head Locking Cover Secures the print head C Angle Adjustment Lever Fine tunes the line misalignment when printing D Print Head Lock Lever Lock print head locking cover 251 ...

Page 252: ... Tank Cover Inside A Ink Tank Cartridges of ink in various colors B Ink Tank Lock Lever A lever that locks the ink tank in place and protects it Lift and press down the lever when replacing an ink tank 252 ...

Page 253: ...sition A For details about the extended position see Using the Basket D Support Rod Can change the position when changing the position of the basket For details about the extended position see Using the Basket E Basket Release Lever Releases the basket when it is set in the extended position B and the lever is pulled forward For details about the extended position see Using the Basket F Locking Ca...

Page 254: ... documents H Basket Ejection Guides This guide supports output paper when using the basket in the extended position B I Accessory Pocket Stores the printer s accessories Note For details about the extended position see Using the Basket 254 ...

Page 255: ...Optional accessories Roll Holder Set Stand 255 ...

Page 256: ... The roll holder in the roll holder set RH2 35 is for use with both 2 inch and 3 inch paper cores Use the correct attachment for the particular paper core See Loading Rolls on the Roll Holder Roll holder set RH2 35 Roll holder for 2 and 3 inch paper cores 3 inch paper core attachment 256 ...

Page 257: ...sition A For details about the extended position see Using the Basket D Support Rod Can change the position when changing the position of the basket For details about the extended position see Using the Basket E Basket Release Lever Releases the basket when it is set in the extended position B and the lever is pulled forward For details about the extended position see Using the Basket F Locking Ca...

Page 258: ... documents H Basket Ejection Guides This guide supports output paper when using the basket in the extended position B I Accessory Pocket Stores the printer s accessories Note For details about the extended position see Using the Basket 258 ...

Page 259: ... Network Device Setup Utility Windows IJ Network Device Setup Utility Starting Up IJ Network Device Setup Utility Diagnosing and Repairing Network Settings Performing Changing Network Settings List of Models Which Does Not Support Diagnosis and Repair Function Other Network Information IJ Network Device Setup Utility macOS IJ Network Device Setup Utility Starting Up IJ Network Device Setup Utility...

Page 260: ... Sharing the Printer on a Network macOS Settings on Print Server Settings on Client PC Restrictions on Printer Sharing Connecting Smartphone Tablet to Printer via Wi Fi Connecting Smartphone Tablet to Printer via Wireless Router 260 ...

Page 261: ...nd with Same Name Connecting to Another Computer via LAN Changing from USB to LAN Connection Printing Network Settings Reconfiguration Method of LAN Connection Reconfiguration Method of Wi Fi Connection Reconfiguration of Network Settings using the Remote UI Network Status and Troubleshooting 261 ...

Page 262: ... for LAN connection Connection via wired LAN Connect the printer and computer to a router using a LAN cable If your router supports Wi Fi connection you can connect a device via Wi Fi Note Devices connected to the router must be connected to the same network What Is Ethernet Cable Advantages of Connecting Printer via Wired LAN Restrictions Connection via a wireless router Connect the printer and c...

Page 263: ...onnected one on one to the computer If your computer is connected to LAN you can use the printer with other devices by enabling the sharing setting on your computer Note You can connect the printer to a computer via USB even when the printer is already connected to another one via wired LAN Another Connection Method Using Wireless Direct enables you to connect the printer directly to a computer or...

Page 264: ...264 ...

Page 265: ...utes Enable disable Bonjour Enable Service name Canon TM 5300 LPR protocol setting Enable Wi Fi DRX setting Enable Wired LAN DRX setting Enable XX represents alphanumeric characters Default value depends on printer To check value use operation panel LAN settings Wireless Direct Defaults Item Default Network SSID device name DIRECT abXX TM 5300 1 Password YYYYYYYYYY 2 Wi Fi security WPA2 PSK AES Co...

Page 266: ... 2 The password is specified automatically when the printer is turned on for the first time 266 ...

Page 267: ... those on detection result screen Check the printer s MAC address or serial to select the correct printer from the results Note Serial number may not appear on result screen Check the printer s MAC address and the serial number by one of the following methods Display on the touch screen MAC address LAN settings Serial number Printer information Print the network settings Printing Network Settings ...

Page 268: ... Windows To add a computer to connect to the printer on a LAN or to change from USB to LAN connection perform setup using the Setup CD ROM or from the web page For macOS To connect an additional computer to the printer via LAN or to change from USB to LAN connection perform setup from the web page 268 ...

Page 269: ...Printer 3 Select Setup icon on HOME screen 4 Select Device settings 5 Select LAN settings 6 Select Print details 7 Select Yes on displayed screen 8 Select Yes or No on displayed screen The printer starts printing network settings information Note You can also print the printer s network settings Select the Setup icon Device settings Test print Print LAN details Yes Yes The printed network settings...

Page 270: ...P Filtering Operation status of IP filtering On Off IP Filtering Select IP filtering method Disabled Enabled IP Filtering Permission Address IP filtering permission address Start Address 1 Start address 1 XXX XXX XXX XXX End Address 1 End address 1 XXX XXX XXX XXX Use Single On 1 Use single on 1 On Off Start Address 2 Start address 2 XXX XXX XXX XXX End Address 2 End address 2 XXX XXX XXX XXX Use ...

Page 271: ... LAN Setting Basic setting information Basic Info IPv4 setting information Wired LAN Control Filtering SNMP filtering setting information IP Filtering Prohibit Address IP filtering prohibit address Start Address 5 Start address 5 XXX XXX XXX XXX End Address 5 End address 5 XXX XXX XXX XXX Use Single On 5 Use single on 5 On Off Print Filtering Print filtering setting information Use IP Filtering Op...

Page 272: ... XXX End Address 1 End address 1 XXX XXX XXX XXX Use Single On 1 Use single on 1 On Off Start Address 2 Start address 2 XXX XXX XXX XXX End Address 2 End address 2 XXX XXX XXX XXX Use Single On 2 Use single on 2 On Off Start Address 3 Start address 3 XXX XXX XXX XXX End Address 3 End address 3 XXX XXX XXX XXX Use Single On 3 Use single on 3 On Off Start Address 4 Start address 4 XXX XXX XXX XXX En...

Page 273: ...ix Length Prefix length XXX 0 to 128 Stateless Address Stateless address IP Address 1 IP address 1 XXXX XXXX XXXX XXXX XXXX XXXX XXXX XXXX Prefix Length 1 Prefix length 1 XXX 0 to 128 IP Address 2 IP address 2 XXXX XXXX XXXX XXXX XXXX XXXX XXXX XXXX Prefix Length 2 Prefix length 2 XXX 0 to 128 IP Address 3 IP address 3 XXXX XXXX XXXX XXXX XXXX XXXX XXXX XXXX Prefix Length 3 Prefix length 3 XXX 0 t...

Page 274: ...of IP filtering On Off IP Filtering Select IP filtering method Disabled Enabled IPv6 Filtering Permission Info IPv6 filtering permission information IP Filtering Start Address 1 IP filtering start address 1 XXXX XXXX XXXX XXXX XXXX XXXX XXXX XXXX IP Filtering End Address 1 IP filtering end address 1 XXXX XXXX XXXX XXXX XXXX XXXX XXXX XXXX Use Single On 1 Use single on 1 On Off LAN Setting Basic se...

Page 275: ...it Info IPv6 Filtering prohibit information IP Filtering Start Address 1 IP filtering start address 1 XXXX XXXX XXXX XXXX XXXX XXXX XXXX XXXX IP Filtering End Address 1 IP filtering end address 1 XXXX XXXX XXXX XXXX XXXX XXXX XXXX XXXX Use Single On 1 Use single on 1 On Off IP Filtering Start Address 2 IP filtering start address 2 XXXX XXXX XXXX XXXX XXXX XXXX XXXX XXXX IP Filtering End Address 2 ...

Page 276: ...X XXXX XXXX XXXX XXXX XXXX XXXX IP Filtering End Address 1 IP filtering end address 1 XXXX XXXX XXXX XXXX XXXX XXXX XXXX XXXX Use Single On 1 Use single on 1 On Off IP Filtering Start Address 2 IP filtering start address 2 XXXX XXXX XXXX XXXX XXXX XXXX XXXX XXXX IP Filtering End Address 2 IP filtering end address 2 XXXX XXXX XXXX XXXX XXXX XXXX XXXX XXXX Use Single On 2 Use single on 2 On Off LAN ...

Page 277: ...Filtering Start Address 2 IP filtering start address 2 XXXX XXXX XXXX XXXX XXXX XXXX XXXX XXXX IP Filtering End Address 2 IP filtering end address 2 XXXX XXXX XXXX XXXX XXXX XXXX XXXX XXXX Use Single On 2 Use single on 2 On Off IP Filtering Start Address 3 IP filtering start address 3 XXXX XXXX XXXX XXXX XXXX XXXX XXXX XXXX IP Filtering End Address 3 IP filtering end address 3 XXXX XXXX XXXX XXXX ...

Page 278: ...X XX XX XX XX XX MAC Address 5 MAC address 5 XX XX XX XX XX XX LAN Setting Basic setting information MAC Info MAC address setting information Wired Wi Fi MAC Filtering Prohibit Info MAC filtering prohibit information MAC Address 1 MAC address 1 XX XX XX XX XX XX MAC Address 2 MAC address 2 XX XX XX XX XX XX MAC Address 3 MAC address 3 XX XX XX XX XX XX MAC Address 4 MAC address 4 XX XX XX XX XX XX...

Page 279: ...EP format for Wi Fi infrastructure Hex String Direct Connection Setting Wireless direct setting information Device Name Wireless direct device name Wireless direct device name up to 32 characters Channel Channel Wireless direct XXX 0 to 255 SSID SSID Wireless direct network name SSID de vice name up to 32 characters Security Type Security type for Wi Fi Wireless direct Disabled WPA2 PSK TKIP WPA2 ...

Page 280: ...er1 User 1 User Name User name XXXXXXXX up to 32 characters Use SNMPv3 Use SNMPv3 On Off MIB Access Restriction MIB access restriction Read Only Read Write Security Setting Security setting No Auth No Priv Auth No Priv Auto Priv Authority Algorithm Authority algorithm Null MD5 SHA1 Encryption Algorithm Encryption algorithm Null AES DES User2 User 2 User Name User name XXXXXXXX up to 32 characters ...

Page 281: ...tion MIB access restriction Read Only Read Write Security Setting Security setting No Auth No Priv Auth No Priv Auto Priv Authority Algorithm Authority algorithm Null MD5 SHA1 Encryption Algorithm Encryption algorithm Null AES DES Dynamic DNS Setting Dynamic DNS setting IPv4 IPv4 Use Dynamic DNS Operation status of Dynamic DNS On Off Host Name Host name XXXXXXXX up to 64 characters Domain Name Dom...

Page 282: ...use EAP TLS EAP TTLS PEAP EAP TTLS Type Internal authority type for EAP TTLS MSCHAPv2 PAP Weak Encryption Restriction Weak encryption restriction Do not restrict Restrict Weak Certificate Restriction Weak certificate restriction Do not restrict Restrict Login Name Login name XXXXXXXX up to 24 characters User Name User name XXXXXXXX up to 24 characters Server Name Server name XXXXXXXX up to 43 char...

Page 283: ...r Name User name XXXXXXXX up to 32 characters User10 User 10 User Name User name XXXXXXXX up to 32 characters Email Setting E mail setting information Retry Count E mail retry count 0 to 5 Retry Interval E mail retry interval 1 to 60 min Use Email Notification Use E mail notification On Off Use SSL Use SSL On Off Use SSL Cert No Check Use SSL certification On Off Use Mailbox Delete Use mailbox del...

Page 284: ... 1 Signature 1 XXXXXXXX up to 128 characters To Address 2 To address 2 XXXXXXXX up to 128 characters Reply Address 2 Reply address 2 XXXXXXXX up to 128 characters Notice Conditions 2 Notice conditions 2 Job End Job end On Off Error Occurred Error occurred On Off Warning Occurred Warning occurred On Off Signature 2 Signature 2 XXXXXXXX up to 128 characters RUI Setting Remote UI setting information ...

Page 285: ... to Performing Changing Wi Fi Settings or Performing Changing Wired LAN Connection Ethernet Cable Settings For macOS Redo setup from the web page Changing Wi Fi Connection Method Follow either procedure below to change Wi Fi connection method infrastructure or wireless direct For Windows Redo setup using the Setup CD ROM or from the web page Perform settings on the Network Settings screen on IJ Ne...

Page 286: ... setup 6 Select Easy wireless connect 7 Check message and select OK Follow instructions on your smartphone or tablet 8 If message saying setup is completed appears select OK For macOS Redo setup from the web page 286 ...

Page 287: ... Chrome Mozilla Firefox For more on Remote UI refer to Configuration Changes Using Web Browser Important Enable JavaScript and cookies in the web browser If you access Remote UI with the printer name instead of its IP address make sure the DNS settings are correctly configured Depending on the network environment you may not be able to start Remote UI On the HOME screen select Setup Device setting...

Page 288: ...ect the cable to the LAN side of the router Make sure the network devices e g hub or router are turned on IP address is not assigned If you specify the printer s IP address automatically enable DHCP on the router If you specify the printer s IP address manually the address is disabled because it is out of the valid range You specified 0 0 0 0 as the IP address for example Specify the valid IP addr...

Page 289: ...t allow more than 5 devices to be connected If you add a device to connect disconnect a device you do not use before adding the device A link local address is assigned Perform printer setup again The security key specified for the wireless router may not match that you entered The security key is case sensitive Enter the correct security key The specified SSID is left default value The SSID is not...

Page 290: ...Windows IJ Network Device Setup Utility Starting Up IJ Network Device Setup Utility Diagnosing and Repairing Network Settings Performing Changing Network Settings List of Models Which Does Not Support Diagnosis and Repair Function 290 ...

Page 291: ...ion IJ Network Device Setup Utility repairs the status of the printer and computer Not available for some models Important Depending on the printer you are using an administrator password is already specified for the printer at the time of purchase When you change the network settings authentication by the administrator password is required For details Administrator Password For improving security...

Page 292: ...en select the Search charm and search for IJ Network Device Setup Utility In Windows 7 or Windows Vista click Start and select All Programs Canon Utilities IJ Network Device Setup Utility and then IJ Network Device Setup Utility When you start up IJ Network Device Setup Utility a message appears Check the message and select Yes The screen below appears Select Diagnose and Repair or Printer Network...

Page 293: ...on Follow the procedure below 1 Start up IJ Network Device Setup Utility 2 Check the displayed message and select Yes 3 Select Diagnose and Repair on the displayed screen Perform operations following the instructions on the screen Note This function checks the following items whether the computer is connected to the router whether a web page on the Internet can be viewed whether the printer can be...

Page 294: ...Performing Changing Network Settings Canon IJ Network Device Setup Utility Screen Performing Network Settings 294 ...

Page 295: ...of detected printer The icon below appears on the left if the printer cannot be used Appears when the printer requires setup or has not been configured Appears when the IP address is duplicated to another printer Appears when you cannot communicate with the printer Note If a printer you want to use is not detected try to set the criteria for printer search Setting Criteria for Printer Search Searc...

Page 296: ... Note If USB is selected from the pulldown menu on the toolbar is displayed E Location Displays the printer location if it is registered Nothing is displayed if the printer status is Requires Setup Note If USB is selected from the pulldown menu on the toolbar nothing is displayed Assigning Printer Information F Connection Method Displays printer connection method wired LAN Wi Fi or USB Note If USB...

Page 297: ...ldown menu on the toolbar nothing is displayed The printer with Requires Setup displayed on Status is not displayed Assigning Printer Information J IPv6 On appears when an IPv6 address is assigned for the printer Note If USB is selected from the pulldown menu on the toolbar is displayed K Displays the printer status and operation guides Selecting a printer from the printer list displays its curren...

Page 298: ...ects printers Note This item has the same function as Update in the View menu C Stops detecting printers Note This item has the same function as Cancel in the View menu D Switches the printer list IPv4 IPv6 or USB printers Note This item has the same function as Switch View in the View menu You can also display the USB connected printer list Not available for some models In this case select USB E ...

Page 299: ...Performing Network Settings Performing Changing Wired LAN Connection Ethernet Cable Settings Performing Changing Wi Fi Settings Assigning Printer Information 299 ...

Page 300: ...he printer with Wired LAN displayed on Connection Method and Available displayed on Status to perform settings You can perform settings for a printer with Available not displayed on Status via USB connection To perform setup for a USB connected printer select USB from the pulldown menu on the toolbar and select the printer to perform change settings 5 Select Network Settings on Printer Settings me...

Page 301: ...use an IP address automatically assigned by a DHCP server DHCP server functionality must be enabled on your router C Use next IP address Select this option if no DHCP server functionality is available in your setup where you use the printer or you want to use a fixed IP address Enter the IP address subnet mask and default gateway IPv6 settings Note If USB is selected from the pulldown menu on the ...

Page 302: ...are using C Use Manual Address Select this option if no DHCP server functionality is available in your setup where you use the printer or you want to use a fixed IP address Enter the IP address and IP address prefix length Note This setting item is not available depending on the printer you are using D Use DHCPv6 Select when you obtain an IP address using DHCPv6 Note This setting item is not avail...

Page 303: ...3 Select Printer Network Setup on the displayed screen Detected printers are listed 4 Select printer to perform change settings from printer list Select the printer with Wi Fi displayed on Connection Method and Available or Requires Setup displayed on Status to perform settings You can perform settings for a printer with Available or Requires Setup not displayed on Status via USB connection To per...

Page 304: ...Fi with a wireless router Direct Connects the printer to wireless communication devices smartphone or tablet without a wireless router Note If Direct is selected all items are displayed in a gray out status and you cannot perform any settings In addition you cannot connect to Internet from your computer depending on your operating environment B Network Name SSID The network name SSID of the Wi Fi ...

Page 305: ...used over the Wi Fi IPv4 settings Note The setting items below are available only when Infrastructure is selected for Network Type If Direct is selected all items are displayed in a gray out status and you cannot perform any settings A Use IPv4 address Always selected displayed in a gray out state B Get IP address automatically Select this option to use an IP address automatically assigned by a DH...

Page 306: ...6 environment B Use Stateless Address Select when you use an IP address assigned automatically Use a router compatible with IPv6 Note This setting item is not available depending on the printer you are using C Use Manual Address Select this option if no DHCP server functionality is available in your setup where you use the printer or you want to use a fixed IP address Enter the IP address and IP a...

Page 307: ...Note This setting item is not available depending on the printer you are using 8 Click Set 307 ...

Page 308: ... Yes 3 Select Printer Network Setup on the displayed screen Detected printers are listed 4 Select printer to assign location name and device name Select the printer with Available displayed on Status 5 Select Detailed Printer Settings on Printer Settings menu The Confirm Printer Password screen appears For more on the password refer to Administrator Password 6 Enter password and click OK The Detai...

Page 309: ... screen Detected printers are listed 4 Select printer to initialize settings Select the printer with Available displayed on Status 5 Select Reset LAN settings on Printer Settings menu The Confirm Printer Password screen appears For more on the password refer to Administrator Password 6 Enter password and click OK 7 Click Yes on the displayed screen 8 Click OK on the displayed screen The printer ne...

Page 310: ...e displayed screen Detected printers are listed 4 Select printer to change password Select the printer with Available displayed on Status 5 Select Change Password on Printer Settings menu The Change Printer Password screen appears For more on the password refer to Administrator Password 6 Enter current password and new password 7 Enter new password in Confirm again 8 Click OK The administrator pas...

Page 311: ... search again Setting Criteria for Printer Search Searching Specific Printer Setting Criteria for Printer Search 1 Start up IJ Network Device Setup Utility 2 Check the displayed message and select Yes 3 Select Printer Network Setup on the displayed screen Detected printers are listed 4 Select Search Settings on Option menu The Search Settings screen appears 5 Enter criteria for printer search A Se...

Page 312: ...n Option menu The Specified Searching screen appears 5 Select item to specify and enter value A IPv4 Address Specifies the IPv4 address of the printer you want to search B IPv6 Address Specifies the IPv6 address of the printer you want to search C Host Name Specifies the host name of the printer you want to search 6 Click Search IJ Network Device Setup Utility starts searching by the specified cri...

Page 313: ...d differ depending on the combination of the key length and key format Key Length 64bit 128bit Key Format ASCII 5 characters 13 characters Hexadecimal Hex 10 digits 26 digits B Key Length Select either 64bit or 128bit C Key Format Select either ASCII or Hex D Key ID Select the Key ID index set to the wireless router 2 Click Set Important If the printer cannot communicate with the computer after th...

Page 314: ...password should be a string of 8 to 63 alphanumeric characters or a 64 digit hexadecimal value If you do not know the wireless router password refer to the instruction manual provided with the wireless router or contact its manufacturer 2 Click Set Important If the printer cannot communicate with the computer after the encryption type of the printer was switched make sure encryption types for the ...

Page 315: ...Status Checking Wi Fi Network Status Displaying Computer Network Information Displaying Printer Network Information Checking Connection Status between Printer and Wireless Router Checking Network Setting Difference 315 ...

Page 316: ...etected printers are listed 4 Select printer to check wireless network status from printer list Select the printer with Available displayed on Status 5 Select Check Wireless Communication Status on View menu The Confirm Printer Password screen appears For more on the password refer to Administrator Password 6 Enter password and click OK If the printer is connected to the computer with a wireless r...

Page 317: ...7 Click OK to close screen 317 ...

Page 318: ... to and on which IJ Network Device Setup Utility is installed 1 Start up IJ Network Device Setup Utility 2 Check the displayed message and select Yes 3 Select Printer Network Setup on the displayed screen Detected printers are listed 4 Select Computer Network Information on View menu The screen below appears Clicking Copy Info copies all network information on the clipboard 5 Click OK to close scr...

Page 319: ... Detected printers are listed 4 Select printer to display network information from printer list Select the printer with Available displayed on Status 5 Select Printer Network Information on View menu The Confirm Printer Password screen appears For more on the password refer to Administrator Password 6 Enter password and click OK The screen below appears Clicking Copy Info copies all network inform...

Page 320: ...es 3 Select Printer Network Setup on the displayed screen Detected printers are listed 4 Select printer to check connection status between printer and wireless router from printer list Select the printer with Available displayed on Status and Wi Fi displayed on Connection Method 5 Select Connection Status of Printer and Wireless Router on View menu The Confirm Printer Password screen appears For m...

Page 321: ...4 Select printer with Unknown or Not Set displayed on Status from printer list 5 Select Check Connection Status on View menu The screen below appears If the network status when you used the printer is different from the current status Mismatch appears on Status and the items are displayed in red Check the red items 6 Click OK to close screen Performing Network Settings via USB Connection When the ...

Page 322: ...onnect the printer to perform setup to the computer using a USB cable Make sure the printer is turned on 2 Click Yes on displayed screen The detected printers are listed 3 Select printer to perform setup from the printer list Perform setup following the on screen instructions 322 ...

Page 323: ...IJ Network Device Setup Utility Menus Printer Settings Menu View Menu Option Menu Help Menu 323 ...

Page 324: ...Printer Information C Reset LAN settings Initializes the printer LAN settings Initializing Network Settings D Change Password Changes the password specified for the printer Change Administrator Password E Set up device by using web browser Check the printer information or perform settings in detail on the web page Note You can use this function on the following the OS and the web browser OS Window...

Page 325: ...Fi communication status Checking Wi Fi Network Status Note Right clicking a printer on the Canon IJ Network Device Setup Utility screen also displays this item C Computer Network Information Check the computer network information Displaying Computer Network Information D Printer Network Information Check the printer network information Displaying Printer Network Information E Connection Status of ...

Page 326: ...Setup Utility screen also displays this item G Delete from List Deletes the selected printer from the printer list temporarily Selecting Update will detect the deleted printer if it exists on the network H Cancel Cancels printer search Note You can also cancel printer search by clicking the icon I Update Searches printers again Note You can also search printers again by clicking the icon 326 ...

Page 327: ... the items displayed on the Option menu A Search Settings Specifies criteria for printer search Setting Criteria for Printer Search B Specified Searching Searches the printer by an IP address or host name Searching Specific Printer 327 ...

Page 328: ...caution message for Wi Fi connection C Changing Wired LAN Wi Fi Connections Displays the message on changing LAN connection method wired or wireless for the selected printer Note This item is displayed in a gray out status if USB is selected from the pulldown menu on the toolbar D About Displays IJ Network Device Setup Utility version information 328 ...

Page 329: ...nction of IJ Network Device Setup Utility G4000 series PRO 500 series PRO 1000 series MB2100 series MB2700 series MB5100 series MB5400 series iB4000 series PRO 520 PRO 540 PRO 540S PRO 560 PRO 560S PRO 2000 PRO 4000 PRO 4000S PRO 6000 PRO 6000S TS9000 series TS8000 series TS6000 series TS5000 series MG3000 series E470 series 329 ...

Page 330: ...Other Network Information Technical Terms Restrictions Firewall List of Devices Which May Interfere with Wi Fi Communication 330 ...

Page 331: ...r does not support ad hoc communication Admin Password Administrator password in IJ Network Device Setup Utility to restrict access to network users It must be entered to access the printer and change printer settings AES An encryption method It is optional for WPA Strong cryptographic algorithm adopted within U S government organizations for information processing Authentication Method The method...

Page 332: ...lay device to connect to another network such as a router or a computer Default router address A default IP address set for a router DHCP server functionality The router assigns an IP address automatically whenever the printer or the personal computer on a network starts up DHCPv6 A protocol to assign necessary information automatically when a computer connects to network DHCPv6 can be used when I...

Page 333: ...ing two or more antennas simultaneously or obtaining a bigger transfer rate than before by using multiple communication channels at the same time the transmission speed may be influenced by the connected apparatus At the maximum transfer rate of 600 Mbps it is possible to communicate with multiple computer terminals within a dozen or so metre radius Compatible with 802 11b and 802 11g Infrastructu...

Page 334: ...automatically from a specific prefix information of current network fe80 and an interface identifier generated from printer s MAC address Link Quality The status of the connection between the wireless router and the printer excluding noise interference is indicated with a value from 0 to 100 LPR A platform independent printing protocol used in TCP IP networks It does not support bidirectional comm...

Page 335: ...ame network name SSID distinguishes one Wi Fi from another to prevent interference The printer and all clients on a Wi Fi must use the same network name SSID in order to communicate with each other The network name SSID can be up to 32 characters long and is made up of alphanumeric characters The network name SSID may also be referred to by its network name Stealth In the stealth mode a wireless r...

Page 336: ...yption protocol employed by WPA WPA2 U USB Serial interface designed to enable you to hot swap devices i e by plugging and unplugging them without turning off the power W WCN Windows Connect Now Users running Windows Vista or later can obtain the setting information directly via wireless network WCN NET WEP WEP Key An encryption method employed by IEEE 802 11 Shared security key used to encrypt an...

Page 337: ...o require an authentication server This printer supports WPA PSK Passphrase This encrypted key is used to perform WPA PSK authentication The password should be a string of 8 to 63 alphanumeric characters or a 64 digit hexadecimal value WPA2 Security framework released by the Wi Fi Alliance in September 2004 as a later version of WPA Provides a stronger encryption mechanism through Advanced Encrypt...

Page 338: ...Push button configuration PBC an actual push button on the hardware or through a simulated push button in the software 338 ...

Page 339: ...f security Wireless communication with a product that does not comply with the Wi Fi standard cannot be guaranteed Connecting with too many computers may affect the printer performance such as printing speed If you use a printer with Wireless Direct you cannot perform the following settings Specifying an IP address manually Enabling disabling IPv6 339 ...

Page 340: ...the security software or operation system Important If you disabled the firewall function disconnect your network from the Internet Some applications like the network configuration software override firewall settings Check the application s settings beforehand If the printer you use is set to Get IP address automatically the IP address changes every time the printer connects to the network This ma...

Page 341: ...eless router Radio frequency interference may cause sending print jobs or printing speed to slow down Microwave oven Baby monitor Wireless mouse Wireless keyboard Wireless earphone headphones Wireless camera e g security camera We recommend you take measures below to avoid radio frequency interference Place the devices above as far away from the printer or wireless router as possible Turn the devi...

Page 342: ...inted from multiple computers that share a single printer Setting Up a Shared Printer This section describes how to set up the print server and the client Note The Windows versions of the computers connected to the network do not necessarily have to be the same Related Topic Restrictions on Printer Sharing 342 ...

Page 343: ...played File menu select Printer properties Sharing tab Important When starting up the software and performing install or uninstall a confirmation or warning dialog box may appear This dialog box appears when administrative rights are required to perform a task When you are logged on to an administrator account click Yes or Continue Allow to continue Some applications require an administrator accou...

Page 344: ...e used and click Next Note If an error message is displayed select the other printer 9 Click Finish The setup on the print server system is complete Next set up the client systems 6 On the client open Explorer and double click the icon of the printer to be shared 7 Follow the window instructions and install the printer driver The setup on the client system is complete Even when you perform the set...

Page 345: ...elect the printer from Printers and click Print server properties on the command bar Uncheck Show informational notifications for network printers on the Advanced tab and then restart the computer If you are using Windows 7 or Windows Server 2008 R2 In the Devices and Printers window of the client system select the printer from Printers and Faxes and click Print server properties on the command ba...

Page 346: ...ver installed on the print server is also installed on the client the network printer icon may be created automatically If an error occurs when you print a document on a shared printer from a client the error message of the Canon IJ status monitor is displayed on both the client and the print server If a document is printed out normally the Canon IJ status monitor is displayed only on the client 3...

Page 347: ...ect a smartphone or tablet to printer via a wireless router Connecting Smartphone Tablet to Printer via Wireless Router To connect a smartphone or tablet to printer without a wireless router Connecting Smartphone Tablet to Printer Directly Wireless Direct 347 ...

Page 348: ...s Enabled 2 Connect Smartphones and Tablets to the Printer Important Check the usage restrictions and change the printer LAN setting Restrictions The administrator password is required to change settings if it is enabled for changing settings using the operation panel Confirm the Printer s Wi Fi Connection is Enabled If a different network icon is displayed on the HOME screen follow the procedure ...

Page 349: ...device 2 Enable Wi Fi 3 Select wireless router SSID you use from detected device list 4 Enter wireless LAN router password Your device is connected to the printer 5 Start printing from application For iOS device 1 Open Settings menu on your device 2 Enable Wi Fi 3 Select wireless router SSID you use from detected device list 349 ...

Page 350: ...4 Enter wireless LAN router password Your device is connected to the printer 5 Start printing from application 350 ...

Page 351: ...stments for Better Print Quality Adjusting the Print Head Adjusting the Print Head Troubleshooting Paper Abrasion and Blurry Images Adjusting Feed Amount Adjusting Feed Amount Adjusting Vacuum Strength 351 ...

Page 352: ...Adjusting the Print Head Adjusting the Print Head Troubleshooting Paper Abrasion and Blurry Images 352 ...

Page 353: ...e after replacing the print head After executing Print head angle adjustment adjust the print head position Adjusting Line Misalignment If printed vertical lines are warped or colors are out of alignment execute Print head alignment in the touch screen menu to adjust the print head position First execute Auto standard of Print head alignment If the print result is not improved execute Auto fine or...

Page 354: ...er during printing or maintenance operations will cause the printer to stop Paper to Prepare When using rolls An unused roll at least 10 00 inches 254 0 mm wide When using sheets One sheet of unused paper of at least A4 Letter size Perform adjustment as follows 1 Load paper Loading Rolls on the Roll Holder Loading Rolls in the Printer Loading Sheets in the Printer Important Always make sure the lo...

Page 355: ...6 Align the angle adjustment lever with the red square and close the top cover A test pattern is printed for adjustment Important Do not touch the linear scale A or carriage shaft B Touching these may cause malfunction 355 ...

Page 356: ...e angle adjustment lever to match number or square of straightest set of lines If no single set of lines is perfectly straight move the angle adjustment lever to a position between the numbers or between the number and the square of the two sets of lines that are least misaligned 9 Close the top cover The print head is now straight and adjustment is complete 356 ...

Page 357: ...with Tracing Paper Translucent Matte Film or Clear Film When using cut sheets do not move the release lever until instructions guidance for removing the paper are displayed Moving the release lever during printing or maintenance operations will cause the printer to stop Note After print head replacement execute Print head alignment When Print pattern after new head is set to ON print head position...

Page 358: ...mpleted correctly unless the loaded paper matches the settings 2 Tap Setup Maintenance on HOME screen Touch Screen The Maintenance screen appears 3 Tap Print head alignment 4 Tap Auto standard or Auto fine A confirmation message appears 5 Tap Yes The paper source setting screen appears 6 Tap Roll paper or Manual A test pattern is printed for adjustment Note If you are printing on sheets smaller th...

Page 359: ...g When using cut sheets do not move the release lever until instructions guidance for removing the paper are displayed Moving the release lever during printing or maintenance operations will cause the printer to stop Paper to Prepare When using rolls An unused roll at least 10 00 inches 254 0 mm wide When using sheets Four sheets of unused paper A4 Letter size or larger or two sheets when using A2...

Page 360: ...D 1 8 Examine adjustment test pattern D 1 and determine the number with straight lines A Example with straight lines B Example with misaligned lines Note If two patterns seem equally good and you cannot decide which one is better choose an intermediate value For example choose 11 if you cannot decide whether pattern 10 or 12 is better 9 Repeat steps 7 8 to specify adjustment value for D 2 to D 41 ...

Page 361: ...Paper rubbing against or becoming caught on the print head may jam or result in printed documents that are soiled Note Raise or lower print head depending on nature of the problem Paper rubs against the Print Head The edges of the paper are dirty Image edges are blurred or white banding occurs 1 Tap paper setting display area on HOME screen Touch Screen The Paper menu screen appears 2 Tap Paper se...

Page 362: ... optimal for the ambient temperature and humidity You can check the setting for the previous print job in Values applied with auto settings Printer information When Auto is set to OFF the setting selected during this procedure is applied Depending on the type of paper some setting values may not be available 362 ...

Page 363: ...Adjusting Feed Amount Adjusting Feed Amount Adjusting Vacuum Strength 363 ...

Page 364: ...Adjusting Feed Amount Selecting Feed Amount Adjustment Method Automatic Banding Adjustment Manual Banding Adjustment Fine Tuning Paper Feed Amount Adjusting Line Length 364 ...

Page 365: ... Operations 3 Tap Maintenance 4 Tap Paper feed adjustment 5 Tap Set priority 6 Tap paper to adjust 7 Tap setting Auto Prioritize print quality or Prioritize length accuracy is selected depending on the setting as selected in the printer driver at the time of printing Prioritize print quality Adjusts the feed amount to reduce banding across the sheet in printed documents Adjust print quality settin...

Page 366: ...ustment Method If additional fine tuning is necessary execute Paper feed fine adjustment Fine Tuning Paper Feed Amount Use Adjust feed length to ensure that lines in CAD drawings are printed at exactly the right length Adjusting Line Length This may take some time depending on the type of paper Items to Prepare When Using Rolls An unused roll at least 254 0 mm 10 00 in wide When Using Sheets One s...

Page 367: ...7 Tap paper to adjust A test pattern is printed for adjustment and adjustment is finished 367 ...

Page 368: ...ne Tuning Paper Feed Amount Use Adjust feed length to ensure that lines in CAD drawings are printed at exactly the right length Adjusting Line Length Items to Prepare When Using Rolls An unused roll at least 254 0 mm 10 00 in wide When Using Sheets Two sheets of unused paper of at least A4 Letter size Follow the procedure below to adjust 1 Load paper Loading Rolls on the Roll Holder Loading Rolls ...

Page 369: ... For example choose 11 if you cannot decide whether pattern 10 or 12 is better 9 Tap number you decided Test pattern B is printed for manual adjustment Note If you printed test pattern A on a sheet follow the instructions on the screen and use another sheet of the same type of paper Additionally after test pattern B is printed follow the instructions on the screen and remove the sheet 10 Examine t...

Page 370: ...lity in Set priority in Paper feed adjustment Always execute Adjust print quality before Paper feed fine adjustment Once you execute Adjust print quality the Paper feed fine adjustment value will revert to 0 Automatic Banding Adjustment Manual Banding Adjustment Follow the procedure below to adjust 1 On the HOME screen tap Setup Menu Operations 2 Tap Maintenance 3 Tap Paper feed fine adjustment 4 ...

Page 371: ...ts One sheet of unused paper of at least A4 Letter size High precision ruler Follow the procedure below to adjust 1 Load paper Loading Rolls on the Roll Holder Loading Rolls in the Printer Loading Sheets in the Printer Important Always make sure the loaded paper matches the type of paper specified Adjustment cannot be completed correctly unless the loaded paper matches the settings 2 On the HOME s...

Page 372: ...ead you will measure a document already printed to determine the discrepancy 7 Tap amount of discrepancy If the scale is shorter than the actual size use a positive setting value If it is longer use a negative value The feed amount can be adjusted in 0 02 increments 372 ...

Page 373: ...ting the level of suction against paper on the platen may improve results Important Paper rubbing against or becoming caught on the print head may jam or result in printed documents that are soiled 1 On the HOME screen tap paper information area 2 Tap Paper settings 3 Tap Advanced 4 Tap Transport unit vacuum strength 5 Tap vacuum strength 373 ...

Page 374: ...cing the Maintenance Cartridge Checking the Remaining Maintenance Cartridge Capacity When to Replace the Maintenance Cartridge Cutter Blade Cutter Blade Replacing the Cutter Blade Performing Maintenance Functions from Your Computer Windows Cleaning the Print Heads Printing a Nozzle Check Pattern Performing Maintenance Functions from Your Computer macOS Opening Remote UI for Maintenance Cleaning th...

Page 375: ...Cleaning the Printer Exterior Cleaning Inside the Top Cover Cleaning the Print Head Other Maintenance Preparing to Transfer the Printer Reinstalling the Printer Firmware update 375 ...

Page 376: ...Ink Tanks Ink Tanks Replacing Ink Tanks Checking Ink Tank Levels When to Replace Ink Tanks 376 ...

Page 377: ...130 ml Colors Model number Matte Black PFI 8120 MBK Black PFI 8120 BK Cyan PFI 8120 C Magenta PFI 8120 M Yellow PFI 8120 Y 10 1 fl oz 300 ml Colors Model number Matte Black PFI 8320 MBK Black PFI 8320 BK Cyan PFI 8320 C Magenta PFI 8320 M Yellow PFI 8320 Y 377 ...

Page 378: ...Note For instructions on replacing the ink tanks see Replacing Ink Tanks 378 ...

Page 379: ...vel detection which may damage the printer or cause other problems We recommend using up an ink tank in the course of printing within six months after breaking the seal Printing quality may be affected if you use older ink tanks Do not leave the printer without ink tanks installed for extended periods a month or more Residual ink may become clogged inside the printer and affect printing quality Ho...

Page 380: ...placement procedure appear on the touch screen Removing ink tank 1 Open ink tank cover Important Avoid jarring the printer a lot when replacing an ink tank Handle the printer gently when replacing tanks Jarring the printer during printing may affect printing quality 2 Press tip of ink tank lock lever of color for replacement horizontally and pull ink tank lock lever up to open it 380 ...

Page 381: ...ith ink remaining with the ink holes B facing up Otherwise ink may leak and cause stains Put the removed ink tank in a plastic bag and close the bag Note Dispose of the used ink tank in accordance with local regulations Loading ink tank 1 Before opening the pouch tilt the ink tank to the left and right gently one or two times Agitate the ink in the ink tank by slowly rotating the ink tank upside d...

Page 382: ...ause the ink components to precipitate and may affect printing quality Note If the ink tank is at a low temperature allow it to warm up to room temperature before installing 2 Open the pouch and remove the ink tank Important Never touch the ink holes B or the metal contacts C This may cause stains damage the ink tank and affect printing quality 382 ...

Page 383: ...down and metal contacts in front Important An ink tank cannot be loaded in the holder if the color or orientation is incorrect If the ink tank does not fit in the holder do not force it into the holder Reinstall while checking the label color display ink tank color and ink tank orientation 4 Push the ink tank lock lever closed until it clicks into place 383 ...

Page 384: ...he holder may damage the printer If a 4 4 fl oz 130 ml ink tank is installed facing the wrong direction the rotating part of the ink tank lock lever come out of place If this happens open the ink tank lock lever to return it to the proper position 5 Close ink tank cover 384 ...

Page 385: ...n ink runs out will appear See the figure below If the touch screen indicates to replace the ink tank replace the ink tank If a message is displayed indicating to check the remaining ink levels or after tasks that consume a lot of ink such as large format printing or head cleaning check the remaining levels and replace ink tank as needed Replacing Ink Tanks Note Tap Order ink now to view the ink s...

Page 386: ...ing Ink Tank Levels Before print jobs and maintenance that consume a lot of ink If little ink is left there may not be enough for large format printing head cleaning and maintenance which require a lot of ink Replace or prepare to replace the ink tanks in the following situations If message for ink replacement appears on touch screen When the ink runs out the Status lamp flashes orange a message r...

Page 387: ...Print Head Print Head Checking for Nozzle Clogging Cleaning the Print Head Replacing the Print Head 387 ...

Page 388: ...Print Head When purchasing check the Model number Model number PF 06 Note For instructions on replacing the print head see Replacing the Print Head 388 ...

Page 389: ...hecked at fixed intervals Auto maintenance settings Paper to Prepare When using rolls An unused roll at least 10 00 inches 254 0 mm wide When using sheets One sheet of unused paper of at least A4 Letter size 1 Load paper Loading Rolls on the Roll Holder Loading Rolls in the Printer Loading Sheets in the Printer 2 Tap Setup Maintenance on HOME screen Touch Screen The Maintenance screen appears 3 Ta...

Page 390: ... some sections of the horizontal lines are faint or incomplete the nozzles for those colors are clogged If horizontal lines are faint or incomplete execute print head cleaning Cleaning the Print Head 390 ...

Page 391: ...f ink Performing this frequently consumes the ink faster Perform this only when needed It takes about 4 minutes Important Do not remove the maintenance cartridge or ink tanks during Cleaning Deep cleaning or System cleaning Ink may leak or an error may occur If printing is not improved after System cleaning the print head may be at the end of its service life Contact your Canon dealer for assistan...

Page 392: ...ance screen appears 2 Tap Print head cleaning 3 Tap Cleaning Deep cleaning or System cleaning 4 Tap ink group to be cleaned All colors Pattern 1 MBK BK Pattern 2 Y M C A confirmation message appears 5 Tap Yes Head cleaning is now executed 6 Print a test pattern to check the nozzles and determine whether cleaning has cleared the nozzles Checking for Nozzle Clogging 392 ...

Page 393: ...eplacement The ink may stain clothing Do not open the print head pouch until immediately before installation After removing the print head from the pouch install it right away If the print head is left as is after the pouch is opened the nozzles may dry out which may affect printing quality How to Replace Print Head Caution When replacing the print head immediately after printing wait a few minute...

Page 394: ...re appear on the touch screen It takes about 1 to 2 minutes for ink to be drawn into the system and remove ink from the print head 4 Open top cover 5 If the print head locking cover and print head lock lever are dirty use a damp cloth that you have wrung out completely to wipe them clean Important Do not touch the linear scale A or carriage shaft B Touching these may cause malfunction 394 ...

Page 395: ... rough textured cloth or similar materials for cleaning so as not to scratch the surface 6 Pull down print head lock lever toward the front while holding its center C with your fingertip 7 Grab grip D and open print head locking cover 395 ...

Page 396: ...tacts of the carriage Furthermore do not allow any dirt or debris to become adhered to the metal contacts of the carriage These may damage the printer Note Dispose of the used print head in accordance with local regulations 9 Take new print head out of its pouch by grabbing grips E 396 ...

Page 397: ...ve protective cap G Important Always carry the print head by holding its right and left grips Never touch nozzle I or metal contacts J This may damage the print head and affect printing quality Never touch the ink holes K This may affect printing quality 397 ...

Page 398: ...a dry cloth If you need to put a print head somewhere temporarily before installation do not set it down with the nozzles and metal contacts facing down If the nozzles or metal contacts are damaged it may affect the printing quality Do not reattach the removed protective part Dispose of these materials in accordance with local regulations 11 Turn ink holes K toward the front and insert print head ...

Page 399: ...13 While holding center part C of print head lock lever lower it toward back 14 Align angle adjustment lever with the red square position 15 Close top cover 399 ...

Page 400: ...s being filled definitely do not remove the ink tank or maintenance cartridge Ink may leak out Note Print head position adjustment is executed when Print pattern after new head is set to ON Follow the instructions on the touch screen to load paper Auto maintenance settings 400 ...

Page 401: ...Maintenance Cartridge Maintenance Cartridge Replacing the Maintenance Cartridge Checking the Remaining Maintenance Cartridge Capacity When to Replace the Maintenance Cartridge 401 ...

Page 402: ...Maintenance Cartridge When purchasing check the Model number Model number MC 31 Note For instructions on replacing the maintenance cartridge see Replacing the Maintenance Cartridge 402 ...

Page 403: ...cing the maintenance cartridge The maintenance cartridge may become damaged or ink may leak out To prevent ink from leaking from a used maintenance cartridge avoid dropping the cartridge or storing it at an angle Otherwise ink may leak and cause stains Ink adheres to the top of the maintenance cartridge after it has been used Handle the maintenance cartridge carefully during replacement The ink ma...

Page 404: ...ge the maintenance cartridge 5 Open maintenance cartridge cover 6 Hold the used maintenance cartridge by the grip B with one hand and put your other hand under the maintenance cartridge to hold it firmly on the bottom keeping it level as you pull it out 404 ...

Page 405: ... maintenance cartridge in supplied plastic bag and store on flat surface 8 Check the top and bottom of the maintenance cartridge place in the box and store the box on a flat surface Important Always put the used maintenance cartridge back in the box and store the box on a flat surface Note Dispose of the used maintenance cartridge in accordance with local regulations 9 Wipe away any soiling on the...

Page 406: ...intenance cartridge level insert it all the way in The maintenance cartridge is initialized Important Do not remove the maintenance cartridge during initialization immediately after replacing the maintenance cartridge The maintenance cartridge may become damaged 11 Close maintenance cartridge cover 406 ...

Page 407: ...ars 2 Tap Maintenance cartridge info The Maintenance cartridge info screen appears If the touch screen indicates to replace the maintenance cartridge replace the maintenance cartridge If a message appears indicating to check the remaining capacity of the maintenance cartridge or before tasks that deplete much of the capacity such as head cleaning or preparations to move the printer check the remai...

Page 408: ...ridge Capacity When the maintenance cartridge capacity is drastically depleted Print head cleaning print head replacement and preparations to transfer the printer deplete much of the maintenance cartridge capacity In particular preparing to move the printer depletes a lot of the capacity Check the remaining maintenance cartridge capacity before this maintenance and replace the maintenance cartridg...

Page 409: ...Cutter Blade Cutter Blade Replacing the Cutter Blade 409 ...

Page 410: ...Cutter Blade When purchasing check the Model number Model number CT 08 Note For instructions on replacing the cutter blade see Replacing the Cutter Blade 410 ...

Page 411: ...essage appears 3 Tap Yes The carriage moves and after it stops moving instructions for the cutter blade replacement procedure appear on the touch screen 4 If cutter blade is dirty use damp cloth that you have wrung out completely to wipe it clean Important Do not use tissue paper paper towels rough textured cloth or similar materials for cleaning so as not to scratch the surface 5 Turn hex screw w...

Page 412: ...ditionally this may damage the printer Do not disassemble the cutter blade Touching the blade may cause injury Note Dispose of the used cutter blade in accordance with local regulations 7 Install new cutter blade while aligning B to C and D to E 8 Turn hex screw until securely fixed 412 ...

Page 413: ...Important After the cutter blade is secured check that the cutter blade does not come off If the cutter blade comes off this may damage the printer 9 Tap Done 10 Tap Yes 413 ...

Page 414: ...Performing Maintenance Functions from Your Computer Windows Cleaning the Print Heads Printing a Nozzle Check Pattern 414 ...

Page 415: ...f printing is faint or a specific color fails to print even though there is enough ink System Cleaning System Cleaning is a more powerful cleaning function Perform System Cleaning if there is no improvement even after repeating Cleaning several times Important System Cleaning consumes an extremely large amount of ink Executing system cleaning frequently will rapidly deplete your printer s ink supp...

Page 416: ...d position Select the feed position from the displayed dialog box 5 Print a nozzle check pattern Make sure that the printer is on and click OK Printing of the nozzle check pattern begins Click OK when the confirmation message appears 6 Check the print result Check the print results A As long as the horizontal lines are in line and not missing the nozzle is working normally B Where the horizontal l...

Page 417: ...Related Topic Cleaning the Print Heads 417 ...

Page 418: ...Cleaning the Printer Cleaning the Printer Exterior Cleaning Inside the Top Cover Cleaning the Print Head 418 ...

Page 419: ...rinter exterior and the power cord plug Warning Never use flammable solvents such as alcohol benzene or thinner If these substances come into contact with electrical components inside the printer there is a risk of fire or electrical shock Important If the output guide is dirty it may soil the edge of the paper when the paper is cut We recommend cleaning the output guide even if it does not appear...

Page 420: ...aten inside the top cover becomes dirty it may soil the underside of paper We recommend cleaning the platen after borderless printing or printing on small paper If the output guide is dirty it may soil the edge of the paper when the paper is cut We recommend cleaning the output guide even if it does not appear dirty because it may actually be covered with paper dust Printing on adhesive paper may ...

Page 421: ...cleaning brush C provided with printer to wipe it away Important Do not touch the linear scale D or carriage shaft E Touching these may cause malfunction Note If the cleaning brush is dirty rinse it in water 6 Using a damp cloth that you have wrung out completely wipe inside the top cover to clean it 421 ...

Page 422: ... inside the printer there is a risk of fire or electrical shock Important Do not use a dry cloth to wipe inside the top cover This may create a static charge which may attract dust and affect the printing quality Do not use tissue paper paper towels rough textured cloth or similar materials for cleaning so as not to scratch the surface Note When cleaning between the platen and ejection guide use a...

Page 423: ...2 Close top cover 423 ...

Page 424: ...Other Maintenance Preparing to Transfer the Printer Reinstalling the Printer Firmware update 424 ...

Page 425: ...idge being used If you can move the printer in a level state using casters or something similar you do not need to execute Prepare to move Always follow the instructions of the service representative when preparing to transfer the printer The following lists transport restrictions by type of transport Move on the same floor Usage Examples Move indoors by carrying Transport and storage in low tempe...

Page 426: ...ant If consumables must be replaced a message appears on the touch screen and preparation is disabled If the message appears tap OK and contact your Canon dealer for assistance 7 Open ink tank cover to remove all ink tanks Replacing Ink Tanks 8 Push all ink tank lock levers closed until they click into place 9 Close ink tank cover Ink is now drawn into the maintenance cartridge A confirmation mess...

Page 427: ...inter If you accidentally unplug the printer plug it in again reinstall the ink tanks and follow this procedure again 2 Tape down printer covers to secure them in the reverse order of tape removal during installation 3 Remove the stand by reversing the installation procedure when it was attached to the printer 4 Disassemble and repackage the stand by following the installation procedure in reverse...

Page 428: ...at least two people on a flat surface Attempting assembly by yourself poses a risk of injury or bending the Stand When assembling the stand lock all four of the casters Attempting to move the stand when the casters are locked poses a risk of injury or damage to the location site Before moving the assembled stand lift the support rod to the position shown A and unlock all four casters Moving the st...

Page 429: ...stall the printer 1 Mount the printer on the assembled stand and tighten the screws firmly Caution Moving the printer requires at least three people Be careful to avoid back strain and other injuries 429 ...

Page 430: ...positions which poses a risk of injury from dropping the printer When placing the printer on the stand lock all four of the casters of the stand Attempting to place the printer on the stand while the casters are not locked poses a risk of injury 2 Remove tape and packaging material attached to the printer 430 ...

Page 431: ...nto the outlet 5 Press ON button to turn on printer When Install the printer here Do not install the ink tanks yet appears tap Yes 6 When instructions for loading ink tank appear on operation panel open ink tank cover and load ink tank 7 Loading Rolls on the roll holder See Loading Rolls on the Roll Holder 431 ...

Page 432: ...ocedure varies depending on the type of connection See Installing the Printer Driver Windows See Installing the Printer Driver macOS Important When the printer is connected to a network via TCP IP the printer s IP address may be changed if you reinstall the printer In this case be sure to reconfigure the printer s IP address 432 ...

Page 433: ...When you use this function make sure the printer is connected to the Internet Note If the firmware update is not complete check the following and take an appropriate action Check the network settings such as a wireless router If Cannot connect to the server is displayed on the touch screen select OK and try again after a while Check current version You can check the current firmware version Update...

Page 434: ...Specifications Specifications Print Area 434 ...

Page 435: ... x D x H Printer and Stand SD 32 Extended position A Approx 50 8 x 35 x 41 8 inches 1289 x 887 x 1060 mm Printer and Stand SD 32 Extended position B Approx 50 8 x 43 4 x 41 8 inches 1289 x 1100 x 1060 mm For Extended position see Using the Basket Weight Printer and Stand SD 32 without print head and ink tanks Approx 132 lb 60 kg Space for installation W x D x H Printer and Stand SD 32 Approx 66 5 ...

Page 436: ... protocol SNMP Canon MIB compatible HTTP TCP IP IPv4 IPv6 FTP Wired LAN specifications Compliance standards IEEE802 3ab 1000BASE T IEEE802 3u 100BASE TX IEEE802 3 10BASE T Transmission speed 10 Mbps 100 Mbps 1000 Mbps automatically selec ted Wi Fi specifications Compliance standards IEEE802 11n IEEE802 11g IEEE802 11b Frequency range 2 4 GHz Channels 1 11 or 1 13 Varies by country and region Effec...

Page 437: ... output correctly even with the above environmental conditions macOS Compatible Operating System Stand ard supplied printer driver OS X 10 10 5 OS X 10 11 macOS 10 12 macOS 10 13 Recommended operating environment CPU Intel multi core processor or later Memory 2 GB or more Free hard disk space 20 GB or more Depending on the application software and data being used the printer may not output correct...

Page 438: ...hes 279 4 mm Maximum printable length Rolls 59 feet 18 m Varies depending on the operating system or application Sheets 5 2 feet 1 6 m Thickness Rolls 3 31 mil 0 07 0 8 mm Sheets 3 31 mil 0 07 0 8 mm Roll maximum outer diameter 5 9 inches 150 mm or shorter Supported paper core inner diam eter 2 00 inches 3 00 inches 50 8 mm 76 2 mm Print area For details about Print Area see Print Area 438 ...

Page 439: ...dges Based on the Scenarios macOS Recommended Print Area We recommend printing within this area To match the document size with the actual printing area print on oversize paper with the required margin added Printing to Oversized Paper Sizes Windows Printing to Oversized Paper Sizes macOS Sheets Printable Area A margin of 0 2 inch 3 mm on top 0 5 inch 12 7 mm on bottom and 0 2 inch 3 mm on left an...

Page 440: ...less printing the margins on top bottom left and right are 0 inch 0 mm For paper that supports borderless printing see Paper Information List Recommended Print Area A margin of 0 8 inch 20 mm on top 0 2 inch 3 mm on bottom and 0 2 inch 3 mm on left and right sides is required A Top Edge B Bottom Edge C Left Edge D Right Edge 440 ...

Page 441: ...Safety Safety Precautions Regulatory Information WEEE EU EEA When Repairing Lending or Disposing of the Printer 441 ...

Page 442: ...es at least 3 people holding it on the left right and rear sides Be careful to avoid back strain and other injuries due to the weight of the printer When moving the printer firmly grasp the carrying handles under each side and at the rear side Holding the printer at other positions is dangerous and cause injury and damage if the printer is dropped When using and transferring the printer do not til...

Page 443: ...al parts may be very hot and could cause burns Do not throw ink tanks and maintenance cartridges into fire Do not attempt to disassemble or modify the print head ink tanks and maintenance cartridges Avoid dropping or shaking print head ink tanks and maintenance cartridges 443 ...

Page 444: ...o correct the interference by one or more of the following measures Reorient or relocate the receiving antenna Increase the separation between the equipment and receiver Connect the equipment into an outlet on a circuit different from that to which the receiver is connected Consult the dealer or an experienced radio TV technician for help Use of a shielded cable is required to comply with Class B ...

Page 445: ...Interference Do not use the printer around medical equipment or other electronic devices Signals from the printer may interfere with the correct operation of these devices 445 ...

Page 446: ...ür Europäische Union und EWR Norwegen Island und Liechtenstein Diese Symbole weisen darauf hin dass dieses Produkt gemäß WEEE Richtlinie 2012 19 EU Richtlinie über Elektro und Elektronik Altgeräte Batterien Richtlinie 2006 66 EG und nationalen Gesetzen zur Umsetzung dieser Richtlinien nicht über den Hausmüll entsorgt werden darf Falls sich unter dem oben abgebildeten Symbol ein chemisches Symbol b...

Page 447: ...ions sur le recyclage de ce produit contactez vos services municipaux votre éco organisme ou les autorités locales compétentes ou consultez le site www canon europe com weee ou www canon europe com battery Uitsluitend bestemd voor de Europese Unie en EER Noorwegen IJsland en Liechtenstein Met deze symbolen wordt aangegeven dat dit product in overeenstemming met de AEEA richtlijn 2012 19 EU de rich...

Page 448: ...biental de su desecho y no es necesario mostrar la cuantía de dicho coste en la información y la factura suministradas a los usuarios finales Si desea más información sobre el reciclado de este producto póngase en contacto con su municipio el servicio o el organismo encargado de la gestión de residuos domésticos o visite www canon europe com weee o www canon europe com battery Només per a la Unió ...

Page 449: ...ti può avere conseguenze negative sull ambiente e sulla salute umana a causa delle sostanze potenzialmente nocive solitamente contenute in tali rifiuti La collaborazione dell utente per il corretto smaltimento di questo prodotto contribuirà a un utilizzo efficace delle risorse naturali ed eviterà di incorrere in sanzioni amministrative ai sensi dell art 255 e successivi del Decreto Legislativo n 1...

Page 450: ...bred på grund af de potentielt sundhedsskadelige stoffer der generelt kan forefindes i elektrisk og elektronisk udstyr Når du foretager korrekt bortskaffelse af produktet bidrager du til effektiv brug af naturressourcerne Kontakt din kommune den lokale affaldsmyndighed det lokale affaldsanlæg eller besøg www canon europe com weee eller www canon europe com battery for at få flere oplysninger om ge...

Page 451: ...fer som ofte brukes i EE utstyr Din innsats for korrekt avhending av produktet vil bidra til effektiv bruk av naturressurser Du kan få mer informasjon om resirkulering av dette produktet ved å kontakte lokale myndigheter avfallsadministrasjonen et godkjent program eller husholdningens renovasjonsselskap eller gå til www canon europe com weee eller www canon europe com battery Vain Euroopan unionin...

Page 452: ...tering eller se www canon europe com weee eller www canon europe com battery Pouze Evropská unie a EHP Norsko Island a Lichtenštejnsko Tento symbol znamená že podle směrnice OEEZ 2012 19 EU směrnice o bateriích 2006 66 ES a nebo podle vnitrostátních právních prováděcích předpisů k těmto směrnicím nemá být tento výrobek likvidován s odpadem z domácností Je li v souladu s požadavky směrnice o bateri...

Page 453: ...letően informálódjon a helyi polgármesteri hivatalnál a helyi közterület fenntartó vállalatnál a hivatalos hulladéklerakó telephelyen vagy a háztartási hulladék begyűjtését végző szolgáltatónál illetve látogasson el a www canon europe com weee vagy www canon europe com battery internetes oldalra Tylko dla krajów Unii Europejskiej oraz EOG Norwegia Islandia i Liechtenstein Te symbole oznaczają że p...

Page 454: ...es Euroopa Liit ja EMP Norra Island ja Liechtenstein Antud sümbolid viitavad sellele et vastavalt elektri ja elektroonikaseadmete jäätmeid käsitlevale direktiivile 2012 19 EL patareisid ja akusid ning patarei ja akujäätmeid käsitlevale direktiivile 2006 66 EÜ ja või nimetatud direktiive rakendavatele riiklikele õigusaktidele ei või seda toodet koos olmejäätmetega ära visata Kui keemiline sümbol on...

Page 455: ... dienestu pilnvaroto organizāciju vai iestādi kas veic sadzīves atkritumu apsaimniekošanu vai apmeklējiet tīmekļa vietni www canon europe com weee vai www canon europe com battery Tik Europos Sąjungai ir EEE Norvegijai Islandijai ir Lichtenšteinui Šie simboliai reiškia kad šio gaminio negalima išmesti į buitines atliekas kaip reikalaujama WEEE Direktyvoje 2012 19 ES ir Baterijų direktyvoje 2006 66...

Page 456: ...on europe com battery Само за Европейския съюз и ЕИП Норвегия Исландия и Лихтенщайн Тези символи показват че този продукт не трябва да се изхвърля заедно с битовите отпадъци съгласно Директивата за ИУЕЕО 2012 19 ЕC Директивата за батерии 2006 66 ЕО и или Вашето национално законодателство прилагащо тези Директиви Ако под показания горе символ е отпечатан символ за химически елемент съгласно разпоре...

Page 457: ...la www canon europe com weee sau www canon europe com battery Samo za Europsku uniju i EEA Norveška Island i Lihtenštajn Oznaka pokazuje da se ovaj proizvod ne smije odlagati s komunalnim i ostalim vrstama otpada u skladu s direktivom WEEE 2012 19 EC Direktivom o baterijama 2006 66 EC i Pravilnikom o gospodarenju otpadnim baterijama i akumulatorima te Pravilnikom o gospodarenju otpadnim električni...

Page 458: ...ikupljanje npr po principu jedan za jedan kada kupujete sličan novi proizvod ili ovlašćenom centru za prikupljanje za reciklažu istrošene električne i elektronske opreme EEE baterija i akumulatora Nepravilno rukovanje ovom vrstom otpada može imati negativne posledice po životnu sredinu i ljudsko zdravlje usled potencijalno opasnih materijala koji se uglavnom vezuju za EEE Vaša saradnja na ispravno...

Page 459: ...steps below in order to delete such information and prevent third parties from accessing it Initializing network settings Setup Device settings LAN settings Wi Fi Wireless Direct Wired LAN Settings Advanced Reset LAN settings Yes Initializing SSL information Setup Device settings LAN settings Wi Fi Wireless Direct Wired LAN Settings Advanced Reset SSL certificates Yes Deleting the administrator pa...

Page 460: ...e screenshots used in this manual are the screens that appear when the operating system Windows 10 is used For macOS The screenshots used in this manual are the screens that appear when the operating system macOS High Sierra 10 13 is used 460 ...

Page 461: ...Basic Printing Workflow Printing procedure Canceling print jobs Pausing Printing 461 ...

Page 462: ...Printing procedure Printing Options Using Rolls and Sheets Turning the Printer On and Off Loading and Printing on Rolls Loading and Printing on Sheets Printing in Windows Printing from macOS 462 ...

Page 463: ...s Microsoft Office applications See Printing Hanging and Horizontal Banners Large Format Printing Windows See Printing Hanging and Horizontal Banners Large Format Printing macOS Borderless printing Print without a margin border around posters or photos See Printing without Edges Based on the Scenarios Windows See Printing without Edges Based on the Scenarios macOS Banner printing You can print mul...

Page 464: ...ts of paper Insert the sheet between the platen and the paper retainer Enlarged reduced printing You can freely adjust the size of originals by enlarging or reducing originals before printing See Scaled Printing Windows See Scaled Printing macOS imagePROGRAF Free Layout Windows imagePROGRAF Free Layout macOS and Canon Free Layout plus Windows Print multiple documents from multiple applications suc...

Page 465: ...operation panel and then Starting the system Please wait momentarily appears When startup is finished the printer enters standby mode The printer will not enter standby mode in the following situations Take action as necessary The top cover is open Close the top cover The ink tank cover is open Close the ink tank cover The print head is not installed Replacing the Print Head 465 ...

Page 466: ...unplug it during a print job This may damage the printer 1 Make sure no print jobs are in progress While the Status lamp is flashing the printer is running The color of the lamp indicates the following states If the Status lamp is flashing orange check the message on the operation panel and take action as necessary If the Status lamp is flashing white the printer is printing receiving data etc Tur...

Page 467: ... before cutting the roll set Drying Time in the printer driver See Specifying the Ink Drying Time for Rolls Once you have used all the paper on a roll clean the platen If the platen inside the top cover becomes dirty it may soil the underside of paper See Cleaning Inside the Top Cover 1 Turn the printer on See Turning the Printer On and Off 2 Load a roll on the roll holder See Loading Rolls on the...

Page 468: ...ave set Manage remaining roll amount to Barcodes specify the roll length after selecting the media type See Specifying the Paper Length 5 Complete settings in the printer driver for the type of paper and other details How to Open the Printer Driver Setup Window Windows How to Open the Printer Driver Setup Dialog macOS 468 ...

Page 469: ...6 Send the print job Printing in Windows Printing from macOS Start printing Important Do not move the release lever during printing 469 ...

Page 470: ...r Information List Borderless printing is not supported on sheets For the features and the main printing methods available for sheet printing see Printing Options Using Rolls and Sheets 1 Turn the printer on See Turning the Printer On and Off 2 Complete settings in the printer driver for the type of paper and other details How to Open the Printer Driver Setup Window Windows How to Open the Printer...

Page 471: ...rom macOS 4 Load the sheet See Loading Sheets in the Printer Start printing Important Do not move the release lever until instructions guidance for removing the paper are displayed Moving the release lever during printing will cause printing to stop 471 ...

Page 472: ...tions 2 After confirming that the printer is selected in the dialog box click Print or OK to start printing Note The appearance of the dialog box varies depending on the software application In most cases the dialog box includes basic printing options and enables you to choose the printer specify the range of pages number of copies and so on Example Print dialog box displayed by the application If...

Page 473: ... for enlarged or reduced printing and borderless printing You can open the printer driver dialog box from the application software or from the operating system menu For details see How to Open the Printer Driver Setup Window Windows or How to Open the Printer Driver Setup Dialog macOS 473 ...

Page 474: ...in System Preferences before printing For instructions on registering printers see Sharing the Printer on a Network macOS Important During this setup process the printer will not be listed among available printers if it is off or disconnected Printing from the application software 1 In the application software select Print from the File menu to display the dialog box for printing conditions Note T...

Page 475: ...wn in the following illustration you can switch to other panes in this dialog box to complete settings for various methods of printing including enlarged and reduced printing borderless printing and so on 475 ...

Page 476: ...Canceling print jobs Canceling Print Jobs from the Operation Panel Canceling Print Jobs from Windows Canceling Print Jobs from macOS 476 ...

Page 477: ...e printer operation varies depending on the current status You press the Stop button before printing starts Pressing the Stop button before printing starts displays a confirmation message To cancel the print job select Yes You press the Stop button during printing Pressing the Stop button during printing displays a confirmation message To cancel the print job immediately select Yes 477 ...

Page 478: ... to display the printer window Note You can proceed from the folder for configuring the printer settings in the OS you are using For example in Windows 7 open the Devices and Printers window from the start menu and double click the printer icon 2 Right click the job to cancel and select Cancel 3 If job to be canceled is not shown in printer window that is if print data has already been received by...

Page 479: ...Note The screen may differ slightly depending on the model you are using 479 ...

Page 480: ...n in the Dock to display the printer window 2 Either click for the job to cancel printing or select the job to cancel printing and then click Delete to delete the job Note If the job to be canceled is not shown in the printer window that is if the print data has already been received by the printer you can cancel printing from the operation panel on the printer or from RemoteUI For details Canceli...

Page 481: ...Pausing Printing Pausing Printing 481 ...

Page 482: ...restore normal operation after pausing printing set Pause printing to Disable Note In the following cases the status is cleared even if you do not set Pause printing to Disable and printing from the job queue resumes When paper is advanced If you changed the media type from the paper settings display area 1 Tap Jobs on Home screen during printing Note If the Home screen does not appear press the H...

Page 483: ...ity and Correcting Image Data Adjusting Color Balance Setting the Print Quality Level Custom Printing a Color Document in Monochrome Specifying Color Correction Optimal Photo Printing of Image Data Adjusting Colors with the Printer Driver Printing with ICC Profiles Adjusting Brightness Adjusting Contrast Printing Using Detailed Setting Mode Scaled Printing Printing to Oversized Paper Sizes Setting...

Page 484: ...s Saving Roll Paper by Eliminating Upper and Lower Margins on Document Switching the Paper Source to Match the Purpose Displaying the Print Results before Printing Other Convenient Settings Stamp Printing Registering a Stamp Setting a Page Size and Orientation Registering a Frequently Used Printing Profile Cutting Roll Paper after Printing Printing from Computer macOS Printing with Easy Setup Basi...

Page 485: ...idth Printing Full Size without Margins Printing Hanging and Horizontal Banners Large Format Printing Printing by Dividing Joining Documents Lining Up and Printing Multiple Documents Printing by Connecting Multiple Pages Printing Multiple Pages All on One Page Printing Document in Center of Paper Printing by Saving Roll Paper Saving Roll Paper by Rotating Document 90 Degrees Saving Roll Paper by E...

Page 486: ...Printing from iOS Device AirPrint 486 ...

Page 487: ...Data Scaled Printing Printing to Oversized Paper Sizes Setting Paper Dimensions Custom Size Prints without Edges Based on the Scenarios Printing Hanging and Horizontal Banners Large Format Printing Printing by Dividing Joining Documents Printing Document in Center of Paper Printing by Saving Roll Paper Switching the Paper Source to Match the Purpose Displaying the Print Results before Printing Oth...

Page 488: ...the Media Type list on the Main tab If Auto Use Printer Settings is selected the paper configured in printer settings is printed Important See Paper Information List for Canon authentic paper or Canon output check paper Note Click Get Information to display the Paper Information on Printer dialog box The Paper Information on Printer dialog box allows you to get the paper information from the print...

Page 489: ...setting that matches your purpose from the Print Target list 6 Select the print quality For Print Quality select High Standard or Fast according to your purpose Important The print quality settings that can be selected may differ depending on a printing profile 7 Select the paper size 489 ...

Page 490: ...ent that was created with the application software 8 Select the paper source For Paper Source select the setting that matches your purpose 9 Select roll paper width If you selected a roll paper for Paper Source set Roll Paper Width to the width of the roll paper loaded in the printer 490 ...

Page 491: ...th settings that match your purpose Note If the paper settings in the printer driver differ from the paper information registered on the printer an error message may appear on the printer s operation panel You can execute Print but you may not obtain the correct printing result 491 ...

Page 492: ...ting or select a new paper source The current printer settings appear in Media Type and Roll Width 4 Apply settings To apply the printer settings to the printer driver click OK Note If the media type and the output paper size are not set on the printer OK will be grayed out and cannot be clicked If communication with the printer is disabled the Get Information does not appear or printer media info...

Page 493: ...es and want to print them in groups and uncheck the check box when you want to print them as a group on the same page 4 Complete the setup Click OK When you execute print the specified number of copies will be printed with the specified printing order Important When the application software that you used to create the document has the same function specify the settings on the printer driver Howeve...

Page 494: ...Printing Photos and Business Documents Printing By Setting Print Purpose Edit in PosterArtist and Print 494 ...

Page 495: ...the document The procedure for printing by using a print purpose is as follows 1 Open the printer driver setup window 2 Select the media type Select the type of paper loaded in the printer from the Media Type list on the Main tab If Auto Use Printer Settings is selected the paper configured in printer settings is printed 3 Select print setting mode From the pull down menu select Easy Settings 495 ...

Page 496: ...ct when printing data such as drawings CAD Monochrome Select when printing data such as drawings in monochrome Perspective GIS Select when printing data such as perspectives and GIS Note To check the settings of the items that are set by Print Target click View Settings 5 Select the paper size From the Page Size list on the Page Setup tab select the same size as that of the document that was creat...

Page 497: ...hat matches your purpose Important The paper feed method will differ according to the paper settings 7 Set the other items Set the other items as necessary 8 Complete the setup Click OK When you print the document is printed to match the specified print purpose 497 ...

Page 498: ...t tab and select Edit Using PosterArtist from the pull down menu Note Edit Using PosterArtist may not be available for use depending on the usage environment 3 Start up PosterArtist Click OK When printing is executed PosterArtist starts up and PageCapture window opens 4 Select page to get in PosterArtist 5 Edit page in PosterArtist Image editing and sorting is implemented in PosterArtist By repeat...

Page 499: ...Note For instructions on how to edit and rearrange images refer to the PosterArtist manual 499 ...

Page 500: ...Printing CAD Drawings Printing By Setting Print Purpose Printing from AutoCAD 500 ...

Page 501: ...the document The procedure for printing by using a print purpose is as follows 1 Open the printer driver setup window 2 Select the media type Select the type of paper loaded in the printer from the Media Type list on the Main tab If Auto Use Printer Settings is selected the paper configured in printer settings is printed 3 Select print setting mode From the pull down menu select Easy Settings 501 ...

Page 502: ...ct when printing data such as drawings CAD Monochrome Select when printing data such as drawings in monochrome Perspective GIS Select when printing data such as perspectives and GIS Note To check the settings of the items that are set by Print Target click View Settings 5 Select the paper size From the Page Size list on the Page Setup tab select the same size as that of the document that was creat...

Page 503: ...hat matches your purpose Important The paper feed method will differ according to the paper settings 7 Set the other items Set the other items as necessary 8 Complete the setup Click OK When you print the document is printed to match the specified print purpose 503 ...

Page 504: ...be installed automatically Note Printer Driver Optimization Module for AutoCAD is applied automatically when you print from AutoCAD and optimal printing is performed Confirming the Installation of Printer Driver Optimization Module for AutoCAD You can confirm whether Printer Driver Optimization Module for AutoCAD is installed by the following method 1 From the File menu of AutoCAD select Print The...

Page 505: ...Correcting Image Data Adjusting Color Balance Setting the Print Quality Level Custom Printing a Color Document in Monochrome Specifying Color Correction Adjusting Brightness Adjusting Contrast Printing Using Detailed Setting Mode 505 ...

Page 506: ...significantly Use the printer driver only when you want to adjust the color balance slightly The following sample shows the case when color balance is used to intensify cyan and to diminish yellow so that the overall colors are more uniform No adjustment Adjust color balance The procedure for adjusting color balance is as follows 1 Open the printer driver setup window 2 Select the advanced setting...

Page 507: ...r example when cyan becomes weaker the color red becomes stronger You can also directly enter a value linked to the slider Enter a value in the range from 50 to 50 The current settings are displayed in the settings preview on the left side of the printer driver After adjusting each color click OK 5 Complete the setup Click OK on the Main tab When you execute print the document is printed with the ...

Page 508: ...printer driver setup window 2 Select advanced settings From the Main tab pull down menu select Advanced Settings 3 Select the print quality For Print Quality select Custom The Custom dialog box opens Important If Auto Use Printer Settings is selected for Media Type Custom cannot be selected 4 Setting the print quality level Drag the slider bar to select the print quality level and click OK 508 ...

Page 509: ... the settings of Media Type 5 Complete the setup Click OK on the Main tab When you execute print the image data is printed with the selected print quality level Related Topics Specifying Color Correction Adjusting Color Balance Adjusting Brightness Adjusting Contrast 509 ...

Page 510: ...d settings From the Main tab pull down menu select Advanced Settings 3 Select color mode For Color Mode select Monochrome or Monochrome Bitmap Note The selectable Color Mode depends on the media type selected for Media Type on the Main tab You can select Monochrome Bitmap for Color Mode only if Line Drawing Text is selected in Print Priority 4 Complete the setup 510 ...

Page 511: ...itmap are selected the printer driver processes image data as sRGB data In this case actual colors printed may differ from those in the original image data When using the grayscale printing function to print Adobe RGB data convert the data to sRGB data using an application software Note With Monochrome or Monochrome Bitmap inks other than black ink may be used as well 511 ...

Page 512: ... want to use an application software to specify a printing ICC profile select None The procedure for specifying color correction is as follows 1 Open the printer driver setup window 2 Select advanced settings From the Main tab pull down menu select Advanced Settings 3 Select color mode For Color Mode select Color and then click Color Settings The Color Settings dialog box appears 4 Select color co...

Page 513: ...from an ICM function compatible application None Print without performing color matching on the printer driver Select this when performing color matching using applications such as Adobe Photoshop or printing a color chart using a profile creation tool 5 Complete the setup Click OK on the Main tab When you execute print the document data is printed with the specified color correction Important Whe...

Page 514: ...Related Topics Optimal Photo Printing of Image Data Adjusting Colors with the Printer Driver Printing with ICC Profiles 514 ...

Page 515: ...at called RAW RAW data refers to an image saving format that requires a computer to develop the image You can embed an input ICC profile tag into a RAW file by using special application software Selecting a Printing Method Suited to the Image Data The recommended printing method depends on the color space of the image data or the application software to be used There are two typical printing metho...

Page 516: ...nitor Color temperature D50 5000K Brightness 100 to 120cd m2 Gamma 2 2 Environment light Fluorescent light for D50 color evaluation color temperature 5000K high color rendering properties Brightness when looking at printed materials 500 lx 125 lx Note When printing from an application software that can identify ICC profiles and allows you to specify them use a printing ICC profile in the applicati...

Page 517: ...atures smooth gradation In addition selecting this setting allows you to adjust colors easily using an application software Saturation Poster CAD Reproduces vivid colors on data such as a poster In addition prints in easy to see colors suitable for line drawing 6 Set the other items If necessary click Color Adjustment tab and adjust the color balance Cyan Magenta Yellow and adjust Brightness and C...

Page 518: ...Related Topics Setting the Print Quality Level Custom Specifying Color Correction Adjusting Color Balance Adjusting Brightness Adjusting Contrast 518 ...

Page 519: ...the color space of the input ICC profile specified in the image data To use this printing method use your application software to select color management items and specify an input ICC profile and a printing ICC profile in the image data Even if you print using a printing ICC profile that you created yourself be sure to select color management items from your application software For instructions ...

Page 520: ...up Click OK on the Main tab When you execute print the printer uses the color space of the image data Specify an ICC Profile with the Printer Driver and then Print When you print from application software that cannot identity input ICC profiles or does not allow you to specify one the data color space is printed as sRGB 1 Open the printer driver setup window 2 Select advanced settings From the Mai...

Page 521: ...Color and then click Color Settings The Color Settings dialog box appears 4 Select color correction Click Matching tab and select ICC Profile Matching for Color Correction 5 Select For Input Profile Select the input profile you want to use 521 ...

Page 522: ...0 5000K Brightness 100 to 120cd m2 Gamma 2 2 Environment light Fluorescent light for D50 color evaluation color temperature 5000K high color rendering properties Brightness when looking at printed materials 500 lx 125 lx Saturation Reproduces vivid colors on data such as a poster In addition prints in easy to see colors suitable for line drawing Relative Colorimetric When image data is converted t...

Page 523: ...t Brightness and Contrast settings and then click OK 9 Complete the setup Click OK on the Main tab When you execute print the printer uses the color space of the image data Related Topics Setting the Print Quality Level Custom Specifying Color Correction Adjusting Color Balance Adjusting Brightness Adjusting Contrast 523 ...

Page 524: ...ting brightness is as follows 1 Open the printer driver setup window 2 Select advanced settings From the Main tab pull down menu select Advanced Settings 3 Select color mode For Color Mode select Color and then click Color Settings The Color Settings dialog box appears 4 Adjust brightness On the Color Adjustment tab moving the Brightness slider to the right brightens dilutes the colors and moving ...

Page 525: ...are displayed in the settings preview on the left side of the printer driver 5 Complete the setup Click OK on the Main tab When you execute print the data is printed at the adjusted brightness Related Topics Setting the Print Quality Level Custom Specifying Color Correction Adjusting Color Balance Adjusting Contrast 525 ...

Page 526: ...n the light and dark portions of images smaller and less distinct reduce the contrast No adjustment Adjust the contrast The procedure for adjusting contrast is as follows 1 Open the printer driver setup window 2 Select advanced settings From the Main tab pull down menu select Advanced Settings 3 Select color mode For Color Mode select Color and then click Color Settings The Color Settings dialog b...

Page 527: ...value in the range from 50 to 50 The current settings are displayed in the settings preview on the left side of the printer driver After adjusting each color click OK 5 Complete the setup Click OK on the Main tab When you execute print the image is printed with the adjusted contrast Related Topics Setting the Print Quality Level Custom Specifying Color Correction Adjusting Color Balance Adjusting ...

Page 528: ...tting mode and printing is as follows 1 Open the printer driver setup window 2 Select the media type Select the type of paper loaded in the printer from the Media Type list on the Main tab If Auto Use Printer Settings is selected the paper configured in printer settings is printed 3 Select advanced settings From the Main tab pull down menu select Advanced Settings 528 ...

Page 529: ...print quality level that is appropriate for the purpose Color Mode Selects color adjustment method Thicken Fine Lines Prints thin lines thicker for easy viewing 5 Select the paper size From the Page Size list on the Page Setup tab select the same size as that of the document that was created with the application software The current settings are displayed in the settings preview on the left side o...

Page 530: ...ording to the paper settings 7 Set the other items Set the other items as necessary 8 Complete the setup Click OK When you print the document is printed with the print conditions you set Related Topics Adjusting Color Balance Setting the Print Quality Level Custom Specifying Color Correction Adjusting Brightness Adjusting Contrast 530 ...

Page 531: ...your purpose Important The paper feed method will differ according to the paper settings 4 Select roll paper width If you selected a roll paper for Paper Source set Roll Paper Width to the width of the roll paper loaded in the printer 5 Select scaled printing Check the Enlarged Reduced Printing check box 6 Set one of scaling methods described below From the items listed below select the setting th...

Page 532: ... is reduced when a size smaller than the Page Size setting is selected from the Printer Paper Size list and enlarged when a size larger is selected 7 Complete the setup Click OK When you execute print the document will be printed with the specified scale Important When the application software which you used to create the original has the scaled printing function configure the settings on your app...

Page 533: ...Note Selecting Enlarged Reduced Printing changes the printable area of the document 533 ...

Page 534: ... printed at their actual size A printout that has the same area as the document can be obtained by trimming the outer margins after printing The procedure for printing with oversize is as follows 1 Open the printer driver setup window 2 Select the paper size From the Page Size list on the Page Setup tab select the same size as that of the document that was created with the application software 3 C...

Page 535: ...the width of the roll paper loaded in the printer 7 Set the other items Set the other items as necessary 8 Complete the setup Click OK When you print the document is printed using oversize Important When printing to oversized paper sizes use paper that has the following necessary margins added to the document size Cut sheet 6 mm or more added to width and 23 mm or more added to height of document ...

Page 536: ...ized paper size for a non standard paper size register the paper size in the Paper Size Options dialog box An oversized paper size cannot be set for paper sizes that were set in the Custom Size Settings dialog box 536 ...

Page 537: ... becomes registered to Page Size and can be selected any time after that If you want to use a user defined paper temporarily setting it from Custom Size is suitable The procedure for specifying a custom size is as follows Setting from Paper Size Options 1 Open the printer driver setup window 2 Click Size Options on the Page Setup tab The Paper Size Options dialog box opens 3 Set user defined paper...

Page 538: ...ze while keeping the Width and Height ratio 4 Set user defined paper Click OK then it returns to Page Setup tab The paper size registered by using Custom Paper Size Name is registered to Custom Paper Size of Page Size and can be selected at any time Setting from Custom Size 1 Open the printer driver setup window 2 Select the paper size For Page Size on the Page Setup tab select Custom Size from th...

Page 539: ...nt has a function for specifying height and width values use the application software to set the values If the application software does not have such a function or if the document does not print correctly perform the above procedure from the printer driver to set the values Printing may be disabled depending on the size of the specified user defined media For information about printable sizes for...

Page 540: ...ffer from the paper information registered on the printer an error message may appear on the printer s operation panel You can still print but you may not be able to obtain correct print results The maximum configurable size with Custom Size is 3 2m 540 ...

Page 541: ...Printing without Edges Based on the Scenarios Printing without Margins to Match Paper Size Printing without Margins to Match Roll Paper Width Printing Full Size without Margins 541 ...

Page 542: ...river open the settings screen 2 Select a feeding method In Paper Source select Roll Paper Important The feeding methods you can choose from vary depending on paper settings 3 Select paper roll width For paper roll width enter the same value set in the printer under Roll Width 4 Select borderless printing In the Page Setup tab place a checkmark next to the Borderless Printing option 542 ...

Page 543: ... the paper may come out stained 6 Select a method for printing borderless In the Borderless Printing Method tab place a checkmark next to the Fit Paper Size option If the size of the document is different from the size of the paper you want to print on select the paper size you want to print on from Printer Paper Size 7 Complete the setting process Click OK If you print now the document will be pr...

Page 544: ... into contact with the paper surface scratching it and causing the paper to be unevenly cut You may be able to improve the situation by clicking Specify on the Main tab and in the Paper Detailed Settings dialog box under Drying Time set Between Pages to a higher value If you print borderless while Automatically switch paper sources paper size priority is on in the Page Setup tab under Borderless P...

Page 545: ...nter driver open the settings screen 2 Select a feeding method In Paper Source select Roll Paper Important The feeding methods you can choose from vary depending on paper settings 3 Select paper roll width For paper roll width enter the same value set in the printer under Roll Width 4 Select borderless printing In the Page Setup tab place a checkmark next to the Borderless Printing option 545 ...

Page 546: ...dth ratio of the paper may be different from that of the image making it impossible for the whole image to fit on the paper When this happens crop the image with the application software to match paper size When printing borderless printing may stop abruptly and the paper will be cut causing a slight color unevenness on the edges of the paper If you require exceptionally high quality in the Roll P...

Page 547: ...l 406 4mm A3 Roll 329 0mm 12 in Roll 304 8mm 300mm Roll 300 0mm A3 A4 Roll 297 0mm B4 Roll 257 0mm 8 in Roll 203 2mm Also stains may appear on the back of the paper Note When using applications like Microsoft Word which allow you to set margins set margins to 0 mm 547 ...

Page 548: ...g method In Paper Source select Roll Paper Important The feeding methods you can choose from vary depending on paper settings 3 Select paper roll width For paper roll width enter the same value set in the printer under Roll Width 4 Select borderless printing In the Page Setup tab place a checkmark next to the Borderless Printing option After the Information dialog is displayed under Roll Width sel...

Page 549: ...to configure them Depending on paper size the length width ratio of the paper may be different from that of the image making it impossible for the whole image to fit on the paper When this happens crop the image with the application software to match paper size When printing borderless printing may stop abruptly and the paper will be cut causing a slight color unevenness on the edges of the paper ...

Page 550: ... A2 A3 Roll 420 0mm 16 in Roll 406 4mm A3 Roll 329 0mm 12 in Roll 304 8mm 300mm Roll 300 0mm A3 A4 Roll 297 0mm B4 Roll 257 0mm 8 in Roll 203 2mm Also stains may appear on the back of the paper Note When using applications like Microsoft Word which allow you to set margins set margins to 0 mm 550 ...

Page 551: ...tion software 2 Open the printer driver setup window 3 Select the paper size Select the same original paper size created in the application soft in the Page Setup tab s Page Size In the event an optional size is set in the application software select Custom Size from Custom Paper Size in Page Size and designate size in the dialog box that appears 4 Select roll width Select the equivalent to the pa...

Page 552: ...be the expected size After creating user defined paper 1 if user defined paper 2 is created after checking Fix the Ratio of the Width to Height settings can be set to the same aspect ratio Also set user defined paper 2 to a size that doesn t exceed the maximum size supported by the application For example when printing on paper 600mm wide and 3 000mm long use the following settings when setting le...

Page 553: ...r horizontal banner is printed by using the user defined size Note Maximum printable length is 18 0m In the event the enlarged length exceeds 18 0m the part of the image exceeding the length will not be printed If printing cannot be performed correctly you may be able to improve printing by using Special Settings on the Layout tab to change FineZoom Settings to Yes 553 ...

Page 554: ...ocuments Inputting Multiple file Documents into Free Layout plus Lining Up and Printing Multiple Documents to Cut Sheets Printing by Connecting Multiple Pages Printing Multiple Pages All on One Page Dividing and Printing Posters 554 ...

Page 555: ...Free Layout and then install it The procedure for lining up and printing multiple documents to cut sheets is as follows 1 Open the printer driver setup window 2 Select Free Layout On the Layout tab select the Page Layout check box and then from the pull down menu select Free Layout 3 Complete the setup Click OK When you print Canon imagePROGRAF Free Layout starts Canon imagePROGRAF Free Layout all...

Page 556: ...Note To lay out multiple application software documents onto one page repeat steps 1 to 3 without closing the Canon imagePROGRAF Free Layout window 556 ...

Page 557: ...the paper source In Paper Source select Roll Paper Important The paper feed method will differ according to the paper settings 3 Set roll paper options Click Roll Paper Options to display the Roll Paper Options dialog box Select the Banner Printing check box and then click OK The current settings are displayed in the settings preview on the left side of the Page Setup tab 4 Complete the setup Clic...

Page 558: ...p window 2 Select the print paper size From the Page Size list on the Page Setup tab select the size of the paper loaded in the printer 3 Set number of pages to be printed per sheet On the Layout tab select the Page Layout check box and from the pull down menu select 2 Pages Sheet 4 Pages Sheet 6 Pages Sheet 8 Pages Sheet 9 Pages Sheet or 16 Pages Sheet The current settings are displayed in the se...

Page 559: ...der select a placement method from the list Page Border To print a page border around each document page check this check box 5 Complete the setup Click OK on the Layout tab When you execute print the specified number of pages will be arranged on each sheet of paper in the specified order Important When there is a checkmark attached to Banner Printing on the Page Setup tab Page Layout is grayed ou...

Page 560: ...ng and printing posters is as follows Setting for Dividing and Printing Posters 1 Open the printer driver setup window 2 Select the print paper size From the Page Size list on the Page Setup tab select the size of the paper loaded in the printer 3 Set number of divisions On the Layout tab select the Page Layout check box and from the pull down menu select Poster 1 x 2 or Poster 2 x 2 The current s...

Page 561: ...ly Specific Pages If ink becomes faint or runs out during printing you can reprint only the specific pages by following the procedure below 1 Display Pages to Print dialog box For Page Layout click Set to display the Pages to Print dialog box 2 Set print range Clear the check boxes of the pages you do not want to print In the setting view the pages that you cleared are deleted and only the pages t...

Page 562: ...ay a cleared page click that page again To switch the pages to display hide click Invert in the Pages to Print dialog box 3 Complete the setup Click OK on the Layout tab When you print only the specified pages are printed Important If you partition and print as a poster the source document will be printed in enlarged form so the print results may become rough 562 ...

Page 563: ...duced Printing on the Page Setup tab and printing the start point for enlarge reduce will always be fixed based on the top left corner of that page For that reason for reduced printing the bottom and right margins of the paper will increase At this time if you place a checkmark next to Print Centered on the Layout tab the top bottom left and right margins can all be printed evenly The procedure fo...

Page 564: ...int from Page Size on the Page Setup tab 4 Set magnification as necessary Where necessary attach a checkmark next to Enlarged Reduced Printing and set according to the objective 5 Select the paper source For Paper Source select the setting that matches your purpose 564 ...

Page 565: ...u selected a roll paper for Paper Source set Roll Paper Width to the width of the roll paper loaded in the printer 7 Print document in the center of paper Select the Print Centered check box on the Layout tab 8 Complete the setup Click OK When you print the document is printed in the center of the paper 565 ...

Page 566: ...Printing by Saving Roll Paper Saving Roll Paper by Rotating Document 90 Degrees Saving Roll Paper by Eliminating Upper and Lower Margins on Document 566 ...

Page 567: ...ed in the printer from the Media Type list on the Main tab If Auto Use Printer Settings is selected the paper configured in printer settings is printed 3 Select the paper size From the Page Size list on the Page Setup tab select the same size as that of the document that was created with the application software 4 Select the paper source In Paper Source select Roll Paper Important The paper feed m...

Page 568: ...paper loaded in the printer 7 Complete the setup Click OK When you print you can rotate a portrait document 90 degrees to save paper Important When there is a checkmark attached to Banner Printing on the Page Setup tab Rotate Page 90 degrees is grayed out and cannot be set 568 ...

Page 569: ...it format as the Page Size from the Page Setup tab if the length in the vertical direction is longer than the width selected in Roll Width even if a checkmark is placed next to Rotate Page 90 degrees the page will not be rotated 569 ...

Page 570: ...r margins is as follows 1 Open the printer driver setup window 2 Select the media type Select the type of paper loaded in the printer from the Media Type list on the Main tab If Auto Use Printer Settings is selected the paper configured in printer settings is printed 3 Select the paper size From the Page Size list on the Page Setup tab select the same size as that of the document that was created ...

Page 571: ...ng to the paper settings 5 Select roll paper width For Roll Paper Width select the width of the roll paper loaded in the printer 6 Selecting Paper Saving On the Layout tab select the No Spaces at Top or Bottom check box The current settings are displayed in the settings preview on the left side of the window 571 ...

Page 572: ...7 Complete the setup Click OK When you print the upper and lower margins are reduced so that you can save paper 572 ...

Page 573: ...ed in the printer from the Media Type list on the Main tab If Auto Use Printer Settings is selected the paper configured in printer settings is printed 3 Select the paper source From the Paper Source list on the Page Setup tab select the paper source that matches your purpose Roll Paper Feeds paper using roll paper Cut Sheet Feeds paper using the cut paper Important The paper feed method will diff...

Page 574: ...gs in the printer driver differ from the paper information registered on the printer an error message may appear on the printer s operation panel You can still print but you may not be able to obtain correct print results 574 ...

Page 575: ...ng the print result before printing is as follows 1 Open the printer driver setup window 2 Set the preview Check the Preview before printing check box on the Main tab 3 Complete the setup Click OK When you execute print the Canon imagePROGRAF Preview opens and displays the print results Related Topic Canon imagePROGRAF Preview 575 ...

Page 576: ...Other Convenient Settings Stamp Printing Setting a Page Size and Orientation Registering a Frequently Used Printing Profile Cutting Roll Paper after Printing 576 ...

Page 577: ...companies are pre registered The procedure for printing with a stamp is as follows 1 Open the printer driver setup window 2 Select stamp On the Layout tab select the Stamp check box and then select the stamp to use from the list The current settings are displayed in the settings preview on the left side of the Layout tab 3 Complete the setup Click OK When you execute print the data is printed with...

Page 578: ...tings of an existing stamp Unnecessary stamps can be deleted at any time The procedure for registering a new stamp is as follows Registering a New Stamp 1 Open the printer driver setup window 2 Select stamp On the Layout tab select the Stamp check box and click Define Stamp The Define Stamp dialog box opens 578 ...

Page 579: ...elect Transparent to print the stamp on the back of the document and select Overlap to print it on the front Position Specifies the stamp position on the page Enter numbers in X and Y to set the coordinates or drag the horizontal and vertical slide bars to the left right or up down to change the settings Angle Set the stamp placement angle Enter a number in Set Angle to set the angle or drag the s...

Page 580: ...ng while viewing the preview 4 Complete the setup Click OK to return to the Layout tab The registered title appears in the Stamp list Note The stamp registered as the default setting cannot be changed Deleting an Unnecessary Stamp 1 Select stamp On the Layout tab select the Stamp check box and click Define Stamp The Define Stamp dialog box opens 2 Select the stamp to be deleted Select the title th...

Page 581: ...ify them with the application software the procedure for selecting a page size and orientation is as follows 1 Open the printer driver setup window 2 Select the paper size Select a page size from the Page Size list on the Page Setup tab 3 Set Orientation Select Portrait or Landscape for Orientation Check Rotate Page 90 degrees check box when you want to perform printing with the original being rot...

Page 582: ...d at any time The procedure for registering a printing profile is as follows Registering a Printing Profile 1 Open the printer driver setup window 2 Set the necessary items On the Main tab the Page Setup tab and the Layout tab specify the print settings you want to register 3 Display Add dialog box On the Favorites tab click Add The Add dialog box opens 582 ...

Page 583: ...settings 3 Complete the setup Click OK When you print the document is printed with the settings of the registered favorite Deleting Unnecessary Printing Profile 1 Select favorite to be deleted Select the favorite you want to delete from the Favorites list on the Favorites tab 2 Delete setting Click Delete When the confirmation message appears click OK The selected favorite is deleted from the Favo...

Page 584: ... feed method will differ according to the paper settings 3 Display Roll Paper Options dialog box Click Roll Paper Options to display the Roll Paper Options dialog box 4 Set auto cut From Automatic Cutting select the item that matches your purpose The current settings are displayed in the settings preview on the left side of the Page Setup tab Yes The roll paper is cut automatically after printing ...

Page 585: ...ter printing Note The default setting for automatic cutting is Yes After completing the setting click OK to return to the Page Setup tab 5 Complete the setup Click OK on the Page Setup tab When you print the roll paper is cut automatically after printing or cut guidelines are printed 585 ...

Page 586: ... HP RTL is an abbreviation of Hewlett Packard Raster Transfer Language Emulation is good for obtaining results similar to printing on other printers When printing from applications that support HP GL 2 or HP RTL output specify HP GL 2 or HP RTL in the plotter output printer language settings HP GL 2 and HP RTL emulation related settings are configured from the printer operation panel For further d...

Page 587: ...Printing from Smartphone Tablet For more on printing from a device refer to the device s or application s instruction manual Connecting Smartphone Tablet to Printer Directly Wireless Direct 587 ...

Page 588: ...is section also describes changing wireless direct connection to Wi Fi connection Change the Printer Setting to Wi Fi Connection Important Check the usage restrictions and switch the printer to the wireless direct Restrictions The administrator password is required to change settings if it is enabled for changing settings using the operation panel If a device has already been connected to the prin...

Page 589: ...t confirmation For updating the SSID password or changing the name of the printer displayed on Wi Fi Direct compatible device see Change Wireless Direct Connection Setting Connect Wi Fi Direct Compatible Devices such as Smartphones and Tablets to the Printer 1 Turn on Wi Fi communication on Wi Fi Direct compatible device For more on turning on Wi Fi communication see your device s instruction manu...

Page 590: ...HOME screen tap Network Menu Operations 3 Tap Wireless Direct 4 Tap Settings 5 Change settings as necessary To update the identifier SSID and the password for wireless direct Tap Update SSID password to display the confirmation screen To update the identifier SSID and the password tap Yes To check the updated password tap Show password To change the printer s name displayed on the Wi Fi Direct com...

Page 591: ...ess we recommend you should not change the setting from the default When you finished performing the settings the printer returns to the Wireless Direct settings screen 6 Touch HOME button The HOME screen appears Note If you change the wireless direct setting on the printer also change the setting on the device Change the Printer Setting to Wi Fi Connection 1 Make sure printer is turned on 2 On th...

Page 592: ...rinting Using Canon Application Software Easy PhotoPrint Editor Guide Preview Guide Free Layout plus Guide Print Plug In for Office Guide Direct Print Share Guide Quick Utility Toolbox Guide IJ Network Device Setup Utility Guide Media Configuration Tool Guide Device Management Console Guide Accounting Manager Guide 592 ...

Page 593: ...Printer Driver Overview of the Printer Driver Printer Driver Description Updating the Printer Driver 593 ...

Page 594: ...g the Print Options Canon imagePROGRAF Preview How to Open the Printer Driver Setup Window Updating Media Information in Printer Driver Setting Accounting Information Deleting the Undesired Print Job Canon IJ Status Monitor Instructions for Use Printer Driver 594 ...

Page 595: ...a formats you need a printer driver for the specific model you are using Installing the Printer Driver Load the Setup CD ROM that comes with the printer and then install the driver from Start Setup Specifying the Printer Driver To specify the printer driver open the Print dialog box of the application software you are using and select XXX where XXX is your model name Displaying the Manual from the...

Page 596: ...the paper source during printing differs from the driver settings or printing fails The procedure for changing the print options is as follows 1 Open the printer driver setup window 2 Click Special Settings on the Layout tab The Special Settings dialog box opens 3 Change the individual settings If necessary change the setting of each item and then click OK The Layout tab is displayed again 596 ...

Page 597: ... driver and allows you to check the document layout print order and number of pages You can also change the media type and paper source settings When you want to display a preview before printing open the printer driver setup window click the Main tab and check the Preview before printing check box When you do not want to display a preview before printing uncheck the check box Related Topic Displa...

Page 598: ...edure below to perform printer maintenance operations such as print head cleaning or to configure a printing profile that is common to all application software 1 Select as described below If you are using Windows 10 or Windows Server 2016 select the Start menu Windows System Control Panel Hardware and Sound Hardware Devices and Printers If you are using Windows 8 1 from the Desktop charms select S...

Page 599: ...ndow is displayed If you are using Windows 7 or Windows Server 2008 R2 select the Start menu Control Panel Hardware and Sound Hardware Devices and Printers The Devices and Printers window is displayed 2 Display setup window Right click the Your model name icon and select Printer properties The printer s Properties window appears 3 Update media information Click Update Media Information the Device ...

Page 600: ...ther than administrators can check if a media information update is required but cannot carry out the update itself When you have added deleted or edited media using administrative tools the Media Configuration Tool but have not updated the media information issues may arise such as the inability to print 600 ...

Page 601: ...d Printers window is displayed If you are using Windows 8 1 Windows Server 2012 R2 or Windows Server 2012 from the Desktop charms select Settings Control Panel Hardware and Sound Hardware Devices and Printers The Devices and Printers window is displayed If you are using Windows 7 or Windows Server 2008 R2 select the Start menu Control Panel Hardware and Sound Hardware Devices and Printers The Devi...

Page 602: ...hibits changes to account IDs that have already been set Check this check box to prevent other users from changing IDs 5 Apply the settings Click OK The Device Settings tab is displayed again The settings are enabled hereafter Note Prohibits Account ID changes can be set only by users with Administrator rights If this is set users without Administrator rights may not be able to set Account ID and ...

Page 603: ...k Status Monitor on the Main tab The Canon IJ Status Monitor appears 3 Display the print jobs Click Display Send Queue The print queue window opens 4 Delete the print jobs Select the print jobs you want to delete and select Cancel from the Document menu When the confirmation message appears click Yes The deletion of the print job is complete Important Users who have not been granted access permiss...

Page 604: ...ppears as a button on the task bar Click the button of the status monitor displayed on the task bar The Canon IJ Status Monitor appears Note To open the Canon IJ Status Monitor when the printer is not printing open the printer driver setup window and click Status Monitor on the Main tab The information displayed on the Canon IJ Status Monitor may differ depending on the country or region where you...

Page 605: ...In such cases take the appropriate action as described 605 ...

Page 606: ...r setup window 2 Launching the Canon IJ Status Monitor On the Main tab click Status Monitor The Canon IJ Status Monitor opens 3 Display Estimated ink levels Ink status is displayed as an illustration Note The information displayed on the Canon IJ Status Monitor may differ depending on the country or region where you are using your printer 606 ...

Page 607: ...n at almost horizontal angles may not print correctly If that should happen re draw the line horizontally and print one more time Immediately after installing or updating the printer driver you might not be able to visualize new features in some of the application software In all application software provided with printing features choose Print from the File menu and after selecting the printer yo...

Page 608: ...n used if you print using features like enlarging reducing layout printing page borders and so on some of the data in the resulting printed document for example graphics may differ from the source document If you print very large images from your computer when it s running low on memory you may not be able to print correctly for example it may take a very long time to print or parts of the image m...

Page 609: ... switch paper sources paper size priority you may not be able to get the desired printing results In such cases uncheck Automatically switch paper sources paper size priority Points to Note About Applications with Restrictions If in Microsoft Excel you tick Collate and then you print more than one copy or if you do Entire workbook after configuring different settings in each tab you may not be abl...

Page 610: ...in the Page Setup tab Page Size Enlarged Reduced Printing and Borderless Printing Open Microsoft Word s Page setup dialog box and close it by clicking OK After configuring the printer driver close momentarily the Print dialog box without printing Then open the printer driver s set up screen once again close it by clicking OK and run printing 610 ...

Page 611: ...ver Description Main Tab Description Page Setup Tab Description Layout Tab Description Favorites Tab Description Maintenance Tab Description Device Settings Tab Description Canon IJ Status Monitor Description 611 ...

Page 612: ... that is loaded in the printer This ensures that printing is carried out properly for the specified paper Get Information Opens the Paper Information on Printer dialog box You can check the settings on the printer and apply the checked settings to the printer driver Specify Open the Paper Detailed Settings dialog box and specify detailed print settings that match the media type loaded in the print...

Page 613: ...nt quality over printing speed Standard Prints with average speed and quality Resolution settings depend on media type Fast Gives priority to printing speed over print quality Custom Opens the Custom dialog box Select this when you want to set the printing quality level individually View Settings Opens the View Settings dialog box Advanced Settings This mode allows you to print by specifying detai...

Page 614: ...ens the Color Settings dialog box You can adjust individual color settings such as Cyan Magenta Yellow Brightness and Contrast on the Color Adjustment tab and select the Color Correction method on the Matching tab Thicken Fine Lines Prints thin lines thicker for easier viewing Preview before printing You can start up the Canon imagePROGRAF Preview and check what the printing results will be before...

Page 615: ...s printing etc and you would like to avoid this smudging and unevenness Printer Default Settings in printer unit control panel are applied None Next scan will be print immediately after first scan is print 0 5sec 1sec 3sec 5sec 7sec 9sec Next scan will be print after the set amount of time has passed after printing one scan If smudges and or unevenness occur please increase time Roll Paper Safety ...

Page 616: ...djust the print quality level Important Certain print quality levels cannot be selected depending on the settings of Media Type Note The High Standard or Fast print quality modes are linked with the slider bar Therefore when the slider bar is moved the corresponding quality and value are displayed on the left This is the same as when the corresponding radio button is selected for Print Quality on ...

Page 617: ...as you drag the slider toward the left You can also directly enter brightness values that are linked to the slider bar Enter a value in the range from 50 to 50 Contrast Adjusts the contrast between light and dark in the image to be printed Moving the slider to the right increases the contrast moving the slider to the left decreases the contrast You can also directly enter a value linked to the sli...

Page 618: ...ation In addition selecting this setting allows you to adjust colors easily using an application software Saturation Poster CAD Saturation Reproduces vivid colors on data such as a poster In addition prints in easy to see colors suitable for line drawing Relative Colorimetric When image data is converted to the color space of the printer this method converts the image data so the color reproductio...

Page 619: ...Custom Size from Custom Paper Size the Custom Size Settings dialog box appears and you can specify any vertical and horizontal dimensions for the paper Borderless Printing Chooses whether you are printing on a full page without any page margins or printing with page margins In borderless printing originals are enlarged to extend slightly off the paper Thus printing can be performed without any mar...

Page 620: ...en print the document Fit Roll Paper Width You can enlarge reduce the document to match the roll paper width and then print the document Scaling Enlarge or reduce the document to a specified scale before printing Printer Paper Size When you select the Fit Paper Size check box or Scaling check box you can specify the setting Select the size of the paper to be printed Orientation Selects the printin...

Page 621: ...egister any user defined paper Custom Size Settings dialog box This dialog box allows you to specify the size width and height of the custom paper Paper Size Specifies the Width and the Height of the custom paper Measurement is shown according to the units specified in Units Units Select the unit for entering a user defined paper size Borderless Setting dialog box Use Amount of Extension to adjust...

Page 622: ...rinter driver can use are displayed Delete From Paper Size List you can delete a user defined paper that a user created Note Paper deletion is not possible in the following case When a standard paper size of the printer driver is selected When an oversized paper size is selected When a paper size with a red circle is selected Custom Paper Size Name You can specify the name of a user defined paper ...

Page 623: ... can use the set user defined paper Add You can register a user defined paper that was set and overwrite the existing user defined paper Display Series You can narrow down the paper sizes to be displayed in Paper Size List Oversize Add appropriate margins so that the document contents will not get cut off and then print the document 623 ...

Page 624: ...Page Layout Selects the size of the document you want to print and the type of printing Poster 1 x 2 Poster 2 x 2 Poster printing is performed The value in parentheses represents the ratio of the vertical x horizontal lengths As the number of divisions increases the number of sheets used for printing increases If you are pasting pages together to create a poster increasing the number of divisions ...

Page 625: ...es document 180 degrees and prints it No Spaces at Top or Bottom When printing on roll paper you can save paper by reducing the upper and lower margins when printing Copies Specifies the number of copies you want to print You can specify a value from 1 to 999 Important If the application used to create your document has a similar function specify the number of copies with the application without s...

Page 626: ...at you selected in that application Portrait Prints the document so that its top and bottom positions are unchanged relative to the paper feed direction Landscape Prints the document by rotating it 90 degrees relative to the paper feed direction Roll Paper Length Sets the roll paper length Auto Automatically determines the roll paper length and prints Manual Settings Determines and specifies the r...

Page 627: ...ion to the pre registered ones you can register and use your original stamp Watermark List This is a list of the pre registered stamps Add Creates an original stamp Click this item to set Name Text Font Style Size and Color Name Enter the stamp name to be registered Text Enter the characters to be used in the stamp Font Selects the font for the stamp text string Style Selects the font style for th...

Page 628: ...ge only Select this check box if you want to print a stamp only on the first page Page Options dialog box Specify the print settings such as date user name and page number Print Date Select the position for printing the date Print Time Also Prints the time along with the date Print User Name Select the position for printing the user name Print Page Number Select the position for printing the page ...

Page 629: ...hen print PageComposer starts Application Color Matching Priority You can assign higher priority to color management by the application software Fast Graphic Process If image colors or line thicknesses are printed incorrectly you may be able to get the print results you want by setting this function to off This is only displayed when using a 32 bit driver Disable the color profile setting of the a...

Page 630: ...vorites list Delete You can delete favorites that have become unnecessary Edit The Edit dialog box opens You can change the name and icon settings of the favorite that you selected from the Favorites list Add The Add dialog box opens You can register the current settings as a favorite Application Settings Priority The setting in the application software will take priority over the favorites settin...

Page 631: ...o be displayed in Favorites list Icon Changes icon to be displayed in Favorites list Comment Changes information to be displayed in Comment Add dialog box You can save the current print settings as the settings of a favorite Name Set the name to be displayed in Favorites list Icon Set the icon to be displayed in Favorites list Comment Enter information to be displayed in Comment 631 ...

Page 632: ...d using the Media Type Page Size and Roll Width for each currently set paper feed position Print Head Cleaning Performs print head cleaning Print head cleaning removes any blockage in the print head nozzles Perform cleaning when printing becomes faint or a specific color fails to print even though all ink levels are sufficiently high There are two head cleaning functions which are described below ...

Page 633: ... s ink supply Therefore execute system cleaning only when necessary Paper Feed Amount Adjustment This function adjusts the paper feed amount if the print result is faint or contains streaks View Status This function displays printer information and setting values Related Topics Cleaning the Print Heads Printing a Nozzle Check Pattern 633 ...

Page 634: ...he printer and cost management tool to tabulate print history information for any ID Note Accounting can be set only by users with Administrator rights Users without Administrator rights may not be able to set Accounting information Device Information Opens the Device Information dialog box You can obtain the device information of the connected printer and change the configuration to match the pri...

Page 635: ...ce Information dialog box The Device Information dialog box allows you to obtain the device information of the connected printer and change the configuration to match the printer that is connected to the driver function Settings Summary This is a list of items that you can set in the Device Information dialog box When you click an item that you want to set the setting contents are displayed outsid...

Page 636: ... how to respond You can check the ink status This function displays graphics showing the ink tank type and the estimated ink levels Icons and messages are displayed when ink is running low ink level warning Canon IJ Status Monitor Overview Canon IJ Status Monitor allows you to check the status of the printer and ink with graphics and messages You can check the information on the printing document ...

Page 637: ...ct ink tank for your printer Estimated Maintenance Cartridge Usage Displays icons to report that the available space in the maintenance cartridge is low or the cartridge is full Click the disclosure triangle to display a pictorial representation of the estimated space available in the maintenance cartridge Paper Feed Displays the size and type of paper loaded in each feeder Click the disclosure tr...

Page 638: ...d using it through a network Note When the printer is being used via USB connection Remote UI will not display Printer Information Allows you check detailed information such as the printer status the print progress and remaining ink levels Maintenance Allows you to run printer maintenance and change printer settings Job Log Displays the Job history window Job List Displays the Print job window Ink...

Page 639: ...Updating the Printer Driver Obtaining the Latest Printer Driver Deleting the Unnecessary Printer Driver Before Installing the Printer Driver Installing the Printer Driver 639 ...

Page 640: ...e version of the printer driver by clicking the About button on the Main tab You can access our website and download the latest printer driver for your model Important You can download the printer driver for free but any Internet access charges incurred are your responsibility Related Topics Before Installing the Printer Driver Installing the Printer Driver 640 ...

Page 641: ...then click Uninstall If you are using Windows 7 select Start menu Control Panel Programs Programs and Features From the program list select XXX Printer Driver where XXX is your model name and then click Uninstall The confirmation window for uninstalling the model appears Important A confirmation warning dialog box may appear when starting installing or uninstalling software This dialog box appears...

Page 642: ...should also refer to this section if the printer driver cannot be installed Checking the Printer Status Turn on the printer Checking the Personal Computer Settings Terminate all running applications Log on as a user who has the administrator account Related Topics Obtaining the Latest Printer Driver Installing the Printer Driver 642 ...

Page 643: ...tor account click Yes or Continue Allow to continue Some applications require an administrator account to continue In such cases switch to an administrator account and restart the operation from the beginning 3 Install the printer driver Take the appropriate action as described on the screen 4 Complete the installation Click Complete Depending on the environment you are using a message prompting y...

Page 644: ...itor Guide Preview Guide Free Layout plus Guide Print Plug In for Office Guide Direct Print Share Guide Quick Utility Toolbox Guide IJ Network Device Setup Utility Guide Media Configuration Tool Guide Device Management Console Guide Accounting Manager Guide 644 ...

Page 645: ... Updating the Printer Driver Printing Using Canon Application Software Easy PhotoPrint Editor Guide Preview Guide Free Layout Guide Quick Utility Toolbox Guide IJ Network Device Setup Utility Guide Media Configuration Tool Guide Device Management Console Guide Accounting Manager Guide 645 ...

Page 646: ...ion Software Easy PhotoPrint Editor Guide Preview Guide Free Layout Guide Quick Utility Toolbox Guide IJ Network Device Setup Utility Guide Media Configuration Tool Guide Device Management Console Guide Accounting Manager Guide 646 ...

Page 647: ...Managing Print Jobs Checking Print Job Information Accounting Manager Guide Basic Print Job Operations Managing Job Queue Delete 647 ...

Page 648: ... queue or delete it from the Web browser or the control panel of the printer Using web browser Log in to the printer from web browser select Job management and perform operations Configuration Changes Using Web Browser Using operation panel Tap Jobs on the HOME screen and perform operations 648 ...

Page 649: ...Basic Print Job Operations Managing Job Queue Delete 649 ...

Page 650: ... Using Operation Panel Using Remote UI Delete You can delete the job queue that are not currently being deleted Using Operation Panel 1 Make sure printer is turned on 2 On the HOME screen tap Jobs Menu Operations 3 Tap Print job 4 In the list tap the target job 5 Tap Delete 6 Confirm displayed message and tap Yes Note Select Delete all print jobs on Job management to delete all jobs in the job que...

Page 651: ...Using Remote UI 1 Start up Remote UI 2 Select Job management 3 Select Print job 4 In the list select the target job 5 Select Delete 651 ...

Page 652: ...ot Roll paper cannot be inserted into the Paper Feed Slot Roll Paper Remains Lacks under Quantity Management Cannot load sheets Paper is not cut straight Paper is not cut Cutter Blade Does Not Work While Cutting Is in Progress Dent in the Tip of Paper The size of clear film cannot be detected Printer Keeps Ejecting the Roll Paper Margins are wide When printing on roll paper the printed surface bec...

Page 653: ...ot Print over Bonjour networks macOS Cannot Find Printer on Network Cannot Find Printer on Check Printer Settings Screen Windows Cannot Proceed beyond Printer Connection Screen Connect Cable Screen Searching Printer by IP Address or Host Name During Setup Cannot Find Printer while Using Wi Fi Cannot Find Printer while Using Wired LAN Cannot Print Using AirPrint Installation Problems Removing Print...

Page 654: ...s not turn on If the Printer Makes a Strange Sound Messages advising to check the maintenance cartridge are not cleared Printer consumes a lot of ink Printed pages are not collected cleanly in the basket Ink Level Detection 654 ...

Page 655: ...re in landscape or portrait orientation automatically enlarged to fit the roll width This is an easy way to create vertical or horizontal banners Printing Hanging and Horizontal Banners Large Format Printing Windows Printing Hanging and Horizontal Banners Large Format Printing macOS 655 ...

Page 656: ...system This printer supports hot swap ink tank replacement Even if an ink tank becomes empty during printing since a certain amount of ink always is stored in a sub ink tank you can replace the ink tank while printing Replacing Ink Tanks 656 ...

Page 657: ...ng mode settings on the printer and then under Automatic cut set Automatic Cutting in the printer driver to Yes When using paper that is easily scratched or paper where the ink requires extra time to fix we recommend setting Cutting mode on the printer to Eject cut Specifying the Cutting Method for Rolls Cutting Roll Paper after Printing Windows Cutting Roll Paper after Printing macOS 657 ...

Page 658: ...r waiting for the ink to dry You can set an ink drying time in the printer driver You can also configure the same settings on the printer itself Main Tab Description Windows Paper Detailed Settings macOS Specifying the Ink Drying Time for Rolls Menu Structure 658 ...

Page 659: ...g on roll paper you can set borderless printing in the printer driver settings If printing on sheets borderless printing is not possible Prints without Edges Based on the Scenarios Windows Prints without Edges Based on the Scenarios macOS 659 ...

Page 660: ...now the paper types that can be used in this printer For information about paper that can be used with this printer see the imagePROGRAF home page or refer to the media information list Paper Information List 660 ...

Page 661: ...The paper type that I want to print is not displayed on the Touch Screen If using a new paper type start the Media Configuration Tool to get the latest media information Updating paper information 661 ...

Page 662: ...er cannot print double sided An alternative to double sided printing is to use the Folded Duplex function of the Windows software Canon Free Layout plus which prints two pages on one side folds the sheet back from the center and hangs it 662 ...

Page 663: ...form enlargement printing Use the printer driver to adjust the original to the paper size and width or print enlarged or reduced by specifying a magnification factor Scaled Printing Windows Scaled Printing macOS 663 ...

Page 664: ...Print or Connect Cannot Connect Printer to Network Cannot Print over TCP IP Network Cannot Print over Bonjour networks macOS Printer Suddenly Stopped Working for Some Reason LAN Setting Tips Changing LAN Settings Printer Connection Methods Default Network Settings Another Printer Found with Same Name Connecting to Another Computer via LAN Changing from USB to LAN Connection Printing Network Settin...

Page 665: ...t Roll Paper Remains Lacks under Quantity Management Cannot load sheets Paper is not cut straight Paper is not cut Cutter Blade Does Not Work While Cutting Is in Progress Dent in the Tip of Paper The size of clear film cannot be detected Printer Keeps Ejecting the Roll Paper Margins are wide When printing on roll paper the printed surface becomes scratched 665 ...

Page 666: ...urn off printer Turning the Printer On and Off 2 Positioning your hands as shown open top cover 3 Cut loaded roll paper with regular scissors or the like Before cutting loose the roll paper and lift it up Caution When cutting paper be careful to avoid injury or damage to the printer 666 ...

Page 667: ... top cover and move carriage to the left or right side manually away from the jam Important Do not move the carriage over jammed paper This may damage the printhead 2 Remove any jammed paper inside top cover After removing the paper make sure there are no other scraps of paper in the printer 667 ...

Page 668: ...r carriage shaft B This may stain your hands and damage the printer If the paper from a roll is jammed by the paper feed slot Remove the jammed paper from the paper feed slot After removing the paper make sure there are no other scraps of paper in the printer 668 ...

Page 669: ... the paper is jammed by the ejection guide Remove the jammed paper from the output tray After removing the paper make sure there are no other scraps of paper in the printer 6 Pull release lever forward 669 ...

Page 670: ...Important Changing the release lever position while printing is in progress causes paper jam misaligned lines or wrong colors Be careful not to touch the release lever while printing in progress 670 ...

Page 671: ...eps below to remove it 1 Turn off printer Turning the Printer On and Off 2 Push release lever back 3 Remove jammed paper If paper is jammed inside the top cover 1 Open top cover and move carriage to the left or right side manually away from the jam 671 ...

Page 672: ...e printhead 2 Remove any jammed paper inside top cover After removing the paper make sure there are no other scraps of paper in the printer 3 Close top cover Important Do not touch the linear scale A or carriage shaft B This may stain your hands and damage the printer 672 ...

Page 673: ... paper feed slot After removing the paper make sure there are no other scraps of paper in the printer If the paper is jammed by the ejection guide Remove the jammed paper from the output tray After removing the paper make sure there are no other scraps of paper in the printer 673 ...

Page 674: ...e lever forward Important Changing the release lever position while printing is in progress causes paper jam misaligned lines or wrong colors Be careful not to touch the release lever while printing in progress 674 ...

Page 675: ...ollow these steps to remove any scraps left in the paper feed slot after you clear jammed sheets or roll paper 1 Turn off printer Turning the Printer On and Off 2 Push release lever back 3 Positioning your hands as shown open top cover 675 ...

Page 676: ...nsert it through the gap of paper feed slot Push scrap out toward platen 5 Remove scrap when it is pushed out onto platen 6 If any scraps remain inside paper feed slot repeat steps 4 and 5 7 Holding it at the positions indicated close top cover 676 ...

Page 677: ...e lever forward Important Changing the release lever position while printing is in progress causes paper jam misaligned lines or wrong colors Be careful not to touch the release lever while printing in progress 677 ...

Page 678: ...d in the feed slot Remove the jammed paper Remove Jammed Roll Paper Remove a Jammed Sheet Check 3 Check the paper information on the HOME screen If Roll is not displayed select Replace roll paper or Load roll paper from the Select paper screen and then load the roll paper Note You cannot load a roll paper and sheets on the printer at the same time 678 ...

Page 679: ...des is selected for Manage remaining roll amount 1 Enter Roll paper length and select OK 2 Select Roll amount 3 standard for Roll amount warning setting If Warning message only is selected for Manage remaining roll amount Select Roll amount 3 standard for Roll amount warning setting Paper related settings 679 ...

Page 680: ...k Check the paper information on the HOME screen If Roll is displayed select Load cut sheet from the Select paper screen and then load the sheet Note You cannot load a roll paper and sheets on the printer at the same time 680 ...

Page 681: ...lect Paper settings Advanced on Paper menu in the touch screen menu and change Cut speed If the paper edge cannot be cut straight at the cut starting position it may be improved by selecting slower cut speed than that selected currently If the paper edge cannot be cut straight at the cut ending position it may be improved by selecting faster cut speed than that selected currently Select Paper sett...

Page 682: ...Check 8 Is the edge of the cutter blade blunt Replace the cutter blade Replacing the Cutter Blade 682 ...

Page 683: ...tings macOS Check 2 Is Cutting mode in the touch screen menu set to Eject cut or User cut If Cutting mode is set to Eject cut select Feed cut in the touch screen menu and cut the paper If Cutting mode is set to User cut cut the roll paper with a cutting implement such as scissors Specifying the Cutting Method for Rolls Check 3 Is the cutter blade attached Attach the cutter blade Replacing the Cutt...

Page 684: ...d currently Select User cut for Cutting mode in the touch screen menu and cut the roll paper with a cutting implement such as scissors Specifying the Cutting Method for Rolls Check 3 Check the setting value for Cut speed Selecting slower value may enable the cutter blade to cut paper Select Paper settings Advanced on Paper menu in the touch screen menu and change the Cut speed setting Menu Structu...

Page 685: ... may leave a dent on the tip of paper and it remains when you print on the paper the next time When printing quality is most important we recommend cutting the paper tip before printing On the HOME screen selecting Feed Cut Cut paper Yes enables the printer to cut the paper tip at the shortest length Menu Structure 685 ...

Page 686: ...The size of clear film cannot be detected Check Is the platen dirty with ink Open the top cover and clean the entire platen area Cleaning Inside the Top Cover 686 ...

Page 687: ... loose may make the printer recognize the loaded roll paper as a sheet In this case selecting Remove paper on Paper menu may allow the printer to keep ejecting the paper Check the paper feed settings on the printer After roll ejection stops follow these steps to reload the roll 1 Push release lever back 2 Open top cover 687 ...

Page 688: ...ward the back to rewind the roll At this time ensure that both ends of the roll are rewound evenly 4 Pull release lever forward 5 Load roll At this time be sure to press the Load button and select Load roll paper Loading Rolls in the Printer 688 ...

Page 689: ...ay have been set by responding to the message Do you want to set to detect the leading edge of the paper when Cutting mode was set to User cut in the touch screen menu If the message Do you want to set to detect the leading edge of the paper appears when setting Cutting mode to User cut select Detect recommended Please note that if Detect recommended is selected and the paper has a strong curl the...

Page 690: ...e roll paper loses tension the paper surface could be damaged and the paper could wrinkle or fold Select Paper settings Advanced on Paper menu in the touch screen menu and set Roll paper tension printing to High Menu Structure Note Carrying out Adjust print quality is recommended when changing Roll paper tension printing settings 690 ...

Page 691: ...ter Suddenly Stopped Working for Some Reason The Data lamp on the Operation Panel does not light up The printer does not respond even if print jobs are sent Preparing the ink system is displayed Agitating the ink is displayed 691 ...

Page 692: ...d on again It may be necessary to resolve wireless router problems e g update interval of a key problems of DHCP update interval energy saving mode etc or to update the wireless router firmware For details contact the manufacturer of your wireless router Check2 Can you view any web pages on your computer Make sure your computer is connected to the wireless router properly For more on checking comp...

Page 693: ... some of them have it inside Check6 Make sure wireless signal is strong Monitor signal status and move printer and wireless router as necessary Place the printer and wireless router where there are no obstacles between them Wireless communication between different rooms or floors is generally poor Wireless communication can be impeded by building materials containing metal or concrete If the print...

Page 694: ...s attempting to access the network If this warning message appears set security software to always allow access If you are using any programs that switch between network environments check their settings Some programs use a firewall by default Check10 If printer is connected to an AirPort Base Station via LAN make sure you use alphanumeric characters for network identifier SSID macOS If the proble...

Page 695: ...he touch screen LAN settings Print the network settings Printing Network Settings Check5 Have you entered the proper password specified for the Wireless Direct To check the password specified for the printer display it using the operation panel of the printer or print out the network setting information of the printer Display on the touch screen LAN settings Print the network settings Printing Net...

Page 696: ...rough Network Check1 Make sure the computer is connected to the wireless router For more on how to check the computer settings or connection status see your computer instruction manual or contact its manufacturer Check2 If the printer driver is not installed install it Windows Install the printer driver using the Setup CD ROM or install it from the Canon website Check3 When using Wi Fi make sure w...

Page 697: ...box and try printing again In macOS open the dialog box of the printer driver select the printer from the list of Printer and try printing again Check 3 Is the print job paused In Windows restart the print job as follows 1 Select the printer icon in the Printers and Faxes or Printers window 2 Clear Pause Printing in the File menu to restart the print job In macOS restart the print job as follows 1...

Page 698: ...ng Check 2 Is USB or LAN connection disabled For USB connection Set Use USB connection on the touch screen menu to Use For LAN connection wired Wi Fi Wireless Direct Set Enable disable Wired LAN Enable disable Wi Fi or Enable disable Wireless Direct on the touch screen menu to Enable Note You cannot enable wired LAN and Wi Fi or Wireless Direct at the same time 698 ...

Page 699: ...k tank are being filled with ink Wait until the system has been filled with ink Note This message might appear if you force the power off while the printer is operating Always follow the correct procedure when turning off the power Turning the Printer On and Off 699 ...

Page 700: ...ting the ink is displayed Ink agitation is in progress Please wait until ink agitation is finished Agitation time varies depending on time elapsed since powering off approximately 20 seconds to 2 minutes 700 ...

Page 701: ...The Printer Stops During a Print Job Printing stops and an error message is displayed The printer ejects blank unprinted paper 701 ...

Page 702: ...of roll paper was used during a print job and paper could not be advanced because the trailing edge is taped to the roll Remove the used roll and insert a new roll Removing the Roll from the Printer Removing Rolls From the Roll Holder Loading and Printing on Rolls 702 ...

Page 703: ...cked Print a nozzle check pattern to check the print head status Checking for Nozzle Clogging Check 3 Is the correct printer driver selected Print again using the correct printer driver for your printer Check 4 When you print data including HP RTL command check the settings below in the touch screen menu Set Auto rotation to OFF If Rotate is set to 90 degrees select 0 degrees and start printing Me...

Page 704: ...soiled during regular printing Printed colors are inaccurate Banding in different colors occurs Colors in printed images are uneven Image edges are blurred or white banding occurs The contrast becomes uneven during printing The length of printed images is inaccurate in the feeding direction Images are printed crooked Documents are printed in monochrome Line thickness is not uniform Lines or colors...

Page 705: ...tructure Check 3 Was the printer left with the ink tank out The ink supply may become blocked by ink if the ink tank is left out If this happens leave the printer for at least 24 hours with the ink tank in and then carry out Print head cleaning Cleaning the Print Head Check 4 Are paper scraps stuck in the top cover Follow the steps below to remove paper scraps left inside the top cover 1 Open the ...

Page 706: ...nter driver Quality Media settings Changing the Print Quality and Correcting Image Data macOS If a setting lower than Standard is selected the printing time is shorter and less ink is used though the print quality is reduced If a printing looks faint select a setting higher than Standard Check 7 Does the paper used for printing create a lot of cutting dust Set Cut dust reduction in the touch scree...

Page 707: ... low Set Paper Thickness Head Height in the touch screen menu to Auto Troubleshooting Paper Abrasion and Blurry Images Check 4 Is the paper thick or a type that curls easily or is prone to buckling after absorbing ink If using paper based printing material such as Heavyweight Coated Paper set Transport unit vacuum strength in the touch screen menu to Medium strong or Strong If that does not resolv...

Page 708: ... correct media type in the touch screen menu when loading paper in the printer Loading Rolls in the Printer Loading Sheets in the Printer Check 6 Does the paper have a strong curl at the front edge or is it buckled Set Cutting mode in the touch screen menu to User cut and set leading edge detection to Do not detect To keep track of the amount of roll paper remaining in this situation set Manage re...

Page 709: ...Paper Follow the steps below to change the printer driver settings 1 To stop printing press the Stop button 2 Change the type of paper in the printer driver and try printing again Check 4 Is the paper creased or curled Straighten out the wrinkles or curls and reload the paper Do not use paper that has been printed on previously Loading Rolls in the Printer Loading Sheets in the Printer Check 5 Is ...

Page 710: ... in the touch screen menu Adjusting Vacuum Strength Troubleshooting Paper Abrasion and Blurry Images If using film based printing material such as tracing paper set the Transport unit vacuum strength in the touch screen menu to Standard Medium strong or Strong If that does not resolve the problem increase the Paper Thickness Head Height setting in the touch screen menu Adjusting Vacuum Strength Tr...

Page 711: ...e paper may curl during printing and come in contact with the output slot In such situations set an Ink drying wait time and an Ink drying target area for Pause between scans in the touch screen menu However note that printing will now take longer Menu Structure Note In a hot and humid environment rolling paper printed with images containing areas of saturated color may transfer ink to the contact...

Page 712: ...r and clean the platen and then manually feed roll paper over the platen when printing Cleaning Inside the Top Cover Feeding Roll Paper Manually Check 3 Paper may be gripped weakly over the platen Set a higher Transport unit vacuum strength in the touch screen menu Adjusting Vacuum Strength Check 4 Is Extension for borderless printing in the touch screen menu set to Large or Standard Set Paper wit...

Page 713: ...ter blade to the next item printed Follow the steps below to change Between Pages in Drying Time to between 30 seconds and 3 minutes and perform borderless printing Windows 1 Click Specify for Media Type on the Main sheet of the printer driver 2 Select an ink drying time from the Between Pages list in Drying Time macOS Select an ink drying time from the Drying Time list on the Paper Detailed Setti...

Page 714: ...djusted Take the actions below Refer to the computer and monitor documentation to adjust the colors Adjust the settings of the color management software referring to the software documentation as needed Check 3 Is the print head nozzle blocked Print a test pattern to check the nozzles and see if they are clogged Checking for Nozzle Clogging Check 4 Is Application Color Matching Priority set to Off...

Page 715: ...nu set to Prioritize length accuracy Setting Set priority to Prioritize print quality and adjusting the feed amount can help Adjusting Feed Amount Check 5 Check if the print head is in the right position Adjust the print head position Automatic Adjustment to Straighten Lines and Colors Check 6 Make sure that the print head nozzle is not blocked Print a test pattern to check the nozzles and see if ...

Page 716: ...the Print Quality and Correcting Image Data macOS If a setting higher than Standard is selected the printing time is longer and more ink is used Check 8 Is the media type specified in the printer driver the same as the media type loaded in the printer Load paper of the same type as you have specified in the printer driver Loading Rolls in the Printer Loading Sheets in the Printer Follow the steps ...

Page 717: ...en select a higher Print Quality setting If using macOS select Quality Media in the printer driver and then select a higher Print Quality setting When Fast or Standard is selected the printing time is shorter and less ink is used than with High but the print quality is reduced Changing the Print Quality and Correcting Image Data Windows Changing the Print Quality and Correcting Image Data macOS Ch...

Page 718: ...sy Paper or Coated Paper Set Print Quality to High and then print Check 9 Is the media type specified in the printer driver the same as the media type loaded in the printer Load paper of the same type as you have specified in the printer driver Loading Rolls in the Printer Loading Sheets in the Printer Follow the steps below to match the media type in the printer driver to the media type loaded in...

Page 719: ...e print head Adjusting the Print Head Setting a lower value for Paper Thickness Head Height in the touch screen menu may resolve the problem Troubleshooting Paper Abrasion and Blurry Images Check 3 Is the media type specified in the printer driver the same as the media type loaded in the printer Load the printer with the media type specified in the printer driver Loading Rolls in the Printer Loadi...

Page 720: ...r the same as the media type loaded in the printer Load the printer with the media type specified in the printer driver Loading Rolls in the Printer Loading Sheets in the Printer Follow the steps below to match the media type in the printer driver to the media type loaded in the printer 1 To stop printing press the Stop button 2 Change the type of paper in the printer driver and try printing again...

Page 721: ...d length Adjusting Feed Amount Check 2 Is the media type specified in the printer driver the same as the media type loaded in the printer Load the printer with the media type specified in the printer driver Loading Rolls in the Printer Loading Sheets in the Printer Follow the steps below to match the media type in the printer driver to the media type loaded in the printer 1 To stop printing press ...

Page 722: ...ard and then reload the paper Menu Structure Check 2 Is Detect paper width set to OFF Set Detect paper width in the touch screen menu to ON Menu Structure Check 3 Has the roll paper been loaded at an angle If there is a gap between the roll paper and roll holder reload the roll Loading Rolls on the Roll Holder Loading Rolls in the Printer 722 ...

Page 723: ... of the printer driver specify Color in Color Mode and try printing again For macOS In the Quality Media of the printer driver specify Color in Color Mode and try printing again Check 2 The print head nozzle may be blocked Print a test pattern to check the color ink nozzles and see if they are clogged Checking for Nozzle Clogging 723 ...

Page 724: ...pe loaded in the printer Load the printer with the media type specified in the printer driver Loading Rolls in the Printer Loading Sheets in the Printer Follow the steps below to match the media type in the printer driver to the media type loaded in the printer 1 To stop printing press the Stop button 2 Reset the media type in the printer driver and then print Check 3 Adjust the position of the pr...

Page 725: ...g Paper Abrasion and Blurry Images Check 2 Is the media type specified in the printer driver the same as the media type loaded in the printer Load the printer with the media type specified in the printer driver Loading Rolls in the Printer Loading Sheets in the Printer Follow the steps below to match the media type in the printer driver to the media type loaded in the printer 1 To stop printing pr...

Page 726: ...ion software you are using Check 4 Is the Extension for borderless printing set to Small In Extension for borderless printing in the touch screen menu set Paper with recommended width and Paper with adequate width to Standard Menu Structure Check 5 Is the width of the paper recommended for borderless printing For paper sizes that are not recommended for borderless printing a slight margin will aut...

Page 727: ...Cannot Print over Network Cannot Connect Printer to Network Cannot Print over TCP IP Network Cannot Print over Bonjour networks macOS 727 ...

Page 728: ...Link indicator is lit The left and right indicators are lit if the printer is connected via 1000Base T The left indicator is green if the printer is connected via 100Base TX and the right indicator is orange if connected via 10Base T If the Link indicator is not lit check the following points The hub is on The end of the Ethernet cable is connected correctly Insert the Ethernet cable until it clic...

Page 729: ... Setup Utility For wired LAN Performing Changing Wired LAN Connection Ethernet Cable Settings For Wi Fi Performing Changing Wi Fi Settings Check2 Are the printer s TCP IP network settings configured correctly Make sure the printer s TCP IP network settings are configured correctly Check3 Is the computer you are trying to print from configured correctly Make sure the computer s TCP IP network setti...

Page 730: ...printer on the same network Due to the nature of Bonjour printing may not be possible if the printer is on another network behind a router Make sure the computer and printer are on the same network For information about network settings ask your network administrator Check3 Are the printer s Bonjour settings configured correctly Make sure the Bonjour settings are configured correctly 730 ...

Page 731: ...ter Settings Screen Windows Cannot Proceed beyond Printer Connection Screen Connect Cable Screen Searching Printer by IP Address or Host Name During Setup Cannot Find Printer while Using Wi Fi Cannot Find Printer while Using Wired LAN Cannot Print Using AirPrint 731 ...

Page 732: ...inter Settings screen appears after searching the printer by Automatic search on the Search for Printers screen click Redetect and search for the printer again by the IP address on the Search for Printers screen If the printer has not been found after searching it by the IP address check network settings 732 ...

Page 733: ... you cannot proceed beyond the Printer Connection screen Check2 Follow procedure below to connect printer and computer again Important For macOS make sure the lock icon is on the lower left of the Printers Scanners screen Print Scan screen in Mac OS X v10 8 or Mac OS X v10 7 If the icon locked is displayed click the icon to unlock The administrator name and the password are necessary to unlock 1 T...

Page 734: ... setup For macOS 1 Click Next If the screen telling you that installation has not been completed appears click Abort on displayed screen and finish setup If the Connection failed screen appears 1 Click Next 2 Click Next on displayed screen 3 Click Back to Top on Select Printer screen 4 Click Exit on Start Setup screen and finish setup 3 Turn off printer 4 Restart computer 5 Make sure you have no a...

Page 735: ...1 Check printer s IP address or host name To check the printer s IP Address or host name print out the network settings information or use the operation panel to display it Display on the touch screen LAN settings Print the network settings Printing Network Settings Note If you use the printer in an office ask the network administrator 2 Specify searching method Select one of the method below A Se...

Page 736: ...d is already used for another device follow the procedure below to specify printer s IP address 1 Select Network status icon Menu Operations If you specify the administrator password enter the password 2 Select Wi Fi 3 Select Settings 4 Select Advanced 5 Select TCP IP settings If you specify IPv4 address 1 Select IPv4 2 Select Yes on the displayed screen 3 Select IP address 4 Select Manual setup S...

Page 737: ...ing to access the network set the security software to allow access After allowing the software to access specify the IP address or host name and search for printers again If the printer is found follow the instructions on the screen to continue to set up the network communication If no message appears Cancel searching printers and then set the security software to allow Canon software below to ac...

Page 738: ...Note For more on firewall settings of your operating system or security software see instruction manual or contact its manufacturer 738 ...

Page 739: ...ck3 Make sure printer setup is complete on the computer If it is not perform setup For Windows Perform setup using the Setup CD ROM or from the web page For macOS Perform setup from the web page Note IJ Network Device Setup Utility allows you to diagnose and repair the network status Download it from the web page For Windows For macOS Check4 Make sure printer and wireless router network settings m...

Page 740: ...te that some of them have it inside Check6 Make sure wireless signal is strong Monitor signal strength and move printer and wireless router as necessary Place the printer and wireless router where there are no obstacles between them Wireless communication between different rooms or floors is generally poor Wireless communication can be impeded by building materials containing metal or concrete If ...

Page 741: ...l support Check9 Make sure security software s firewall is off If your security software s firewall is on a message may appear warning you that Canon software is attempting to access the network If this warning message appears set security software to always allow access If you are using any programs that switch between network environments check their settings Some programs use a firewall by defa...

Page 742: ...n displayed on touch screen If the icon is not displayed wired LAN is disabled If not select Setup icon Device settings LAN settings Wired LAN Settings and then select Enable for Enable disable Wired LAN Check3 Make sure LAN cable is connected properly Make sure the printer is connected to the router with the LAN cable If the LAN cable is loose connect the cable properly If the LAN cable is connec...

Page 743: ... whether the issue is resolved Check2 Make sure printer is registered to your computer Check3 Make sure printer is connected by LAN to same network subnet as AirPrint compliant device when printing over LAN Check4 Make sure printer has enough paper and ink Check5 Make sure no error message is displayed on printer s touch screen 743 ...

Page 744: ...Installation Problems Removing Printer Software Taking Time to Setup Process Windows Failed to Printer Driver Installation Windows 744 ...

Page 745: ...ows 10 1 Click start select Windows System and then select Control Panel 2 Under Programs select Programs and Features select IJ Network Device Setup Utility from the list of programs and then click Uninstall Windows 8 1 1 Use the Settings charm on the desktop to open the Control Panel 2 Under Programs select Programs and Features select IJ Network Device Setup Utility from the list of programs an...

Page 746: ... Go menu of Finder double click Canon Utilities IJ Network Device Setup Utility and then drag Canon IJ Network Device Setup Utility icon into Trash 2 Restart computer Empty the Trash and restart your computer Note To reinstall IJ Network Device Setup Utility uninstall IJ Network Device Setup Utility and install it again from the Canon website 746 ...

Page 747: ...s Windows If Windows update starts during setup or if you perform setup while Windows update is in progress it may take a while to register the printer or to perform other processes Wait for a while This is not a malfunction 747 ...

Page 748: ...dows 7 click Start and then click Computer 2 Double click the CD ROM icon in the window that appears If the contents of the CD ROM appear double click MSETUP4 EXE If you cannot install the printer driver with the Setup CD ROM install it from the Canon website Note If the CD ROM icon does not appear try the following Remove the CD ROM from your computer and reinsert it Restart your computer If the ...

Page 749: ...y uninstall the printer driver restart your computer and then reinstall the printer driver Deleting the Unnecessary Printer Driver Reinstall the printer driver with the Setup CD ROM or install it from the Canon website Note If the installer was stopped due to a Windows error Windows operation may be unstable and you may not be able to install the drivers Restart your computer and then reinstall th...

Page 750: ...t jobs HP GL 2 jobs are printed in monochrome or color Printed colors of lines are inaccurate during HP GL 2 printing HP GL 2 jobs are printed 6 mm larger than specified HP GL 2 jobs are printed at maximum size even if a standard size is specified HP GL 2 printing takes a long time The printer stops when printing a HP GL 2 job the carriage stops moving 750 ...

Page 751: ...With HP GL 2 printing is misaligned Check Check the Margin setting Adjust the Margin setting values in the touch screen menu Print settings 751 ...

Page 752: ...HP GL 2 command not supported by this printer Check the print job and settings Check 3 Has the printer received print data that includes HP RTL commands when Auto rotation is ON Set Auto rotation to OFF in the touch screen menu and print again Print settings Check 4 Is Oversize set to Disable Set Oversize to Enable in the touch screen menu Print settings 752 ...

Page 753: ...ck the Width correction setting Change the Width correction setting in the touch screen menu Print settings Check 2 Is Adjust faint lines set to OFF If fine lines are printed faintly setting Adjust faint lines to ON will print the lines more distinctly Print settings 753 ...

Page 754: ...or Check Check the Color mode setting Check the Color mode setting in the touch screen menu Print settings However for optimal Printhead performance the printer consumes trace amounts of color ink even when Monochrome is selected as Color mode 754 ...

Page 755: ...ccurate during HP GL 2 printing Check Is Adjust faint lines set to ON Setting Adjust faint lines to OFF in the touch screen menu may help produce the expected results However lines in some colors may appear broken Print settings 755 ...

Page 756: ...P GL 2 jobs are printed 6 mm larger than specified Check Check the page size of the HP GL 2 print job as created in the source application Set Oversize to OFF in the touch screen menu Print settings 756 ...

Page 757: ... printed at maximum size even if a standard size is specified Check Check the page size of the HP GL 2 print job as created in the source application Set Conserve paper to ON in the touch screen menu Print settings 757 ...

Page 758: ...eck 1 Is the print data size large Large print jobs with a lot of data take longer to print Please wait a while until printing is finished Check 2 Is Input resolution set to 600 dpi Set Input resolution to 300 dpi Adjusting Feed Amount 758 ...

Page 759: ...a HP GL 2 job the carriage stops moving Check 1 The printer is analyzing the print job Please wait a while until printing is finished Check 2 Is Input resolution set to 600 dpi Set Input resolution to 300 dpi Adjusting Feed Amount 759 ...

Page 760: ...s not turn on If the Printer Makes a Strange Sound Messages advising to check the maintenance cartridge are not cleared Printer consumes a lot of ink Printed pages are not collected cleanly in the basket Ink Level Detection 760 ...

Page 761: ...urn on Check 1 Is the power cord plugged in Plug the power cord into the outlet and then turn on the printer Check 2 Is the specified voltage being supplied Check the voltage of the outlet and breaker Specifications 761 ...

Page 762: ...printer even when not printing The following sounds do not indicate a problem with the printer A suction sound can be heard from the platen To prevent the paper from rising the surface of the platen has vacuum holes that create suction on the paper Roll paper makes a fluttering sound during printing There may be a fluttering sound when large paper is advanced You suddenly hear the sound of cleanin...

Page 763: ...following times Please note that no other operations can be performed while Agitating the ink is on the touch screen After the printer is turned on After data transmission After ink tank replacement In other cases contact your Canon dealer 763 ...

Page 764: ...ck the maintenance cartridge are not cleared The newly replaced maintenance cartridge is not recognized Remove the newly replaced maintenance cartridge and then reinsert it again firmly Replacing the Maintenance Cartridge 764 ...

Page 765: ...out System cleaning after the printer has been transported if has not been used for a long time or if there is a problem with the print head Check 3 You have just finished initial installation when more ink is consumed to fill the system If using the printer for the first time or using it after transport the ink tank will supply an initial fill of ink to the print head Although the amount of remai...

Page 766: ...ected cleanly in the basket Check Is the basket in the right position for the media size The optimal basket position depends on factors such as media size or orientation Make sure the basket is used properly Using the Basket 766 ...

Page 767: ...red for that ink tank To restore the function for detecting the remaining ink level replace the ink tank with a new ink tank for that printer Repeatedly removing and inserting the same ink tank can cause the contacts between the ink tank and printer to malfunction ink may leak from the ink tank and the printer may become damaged Releasing ink level detection Ink level detection will be deactivated...

Page 768: ...1 1051 1052 1054 1055 1056 1057 1058 1061 1200 1201 1210 1213 1214 1300 1306 1317 1322 1323 1324 1401 1403 1408 1409 140A 140B 140C 140F 1468 1477 1478 1480 1481 1485 1492 1494 1495 1500 1551 1552 1570 1571 1660 168B 1720 1721 1722 1730 1731 1752 1753 1756 1757 2000 to 2ZZZ 2130 2131 2132 3000 to 3ZZZ 3000 3001 3200 3201 3250 3300 3301 3302 3303 3304 3306 3311 3312 3313 3314 3315 3316 3317 3331 33...

Page 769: ...53 4954 4955 4956 4957 5000 to 5ZZZ 5106 5200 5B16 5B20 5B21 5C00 6000 to 6ZZZ 6502 6700 6702 6820 6900 6901 6902 6910 6911 6920 6921 6930 6931 6932 6933 6940 6941 6942 6943 6944 6945 6946 7000 to 7ZZZ 7050 7051 7052 8000 to 8ZZZ 8200 9000 to 9ZZZ 9000 9110 A000 to ZZZZ B20A B510 769 ...

Page 770: ...at to Do Check the media size and type for the print job on the touch screen and then tap OK Continuing to print Tap Load paper and then load the paper Loading and Printing on Sheets Stopping printing To stop printing tap Cancel on the touch screen or press the Stop button 770 ...

Page 771: ...but no roll is loaded What to Do Tap Load paper on the touch screen and then load the paper roll and print Loading Rolls on the Roll Holder Loading Rolls in the Printer Note To stop printing tap Cancel on the touch screen or press the Stop button 771 ...

Page 772: ... print on a sheet but no sheet is loaded What to Do Tap Load paper on the touch screen and then load cut paper and print Loading and Printing on Sheets Note To stop printing tap Cancel on the touch screen or press the Stop button 772 ...

Page 773: ...the print job and you may not be able to print all of the document Replacing paper Tap Replace the paper and print and print on the touch screen Change the Paper Source in the printer driver or replace the paper with paper of the right length for the print job and then try again Removing the Roll from the Printer Loading Rolls in the Printer Stopping printing To stop printing tap Cancel on the tou...

Page 774: ...t the paper length Specifying the Paper Length 5 If There is a job whose printing is not complete Do you want to print this job appears on the touch screen tap Yes Printing will resume starting from the page on which the error occurred Feed stopped because the end of the paper roll is attached to the core with tape Remove the used roll paper and insert a new roll paper Removing the Roll from the P...

Page 775: ...Note To stop printing press the Stop button 775 ...

Page 776: ...ng paper source for Replace paper What to Do Match the paper source for loading paper with the paper source setting for Replace paper For the roll paper select Roll paper and load it For the cut sheet select Cut sheet and load it 776 ...

Page 777: ... The media type specified in the printer driver is not the same as the media type loaded in the printer What to Do You can continue to print but note that this error may cause problems in the printing results 777 ...

Page 778: ... paper set in Fit Roll Paper Width in the printer driver is not the same as the width of the roll paper loaded in the printer What to Do You can continue to print but note that this error may cause problems in the printing results 778 ...

Page 779: ...1054 Cause The paper in the printer is smaller than the paper size set in the printer driver What to Do You can continue to print but note that this error may cause problems in the printing results 779 ...

Page 780: ...1055 Cause The paper size in the printer cannot be printed borderless What to Do You can continue to print but note that this error may cause problems in the printing results 780 ...

Page 781: ...1056 Cause The paper position is not suitable for borderless printing What to Do You can continue to print but note that this error may cause problems in the printing results 781 ...

Page 782: ...1057 Cause The paper position is not suitable for borderless printing What to Do You can continue to print but note that this error may cause problems in the printing results 782 ...

Page 783: ...at to Do Printing will continue Replace the roll paper in the printer with one that has enough paper for printing as soon as possible Removing the Roll from the Printer Loading Rolls in the Printer Note To stop printing press the Stop button 783 ...

Page 784: ...Tap Cancel to stop printing 2 Change the media type in the printer driver settings to the media type loaded in the printer and then try again Replacing paper Follow the steps below to match the media type in the printer driver and the media type specified for the printer 1 Tap Replace the paper and print 2 Load the paper with the media type specified in the printer driver Loading and Printing on R...

Page 785: ...ead lock lever is closed properly Make sure there are no foreign objects caught in the top cover and then close the top cover If this error appears again close the top cover turn the power off wait a moment and then turn the power back on Note If installing a print head close the top cover after finishing 785 ...

Page 786: ...1201 Cause The ink tank cover is open What to Do Close the ink tank cover 786 ...

Page 787: ...1210 Cause The ink tank cover is open What to Do Close the ink tank cover 787 ...

Page 788: ...1213 Cause Release lever is released What to Do Pull the release lever toward the front If the error occurs again turn off the printer and wait a while before restoring power 788 ...

Page 789: ...eleased What to Do Turn off the power wait a moment and then turn it back on If the error appears again make a note of the detailed error code ECxx xxxx that appears on the touch screen and then turn off the power and contact a Canon customer service center Detailed error codes EC19 2F21 789 ...

Page 790: ...l Paper Clearing a Jammed Sheet 2 Load the paper Loading Rolls in the Printer Loading Sheets in the Printer 3 If There is a job whose printing is not complete Do you want to print this job appears on the touch screen tap Yes Printing will resume starting from the page on which the error occurred If the error appears again the printer may be damaged Contact a Canon customer service center 790 ...

Page 791: ...ed What to Do Follow these steps to load and print on a roll 1 To remove the cut paper tap Remove paper on the touch screen Removing Sheets 2 Load a new roll Loading Rolls in the Printer Note To stop printing tap Cancel on the touch screen or press the Stop button 791 ...

Page 792: ...r roll firmly into the roll holder until it is up against the flange and then insert the roll holder into the printer Loading Rolls on the Roll Holder Important If this message continues to appear even after taking the steps above or if you do not want this message to appear set Skew detection accuracy in the printer menu to OFF or Loose However note that the paper will be printed skewed which cou...

Page 793: ...es Printing will resume starting from the page on which the error occurred Note If this error appears again even after reloading the paper roll remove the roll holder from the printer insert the paper roll firmly into the roll holder until it is up against the flange and then insert the roll holder into the printer Loading Rolls on the Roll Holder This error might also appear if the platen has bee...

Page 794: ... lever remove any paper and then reload paper of suitable size Paper Sizes Loading Rolls in the Printer Loading Sheets in the Printer Note Load unused A4 letter size or larger paper if printing calibration and nozzle check patterns Each calibration may take several sheets of paper 794 ...

Page 795: ... again 1 Tap Remove paper on the touch screen to stop printing 2 Remove the paper roll load cut paper of the size and type specified in the printer driver and then try again Removing the Roll from the Printer Loading and Printing on Sheets Note To stop printing tap Cancel on the touch screen or press the Stop button 795 ...

Page 796: ...1401 Cause Failed to recognize print head What to Do Open the top cover and reattach the print head Replacing the Print Head 796 ...

Page 797: ...ead What to Do Tap OK on the touch screen and then replace the current print head with a new one Replacing the Print Head If you do not have a replacement print head ready turn off the power and replace the print head once you have the new one 797 ...

Page 798: ...ead What to Do Tap OK on the touch screen and then replace the current print head with a new one Replacing the Print Head If you do not have a replacement print head ready turn off the power and replace the print head once you have the new one 798 ...

Page 799: ...ead What to Do Tap OK on the touch screen and then replace the current print head with a new one Replacing the Print Head If you do not have a replacement print head ready turn off the power and replace the print head once you have the new one 799 ...

Page 800: ...ead What to Do Tap OK on the touch screen and then replace the current print head with a new one Replacing the Print Head If you do not have a replacement print head ready turn off the power and replace the print head once you have the new one 800 ...

Page 801: ...140B Cause Failed to recognize print head What to Do Open the top cover and reattach the print head Replacing the Print Head 801 ...

Page 802: ...140C Cause There is a problem with the print head What to Do Turn off the power wait a moment and then turn it back on 802 ...

Page 803: ...ead What to Do Tap OK on the touch screen and then replace the current print head with a new one Replacing the Print Head If you do not have a replacement print head ready turn off the power and replace the print head once you have the new one 803 ...

Page 804: ...e power wait a moment and then turn it back on If the error appears again make a note of the detailed error code ECxx xxxx that appears on the touch screen and then turn off the power and contact a Canon customer service center Detailed error codes EC55 2F24 804 ...

Page 805: ...1477 Cause There is a problem with the print head What to Do Open the top cover and replace the print head with a new one Replacing the Print Head 805 ...

Page 806: ...ead What to Do Tap OK on the touch screen and then replace the current print head with a new one Replacing the Print Head If you do not have a replacement print head ready turn off the power and replace the print head once you have the new one 806 ...

Page 807: ...1480 Cause The attached print head was previously used in a different model What to Do Attach the correct print head Replacing the Print Head 807 ...

Page 808: ...1481 Cause The attached print head was previously used in a model that uses a different ink set What to Do Attach the correct print head Replacing the Print Head 808 ...

Page 809: ...1485 Cause Cannot use attached print head What to Do Attach the correct print head Replacing the Print Head 809 ...

Page 810: ... moment and then turn it back on If the error appears again make a note of the detailed error code ECxx xxxx that appears on the touch screen and then turn off the power and contact a Canon customer service center Detailed error codes EC02 2F42 EC21 2F44 EC3F 2F40 EC3F 2F41 810 ...

Page 811: ...rint head What to Do Turn off the power wait a moment and then turn it back on If the error appears again remove and reattach the print head Replacing the Print Head If that does not get rid of the error replace the print head with a new one 811 ...

Page 812: ...ncel on the touch screen to stop printing 2 Clean the print head Cleaning the Print Head If this message still appears when printing replace the print head Replacing the Print Head Important To continue printing use the touch screen and tap Continue printing However the print results may not be satisfactory 812 ...

Page 813: ...1500 Cause The ink in the ink tank is running low What to Do Prepare a new ink tank 813 ...

Page 814: ...1551 Cause A genuine Canon ink tank with a history of past use has been detected What to Do To dismiss the message tap OK on the touch screen 814 ...

Page 815: ...1552 Cause A genuine Canon ink tank has been inserted What to Do To dismiss the message tap OK on the touch screen 815 ...

Page 816: ...tank has run out What to Do Open the ink tank cover and then replace the ink tank before the ink in the sub ink tank of this printer becomes insufficient Replacing Ink Tanks Note You can replace the ink tank even while printing 816 ...

Page 817: ...1571 Cause Ink tank removed during printing What to Do If replacing the ink tank insert a new ink tank Replacing Ink Tanks 817 ...

Page 818: ...1660 Cause Ink tank not inserted What to Do Insert the ink tank correctly Replacing Ink Tanks 818 ...

Page 819: ...168B Cause The ink tank cannot be recognized Printing cannot be executed because the ink tank may not be compatible with this printer What to Do Install the appropriate ink tank 819 ...

Page 820: ...1720 Cause The maintenance cartridge is full It needs to be replaced What to Do Replace the maintenance cartridge Replacing the Maintenance Cartridge 820 ...

Page 821: ...1721 Cause The maintenance cartridge is not installed What to Do Install the maintenance cartridge Replacing the Maintenance Cartridge 821 ...

Page 822: ...use Incorrect type of maintenance cartridge What to Do Insert the correct maintenance cartridge Replacing the Maintenance Cartridge If this error continues to appear contact a Canon customer service center 822 ...

Page 823: ...se it By this operation the fact that you have disabled the function for detecting the remaining ink level will be memorized Please be advised that Canon shall not be liable for any malfunction or trouble caused by continuation of printing under the ink out condition or by using refilled ink tanks Note If the function for detecting the remaining ink level is disabled the ink tank in gray is displa...

Page 824: ... it By this operation the fact that you have disabled the function for detecting the remaining ink level will be memorized Please be advised that Canon shall not be liable for any malfunction or trouble caused by using a non genuine Canon ink tank Note If the function for detecting the remaining ink level is disabled the ink tank in gray is displayed on the touch screen when checking the current i...

Page 825: ...1752 Cause The ink has run out What to Do Open the ink tank cover and then replace the ink tank Replacing Ink Tanks 825 ...

Page 826: ...isable the function for detecting the remaining ink level To disable this function press and hold the printer s Stop button for at least 5 seconds and then release it With this operation disabling the function for detecting the remaining ink level is memorized Please be advised that Canon shall not be liable for any malfunction or trouble caused by continuation of printing under the ink out condit...

Page 827: ...1756 Cause The ink may become insufficient What to Do To perform the next process or to continue the specified process replace the ink tank Replacing Ink Tanks 827 ...

Page 828: ...annot fill ink reserve tank What to Do Check the touch screen remove the ink tank for the affected color and then reinsert it If the inserted ink tank is empty replace it with a new ink tank Replacing Ink Tanks 828 ...

Page 829: ...the paper and print then remove the roll paper Removing the Roll from the Printer Removing Rolls From the Roll Holder 2 Replace the paper with paper of the width set in the printer driver Loading Rolls on the Roll Holder Loading Rolls in the Printer Printing begins Note To change print settings in Windows select Fit Roll Paper Width in the printer driver and set the roll paper width in the dialog ...

Page 830: ...lace the paper and print then remove the roll paper Removing the Roll from the Printer Removing Rolls From the Roll Holder 2 Replace the paper with paper of the width set in the printer driver Loading Rolls on the Roll Holder Loading Rolls in the Printer Printing begins Note To change print settings in Windows select Fit Roll Paper Width in the printer driver and set the roll paper width in the di...

Page 831: ... Do Roll Tap Replace the paper and print on the touch screen or tip back the release lever and replace the paper with paper of the correct size Loading Rolls in the Printer To stop printing tap Cancel or press the Stop button Sheet Tip back the release lever remove any paper and then load paper of the same size and type as the first page Loading Sheets in the Printer To stop printing press the Sto...

Page 832: ...3000 Cause The print head has not been calibrated What to Do Print head alignment is recommended Adjusting the Print Head Note This message will appear until Print head alignment is carried out 832 ...

Page 833: ...3001 Cause The print head nozzle is becoming blocked What to Do Check the printed materials If the printed materials are scratched clean the print head Cleaning the Print Head 833 ...

Page 834: ...e It is almost time to replace consumables for which service is required What to Do This can used for a little while until the message Part replacement needed appears Contact your Canon dealer for assistance 834 ...

Page 835: ...3201 Cause It is past the recommended time to replace consumables for which service is required What to Do Contact your Canon dealer for assistance 835 ...

Page 836: ...tenance cartridge is almost full What to Do Prepare a new maintenance cartridge because an error may occur if you continue to use the printer while the maintenance cartridge is full Replacing the Maintenance Cartridge 836 ...

Page 837: ...3300 Cause Printer memory is full in HP GL 2 emulation mode What to Do Check the print data Printing will continue but you may not obtain correct printing results Check the printing results 837 ...

Page 838: ...3301 Cause Parameter specified in HP GL 2 command is not supported What to Do Check the print data Printing will continue but you may not obtain correct printing results Check the printing results 838 ...

Page 839: ...3302 Cause Unsupported HP GL 2 command was used What to Do Check the print data Printing will continue but you may not obtain correct printing results Check the printing results 839 ...

Page 840: ...3303 Cause Printer memory is full in HP GL 2 emulation mode What to Do Check the print data Printing will continue but you may not obtain correct printing results Check the printing results 840 ...

Page 841: ...3304 Cause Printer memory is full in HP GL 2 emulation mode What to Do Check the print data Printing will continue but you may not obtain correct printing results Check the printing results 841 ...

Page 842: ...ool and then recover the media information Media Configuration Tool Guide To set the Media Configuration Tool to recovery mode open the Media Configuration Tool select this device and then click OK Select and load the media information backup file If you do not have a media information backup file contact a Canon customer service center 842 ...

Page 843: ...Incorrect print data Illegal number of parameters What to Do Defective print data please check the print results If using printing software such as RIP Raster Image Processor contact the software manufacturer 843 ...

Page 844: ...correct print data Required items have been omitted What to Do Defective print data please check the print results If using printing software such as RIP Raster Image Processor contact the software manufacturer 844 ...

Page 845: ...Cause Incorrect print data Data out of range What to Do Defective print data please check the print results If using printing software such as RIP Raster Image Processor contact the software manufacturer 845 ...

Page 846: ...Incorrect print data Resolution value out of range What to Do Defective print data please check the print results If using printing software such as RIP Raster Image Processor contact the software manufacturer 846 ...

Page 847: ...rrect print data Compression method value out of range What to Do Defective print data please check the print results If using printing software such as RIP Raster Image Processor contact the software manufacturer 847 ...

Page 848: ...rint data Incorrect data formatting color sequence bit count What to Do Defective print data please check the print results If using printing software such as RIP Raster Image Processor contact the software manufacturer 848 ...

Page 849: ...nt data Illegal combination of resolution and image data format What to Do Defective print data please check the print results If using printing software such as RIP Raster Image Processor contact the software manufacturer 849 ...

Page 850: ...3331 Cause Print results may be abnormal as there is a large volume of print data What to Do Check the print job 850 ...

Page 851: ...he JPEG data Printable file formats are as follows Files which conforms to JFIF 1 02 Processing method Basic DCT Color mode RGB GrayScale Number of colors 24bit 8bit Number of pixels 38400 or less vertically and horizontally Does not support some samplings 851 ...

Page 852: ...he JPEG data Printable file formats are as follows Files which conforms to JFIF 1 02 Processing method Basic DCT Color mode RGB GrayScale Number of colors 24bit 8bit Number of pixels 38400 or less vertically and horizontally Does not support some samplings 852 ...

Page 853: ...mage processing What to Do Print the image without rotating it To change image rotation when printing Setup Device settings Print settings JPEG print settings Paper settings Rotate Note You may be able to print the file by increasing JPEG file compression 853 ...

Page 854: ...a information set at the printer does not match the media information at the printer driver update the media information at the printer driver Updating Media Information in Printer Driver Windows Updating Media Information in Printer Driver macOS If using printing software such as RIP Raster Image Processor contact the software manufacturer 854 ...

Page 855: ...use Print data contains illegal image processing table What to Do Check the print job image processing table If using printing software such as RIP Raster Image Processor contact the software manufacturer 855 ...

Page 856: ...ror Check that the address and port numbers of the sending mail server SMTP server are correct in the Remote UI mail server settings Setting Mail Server If this does not resolve the error check the status of the mail server Contact the mail server administrator to check the server settings and status 856 ...

Page 857: ...or Check that the address and port numbers of the receiving mail server POP3 server are correct in the Remote UI mail server settings Setting Mail Server If this does not resolve the error check the status of the mail server Contact the mail server administrator to check the server settings and status 857 ...

Page 858: ...uch screen to dismiss the error Check that the mail server and device secure connection SSL settings match Check the secure connection SSL settings in Remote UI Setting Mail Server Contact the mail server administrator to configure a secure connection SSL to the mail server 858 ...

Page 859: ...uch screen to dismiss the error Check that the mail server and device secure connection SSL settings match Check the secure connection SSL settings in Remote UI Setting Mail Server Contact the mail server administrator to configure a secure connection SSL to the mail server 859 ...

Page 860: ...iss the error Check that the sending mail server SMTP server is correctly configured in the Remote UI mail server settings Setting Mail Server If this does not resolve the error check the status of the mail server Contact the mail server administrator to check the server settings and status 860 ...

Page 861: ...miss the error Check that the sending account and password are correctly configured in the Remote UI mail server settings Setting Mail Server If this does not resolve the error check the status of the mail server Contact the mail server administrator to check the server settings and status 861 ...

Page 862: ...ss the error Check that the receiving mail server POP3 server is correctly configured in the Remote UI mail server settings Setting Mail Server If this does not resolve the error check the status of the mail server Contact the mail server administrator to check the server settings and status 862 ...

Page 863: ...iss the error Check that the receiving account and password are correctly configured in the Remote UI mail server settings Setting Mail Server If this does not resolve the error check the status of the mail server Contact the mail server administrator to check the server settings and status 863 ...

Page 864: ...the touch screen to dismiss the error Check that the settings on the mail server and the APOP settings on this device match Check this device s APOP settings in Remote UI Setting Mail Server Contact the mail server administrator for configuring APOP on the mail server 864 ...

Page 865: ...on the touch screen to dismiss the error Check if the Remote UI mail server settings are correct Setting Mail Server If this does not resolve the error check the status of the mail server Contact the mail server administrator to check the server settings and status 865 ...

Page 866: ...3424 Cause Sending mail failed What to Do Tap OK on the touch screen to dismiss the error Specify the correct destination mail address and try again 866 ...

Page 867: ...the touch screen to dismiss the error Check the network configuration and change the network configuration to prevent a conflict with other network devices For details on changing the network configuration refer to the documentation for your network device 867 ...

Page 868: ...4111 Cause The media type specified is incompatible with this device What to Do Tap OK on the touch screen to dismiss the error Check the media type settings and then try again 868 ...

Page 869: ...below to replace the printer paper with paper that can be printed borderless 1 Tap Replace the paper and print on the touch screen then remove the roll paper Removing the Roll from the Printer Removing Rolls From the Roll Holder 2 Replace the printer paper with paper that can be printed borderless Loading Rolls on the Roll Holder Loading Rolls in the Printer Printing with a border Tap Print with b...

Page 870: ...ving Rolls From the Roll Holder 2 Replace the printer paper with paper that can be printed borderless Loading Rolls on the Roll Holder Loading Rolls in the Printer Printing with a border Tap Print with border on the touch screen Printing with a border is now enabled Note Because paper expands or contracts depending on the environment of use it may become narrower or wider than the supported width ...

Page 871: ... be printed borderless 1 Tap Replace the paper and print on the touch screen then remove the roll paper Removing the Roll from the Printer Removing Rolls From the Roll Holder 2 Replace the printer paper with paper that can be printed borderless Loading Rolls on the Roll Holder Loading Rolls in the Printer Printing with a border Tap Print with border on the touch screen Printing with a border is no...

Page 872: ... firmly until it is against the roll holder flange Loading Rolls on the Roll Holder Printing with a border Tap Print with border on the touch screen Printing with a border is now enabled Stopping printing Tap Cancel on the touch screen to stop printing Note To force the printer to print set Detect paper setting mismatch in the touch screen menu to Do not detect However note that this error may aff...

Page 873: ...o stop printing 2 Check that the printer driver for the printer has been selected and then try again See the media information list for media types compatible with borderless printing Paper Information List Printing with a border Tap Print with border on the touch screen Printing with a border is now enabled Note To force the printer to print set Detect paper setting mismatch in the touch screen m...

Page 874: ...EC06 2F9A EC06 2F9B EC06 2F9C EC0F 2F96 EC11 2F2A EC12 2F29 EC12 2F2B EC12 2F2C EC13 2F17 EC15 2E23 EC16 2021 EC16 2022 EC16 2027 EC16 202A EC16 2038 EC21 2F51 EC21 2F54 EC21 2F57 EC21 2F59 EC21 2F61 EC21 2F67 EC21 2F70 EC21 2F71 EC21 2F72 EC22 2F30 EC22 2F47 EC23 260E EC23 2F11 EC23 2F18 EC23 2F32 EC25 2F16 EC31 2F1C EC31 2F1D EC31 2F1E EC31 2F1F EC31 2F22 EC33 2601 EC33 2F3A EC33 2F3D EC33 2F3E ...

Page 875: ...e power wait a moment and then turn it back on If the error appears again make a note of the detailed error code ECxx xxxx that appears on the touch screen and then turn off the power and contact a Canon customer service center Detailed error codes EC51 203C 875 ...

Page 876: ...d then turn it back on If the error appears again make a note of the detailed error code ECxx xxxx that appears on the touch screen and then turn off the power and contact a Canon customer service center Detailed error codes EC51 3304 EC51 3306 EC51 3307 EC51 3308 EC51 3309 EC51 330A 876 ...

Page 877: ...low the steps below to replace the paper with roll paper of the width set in the printer driver 1 Tap Replace the paper and print then remove the roll paper Removing the Roll from the Printer Removing Rolls From the Roll Holder 2 Replace the paper with paper of the width set in the printer driver Loading Rolls on the Roll Holder Loading Rolls in the Printer Printing begins Note To change print set...

Page 878: ...er settings to the media type loaded in the printer and then try again Replacing paper Follow the steps below to match the media type in the printer driver and the media type specified for the printer 1 Tap Cancel on the touch screen to stop printing 2 Load the paper with the media type set in the printer driver and then try again Loading and Printing on Rolls Loading and Printing on Sheets Printi...

Page 879: ...paper that can be printed borderless Loading Rolls on the Roll Holder Loading Rolls in the Printer Printing begins Note See the media information list for media types compatible with borderless printing Paper Information List Reloading paper Tap Replace the paper and print on the touch screen and then load the paper so that the edges are inside the borderless printing ink grooves Insert the roll p...

Page 880: ...inting will resume starting from the page on which the error occurred Loading Rolls in the Printer A foreign object near the output slot is obstructing the cutter blade Follow the steps below to resume printing 1 Open the top cover and remove any foreign objects 2 If There is a job whose printing is not complete Do you want to print this job appears on the touch screen tap Yes Printing will resume...

Page 881: ...e media information list for paper types that can be used with Automatic cut Paper Information List If this does not apply there may be a cutter blade malfunction Contact your Canon dealer for assistance 881 ...

Page 882: ...e sensors to malfunction The test pattern was printed too faintly What to Do Tap OK on the touch screen to dismiss the error and then take the following actions Load unused paper Make adjustments to ensure that the printer is not exposed to strong light Print a nozzle check pattern to check the print head status If the pattern has gaps or horizontal white lines the print head nozzle is blocked Cle...

Page 883: ...e the printer is loaded with very transparent film type paper What to Do Tap OK on the touch screen to dismiss the error We recommend calibrating the print head with a frequently used non film paper Automatic Adjustment to Straighten Lines and Colors 883 ...

Page 884: ...t head alignment 1 Tap OK on the touch screen to dismiss the error 2 Print a test pattern to check the nozzles Checking for Nozzle Clogging 3 If the nozzle is blocked clean the print head Cleaning the Print Head 4 Repeat Print head alignment Automatic Adjustment to Straighten Lines and Colors 884 ...

Page 885: ...t head alignment 1 Tap OK on the touch screen to dismiss the error 2 Print a test pattern to check the nozzles Checking for Nozzle Clogging 3 If the nozzle is blocked clean the print head Cleaning the Print Head 4 Repeat Print head alignment Automatic Adjustment to Straighten Lines and Colors 885 ...

Page 886: ...t head alignment 1 Tap OK on the touch screen to dismiss the error 2 Print a test pattern to check the nozzles Checking for Nozzle Clogging 3 If the nozzle is blocked clean the print head Cleaning the Print Head 4 Repeat Print head alignment Automatic Adjustment to Straighten Lines and Colors 886 ...

Page 887: ...o check the nozzles Checking for Nozzle Clogging 2 If the nozzle is blocked clean the print head Cleaning the Print Head 3 Retry Print head alignment Automatic Adjustment to Straighten Lines and Colors If any print head nozzles are still blocked replace the print head Replacing the Print Head If the error appears again the printer may be damaged Contact a Canon customer service center 887 ...

Page 888: ...4950 Cause WPS Push button method connection failed What to Do Follow the instructions on the touch screen to try connecting to the wireless LAN router again 888 ...

Page 889: ...4951 Cause AOSS BUFFALO connection failed What to Do Follow the instructions on the touch screen to try connecting to the wireless LAN router again 889 ...

Page 890: ...4952 Cause Failed to connect to the wireless LAN router What to Do Follow the instructions on the touch screen to try connecting to the wireless LAN router again 890 ...

Page 891: ...4953 Cause Failed to acquire IP address What to Do Check the information that appears on the touch screen and then try connecting again 891 ...

Page 892: ...4954 Cause Failed to set up wireless LAN using Easy wireless connect What to Do Tap OK on the touch screen to dismiss the error and then configure the settings again 892 ...

Page 893: ...4955 Cause IPv4 IPv6 settings were changed but wired LAN and wireless LAN are disabled What to Do Tap OK on the touch screen to dismiss the error and then enable wired LAN or wireless LAN 893 ...

Page 894: ...but they cannot be changed for the following reasons Printer is operating Printer currently being configured using Remote UI What to Do Tap OK on the touch screen to dismiss the error exit other processes and then configure the settings again 894 ...

Page 895: ...4957 Cause Raku Raku WLAN Start NEC connection failed What to Do Tap OK on the touch screen to dismiss the error and try connecting again 895 ...

Page 896: ... occurred What to Do Make a note of the detailed error code ECxx xxxx that appears on the touch screen and then turn off the power and unplug the power cord Contact your Canon dealer for assistance Detailed error codes EC03 4061 896 ...

Page 897: ...power and unplug the power cord Wait a moment and turn the power back on If the error appears again make a note of the detailed error code ECxx xxxx that appears on the touch screen and then contact a Canon customer service center Detailed error codes EC21 2F7E 897 ...

Page 898: ... occurred What to Do Make a note of the detailed error code ECxx xxxx that appears on the touch screen and then turn off the power and unplug the power cord Contact your Canon dealer for assistance Detailed error codes EC22 4001 898 ...

Page 899: ... Make a note of the detailed error code ECxx xxxx that appears on the touch screen and then turn off the power and unplug the power cord Contact your Canon dealer for assistance Detailed error codes EC25 4001 EC41 4001 EC43 4001 EC44 4001 EC47 4001 899 ...

Page 900: ... occurred What to Do Make a note of the detailed error code ECxx xxxx that appears on the touch screen and then turn off the power and unplug the power cord Contact your Canon dealer for assistance Detailed error codes EC48 4001 900 ...

Page 901: ... occurred What to Do Make a note of the detailed error code ECxx xxxx that appears on the touch screen and then turn off the power and unplug the power cord Contact your Canon dealer for assistance Detailed error codes EC31 4001 901 ...

Page 902: ...power and unplug the power cord Wait a moment and turn the power back on If the error appears again make a note of the detailed error code ECxx xxxx that appears on the touch screen and then contact a Canon customer service center Detailed error codes EC56 2FE0 902 ...

Page 903: ... occurred What to Do Make a note of the detailed error code ECxx xxxx that appears on the touch screen and then turn off the power and unplug the power cord Contact your Canon dealer for assistance Detailed error codes EC57 404F 903 ...

Page 904: ... occurred What to Do Make a note of the detailed error code ECxx xxxx that appears on the touch screen and then turn off the power and unplug the power cord Contact your Canon dealer for assistance Detailed error codes EC57 4040 904 ...

Page 905: ...code ECxx xxxx that appears on the touch screen and then turn off the power and unplug the power cord Contact your Canon dealer for assistance Detailed error codes EC07 4060 EC51 4041 EC51 4042 EC51 4045 EC51 4046 EC51 4047 EC51 404C EC51 404D EC51 404E EC51 4070 EC51 4071 EC51 4072 905 ...

Page 906: ...power and unplug the power cord Wait a moment and turn the power back on If the error appears again make a note of the detailed error code ECxx xxxx that appears on the touch screen and then contact a Canon customer service center Detailed error codes EC51 3000 906 ...

Page 907: ...power and unplug the power cord Wait a moment and turn the power back on If the error appears again make a note of the detailed error code ECxx xxxx that appears on the touch screen and then contact a Canon customer service center Detailed error codes EC51 3001 907 ...

Page 908: ...power and unplug the power cord Wait a moment and turn the power back on If the error appears again make a note of the detailed error code ECxx xxxx that appears on the touch screen and then contact a Canon customer service center Detailed error codes EC51 3006 908 ...

Page 909: ...power and unplug the power cord Wait a moment and turn the power back on If the error appears again make a note of the detailed error code ECxx xxxx that appears on the touch screen and then contact a Canon customer service center Detailed error codes EC51 3002 909 ...

Page 910: ...power and unplug the power cord Wait a moment and turn the power back on If the error appears again make a note of the detailed error code ECxx xxxx that appears on the touch screen and then contact a Canon customer service center Detailed error codes EC51 3003 910 ...

Page 911: ...power and unplug the power cord Wait a moment and turn the power back on If the error appears again make a note of the detailed error code ECxx xxxx that appears on the touch screen and then contact a Canon customer service center Detailed error codes EC51 3004 911 ...

Page 912: ...power and unplug the power cord Wait a moment and turn the power back on If the error appears again make a note of the detailed error code ECxx xxxx that appears on the touch screen and then contact a Canon customer service center Detailed error codes EC51 3005 912 ...

Page 913: ...power and unplug the power cord Wait a moment and turn the power back on If the error appears again make a note of the detailed error code ECxx xxxx that appears on the touch screen and then contact a Canon customer service center Detailed error codes EC51 3100 913 ...

Page 914: ...power and unplug the power cord Wait a moment and turn the power back on If the error appears again make a note of the detailed error code ECxx xxxx that appears on the touch screen and then contact a Canon customer service center Detailed error codes EC51 3101 914 ...

Page 915: ...power and unplug the power cord Wait a moment and turn the power back on If the error appears again make a note of the detailed error code ECxx xxxx that appears on the touch screen and then contact a Canon customer service center Detailed error codes EC51 3102 915 ...

Page 916: ...power and unplug the power cord Wait a moment and turn the power back on If the error appears again make a note of the detailed error code ECxx xxxx that appears on the touch screen and then contact a Canon customer service center Detailed error codes EC51 3103 916 ...

Page 917: ...power and unplug the power cord Wait a moment and turn the power back on If the error appears again make a note of the detailed error code ECxx xxxx that appears on the touch screen and then contact a Canon customer service center Detailed error codes EC51 3104 917 ...

Page 918: ...power and unplug the power cord Wait a moment and turn the power back on If the error appears again make a note of the detailed error code ECxx xxxx that appears on the touch screen and then contact a Canon customer service center Detailed error codes EC51 3105 918 ...

Page 919: ...power and unplug the power cord Wait a moment and turn the power back on If the error appears again make a note of the detailed error code ECxx xxxx that appears on the touch screen and then contact a Canon customer service center Detailed error codes EC51 3106 919 ...

Page 920: ...power and unplug the power cord Wait a moment and turn the power back on If the error appears again make a note of the detailed error code ECxx xxxx that appears on the touch screen and then contact a Canon customer service center Detailed error codes EC51 3107 920 ...

Page 921: ...power and unplug the power cord Wait a moment and turn the power back on If the error appears again make a note of the detailed error code ECxx xxxx that appears on the touch screen and then contact a Canon customer service center Detailed error codes EC51 3108 921 ...

Page 922: ...power and unplug the power cord Wait a moment and turn the power back on If the error appears again make a note of the detailed error code ECxx xxxx that appears on the touch screen and then contact a Canon customer service center Detailed error codes EC51 3109 922 ...

Page 923: ...power and unplug the power cord Wait a moment and turn the power back on If the error appears again make a note of the detailed error code ECxx xxxx that appears on the touch screen and then contact a Canon customer service center Detailed error codes EC51 3110 923 ...

Page 924: ... occurred What to Do Make a note of the detailed error code ECxx xxxx that appears on the touch screen and then turn off the power and unplug the power cord Contact your Canon dealer for assistance Detailed error codes EC51 5001 924 ...

Page 925: ... occurred What to Do Make a note of the detailed error code ECxx xxxx that appears on the touch screen and then turn off the power and unplug the power cord Contact your Canon dealer for assistance Detailed error codes EC51 5002 925 ...

Page 926: ... occurred What to Do Make a note of the detailed error code ECxx xxxx that appears on the touch screen and then turn off the power and unplug the power cord Contact your Canon dealer for assistance Detailed error codes EC51 5003 926 ...

Page 927: ...What to Do Make a note of the detailed error code ECxx xxxx that appears on the touch screen and then turn off the power and unplug the power cord Contact your Canon dealer for assistance Detailed error codes EC24 4049 EC24 404A EC24 404B 927 ...

Page 928: ... occurred What to Do Make a note of the detailed error code ECxx xxxx that appears on the touch screen and then turn off the power and unplug the power cord Contact your Canon dealer for assistance Detailed error codes EC51 2F07 928 ...

Page 929: ...rred What to Do Make a note of the detailed error code ECxx xxxx that appears on the touch screen and then turn off the power and unplug the power cord Contact your Canon dealer for assistance Detailed error codes EC52 4038 EC52 4039 929 ...

Page 930: ... occurred What to Do Make a note of the detailed error code ECxx xxxx that appears on the touch screen and then turn off the power and unplug the power cord Contact your Canon dealer for assistance Detailed error codes EC03 403A 930 ...

Page 931: ... occurred What to Do Make a note of the detailed error code ECxx xxxx that appears on the touch screen and then turn off the power and unplug the power cord Contact your Canon dealer for assistance Detailed error codes EC32 4001 931 ...

Reviews: