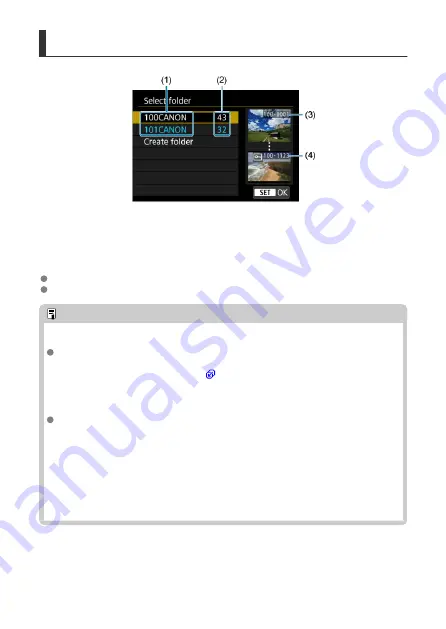
Selecting a Folder
(1) Folder name
(2) Number of images in folder
(3) Lowest file number
(4) Highest file number
Select a folder on the folder selection screen.
Captured images are stored in your selected folder.
Note
Folders
A folder can contain up to 9999 images (file number 0001–9999). When a folder
becomes full, a new folder with the folder number increased by one is created
automatically. Also, if manual reset (
) is executed, a new folder will be created
automatically. Folders numbered from 100 to 999 can be created.
Creating folders with a computer
With the card open on the screen, create a new folder with “
DCIM
” as the name.
Open the DCIM folder and create as many folders as necessary to save and
organize your images. “
100ABC_D
” is the required format for folder names, and
the first three digits must be a folder number in the range 100–999. The last five
characters can be any combination of upper- and lower-case letters from A to Z,
numerals, and the underscore “_”. The space cannot be used. Also note that two
folder names cannot share the same three-digit folder number (for example,
“100ABC_D” and “100W_XYZ”) even if the remaining five characters in each name
are different.
227
Summary of Contents for RowerShot V10
Page 1: ...Advanced User Guide E CT2 D251 A CANON INC 2023 ...
Page 13: ...Note To stream video see Live Streaming 13 ...
Page 24: ...Attaching the Strap Attach the included wrist strap to the camera strap mount 24 ...
Page 28: ...3 Close the cover 28 ...
Page 37: ...Menu Operations and Settings Menu Screen Menu Setting Procedure Dimmed Menu Items 37 ...
Page 86: ...Grid A grid can be displayed on the screen 1 Select Grid display 2 Select an option 86 ...
Page 111: ...Note You can also magnify display by double tapping with one finger 111 ...
Page 119: ...4 Erase the image Select Erase 119 ...
Page 121: ...4 Erase the images Select OK 121 ...
Page 123: ...4 Erase the images Select OK 123 ...
Page 152: ...Note When you will not use Bluetooth setting Bluetooth settings to Disable is recommended 152 ...
Page 181: ...5 Set the IP address Go to Setting the IP Address 181 ...
Page 184: ...4 Set the IP address Go to Setting the IP Address 184 ...
Page 197: ...3 Use the connected device as needed 197 ...
Page 203: ...1 Select Wi Fi settings 2 Select MAC address 3 Check the MAC address 203 ...
Page 226: ...3 Select OK 226 ...
Page 241: ...Language 1 Select Language To set it initially select Language 2 Set the desired language 241 ...
Page 258: ...The camera turns off by itself A power saving feature is enabled 258 ...


