5
-4
Specify the Recording Period and Day of the
Week
• To record for the entire day without specifying a
starting and ending time, click [All Day].
• To specify a recording period, enter the start time
in [Start Time] and the end time in [End Time]. Use
these items when you want to specify a recording
time that goes past midnight, such as when
recording late into the night. Alternately, select a
duration for the recording (minimum of 15 min.) in
the [Duration] field.
Note
• You cannot specify overlapping recording schedules on the
same camera.
• The time of the recording schedules is based on the Storage
Server clock. We recommend that you synchronize the clocks
on all the Storage Server you are using.
• If you set the operating system to automatically handle daylight
saving time, the time will be automatically adjusted on the first
and last days of the daylight saving time period.
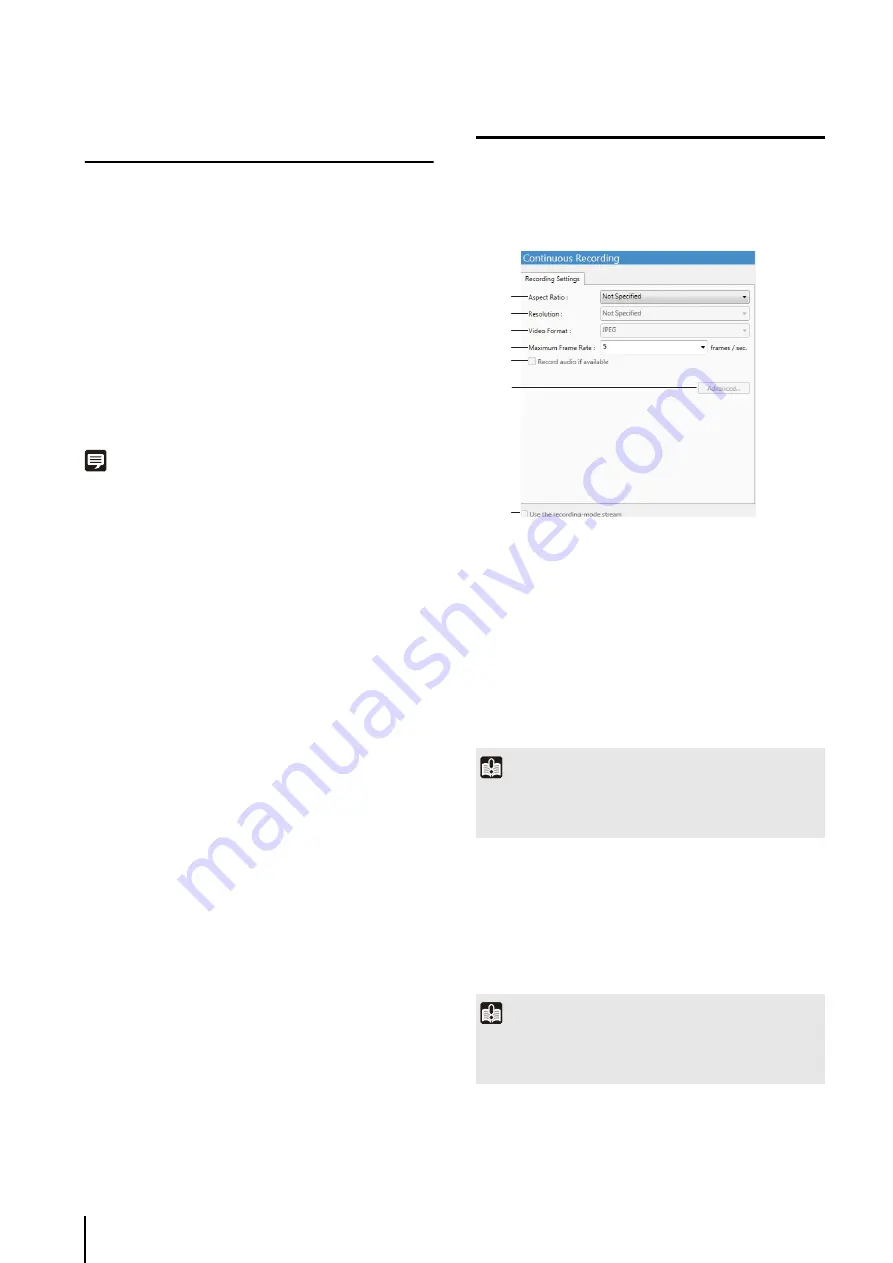
Configure the Recording Mode
➀
[Aspect Ratio]
Specify the aspect ratio ([4:3]).
If you select [Not specified], the camera’s aspect ratio
setting is used for recording.
➁
[Resolution]
Set the [Aspect Ratio] to [4:3] to make this setting
available and specify the resolution ([160x120],
[320x240], [640x480] or [1280x960]).
If you select [Not Specified] for the [Resolution], the
camera’s resolution setting is used for recording.
➂
[Video Format]
Fixed at [JPEG].
➃
[Maximum Frame Rate]
Specify the maximum frame rate (number of frames
recorded in one second) in the range from 0.1 to
5 frames per second (fps).
1
S
pecify the recording period.
2
S
elect the check boxes for the days of the week on
which to repeat the recording in [Repeat On].
1
Click [Continuous Recording] in the recording mode
list and select the check box.
2
Configure the video format of the recorded image.
Important
The size of the recording file increases as the resolution
becomes higher. Make sure there is sufficient hard disk space
available before specifying a higher resolution.
Important
The size of the recording file increases as the frame rate
becomes higher. Make sure there is sufficient hard disk space
available before specifying a higher frame rate.
➀
➂
➃
➄
➅
➁
➆
Summary of Contents for RM-Lite 1.0
Page 7: ...vii ...
Page 12: ...xii ...
Page 22: ...1 10 ...
Page 23: ...Chapter 2 Setup How to install the software Settings after installation ...
Page 28: ...2 6 ...
Page 43: ...Chapter 4 Viewer Settings Configuring the Viewer Configuring a camera Creating a layout ...
Page 56: ...4 14 ...
Page 76: ...6 14 ...
Page 82: ...7 6 ...
Page 86: ...8 4 ...
Page 96: ...9 10 ...
Page 97: ...Appendix ...
Page 103: ...Index 10 7 Appendix ...


