

Canon U.S.A., Inc.
Rayo S1
Quick Guide
(Scan to open the User Guide)
For more details, please refer to the User Guide on our homepage (http://www.usa.canon.com/rayomanual).
Please read the following instructions and safety precautions before using the Projector.
What’s in the Box
Please check whether the following items are included in the box:
* Items included in the box are subject to change without prior notice.
Main body
USB cable (1m)
USB Type-A to Micro-USB
Quick Guide
USB Charger (2.4A)
Warranty
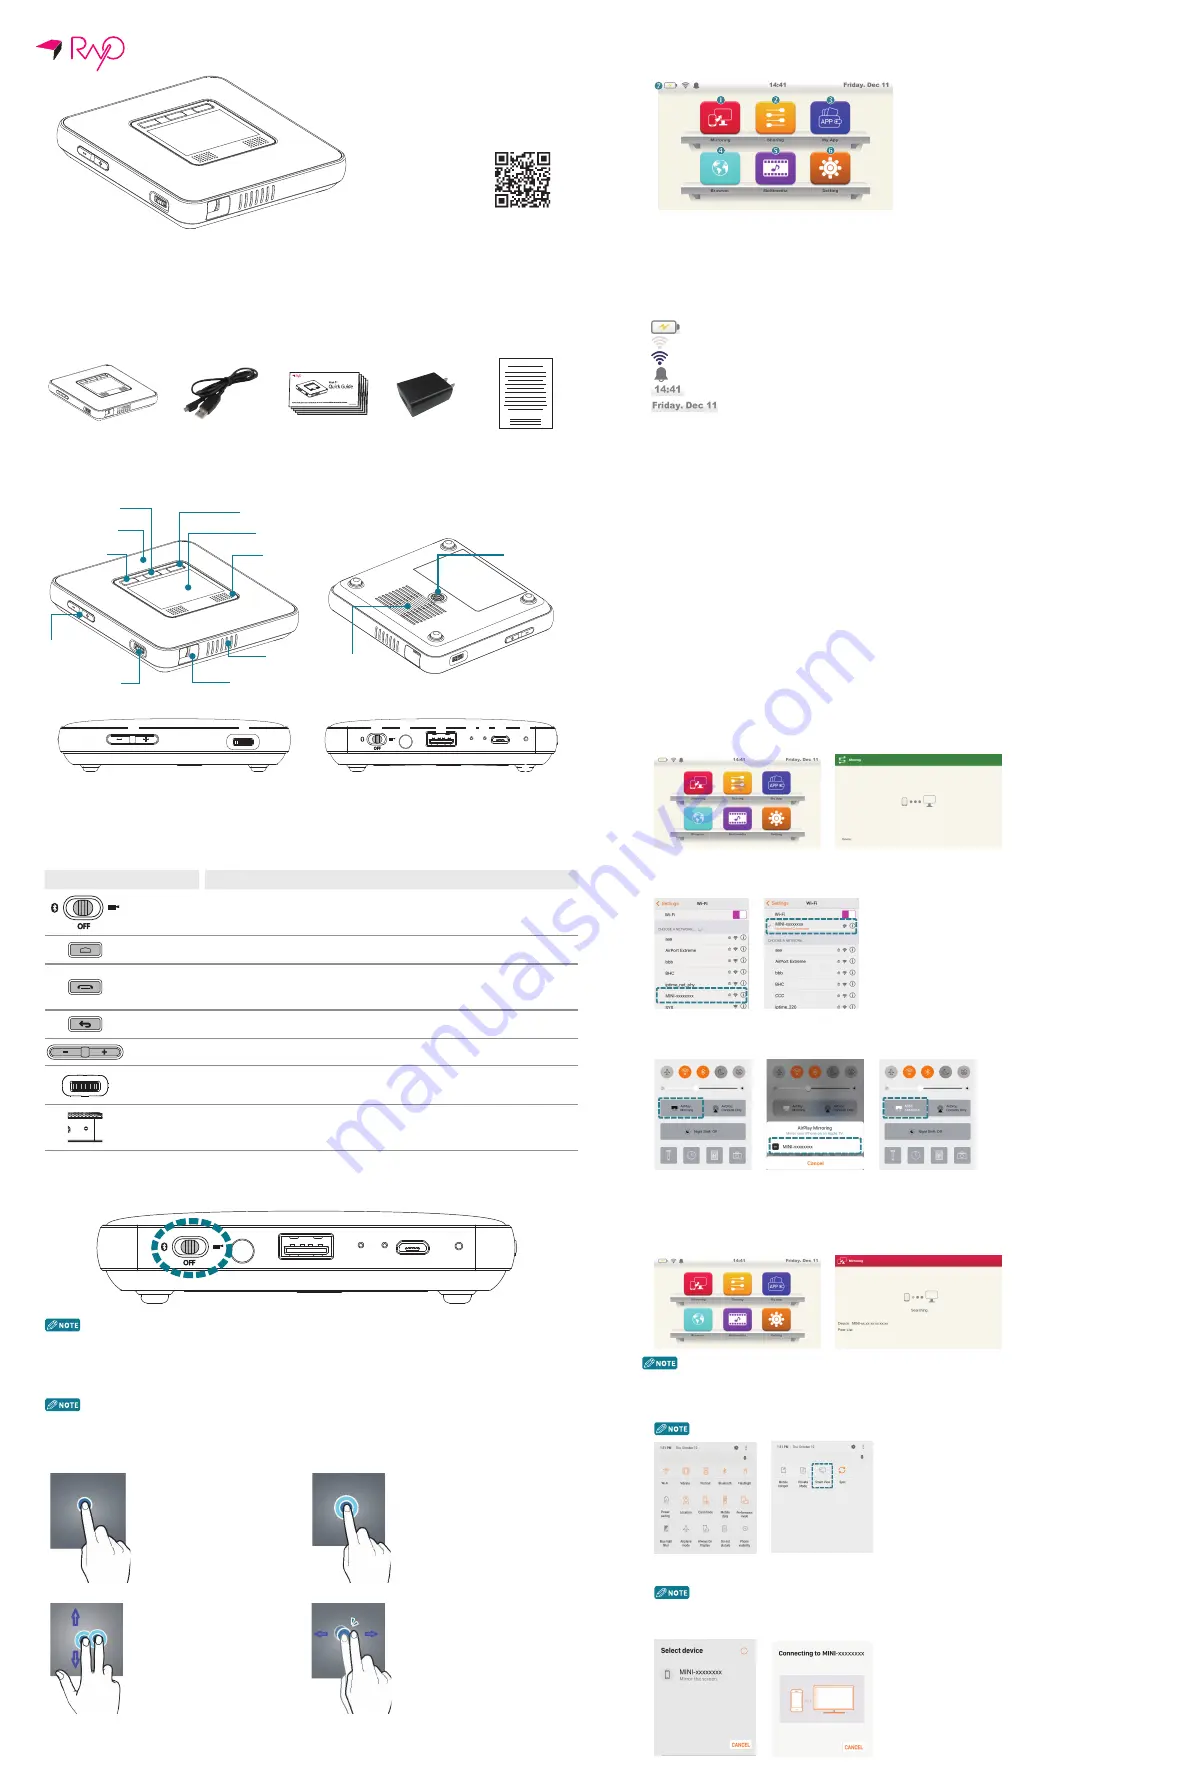
Name of Each Part
❶
Volume button
❶
Power switch
❷
Audio terminal
❷
Focus adjustment ring
❸
USB Type-A terminal
❹
MIC
❺
Charging light
❻
Power input terminal
❼
Reset button
Button
Function
Power switch
Slide the switch to the right to turn on Projector mode.
Slide the switch to the left to turn on Bluetooth
Ⓡ
mode.
Slide the switch to the center to turn the power off.
Home
Projector mode: Press briefly to see the home screen display.
Call/End
Projector mode: Same as the OK button function for selecting screens.
Bluetooth
Ⓡ
mode: You can make, receive, or end a call from your compatible smart
device.
Cancel
Press briefly to return to the previous screen.
Volume
Adjust the volume.
Focus
adjustment ring
Turn the focus adjustment ring clockwise or counter clockwise to make the
projection screen clearer.
Reset button
If the projector does not operate or turn off, press the Reset button for about a
second with a paperclip. The power will be turned off and the projector will be
initialized.
Turning off
Slide the power switch to the center(OFF) in between Projector and Bluetooth® mode to turn off the power.
• In Projector mode, slide the power switch to the center(OFF), a confirmation dialog will appear on the projection
screen. Select OK to turn off the power.
• If you select Cancel, you can continue to use Projector mode. Before use, please slide the power switch back to
Projector mode.
Using the touchpad
• Make sure that the touchpad does not come in contact with any electrical objects. Any flow of electrical current,
such as electrical shock can cause malfunction or failure.
• Please note that the edge of the touchpad does not detect touch so it may not respond correctly to touch.
• Use your fingers to touch the touchpad.
Select/Run
Menu Displays
Gently tap the touchpad to run an
application, select a desired menu,
click displayed buttons on the
screen, or for keyboard input.
To open the additional operation menu
e.g. file copy/move/paste, tap twice and
hold down on the second tap.
Moving the Screen Up and Down
Moving the Screen Left and Right
To move the screen up or down,
use two fingers to tap and drag up
or down.
To move the screen left or right, use
two fingers to long-press and drag left
or right. Or, tap the page arrows or the
point on the page.
❶
❷
❶
❷
❸
❹ ❺ ❻ ❼
Home screen
The Home screen is the start screen for running the main applications or features. Tap the icon on the Home screen to move
to the desired page or the features window.
❶
Mirroring : Runs when connected to a compatible Android™ or Windows® OS installed device.
❷
Sharing : Runs when connected to a compatible iOS® installed device.
❸
My App : Runs various applications that are installed.
❹
Browser : Runs the browser for Internet access.
❺
Multimedia : Runs video, music, or photo applications.
❻
Setting : Check or change the projector settings.
❼
Status bar: Displays the projector status icon, date, and time.
: Remaining battery display
:Indicates that Wi-Fi is turned on but not connected to the Internet.
:Indicates that Wi-Fi is turned on and is connection to the Internet.
:Alarm display
:Current time display
:Current date and day display
Wireless connection to compatible external devices
Note on wireless connections
• The applications running and other operations on the compatible smart device can delay the transmission speed during a
wireless connection.
• The performance of the wireless connection can vary depending on the OS type of your compatible smart device and the
wireless conditions of your manufacturer.
• With “SoftAP” installed, a wireless connection for mirroring can occur within an external router. Before using the DLNA,
make sure that a wireless supported compatible smart device or laptop has a DLNA supported application or media players
installed. For more details, see the user guide of your device.
• For compatible smart devices running on Android™ OS, Android™ OS 4.2.2 or later is required to set up a mirroring connection.
• For compatible IOS® devices, IOS® 8.0 or later is required to use the sharing function.
• When you set up a mirroring connection from a Windows computer, specifications for graphics, wireless LAN, hardware, and
software of Windows® 8.1 or later are required.
• At a DLNA-based wireless connection, the Internet connection of the compatible smart device will use a 3G/4G connection.
• When you play a video from the middle after setting up a wireless connection to a compatible smart device, buffering may
occur depending on the type of a player on the device. So make sure to play videos from the beginning.
• When you change the wireless connection mode (Bluetooth® or Projector), make sure to end the connection with the device
and check for the availability of connection before switching the mode.
• The quality of the wireless connection can vary depending on the device and the access environment.
• A connection to the OS installed in each compatible device is independently tested and validated by Canon. Connectivity
has not been tested or guaranteed by OS manufacturer. For latest version of information regarding OS connection response,
please visit our website.
Sharing connection (iOS®)
※ The images below are for illustration purposes only. It may differ depending on the OS version of your compatible device.
1
On the home screen, tap the Sharing icon.
2
In the Wi-Fi® setting on the compatible iOS® device, select a name of device to connect and connect to the
Wi-Fi® network.
※ This device name is shown as “MINI-xxxx”.
3
On the compatible iOS® device’s screen, swipe up from the bottom of the screen to turn on AirPlay®
mirroring and select the name of device to be connected to your iOS® device. If the mirroring screen from
your iOS® device is projected after selecting the name of device to be connected, the setup is complete.
4
After use, make sure to turn off the AirWay mirroring function for iOS®.
Mirroring connection (Android™ OS)
※ The images below are for illustration purposes only. It may differ depending on the OS version of your compatible device.
1
On the Home screen, tap the Mirroring icon.
• To use the mirroring function, turn on the Wi-Fi® in Projector Settings.
• Make sure that Wi-Fi® is turned ON.
2
Switch the compatible smart device to Mirroring mode.
❶
Turn on the Wi-Fi® on the compatible smart device. (No need for an Internet connection.)
❷
In the Menu Settings, tap the mirroring function icon to activate it.
• Different names or icons can be used depending on the smart device manufacturer or the Android™ version. (E.g., Screen
mirroring, Miracast, Wireless Display, and Smart View.)
❸
Search for a connectable device from the compatible smart device.
❹
Click on the projector and the mirroring function will be executed.
• The access confirmation screen for a compatible device to be connected to the projector will be displayed, where you can choose
to connect or disable the connection.
• If you select Connect and a connection is set up successfully, the screen of the compatible smart device will be projected by the
projector.
• After use, make sure to turn off the mirroring function on your compatible smart device.
Bluetooth
Ⓡ
LED
status indicator
Call/End button
Cancel button
Volume button
Focus
adjustment ring
Home button
Touchpad
Speaker
Air vent
Projection lens
Tripod mount
hole
Air vent


