Charging the Camera
1.
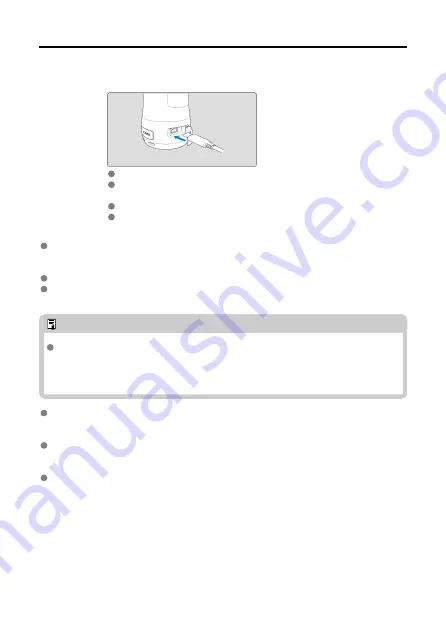
Charge the camera.
Charge the camera before use.
Charge the camera by connecting the camera's Digital terminal to a
power adapter (sold separately).
After charging begins, the charging indicator blinks slowly in orange.
The charging indicator is lit in orange after charging is finished.
Charging the camera when it is fully depleted takes approx. 1 hr. and 59 min. at
room temperature (23°C/73°F).
Charging time varies greatly depending on ambient
temperature and remaining capacity.
For safety, charging in low temperatures (5–10°C/41–50°F) takes longer.
The camera can also be used while plugged in for power. When receiving power, do not
allow the terminal cover to come in contact with moving parts of the camera.
Note
For charging and powering the camera, an optional USB Power Adapter PD-E1 is
recommended. Some commercially available power adapters (USB Type-C Power
Delivery, with an output voltage/current of at least 9V DC/2A) have also been
confirmed to work with the camera. For details, check the Canon website.
Upon purchase, the battery is not fully charged.
Charge the battery before use.
Charge the battery on the day before or on the day it is to be used.
Charged batteries gradually lose their charge, even when they are not used.
Use the camera where the temperature is 0–40°C (32–104°F).
For optimal camera performance, use where the ambient temperature is 10–30°C (50–
86°F). Lower temperatures may temporarily reduce the performance and life of the built-
in battery.
24
Summary of Contents for PowerShot PICK
Page 26: ...3 Close the cover 26 ...
Page 35: ...Turning Off Wi Fi and Closing the App 1 Tap Settings 2 Tap Basic Camera Set 35 ...
Page 36: ...3 Tap Wi Fi off close app To stop shooting turn off the camera 36 ...
Page 46: ...Turn off voice commands as follows 1 Tap Basic Camera Set 46 ...
Page 47: ...2 Turn off Voice command 47 ...
Page 73: ...Highlights Screen iOS Only Highlights are created from this screen 73 ...
Page 75: ...Auto shooting settings Specify details for shooting automatically 75 ...
Page 81: ...2 Tap 81 ...
Page 84: ...2 Tap 84 ...
Page 85: ...3 Tap Delete 4 Tap Yes 85 ...
Page 87: ...2 Tap 87 ...
Page 88: ...3 Tap Merge 88 ...
Page 89: ...4 Tap a person to merge Selected people are identified by a check mark 5 Tap Merge 89 ...
Page 93: ...2 Tap Basic Camera Set 93 ...
Page 101: ...3 Tap Aspect ratio 4 Select an option 101 ...
Page 103: ...2 Tap Basic Camera Set 103 ...
Page 104: ...3 Tap Video recording quality 4 Select an option 104 ...
Page 115: ...Checking Network Settings 1 Access the settings screen 2 Tap Network Settings 115 ...
Page 119: ...3 Tap Webcam settings 119 ...
Page 128: ...Other Information 1 Access the settings screen 2 Tap Other Settings 128 ...
Page 145: ...4 Remove the body cover 5 Remove the battery 145 ...


