background image

22

1
2
3
4
5
6
7
8
9
10

Cover 
Preliminary Notes and 

Legal Information
Contents: Basic 

Operations

Advanced Guide

Camera Basics
Creative Shot 

Mode
Auto Mode/ 

Hybrid Auto Mode
Other Shooting 

Modes

Playback Mode

Wi-Fi Functions

Setting Menu

Accessories

Appendix

Index

P Mode

Basic Guide

z

z

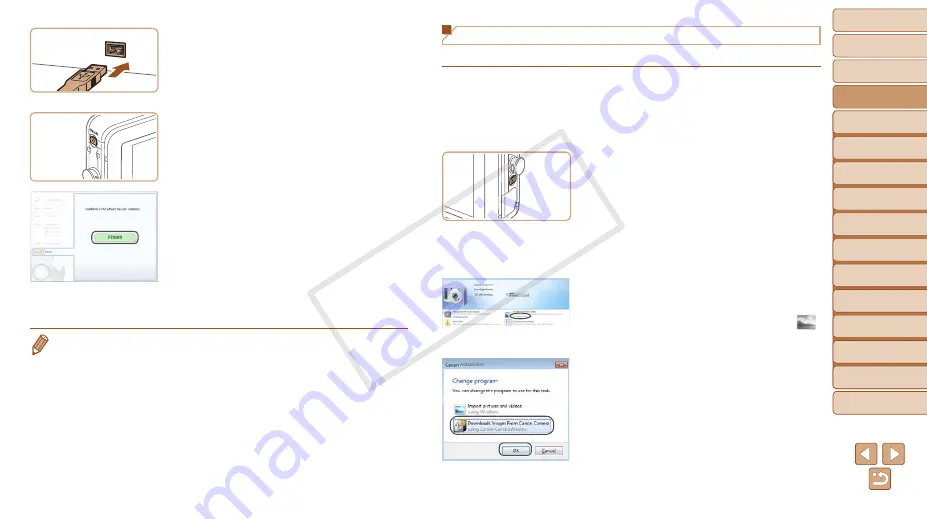
Insert the larger plug of the interface 

cable in the computer’s USB port. For 

details about USB connections on the 

computer, refer to the computer user 

manual.

4

  Install the files.

z

z

Turn the camera on, and follow the 

on-screen instructions to complete the 

installation process.

X

X

The software will connect to the Internet 

to update to the latest version and 

download new functions. Installation may 

take some time, depending on computer 

performance and the Internet connection.

z

z

Click [Finish] or [Restart] on the screen 

after installation and remove the CD-

ROM when the desktop is displayed.

z

z

Turn the camera off and disconnect the 

cable.

• 

When not connected to the Internet, there are the following limitations.

The screen in step 3 will not be displayed.

Some functions may not be installed.

• 

The first time you connect the camera to the computer, drivers will be installed, 

so it may take a few minutes until camera images are accessible.

• 

If you have several cameras that were bundled with ImageBrowser EX on the 

included CD-ROMs, be sure to use each camera with their included CD-ROM 

and follow the on-screen installation instructions for each. Doing so will ensure 

that each camera will receive the correct updates and new functions via the 

auto update function.

Saving Images to a Computer

Windows 7 and Mac OS X 10.6 are used here for the sake of illustration.

1

  Connect the camera to the 

computer.

z

z

Follow step 3 in “Installing the Software” 

(

=

  21) to connect the camera to a 

computer.

2

  Turn the camera on to access 

CameraWindow.

z

z

Press the <

1

> button to turn the camera 

on.

z

z

On a Macintosh computer, 

CameraWindow is displayed when a 

connection is established between the 

camera and computer.

z

z

For Windows, follow the steps introduced 

below.

z

z

In the screen that displays, click the [

link to modify the program.

z

z

Choose [Downloads Images From Canon 

Camera using Canon CameraWindow] 

and then click [OK].

COP

Y

Summary of Contents for PowerShot N

Page 1: ...ON INC 2013 CDD E514 010 Click the buttons in the lower right to access other pages Next page Previous page Page before you clicked a link To jump to the beginning of a chapter click the chapter title...

Page 2: ...ubsidiaries and affiliates and its distributors are not liable for any consequential damages arising from any malfunction of a camera or accessory including memory cards that result in the failure of...

Page 3: ...eaker Wi Fi antenna area In this guide icons are used to represent the corresponding camera buttons on which they appear or which they resemble Shooting modes and on screen icons and text are indicate...

Page 4: ...Super Slow Motion Movies 57 5 P Mode 59 Shooting in Program AE P Mode 60 Image Brightness Exposure Compensation 60 Adjusting White Balance 61 Continuous Shooting 62 Activating Flash 63 Table of Conten...

Page 5: ...applied to each shot using camera determined settings Creative Shot Mode 33 z z Shoot from many angles 28 z z Applying special effects Fish Eye Effect 54 Soft Focus 56 Monochrome 57 Miniature Effect...

Page 6: ...Do not allow liquids or foreign objects to enter the camera This could result in electrical shock or fire If liquids or foreign objects come into contact with the camera interior immediately turn the...

Page 7: ...adapter Caution Denotes the possibility of damage to the equipment Do not aim the camera at bright light sources such as the sun on a clear day Doing so may damage the image sensor When using the cam...

Page 8: ...Basic Operations Keep credit cards or other objects affected by magnetism away from the screen The magnet on the back of the screen may cause data loss Do not sit down with the camera in your pocket D...

Page 9: ...Auto Mode Other Shooting Modes Playback Mode Wi Fi Functions Setting Menu Accessories Appendix Index P Mode Basic Guide Basic Guide Gives basic instructions from initial preparations to shooting play...

Page 10: ...g the screen Touch Touch the screen briefly with your finger z z This gesture is used to shoot configure camera functions and so on Drag Touch the screen and move your finger across it z z This gestur...

Page 11: ...ed position z z If you insert the battery facing the wrong way it cannot be locked into the correct position Always confirm that the battery is facing the right way and locks when inserted 3 Close the...

Page 12: ...s Recording Time Playback Time 130 You can view images even while the battery is charging by turning the camera on and entering Playback mode 65 However you cannot shoot while the battery is charging...

Page 13: ...g the wrong way may damage the camera 3 Close the cover z z Lower the cover and hold it down as you slide it until it clicks into the closed position For guidelines on how many shots or hours of recor...

Page 14: ...is no longer displayed z z To turn off the camera press the power button Unless you set the date and time the Date Time screen will be displayed each time you turn the camera on Specify the correct in...

Page 15: ...separately 112 even if the camera is left off Once the date time battery is depleted the Date Time screen will be displayed when you turn the camera on Follow the steps on 13 to set the date and time...

Page 16: ...the subject and shooting conditions 1 Turn the camera on z z Press the power button X X The startup screen is displayed 2 Enter mode z z Set the mode switch to 4 z z Touch touch q r or quickly drag le...

Page 17: ...light conditions the flash fires automatically z z Keep the camera still until the shutter sound ends X X Your shot is only displayed until the camera is ready to shoot again Shooting Movies Start sh...

Page 18: ...area indicated by frame at left In this case r is displayed Similarly you can view the previous image by touching the left edge of the screen in the area indicated by frame at left and in this case q...

Page 19: ...nuals The software and PDF manuals on the included DIGITAL CAMERA Solution Disk CD ROM 2 are introduced below with instructions for installation and saving images to a computer Software After installi...

Page 20: ...PDF manuals Operating System 1 Windows Macintosh Windows 8 Windows 7 SP1 Windows Vista SP2 Windows XP SP3 Mac OS X 10 6 Mac OS X 10 7 Mac OS X 10 8 2 Computer Computers running one of the above operat...

Page 21: ...used here for the sake of illustration Using the software auto update function you can update to the latest version and download new functions via the Internet some software excluded so be sure to ins...

Page 22: ...ns The screen in step 3 will not be displayed Some functions may not be installed The first time you connect the camera to the computer drivers will be installed so it may take a few minutes until cam...

Page 23: ...ameraWindow CameraWindow On a Macintosh computer if CameraWindow is not displayed after step 2 click the CameraWindow icon in the Dock the bar at the bottom of the desktop CameraWindow Although you ca...

Page 24: ...ccessories Power Other Accessories Battery Charger CB 2LB CB 2LBE Also available for purchase separately Use of genuine Canon accessories is recommended This product is designed to achieve excellent p...

Page 25: ...Mode Wi Fi Functions Setting Menu Accessories Appendix Index Basic Guide P Mode 1 Camera Basics Advanced Guide Camera Basics Practical guide that introduces other camera basics and describes shooting...

Page 26: ...27 except during battery charging 11 The lens will be retracted after about one minute once the camera is in Playback mode Power Saving Features Auto Power Down As a way to conserve battery power the...

Page 27: ...the way down 1 Press halfway Press lightly to focus z z Press the shutter ring halfway The camera beeps twice and AF frames are displayed around image areas in focus 2 Press all the way down From the...

Page 28: ...and hold the camera securely to prevent it from moving Do not rest your fingers on the flash z z The angle of the screen can be adjusted for easy viewing z z You can press the shutter ring from the b...

Page 29: ...n image brightness may not match the brightness of your shots Note that any on screen image distortion or jerky subject motion will not affect recorded images For playback display options see Switchin...

Page 30: ...tep 1 is displayed again showing the option you configured To undo any accidental setting changes you can restore the camera s default settings 110 On the screen in step 2 you can also choose options...

Page 31: ...ptions displayed with a bar to indicate the level touch the desired position on the bar 5 Finish the setup process z z Touch to return to the screen displayed before you touched H in step 1 To undo an...

Page 32: ...to Mode Hybrid Auto Mode Other Shooting Modes Playback Mode Wi Fi Functions Setting Menu Accessories Appendix Index Basic Guide P Mode 2 Advanced Guide Creative Shot Mode Creative Shot Mode Shoot mult...

Page 33: ...X After the six images are displayed in succession they are displayed simultaneously for about two seconds z z If you touch the screen while the images are displayed is displayed and the images remai...

Page 34: ...y images Magnifying Images 71 You can erase all images or add them to a photobook by choosing All Images in Group in Erasing All Images 73 or Adding Images to a Photobook 116 Grouped Images To ungroup...

Page 35: ...ng Menu Accessories Appendix Index Basic Guide P Mode 3 Advanced Guide Auto Mode Hybrid Auto Mode Auto Mode Hybrid Auto Mode Convenient mode for easy shots with greater control over shooting 3 4 Shoot...

Page 36: ...drag left or right on the screen and then touch to choose it z z To confirm your choice touch OK z z Aim the camera at the subject The camera will make a slight clicking noise as it determines the sce...

Page 37: ...ecording begins and Rec is displayed with the elapsed time X X Black bars displayed on the top and bottom edges of the screen indicate image areas not recorded X X Frames displayed around any detected...

Page 38: ...ys Camera operating sounds will be recorded in digest movies Although the digest movie recorded on a particular day constitutes a single file a single clip chapter is created with each shot and the cl...

Page 39: ...be recorded Audio recording is monaural Microphone Still Images Movies Scene Icons In and modes shooting scenes determined by the camera are indicated by the icon displayed and corresponding settings...

Page 40: ...ing Babies Consecutive images are captured and the camera analyzes details such as facial expressions to save the image determined to be the best Sleeping including Babies Beautiful shots of sleeping...

Page 41: ...cus and image brightness are constantly adjusted Servo AF Try shooting in G mode 59 if no frames are displayed if frames are not displayed around desired subjects or if frames are displayed on the bac...

Page 42: ...include yourself in group photos or other timed shots The camera will shoot about 10 seconds after you press the shutter ring 1 Configure the setting z z Touch H choose in the menu and then choose the...

Page 43: ...in focus and image brightness adjusted Servo AF 3 Shoot z z Release your finger from the screen A shutter sound is played as the camera shoots z z To cancel touch shutter choose Off in step 1 Even whi...

Page 44: ...ess but choose If a flashing icon is displayed when you press the shutter ring halfway in low light conditions mount the camera on a tripod or take other measures to keep it still Using Face ID If you...

Page 45: ...es that the face is recognized Make sure a white frame is displayed on the face and then shoot z z If the face is not recognized you cannot register face information z z After Register is displayed to...

Page 46: ...3 registered people will be displayed when they are detected z z Shoot X X Displayed names will be recorded in still images Even if people are detected but their names are not displayed the names up...

Page 47: ...d and then touch the face information to erase After Erase is displayed touch OK Even if you change names in Edit Profile the names recorded in previously shot images will remain the same You can use...

Page 48: ...ion slots are filled Follow the steps above to overwrite face information You can follow the above steps to register new face info when there is at least one slot open however you cannot overwrite any...

Page 49: ...as 35mm film used for printing images at 5 x 7 inch or postcard sizes Native aspect ratio of the camera screen also used for display on standard definition televisions or similar display devices or fo...

Page 50: ...s now displayed z z To restore the original setting repeat this process but choose Image Quality Resolution Frame Rate Details 1920 x 1080 24 fps For shooting in Full HD 1280 x 720 30 fps For shooting...

Page 51: ...se Off 30 z z To restore the original setting repeat this process but choose On Still Images Changing the Image Display Style After Shots You can change how long images are displayed and what informat...

Page 52: ...51 2 Configure the setting z z Choose Display Info and then choose the desired option z z To restore the original setting repeat this process but choose Off Off Displays only the image Detailed Displ...

Page 53: ...de Playback Mode Wi Fi Functions Setting Menu Accessories Appendix Index Basic Guide P Mode Advanced Guide 4 Other Shooting Modes Other Shooting Modes Shoot more effectively in various scenes and take...

Page 54: ...ting modes touch q r or quickly drag left or right on the screen z z Touch the desired mode to view a description z z To confirm your choice touch OK z z Touch to return to the shooting mode selection...

Page 55: ...e area that will not be blurred 2 Choose the area to keep in focus z z To adjust the area in focus either touch the screen or drag the white frame up or down z z To change the size of the area in focu...

Page 56: ...then touch X X A preview is shown of how your shot will look with the effect applied 3 Shoot Standard Shots resemble toy camera images Warm Images have a warmer tone than with Standard Cool Images ha...

Page 57: ...hown of how your shot will look with the effect applied 3 Shoot B W Black and white shots Sepia Sepia tone shots Blue Blue and white shots Movies Shooting Super Slow Motion Movies You can shoot fast m...

Page 58: ...ccessories Appendix Index Basic Guide P Mode Advanced Guide 4 Other Shooting Modes Zooming is not available during recording even if you turn the zoom ring Focus exposure and color are determined when...

Page 59: ...e P Mode More discerning shots in your preferred shooting style Instructions in this chapter apply to the camera when set to G mode G Program AE AE Auto Exposure Before using a function introduced in...

Page 60: ...isplayed in orange In this case try adjusting the ISO speed 61 or activating the flash if subjects are dark 63 which may enable adequate exposure Movies can be recorded in G mode as well by touching H...

Page 61: ...shooting night scenes or in dark rooms To view the automatically set ISO speed when the camera is set to press the shutter ring halfway Although choosing a lower ISO speed may reduce image graininess...

Page 62: ...t X X Hold the shutter ring all the way down to shoot continuously Cannot be used with the self timer 42 During continuous shooting focus and exposure are locked at the position level determined when...

Page 63: ...h H choose in the menu and then choose the h option 29 X X Once the setting is complete h is displayed If the flash fires vignetting may occur Still Images Movies Changing the IS Mode Settings z z Tou...

Page 64: ...ur shots and browse or edit them in many ways To prepare the camera for these operations press the 1 button to enter Playback mode It may not be possible to play back or edit images that were renamed...

Page 65: ...edge of the screen in the area indicated by frame at left In this case r is displayed Similarly you can view the previous image by touching the left edge of the screen in the area indicated by frame...

Page 66: ...charging 11 Touching the volume indicator displays the volume panel You can adjust the volume by touching o p Still Images Movies Switching Display Modes Touch the screen to view other information on...

Page 67: ...on the camera adding information such as latitude longitude and elevation 102 Geotagged images are labeled with a icon in detailed information display Touch the icon to view the information recorded L...

Page 68: ...l be displayed on detected people If you do not want names to display on images shot using Face ID touch H touch n choose Face ID Info on the 1 tab and then set Name Display to Off Browsing and Filter...

Page 69: ...arch condition z z Touch H choose in the menu and then choose a condition 29 z z When selecting or touch the condition on the screen displayed next 2 View the filtered images z z Images matching your...

Page 70: ...e who are not detected by Face ID names are not displayed and for people whose names have been erased Changing Names 1 Access the setting screen z z Touch H touch n and choose Face ID Info on the 1 ta...

Page 71: ...zoom out 2 Move the display position and switch images as needed z z To move the display position drag across the screen z z Touch to restore single image display Approximate Position of Displayed Are...

Page 72: ...isplayed z z To end the slideshow touch the screen Slideshows are played repeatedly The camera s power saving functions 26 are deactivated during slideshows In image search mode 69 only images matchin...

Page 73: ...0 2 Choose a selection method z z Choose a setting as desired 30 z z Touch to return to the menu screen Choosing Images Individually 1 Choose Select z z Following step 2 in Choosing a Selection Method...

Page 74: ...Rotation is not possible when Auto Rotate is set to Off 74 Using the Menu 1 Choose Rotate z z Touch H and then n and then choose Rotate on the 1 tab 30 2 Rotate the image z z Drag left or right acros...

Page 75: ...yed z z To untag the image repeat this process and choose again Using the Menu 1 Choose Favorites z z Touch H and then n and then choose Favorites on the 1 tab 30 2 Choose an image z z Choose an image...

Page 76: ...Actions Functions Simplify your preferred camera operations by reassigning dragging patterns to them as desired 1 Access the setting screen z z Touch H touch n and choose Set Touch Actions on the 1 ta...

Page 77: ...z Touch H touch n and choose Red Eye Correction on the 1 tab 30 2 Choose an image z z Drag left or right across the screen to choose an image 3 Correct the image z z Touch OK X X Red eye detected by t...

Page 78: ...ll only trim from the nearest to the beginning when you chose Cut Beginning or from the nearest to the end when you chose Cut End 3 Specify which portion to remove z z Touch Cut Beginning or Cut End z...

Page 79: ...d as needed Be careful when erasing chapters because they cannot be recovered 1 Select the chapter to erase z z Follow steps 1 2 in Viewing Short Movies Created When Shooting Still Images Digest Movie...

Page 80: ...o a variety of compatible devices and use the camera with Web services 7 4 What You Can Do With Wi Fi 81 Using Wi Fi to Send Images From the Camera 82 Wi Fi Wireless LAN Precautions 83 Security Precau...

Page 81: ...lso geotag your shots from a connected smartphone or tablet Installation of a dedicated application on the smartphone or tablet is required See the Canon website for details For convenience in this ma...

Page 82: ...camera images 85 You can also register smartphones by accessing the Wi Fi menu 87 Via a Connection to Other Devices or Web Services Device Operation Registering a camera nickname 88 Installing the inc...

Page 83: ...f the wireless LAN settings you use The wireless LAN settings saved to this product may be erased due to incorrect operation of the product the effects of radio waves or static electricity accident or...

Page 84: ...y information Additionally you could fall victim to other types of unauthorized access such as impersonation where someone assumes an identity to gain access to unauthorized information or springboard...

Page 85: ...you have connected to a smartphone initially via Wi Fi by pressing the button you can simply press the button after that to connect again and view and save camera images on connected devices Installin...

Page 86: ...button 1 Press the button 2 Register a nickname z z Touch inside the frame shown at left to display the keyboard Enter a nickname 88 This nickname is displayed on the screen of target devices z z Up...

Page 87: ...e date and time have not been set the Date Time screen will be displayed in step 2 Set them following the steps in Setting the Date and Time 13 Adding Other Smartphones Only one smartphone can be assi...

Page 88: ...hem z z Up to 16 characters can be used z z Touch q r to move the cursor z z Touch to enter capital letters z z Touch to enter numbers or symbols z z Touch to delete the previous character z z Touch a...

Page 89: ...GATEWAY is available visit the Canon website http canon com cig 1 Register as a CANON iMAGE GATEWAY member z z From a computer or other device connected to the Internet access http canon com cig and v...

Page 90: ...access CANON iMAGE GATEWAY an Internet browser must be installed on the computer you must have an account with an Internet service provider and an Internet connection must be established When connecti...

Page 91: ...s set using the Touch Actions setting 76 you can automatically access the function to connect to the last connected destination from the next time by just dragging on the screen without needing to per...

Page 92: ...the connection operation Connecting to a Computer Configure computer settings for the connection add the computer as a connection destination and transfer images to the computer wirelessly using the...

Page 93: ...ring transmission via Wi Fi None WEP open system authentication WPA PSK TKIP WPA PSK AES WPA2 PSK TKIP WPA2 PSK AES Encryption key network key The data encryption key used for transmission via Wi Fi K...

Page 94: ...nt you from completing the settings as described here Check the settings of your security software Adding a Computer Add a computer to your list of devices to connect to via Wi Fi Follow these instruc...

Page 95: ...z z When using a Macintosh computer see Using CameraWindow to Transfer Images to a Computer 97 8 Install a driver first Windows connection only z z When the screen at left is displayed on the camera...

Page 96: ...Connecting to Access Points in the List 1 View the listed access points z z View the listed access points as described in steps 1 3 of Adding a Computer 94 2 Choose an access point z z Touch the netw...

Page 97: ...displayed X X On a Macintosh computer CameraWindow is automatically displayed when a Wi Fi connection is established between the camera and computer 2 Import images z z Click Import Images from Camer...

Page 98: ...z z Touch Add a Device 4 Use the printer to connect to the network displayed on the camera screen z z Choose the displayed SSID network name from the printer s Wi Fi setting menu 5 Choose the printer...

Page 99: ...dividually 1 Choose an image z z Drag left or right across the screen to choose an image to send 2 Send the image z z Touch Send this image z z When uploading to YouTube read the terms of service and...

Page 100: ...OK 3 Send the images z z Touch Send You can also choose images by switching to single image display 68 in step 2 and dragging left or right across the screen In step 3 you can choose the resolution si...

Page 101: ...sending movies with images z z Touch H touch n and choose Wi Fi Settings on the 3 tab 30 z z Choose Send via Server and then choose Stills Movies z z When sending only still images go to step 2 2 Sen...

Page 102: ...n other time zones The smartphone you will use for geotagging must be authorized to view the images on the camera 87 Others may be able to locate or identify you by using location data in your geotagg...

Page 103: ...name You can change the device nickname display name that is displayed on the camera z z Following step 5 in Editing Connection Information 103 touch Change Device Nickname to choose it z z Touch the...

Page 104: ...Touch OK X X The Wi Fi settings are now reset Settings assigned to the button 85 are also reset When returning the Wi Fi settings to defaults all Web services set using a computer will also be erased...

Page 105: ...sics Creative Shot Mode Auto Mode Hybrid Auto Mode Other Shooting Modes Playback Mode Wi Fi Functions Accessories Appendix Index Basic Guide P Mode 8 Advanced Guide Setting Menu Setting Menu Customize...

Page 106: ...st the volume of individual camera sounds as follows z z Touch Volume z z Drag up or down to choose an item and then adjust the volume by touching the desired position on the bar Date and Time Adjust...

Page 107: ...Shooting mode 26 To have the lens retracted immediately after you press the 1 button set the retraction timing to 0 sec z z Choose Lens Retract and then choose 0 sec Using Eco Mode This function allo...

Page 108: ...ice you should format the card with this camera Formatting erases all data on a memory card Before formatting copy images on the memory card to a computer or take other steps to back them up 1 Access...

Page 109: ...Cards 108 to continue with the formatting process Low level formatting takes longer than Formatting Memory Cards 108 because data is erased from all storage regions of the memory card You can cancel l...

Page 110: ...on the camera body z z Touch Certification Logo Display Display Language Change the display language as needed z z Touch Language z z Touch a display language to choose it and then touch the language...

Page 111: ...Auto Mode Other Shooting Modes Playback Mode Wi Fi Functions Setting Menu Appendix Index Basic Guide P Mode Advanced Guide 9 Accessories Accessories Enjoy the camera in more ways with optional Canon a...

Page 112: ...Kit ACK DC70 z z For powering the camera using household power Recommended when using the camera over extended periods or when connecting the camera to a printer or computer Cannot be used to charge...

Page 113: ...ry chargers that use a power cord do not attach the charger or cord to other objects Doing so could result in malfunction or damage to the product For details on charging time and the number of shots...

Page 114: ...e camera off and unplug the power cord from the outlet Do not disconnect the adapter or unplug the power cord while the camera is still on This may erase your shots or damage the camera Do not attach...

Page 115: ...printer z z Open the cover Holding the smaller cable plug in the orientation shown insert the plug fully into the camera terminal z z Connect the larger cable plug to the printer For other connection...

Page 116: ...g Images to a Photobook Photobooks can be set up on the camera by choosing up to 998 images on a memory card and importing them into the included software on your computer where they are stored in the...

Page 117: ...image to choose it X X is displayed z z To remove the image from the photobook touch the screen again is no longer displayed z z Repeat this process to specify other images z z When finished touch OK...

Page 118: ...Auto Mode Other Shooting Modes Playback Mode Wi Fi Functions Setting Menu Accessories Index Basic Guide P Mode 10 Appendix Advanced Guide Appendix Helpful information when using the camera 10 4 Troub...

Page 119: ...tact a Canon Customer Support Help Desk Shooting Cannot shoot Switch from Playback mode 15 to Shooting mode if necessary by pressing the 1 button Strange display on the screen under low light 29 Stran...

Page 120: ...bies or Children icon does not display The Babies and Children icons will not display if the birthday is not set in face information 44 If the icons still do not display even when you set the birthday...

Page 121: ...install the included software CameraWindow on the computer Also check your computer and Wi Fi environment and settings 92 93 Do not use the camera near sources of Wi Fi signal interference such as mi...

Page 122: ...pported or corrupt images cannot be displayed It may not be possible to display images that were edited or renamed on a computer or images shot with another camera Cannot magnify Cannot rotate Cannot...

Page 123: ...rect Wi Fi encryption key Incorrect Wi Fi security settings Check the access point security settings 93 IP address conflict Reset the IP address so that it does not conflict with another Disconnected...

Page 124: ...ification 41 AF frame 17 IS mode icon 40 Shooting mode 126 Scene icon 39 Hybrid Auto mode 38 Flash mode 44 63 Movie recording 37 57 Spot AE point frame 60 Grid lines 50 l Display 29 Metering method 60...

Page 125: ...umber Current image no Total no of images Shutter speed still images Image quality Frame rate movies 50 Aperture value Flash 63 Red eye correction 77 File size Still images Resolution 130 Movies Playb...

Page 126: ...O O O O O O O Available or set automatically Not available 1 The frame is displayed in green when you press the shutter ring halfway and the focus and brightness level cannot be changed 2 The frame is...

Page 127: ...r set automatically Not available 1 Only and are available 2 Synchronizes with the aspect ratio setting and is automatically set 55 4 Shooting Menu Shooting Mode Function 4 G Touch Shutter 43 On O O O...

Page 128: ...07 Mobile Device Connect Button 85 Eco Mode 107 Certification Logo Display 110 LCD Brightness 108 Language 15 Color Option 108 Reset All 110 1 Playback Menu Item Ref Page Item Ref Page Erase 72 Face I...

Page 129: ...his state may damage it Remove the battery and memory card and wait until the moisture has evaporated before resuming use Before long term battery storage use up the battery s remaining charge remove...

Page 130: ...ding to Canon standards and may change depending on the subject memory card and camera settings The values in the table are based on 4 3 aspect ratio If the aspect ratio is changed 49 more images can...

Page 131: ...ns 14 6 x 43 1 x 15 3 mm 0 57 x 1 70 x 0 60 in Weight Approx 21 g approx 0 74 oz Compact Power Adapter CA DC30 CA DC30E Rated Input 100 240 V AC 50 60 Hz 7 VA 100 V 10 VA 240 V 0 07 A 100 V 0 045 A 24...

Page 132: ...on Changing nickname 103 Editing 102 Continuous shooting 62 D Date time Changing 14 Date time battery 15 Settings 13 World clock 106 DC coupler 113 Defaults Reset all DIGITAL CAMERA Solution Disk 2 Di...

Page 133: ...99 100 Sending individually 99 Sending multiple images 100 Shooting Shooting date time Date time Shooting information 124 Smartphone Adding target devices 85 Soft focus shooting mode 56 Software DIGIT...

Page 134: ...ent C to OET65 and RSS 102 of the IC radio frequency RF Exposure rules This device complies with Part 15 of FCC Rules and Industry Canada licence exempt RSS standard s Operation is subject to the foll...

Page 135: ...easures Reorient or relocate the receiving antenna Increase the separation between the equipment and receiver Connect the equipment into an outlet on a circuit different from that to which the receive...

Reviews: